Orion OLS-8410NL User manual

Ultra High Definition LED
• 2013.05.31
Thank you for purchasing this product.
Please read this manual thoroughly prior to install the product for your safety.
User’s Manual
Address: 257-6, Gongdan-dong, Gumi-si, Gyeongsangbuk-do, Korea
Tel : +82-2-6678-8533, Fax: +82-2-6678-8599
ORION CO.,LTD.
www.oriondisplay.net

-1-
Features
▶Enjoy a wide flat screen with high brightness and high quality.
▶Easy to install and move due to its thin design
▶Enjoy your favorite programs with various split-screen features simultaneously presenting several
programs.
If you fail to comply with the regulations for safety and proper use, fire or
injury may be caused.
Warning
Thank you for purchasing this product.
This manual describes how to use the product and notes in use.
Please read the manual carefully before using it.
After reading this manual, please retain for future reference.
If you have any questions or a problem occurs, please contact either the company you purchased this
product from or an authorized service center.
※Displaying static picture for an extended period of time may cause an burn-in effect.
※Burn-in effect and the faults in brightness and picture elements caused by fixed images are not
subject to the warranty coverage.
RS-232C CableHDIM Cable 4EA Power Cable Remote Control Battery
(AAA X2)IR Receiver
Supplied Accessories
Options
User's Manual
Cable tie Cable tie base Monitor clip Form strip
To prevent electric shock, Do not remove cover.
No user serviceable part inside
Refer servicing to qualified service personnel.
Warning
Notice to users
Class A digital device
It is a device designed for business purpose with a safety certificate for electromagnetic interference, which
user should be mindful of.
" Important Safety Instructions"
1) Read these instructions.
2) Keep these instructions.
3) Heed all warnings.
4) Follow all instructions.
5) Do not use this apparatus near water.
6) Clean only with dry cloth.
7) Do not block any ventilation openings. Install in accordance with the manufacturer’s instructions.
8) Do not install near any heat sources such as radiators, heat registers, stoves, or other apparatus
(including ampliers) that produce heat.
9) Do not defeat the safety purpose of the polarized or grounding-type plug. A polarized plug has
two blades with one wider than the other. A grounding type plug has two blades and a third
grounding prong. The wide blade or the third prong are provided for your safety. If the provided
plug does not t into your outlet, consult an electrician for replacement of the obsolete outlet.
10) Protect the power cord from being walked on or pinched particularly at plugs, convenience
receptacles, and the point where they exit from the apparatus.
11) Only use attachments/accessories specied by the manufacturer.
12) Use only with the cart, stand, tripod, bracket, or table specied by the
manufacturer, or sold with the apparatus. When a cart is used, use
caution when moving the cart/apparatus combination to avoid injury
from tip-over.
13) Unplug this apparatus during lightning storms or when unused for long periods of time.
14) Refer all servicing to qualied service personnel. Servicing is required when the apparatus has
been damaged in any way, such as power-supply cord or plug is damaged, liquid has been
spilled or objects have fallen into the apparatus, the apparatus has been exposed to rain or
moisture, does not operate normally, or has been dropped.
The symbol in gure 21 shall be shown adjacent to the text of item 12 above.

-2- -3-
Content
01. Cautions.......................................................................................................................................................................................................................4
▶Cautions for System installation............................................................................................................................................4
▶Application information............................................................................................................................................................. 5
▶Clearance for Ventilation............................................................................................................................................................ 6
▶Do not cover the vent hole for the fan............................................................................................................................. 7
▶Cleaning and Maintenance ..................................................................................................................................................... 7
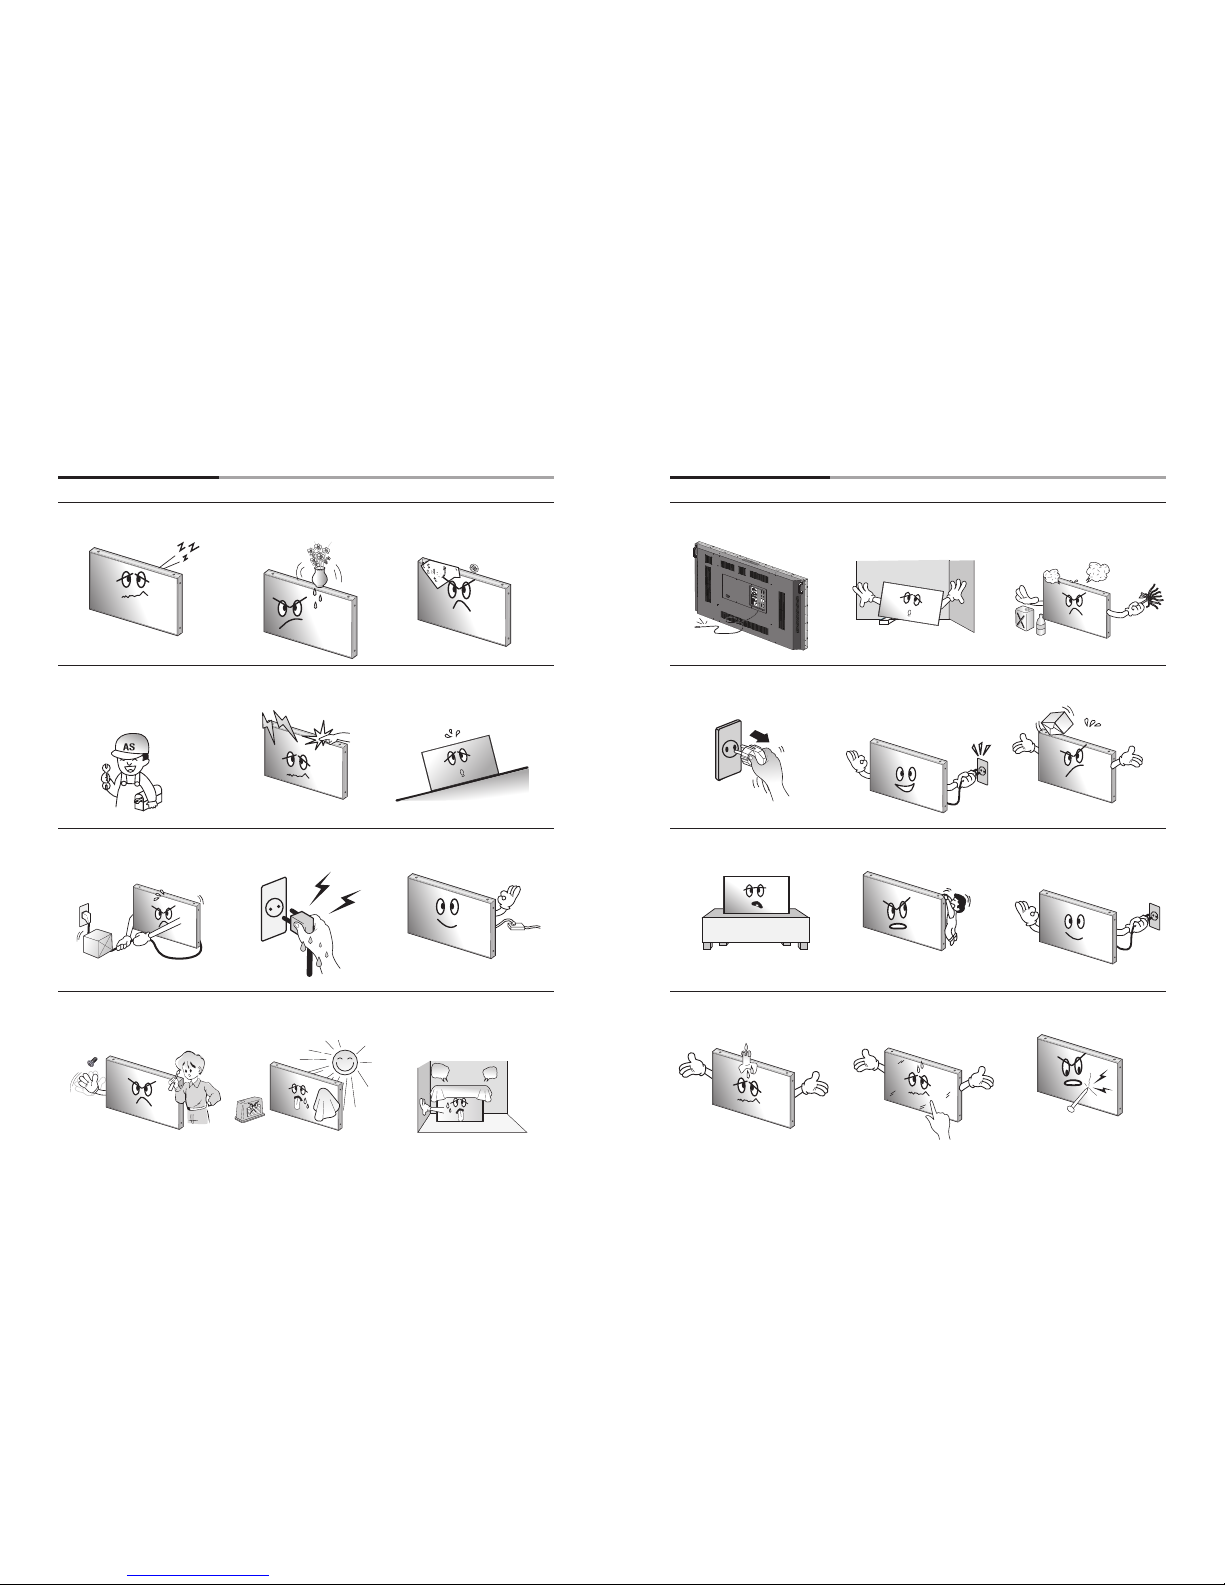
02. Safety Precautions....................................................................................................................................................................................8
03. Names...........................................................................................................................................................................................................................10
▶Front ................................................................................................................................................................................................... 10
▶Rear ..................................................................................................................................................................................................... 10
▶Input Ports....................................................................................................................................................................................... 11
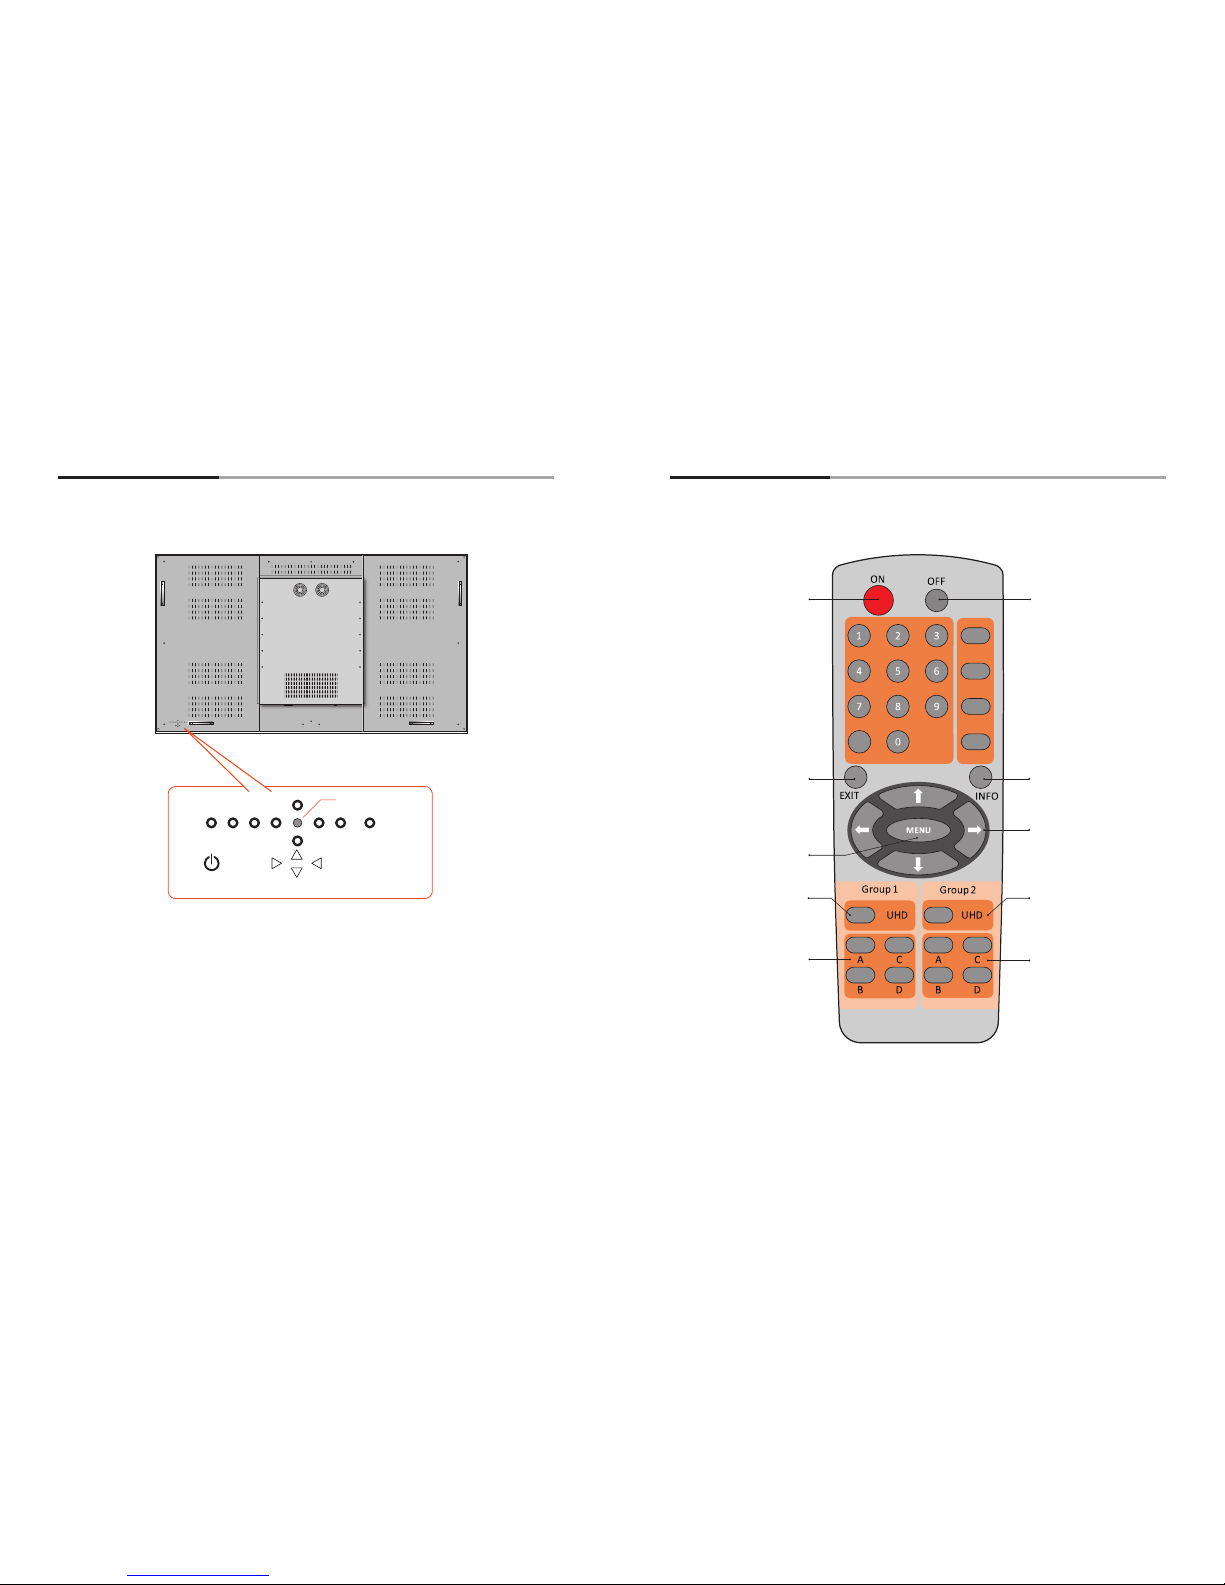
▶KEY PAD ............................................................................................................................................................................................. 12
▶Remote Controller ..................................................................................................................................................................... 13
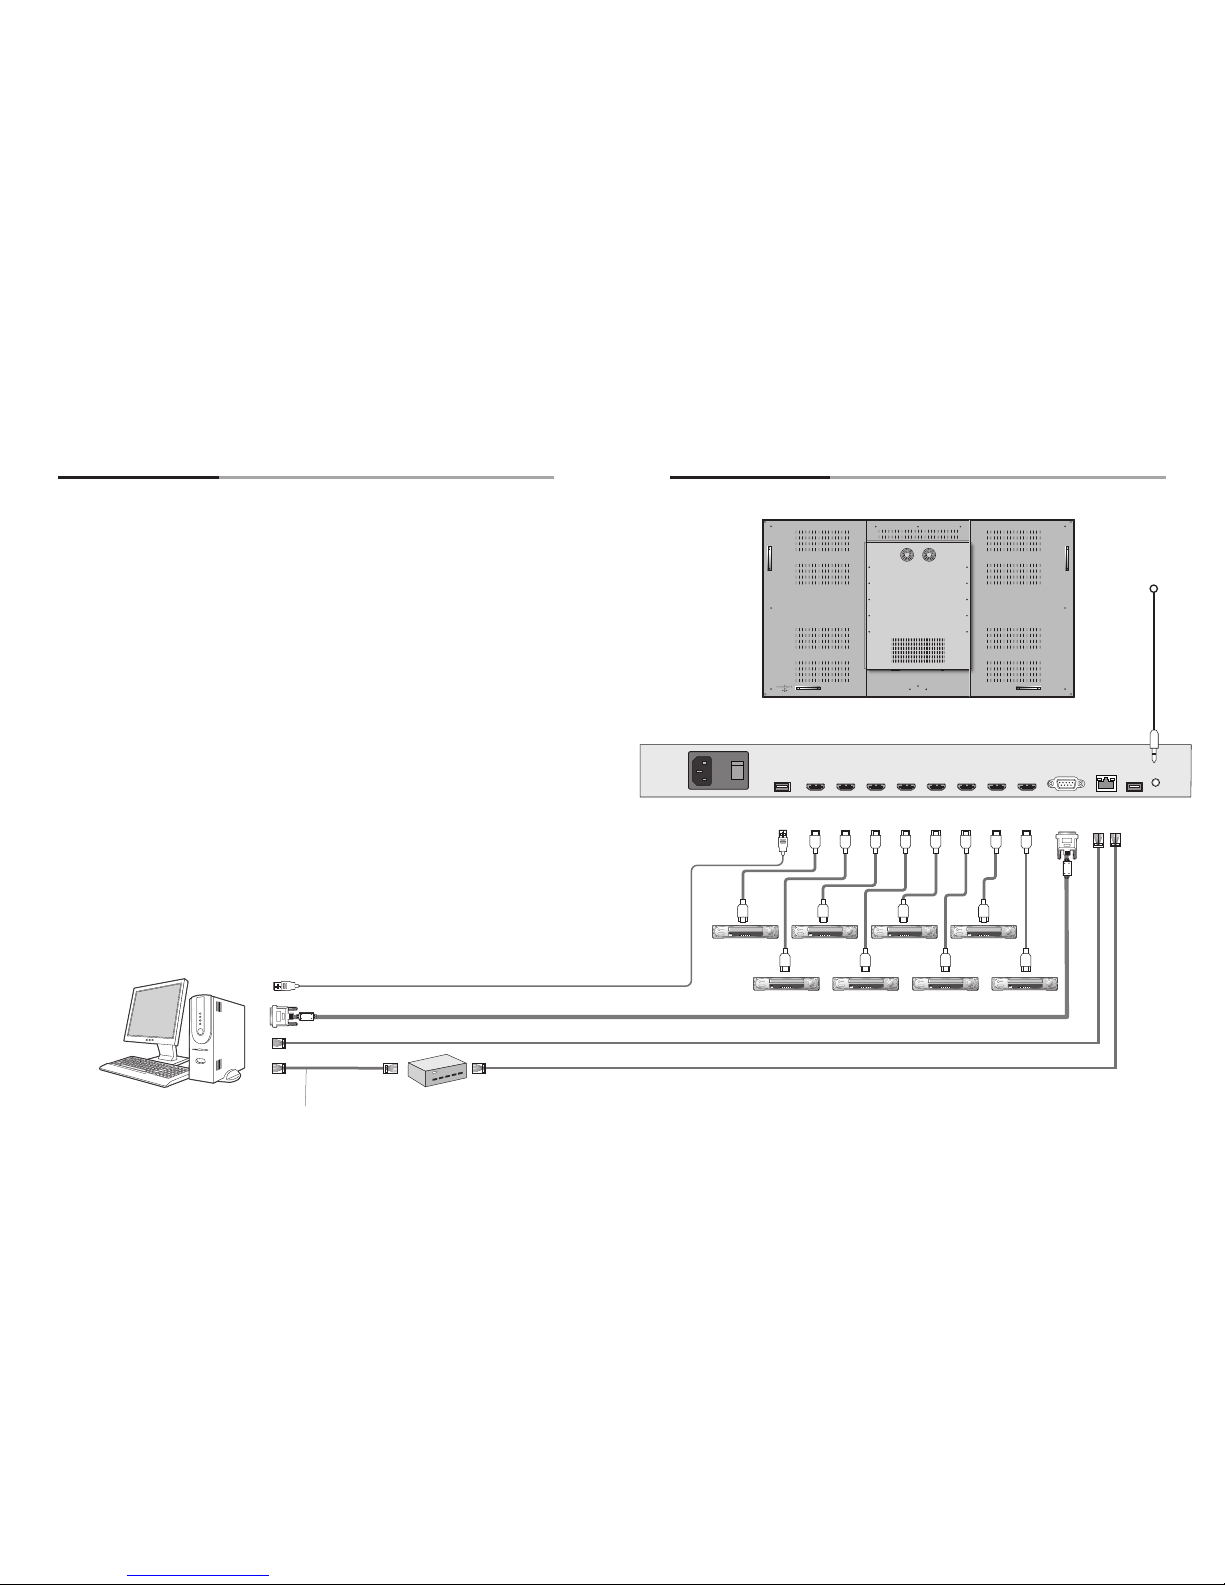
04. Cable Connection....................................................................................................................................................................................14
05. How to use Remote Controller........................................................................................................................................16
06. Conguration.................................................................................................................................................................................................18
▶BRIGHTNESS ADJUSTMENT .................................................................................................................................................. 19
▶CONTRAST ADJUSTMENT ..................................................................................................................................................... 19
▶TINT ADJUSTMENT .................................................................................................................................................................... 20
▶COLOR ADJUSTMENT .............................................................................................................................................................. 20
▶VIDEO MODE SELECTION ...................................................................................................................................................... 21
▶PICTURE RESET ............................................................................................................................................................................. 22
▶H POSITION ..................................................................................................................................................................................... 24
▶V POSITION...................................................................................................................................................................................... 24
▶ASPECT RATIO Conguration...............................................................................................................................................25
▶VIDEO MUTE ................................................................................................................................................................................... 26
▶SCREEN RESET Adjustment................................................................................................................................................... 27
▶AUTO POWER Conguration................................................................................................................................................29
▶DISPLAY MODEL Conguration.......................................................................................................................................... 29
▶FIRMWARE Conguration....................................................................................................................................................... 30
▶LAN Conguration...................................................................................................................................................................... 30
▶BAUD RATE Conguration ..................................................................................................................................................... 31
▶OSD Conguration..................................................................................................................................................................... 32
▶SETUP A RESET Conguration ........................................................................................................................................ 36
▶POWER ON SOURCE Conguration................................................................................................................................. 38
▶KEY LOCK Conguration......................................................................................................................................................... 39
▶SETUP B RESET Conguration ..........................................................................................................................................40
▶FACTORY RESET Conguration ....................................................................................................................................... 41
07. User guide for UHD Graphic................................................................................................................................................ 42
08. PROTOCOL............................................................................................................................................................................................................64
09. Before calling for service...........................................................................................................................................................80
10. Applicable signals..................................................................................................................................................................................81
11. Specication..................................................................................................................................................................................................... 82
12. Dimension............................................................................................................................................................................................................84
NOTICE
1. To disconnect the apparatus from the mains, the plug must be pulled out from the mains socket,
therefore the mains plug shall be readily operable
2. WARNING - To Reduce The Risk Of Fire Or Electric Shock, Do Not Expose This Appliance To
Rain Or Moisture.
3. Apparatus shall not be exposed to dripping or splashing and no objects lled with liquids, such
as vases, shall be placed on the apparatus.
4. Use only a properly grounded plug and receptacle
5. "Warning" CAUTION – These servicing instructions are for use by qualied service personnel only.
To reduce the risk of electric shock, do not perform any servicing other than that contained in the
operating instructions unless you are qualied to do so.
6. "Warning" CAUTION – These servicing instructions are for use by qualied service personnel only.
To reduce the risk of electric shock, do not perform any servicing other than that contained in the
operating instructions unless you are qualied to do so.
RISK OF ELECTRIC SHOCK
DO NOT OPEN
CAUTION
CAUTION : TO REDUCE THE RISK OF ELECTRIC SHOCK,
DO NOT REMOVE COVER (OR BACK).
NO USER-SERVICEABLE PARTS INSIDE.
REFER SERVICING TO QUALIFIED SERVICE PERSONNEL.
This symbol is intended to alert the user to the presence of uninsulated "dangerous
voltage" within the product's enclosure that may be of sufcient magnitude to
constitute a risk of electric shock to persons.
This symbol is intended to alert the user to the presence of important operating and
maintenance(servicing) instructions in the literature accompanying the appliance.

WARNING
WARNING
-4- -5-
01. Cautions
▶Cautions for System installation
▶Environmental condition for installation
- Since product panel is very sensitive for physical impact, installation requires considerable
caution.
- Minimum clearance(20cm) must be secured for smooth ventilation. (See page 6p~7p
참조), nstallation must avoid air tight or near air tight places. Improper ventilation causes
malfunction and shortens product lifetime by rapid internal temperature rise. If product
has to installed at the improper ventilation, additional ventilation openings or fans must be
provided to keep the internal temperature between 0~ 35˚C.
- For ground of product and application devices, it should be connected as frame ground.
- Considering product Max power consumption, check the main electric specication.
▶Recommended Operating Condition
- Temperature: 5~35˚C, Humidity: 35~75%, Suitable operating time : under 12 hours a day.
- Do not install the set at the air-tight condition.
- It is recommended to install the set with good ventilation.
- Do not install the set at the place of direct sunlight or excessive exposure to lightings.
※Blackening, stains or burning effect on the screen can be occurred by improper installation
or use against the above recommended conditions.
▶Consideration for easier service
- When you design the exterior design for product system, consider easier disassembly for
possible service occasion in the future.
- The sliding Universal Unit of ORION is recommended for easier service.
- If service people can step into the backside of product system, it can greatly reduce time and
effort for service.
- In case of higher locations, consider the installation location and exterior design for easier
service.
▶Application information
If static images are displayed on the screen for a long time, it causes burn-in image.
Please keep the following instruction to optimize the lifetime and functions of the
product.
1. Operating condition
-Temperature: 20 ±15˚C
-Humidity: 55 ±20 %
-Display pattern: moving picture or regular switchover display
-Environmental condition : Well ventilated place is recommended.
-Power off and screen saver : Periodical power-off or screen saver is needed after long-term static display.
※Note : Moving picture or black pattern is strongly recommended for screen saver.
2. Operating methods to minimize burn-in image due to long-term static information
display
-Suitable operating time : under 12 hours a day.
-Periodical display contents change from static image to moving picture.
-Periodical background color and character (image) color change
DEPARTURE
ÅÆ
DEPARTURE
Flight No. Time Gate Flight No. Time Gate
UA 012 11:20 A02 UA 012 11:20 A02
KE 732 12:10 K17 KE 732 12:10 K17
AN 291 12:45 F11 AN 291 12:45 F11
-Change the images of little luminance difference between the background and characters, periodically.
DEPARTURE
Æ
DEPARTURE
Æ
DEPARTURE
Æ
DEPARTURE
Flight No. Time Gate Flight No. Time Gate Flight No. Time Gate Flight No. Time Gate
UA 012 11:20 A02 UA 012 11:20 A02 UA 012 11:20 A02 UA 012 11:20 A02
-It is not recommended to display the images of huge luminance difference between the background and
characters or the images of grey tone.
ARRIVAL
(X)
ARRIVAL
(X)
Flight No. Time Gate Delay Flight No. Time Embark Delay
AA 213 9:20 K11 On time AA 213 9:20 New York On time
OZ 621 11:25 G21 10 min. OZ 621 11:25 Seoul 10 min.
JA 032 12:05 A19 On time JA 032 12:05 Beijing On time
-Scroll the characters periodically.
DEPARTURE
Æ Æ
DEPARTURE
Flight No. Time Gate Flight No. Time Gate
UA 012 11:20 A02 UA 012 11:20 A02
KE 732 12:10 K17 KE 732 12:10 K17
AN 291 12:45 F11 AN 291 12:45 F11
(Whole Screen Scroll)
DEPARTURE
DEPARTURE
Flight No.
Flight No.
Time
Time
Gate
Gate
UA 012
KE 732
UA 012
KE 732
11:20
12:40
A02
K17
13:40
15:20
K17
A02
UA 012
KE 732
17:03
18:20
A02
K17

WARNING
WARNING
-6- -7-
- When you install product, make sure there is at least 20cm clearance for effective
ventilation and do not seal off MLCD sets.
If MLCD sets are installed at the locations of bad ventilation, the inner temperature
can be raised rapidly and it can cause frequent malfunctions and rapid reduction of
the product life.
※Ventilation space in front of product must be furnished for heat dispersion.If the front
space of MLCD has to be sealed, there must be consideration for the heat dispersion in
the rear side of MLCD.
-Carefully install product not to cover the fan air holes with any structural object.
If the holes are covered with anything, the inner temperature can be raised rapidly
and it can cause malfunctions.
-Regularly clean off the vent holes in the back of product sets.
If the vent holes and the fan air holes are clogged with dust, it prevents the air ow
inside of product sets.
It can cause rapid increase of the inner temperature and may cause malfunctions.
Clean off the vent holes and the fan air holes with a vacuum cleaner regularly.
▶Clearance for Ventilation ▶Do not cover the vent hole for the fan
▶Cleaning and Maintenance
Installation structure
Vacuum Cleaner
PWRSRCMODE
ACINPUT ON/OFF
HDMI1A HDMI2A HDMI1B HDMI2B HDMI1C HDMI2C HDMI1D HDMI2D RS232 LAN A/S IR
ENT IR
FAN

-8- -9-
02. Safety Precautions
•If it operates abnormally, stop using it
immediately.
•Please refer to a specialized
construction company for installing stand
or wall mount unit. Otherwise, damage
or injury may be caused.
•Avoid any action to damage the power
cord or power plug. It may cause fire or
electric shock.
•Do not alter (or disassemble) the
product. It may cause electric shock
since high voltage is flowing inside.
•Do not place any liquid-containing
container on it. If the inside is wet, it
may cause electric shock or fire.
•Do not touch the device when lightning
strikes.
•Do not pull out the power plug with a wet
hand. It may cause electric shock.
•Do not install the product where it may
be exposed to direct sunlight or near
any heating device. It may shorten the
product's life span or cause failure.
•Do not put any foreign material into
the product. It may cause a failure or
shorten the life span.
•Do not install in an unstable location
It may cause injury.
•Do not exceed ratings of AC outlet
or extension cords. It may cause failure.
•Make sure the product is not covered
with any object. If the ventilation hole is
blocked, the inside temperature may rise
to cause overheating resulting in fire.
•Do not poke the front screen with sharp
material. It may damage the screen and
may cause malfunction of the product.
•Do not lean against the product or keep
it leaned. It may cause injury or failure.
•Do not put it at any place with much
humidity, dust, oil, smoke or steam. It
may cause failure.
•If you do not want to use the product
for a long time, keep the power plug
unplugged to save electricity.
•The socket-outlet should be installed
near the equipment and be easily
accessible.
•Do not put any heavy object on it.
It may cause failure.
•Do not pull out or hang down the
connection cable. It may damage the
cord to cause fire or electric shock.
•Pull out the power plug by holding the
plug. Otherwise, it may damage the
power cord to cause fire or electric
shock.
•Do not ride or step on the product It may
cause breakage when fallen down.
•When moving it, disconnect the
connecting cable. Otherwise, it may
damage the cable to cause fire or
electric shock.
•Install the product on safe and flat
surface.
•Do not put candles on the product. If the
liquid flows inside the product. It may
cause electric shock or fire.
•Donottouchproduct’sfrontsurfacewith
hand. Otherwise, the image quality can
be lowered.

-10- -11-
▶Input Ports
▶Front
▶Rear
1. AC Input
AC 100V ~ 240V, 50/60Hz
2. ON/OFF Switch
Turn on or off the display.
3. USB
For touch sensor(Only Touch Model)
4. HDMI
Group 1(1A, 1B, 1C, 1D)
Group 2(2A, 2B, 2C, 2D)
5. RS-232C
Display control via COM port or firmware
upgrade (D-Sub 9pin)
6. LAN
Display control via Ethernet (RJ45)
7. A/S
Service port for firmware upgrade
8. IR
Remote controller input port
03. Names
PWRSRC MODE
ACINPUT ON/OFF
HDMI1A HDMI2A HDMI1B HDMI2B HDMI1C HDMI2C HDMI1D HDMI2D RS232 LAN A/S IR
ENT IR
PWRSRCMODE
ACINPUT ON/OFF
HDMI1A HDMI2A HDMI1B HDMI2B HDMI1C HDMI2C HDMI1D HDMI2D RS232 LAN A/S IR
ENT IR
AC INPUT ON/OFF
HDMI1AUSB HDMI2A HDMI1B HDMI2B HDMI1C HDMI2C HDMI1D HDMI2D RS232 LAN A/S IR
➊ ➋ ➌ ➍ ➎ ➏ ➑➐

-12- -13-
▶KEY PAD ▶Remote Controller
1. PWR (Power)
Turn on or off the display.
2. SRC (Input source selection)
Select HDMI input.
3. MODE (MENU)
Turn on or off the menu or select adjust menu.
4. Direction (up, down, left and right)
Move up, down, left or right direction on the
menu screen.
5. ENT (Enter)
Select adjustment.
6. IR (IR Reception)
Receive the IR signal from remote controller
7. Power Indication Lamp
Indicate the power status.
PWRSRCMODE
ACINPUT ON/OFF
HDMI1A HDMI2A HDMI1B HDMI2B HDMI1C HDMI2C HDMI1D HDMI2D RS232 LAN A/S IR
ENT IR
➊ ➋ ➌ ➍➎ ➏
➐
SRC MODE ENT IR
POWER ON :
Turn on the display.
POWER OFF :
Turn o the display.
EXIT :
Exit from MENU &
Conguration.
INFO :
Display the resolution
MENU :
Display OSD MENU
on the screen & ENTER
:
MENU Movement
UHD :
Select HDMI 1CHANNEL
for UHD SCREEN MODE
UHD :
Select HDMI 2CHANNEL
for UHD SCREEN MODE
HDMI 1A :
Select HDMI 1A for Input source
HDMI 1B:
Select HDMI 1B for Input source
HDMI 1C :
Select HDMI 1C for Input source
HDMI 1D :
Select HDMI 1D for Input source
HDMI 2A :
Select HDMI 2A for Input source
HDMI 2B :
Select HDMI 2B for Input source
HDMI 2C :
Select HDMI 2C for Input source
HDMI 2D :
Select HDMI 2D for Input source

-14- -15-
04. Cable Connection
•Do not connect or disconnect the signal cables while the display and the peripheral devices are turned on.
•The power must be turned off before connecting the signal cables or the peripheral devices.
•The power cord must be firmly inserted to prevent unexpected disconnection.
AC INPUT ON/OFF
HDMI1A HDMI2A HDMI1B HDMI2B HDMI1C HDMI2C HDMI1D HDMI2D RS232 LAN A/SUSB IR
Ethernet Control PC
DVD player
with HDMI out
DVD player
with HDMI out
DVD player
with HDMI out
DVD player
with HDMI out
DVD player
with HDMI out
DVD player
with HDMI out
DVD player
with HDMI out
DVD player
with HDMI out
HUB or Router
LAN Cable (Direct cable)
LAN Cable (Direct
cable)
LAN Cable (Cross cable)
IR Reception
RS-232
USB Cable (Touch Model Only)
PWRSRCMODE
ACINPUT ON/OFF
HDMI1A HDMI2A HDMI1B HDMI2B HDMI1C HDMI2C HDMI1D HDMI2D RS232 LAN A/S IR
ENT IR

-16- -17-
1. MENU button
OSD MENU will be displayed by pressing MENU button.
2. 2. Direction buttons for movement
Use buttons or MENU button to adjust menu items.
Use buttons to move to adjust sub-menu items.
3. EXIT button
Press EXIT button to exit from the MENU after adjustment.
4. INFO button
The display information for the screen at the moment is displayed at the upper
left corner of the screen.
ex) Input HDMI 1A - Ex) UHD
05. How to use Remote Controller
5. UHD button
Input A, Input B, Input C and Input D will be displayed on the screen
simultanesously.
6. A, B, C, D button
Selected input will be displayed on the whole screen.
A
A
C
B
D

-18- -19-
PICTURE Adjustment
BRIGHTNESS, CONTRAST, TINT, COROR, VIDEO MODE, and PICTURE RESET can be
adjusted in the PICTURE MENU.
1. Press MENU button.
Press MENU button to display OSD MENU on the screen.
2. Select MENU.
Use buttons to move to PICTURE MENU.
When PICTURE item is selected, press MENU button to move into the sub-menu.
3. Adjust the value.
BRIGHTNESS, CONTRAST, TINT, COLOR and VIDEO MODE can be adjusted.
Each of the value can be adjusted by pressing buttons.
4. Exit from the MENU
Press EXIT button to getting out of OSD MENU.
06. Conguration
▶BRIGHTNESS ADJUSTMENT
Screen brightness can be adjusted.
The brightness of black color at the dark side of the screen can be adjusted.
1. Select BRIGHTNESS from PICTURE Menu.
Select BRIGHTNESS and move buttons to adjust the value.
2. EXIT MENU
Press Exit button to exit from the menu after adjusting the value.
▶CONTRAST ADJUSTMENT
The brightness of white color at the bright side of the screen can be adjusted.
1. Select CONTRAST from PICTURE menu.
Select CONTRAST and move buttons to adjust the value.
2. EXIT MENU
Press Exit button to exit from the menu after adjusting the value.

-20- -21-
▶TINT ADJUSTMENT
Adjust Red and Green color of the screen.
1. Select TINT from PICTURE Menu.
Select TINT and move buttons to adjust the value.
2. EXIT MENU
Press Exit button to exit from the menu after adjusting the value.
▶COLOR ADJUSTMENT
Adjust the depth of the screen color.
The depth of color will be thicker as the value goes higher.
As the value goes lower, the depth of color will be getting thinner and go to black
and white.
1. Select COLOR from PICTURE Menu.
Select COLOR and move buttons to adjust the value.
2. EXIT MENU
Press Exit button to exit from the menu after adjusting the value.
▶VIDEO MODE SELECTION
Adjust the color temperature of the screen.
1. Select VIDEO MODE from PICTURE Menu.
Select VIDEO MODE and move buttons to select a VIDEO MODE of your choice
among POLYCOM, COOL, NATURAL, WARM and CUSTOM.
» CUSTOM conguration
1. Select CUSTOM from VIDEO MODE.
Detailed values for RGB can be controlled by pressing MENU button after selecting
CUSTOM.
2. Adjust values
USER–R O, USER–G O, and USER-B O mean OFFSET RED, OFFSET GREEN, and OFFSET BLUE,
respectively. USER–R, USER–G and USER-B are GAIN RED, GAIN GREEN, and GAIN BLUE.
Each value can be adjusted by buttons.

-22- -23-
▶PICTURE RESET
Initialize the values of PICTURE NENU.
1. Select PICTURE RESET from PICTURE menu.
Press MENU button to display OSD.
Use buttons to move to PICTURE RESET and press MENU button.
2. Initialize the values
Select YES or NO for initializing PICTURE RESET menu.
Use buttons to move to YES and press MENU button to initialize the value.
3. EXIT MENU
Press Exit button to exit from the menu after reset.
SCREEN ADJUSTMENT
H POSITION, V POSITION, ASPECT RATIO, VIDEO MUTE, SCREEN MODE, and
SCREEN RESET can be adjusted in the SCREEN MENU.
1. Press MENU button.
Press MENU button to display OSD MENU on the screen.
2. Select SCREEN menu
Use buttons to move SCREEN menu.
When SCREEN is selected, press MENU button to move to the sub-menu.
H POSITION, V POSITION, ASPECT RATIO, VIDEO MUTE, and SCREEN MODE can be
adjusted.
3. EXIT MENU
Press Exit button to exit from the menu.

-24- -25-
▶H POSITION
Adjust the horizontal position of the display image on the screen.
1. Select H POSITION from SCREEN menu.
Adjust H POSITION values with buttons after selecting H POSITION.
2. EXIT MENU
Press Exit button to exit from the menu.
▶V POSITION
Adjust the vertical position of the display image on the screen.
1. Select V POSITION from SCREEN menu.
Adjust V POSITION values withbuttons after selecting V POSITION.
2. EXIT MENU
Press Exit button to exit from the menu.
▶ASPECT RATIO Conguration
Adjust screen ratio.
FULL – All the input will be displayed with the screen ratio of 16:9.
ASPECT – All the input will be displayed with their original screen ratio.
1. Select ASPECT RATIO from SCREEN menu.
Move to the sub-menu by pressing MENU button after selecting ASPECT RATIO.
2. Select ASPECT RATIO value.
16:9or 4:3screen ration can be selected.
Use buttons to move into the sub-menu and press MENU button again to
select the screen ratio.
3. EXIT MENU
Press Exit button to exit from the menu.

-26- -27-
▶VIDEO MUTE
Display the input image on the screen.
ON- Display on the screen
OFF- No screen display (Black screen)
1. Select VIDEO MUTE from SCREEN menu.
Congure VIDEO MUTE value by pressing MENU button after selecting VIDEO
MUTE.
2. Select VIDEO MUTE value.
Use buttons to move to ON or OFF.
To select VIDEO MUTE, move to ON and press MENU button.
Move to OFF and press MENU button to deselect VIDEO MUTE.
3. EXIT MENU
Press Exit button to exit from the menu.
▶SCREEN RESET Adjustment
Initialize the values of SCREEN MENU.
1. Select SCREEN RESET from SCREEN menu .
Press MENU button to display OSD.
Use buttons to move to SCREEN RESET and press MENU button..
2. Initialize the previously adjusted values.
Select YES or NO for initializing SCREEN menu.
Use buttons to move to YES and press MENU button to initialize the value.
3. EXIT MENU
Press Exit button to exit from the menu.

-28- -29-
SETUP A Conguration
AUTO POWER, DISPLAY MODEL, FIRMWARE VERSION, LAN SETTING, SERIAL
SETTING, OSD, and SETUP A RESET can be adjusted in SETUP A MENU.
1. Press MENU button.
Press MENU button to display OSD MENU on the screen.
2. Select SETUP A.
Use buttons to move to SETUP A menu.
Press MENU button to move into the sub-menu.
AUTO POWER, LAN SETTING, SERIAL SETTING, and OSD menu can be adjusted.
DISAPLAY MODEL and FIRMWARE VERSION also can be checked.
3. Each sub-menu can be congured.
Use buttons to move to the sub-menus you want to adjust.
To congure the sub-menu, move to the sub-menu and press MENU button to
enter.
4. EXIT MENU
Press Exit button to exit from the menu.
▶AUTO POWER Conguration
The display set can be turned on automatically as the power is on.
ON – Select the function for automatic turn on.
OFF -Deselect the function.
1. Select AUTO POWER from SETUP A menu.
Use buttons to select ON or OFF.
Move to ON and press MENU button to select and move to OFF and press MENU
button to deselect.
2. EXIT MENU
Press Exit button to exit from the menu.
▶DISPLAY MODEL Conguration
It displays the model information.
1. Select DISPLAY MODEL from SETUP A menu.
Move to DISPLAY MODEL and press MENU button to check current model name.
2. EXIT MENU
Press Exit button to exit from the menu.

-30- -31-
▶FIRMWARE Conguration
It displays the rmware version information.
1. Select FIRMWARE from SETUP A menu.
Move to FIRMWARE and press MENU button to check current rmware version.
2. EXIT MENU
Press Exit button to exit from the menu.
▶LAN Conguration
It congures the IP address of the set to control via Ethernet.
1. Select LAN from SETUP A menu.
Move to LAN and press MENU button to check current LAN conguration.
Congurations for DHCP ENABLE or DISABLE, IP ADDRESS, SUBNET MASK,
DEFAULT GATEWAY, DNS PRIMARY & SECONDARY, and PORT can be checked.
2. EXIT MENU
Press Exit button to exit from the menu.
▶BAUD RATE Conguration
It adjusts the communication rate to control the set via RS-232C.
1. Select BAUD RATE from SETUP A menu.
Move to BAUD RATE and press MENU button.
2. Press MENU button to move into the sub-menu of BAUD RATE.
Use buttons to adjust values.
Press MENU button to select a value.
3. EXIT MENU
Press Exit button to exit from the menu.

-32- -33-
▶OSD Conguration
It congures OSD menu.
1. Select OSD from SETUP A menu.
Move to OSD and press MENU button.
» TURN OFF Conguration
TURN OFF – Select the duration time of OSD on the screen.
1. Select TURN OFF.
Move to TURN OFF and press MENU button.
2. Select the sub-items of TURN OFF
Select the duration time for OSD CONTRON MENU or TURN OFF
3. EXIT MENU
Press Exit button to exit from the menu.

-34- -35-
» OSD POSITION Conguration
H POSITION – Select the horizontal position of OSD.
V POSITION - Select the vertical position of OSD.
1. Select OSD H POSITIION
Use buttons to adjust OSD H POSITION value.
2. Select OSD V POSITIION
Use buttons to adjust OSD V POSITION value.
3. EXIT MENU
Press Exit button to exit from the menu.
» INFO DISPLAY Conguration
INFO DISPLAY - Select the duration time of INFO OSD.
1. Select INFO DISPLAY
Turn on or o INFO DISPLAY OSD and select display duration time.
Use buttons to select ON or OFF.
Press MENU button after selecting ON or OFF.
2. EXIT MENU
Press Exit button to exit from the menu.
» TRANSPARENCY Conguration
TRANSPARENCY – Select the transparent percentage of OSD.
1. Select TRANSPARENCY
The transparency of OSD can be adjusted.
Use buttons to select ON or OFF.
Press MENU button after selecting ON or OFF.
2. EXIT MENU
Press Exit button to exit from the menu.

-36- -37-
▶SETUP A RESET Conguration
Initialize the previously adjusted values of SETUP A RESET MENU.
1. Select SETUP A RESET from SETUP A menu.
Press MENU button to display OSD.
Use buttons to move to SETUP A RESET and press MENU button.
2. Initialize the previously adjusted values.
Select YES or NO for initializing SETUP A menu.
Use buttons to move to YES and press MENU button to initialize the value.
3. EXIT MENU
Press Exit button to exit from the menu.
SETUP B Adjustment
INFORMATION, POWER ON SOURCE, SETUP B RESET, and FACTORY RESET can be
adjusted in SETUP B MENU.
1. Press MENU button.
Press MENU button to display OSD MENU on the screen.
2. Select SETUP B menu.
Use buttons to move to SETUP B.
Press MENU button to move into the sub-menu.
POWER ON SOURCE, SET UP B RESET, and FACTORY RESET can be adjusted.
Current display conguration can be displayed by INFORMATION function.
3. Sub-menus can be congured.
Use buttons to move to the menus you want to adjust.
To congure the sub-menu, move to the sub-menu and press MENU button to
enter.
4. EXIT MENU
Press Exit button to exit from the menu.
This manual suits for next models
3
Table of contents
Other Orion LED TV manuals