Orion OVC-023 User manual

http://www.orion.ua
U
US
SE
ER
R’
’S
S
G
GU
UI
ID
DE
E
W
WA
AT
TE
ER
R
F
FI
IL
LT
TR
RA
AT
TI
IO
ON
N
V
VA
AC
CU
UU
UM
M
C
CL
LE
EA
AN
NE
ER
R
Model: O
OV
VC
C-
-0
02
23
3
ENGLISH GB

2
IMPORTANT SAFEGUARDS
When using an electrical appliance, basic safety precautions should always be observed,
including the following
READ ALL INSTRUCTIONS BEFORE USING YOUR VACUUM.
WARNING: To reduce the risk of fire, electrical shock, or injury:
1. To ensure safe and correct use of your product, do not operate without first reading this operation manual thoroughly.
2. To avoid shortening the life span or damaging your product, do not use the machine with part or accessories not
recommended by this manual. Use only original spare parts or accessories.
3. Do not allow children or unsuitable persons to operate the system.
4. Ensure that the vacuum cleaner is placed on a flat surface when in operation.
5. Do not touch the main plug with wet hands. Do not operate the machine with wet hands. Do not operate the machine in
an excessively wet environment.
6. Do not put any object into openings. Do not use with any opening blocked; keep free of dust, lint, hair and anything that
may reduce airflow.
7. Keep hair, loose clothing, fingers, and all parts of body away from openings and moving parts.
8. Do not use the machine for vacuuming hot or burning objects including ash.
9. Turn off the control before unplugging
10. Do not use the machine for vacuuming any type of chemicals, acids or solvents. This will damage the machine.
11. Do not use the product near explosive materials, inflammable liquids or any type of gas. Such usage can cause fire or
explosions.
12. Keep end of hose, wands and other openings away from your face and body
13. Do not use for any purpose other than described in this user’s guide.
14. Using improper voltage may result in damage to the motor and possible injury to the user. correct voltage is listed on
the rating label.
15. Do not disconnect the AC plug from the main outlet roughly. Never remove the AC plug by pulling the cord; always pull
out the plug by holding the plug itself.
16. Do not connect or disconnect the AC plug from the main outlet with wet hands. This may result in an electrical shock.
17. Always switch-off your machine and disconnect the AC plug from the main outlet when the appliance is not in use.
18. Do not use your machine if the AC cord or plug is damaged.
19. If the cleaner is damages, it must be repaired by the manufacturer or its service agent or a similarly qualified person in
order to avoid a hazard.
20. This appliance is not intended for use by children or other persons without assistance or supervision if their physical,
sensory or mental capabilities prevent them from using it safely. Children should be supervised to ensure that they do
not play with the appliance.
21. If the supply cord is damaged, it must be replaced by the manufacturer or its service agent or a similarly qualified
person in order to avoid a hazard.
22. The vacuum cleaner must not be left unattended while it is connected the supply mains.
23. This vacuum cleaner is for household use only
24. The plug must be removed from the socket-outlet before cleaning or maintaining the vacuum cleaner.
Caution:
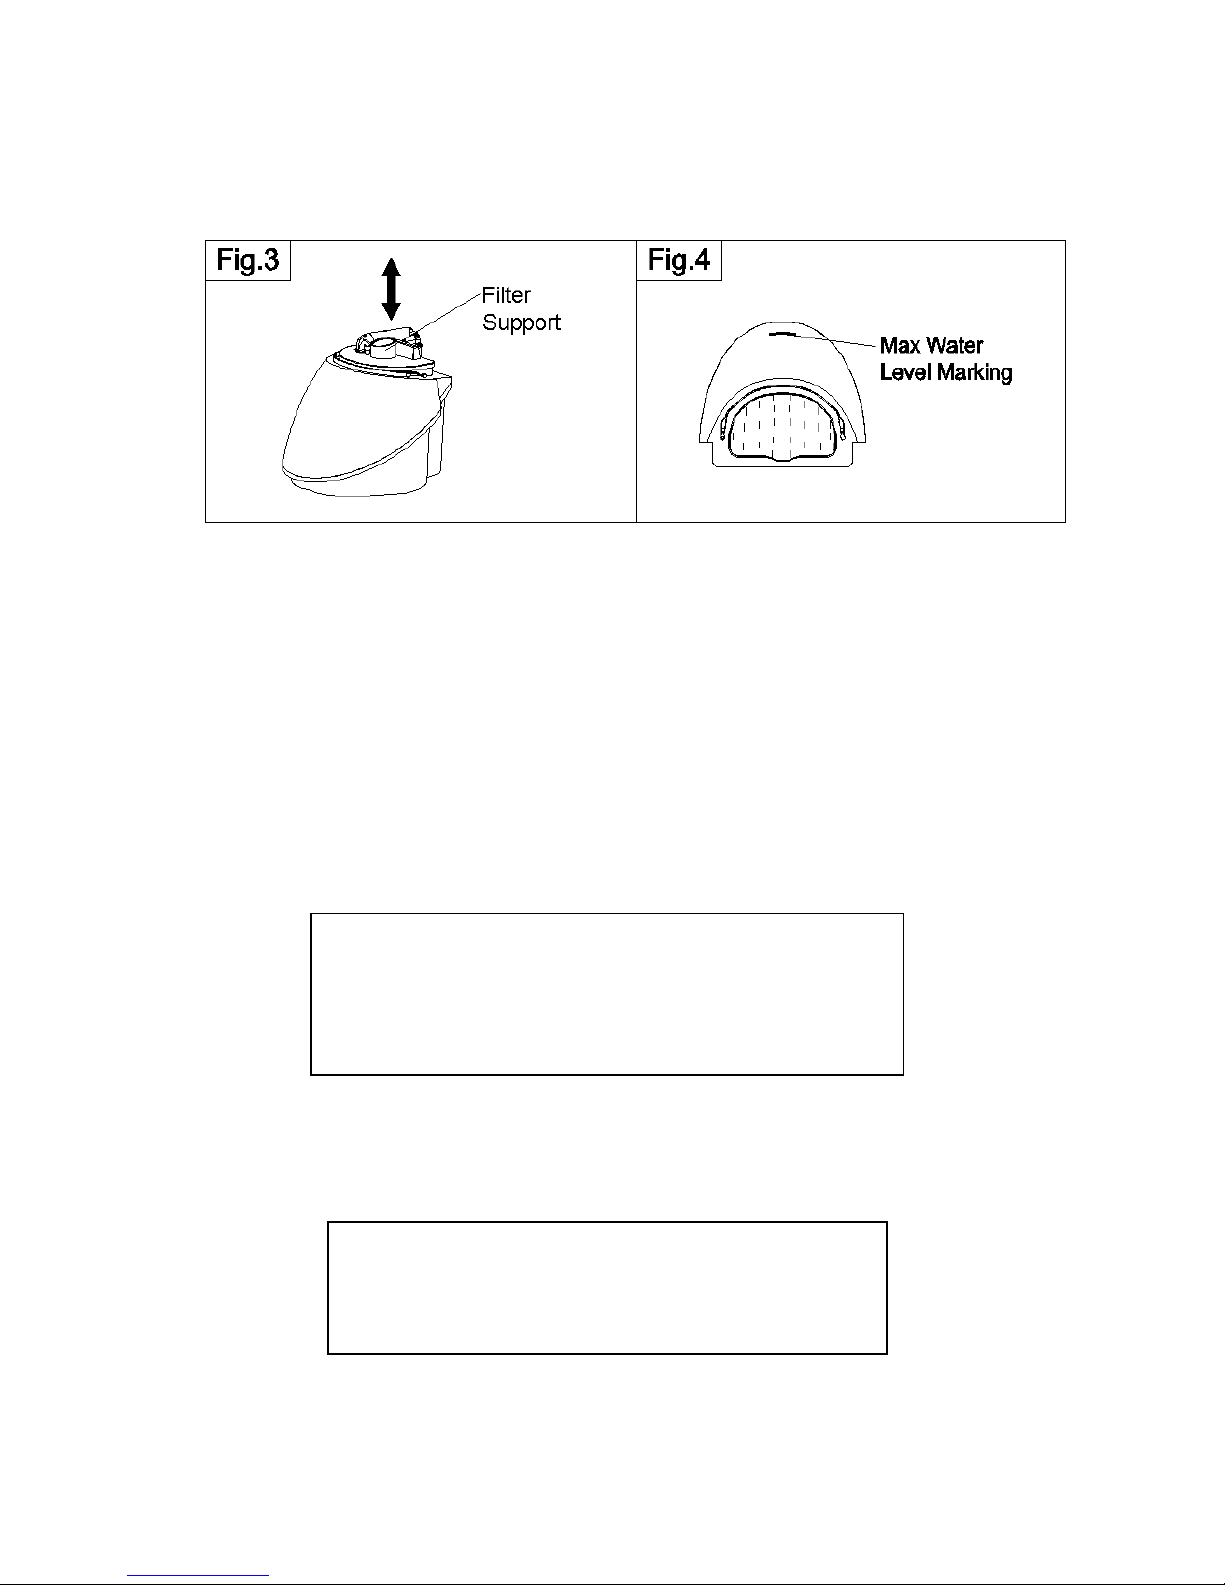
zDo not overfill the water container. Note the ‘Maximum Level’ marking.
zDo not fill the water container with anything other than water.
zAlways empty the dirty water, clean and store you machine correctly after each use.

3
Part and Accessories Index
Water Brush
Duster Brush
Crevice Nozzle
Curved Tube
Floater Cage
Sponge Filter
Meshed Filter Cage
Floater
Switch Button
Tank Cover
Big Wheel
Filter Support
Water Tank
Telescopic Tube
Hose Joint
Handle
Carrying Handle
Rewind Button
Flexible Hose
Carpet Brush
Big Size Air Turbo Brush

4
Features
zWater-based vacuum system plus twin HEPA filters system.
zMulti filtration system (6-stages) capable of capturing bacteria particles down to the size of 0.3Microns.
zUses no bag and non-direct HEPA filter and as a result: no clogged pores, no loss of suction or airflow, no
indoor air pollution and no costly replacement bags.
z4-Speed motor with electronic control for the best use of suction power and ultimate convenience.
z2 in 1 water squeegee reaches under low furniture, fixtures and fittings and allows liquid suction.
zAutomatic switch off when the float switch goes up for safety.
zMixing of Bio-fresh anti-bacterial, anti-allergenic & non –chemical fresheners such as Mountain Pine,
Tropical Citrus & Country Lavender with water helps to purify and disinfect indoor air as well as eliminate
unpleasant odors.
z2 HEPA filters at system’s motor air outlet means the air coming out, is even cleaner than the air going into
the system.
zOptional Turbo Rotating Brush allows deep cleaning of mattresses and rugs. Also ideal for removing loose
hair and fluff from carpeted floors and upholstered surfaces.
Effectiveness
zEco-Active water filter captures and retains dust & dirt in water without polluting the indoor air.
zMulti filtration including HEPA filter provides 99.99% efficiency in purifying the air and capturing micro-
organisms down to 0.3 Microns in size, such as dust, pollen, dust mites and their feces, pet hair & dander.
zA HEPA filter at the motor air outlet stops all the carbon powder from the motor and ensures providing the
ultimate indoor air quality. No more 2nd pollution.
zWhen operating the product, the water filter system makes and blow out natural Minus Ion, so the product
is acting as a Minus-Ion generator or an air cleaner when it is operated.
zBy not using dirty and blocked paper bags or direct HEPA filter, the product maintains its maximum
airflow & efficiency at all times.
zThe product is a real Green Vac, Hygienical Vac, Healthy Vac.
Preparation before Use
1. Setting Up the Product
zRotate (upside) the release button and rotate the cover upwards. (Fig.1)
zRemove the water container using the handle on the container. (Fig.2)

5
zRemove the filter assembly from the water container. (Fig.3).
zFill the container with tap water to ‘Max Water Level’ indicated on the front of the container. This is
about 1.5 liters. Please ensure the container is not overfilled. (Fig.4)
zReplace the filter assembly into the water container.(please make sure the direction of the curved tube is
correct: towards to the front side, and also make sure the sponge filter is equipped correctly.) Place the
water container back to the body holder. Close and lock the body cover. The locking mechanism will
“Click” when locked.
zInsert the flexible hose into the hose socket.
zConnect the telescopic tube to the flexible hose handle, and then connecting with accessories such as
floor brush, water brush etc. Now it is ready for use.
2. Power On
zExtract the AC power cord fully by holding the cord and pull it towards you. Do not pull the cord by
holding the plug, as this will damage the cord.
zConnect the plug to a suitable mains power outlet with the correct voltage.
zPress firmly and turn on the main ON/OFF switch. One green indicator light will flash. The machine is
now at ‘Standby’ mode. At this stage, your machine is ready to work.
zPush the standby button on the main body will activate the machine in the lower suction mode.
Caution: Before connect the plug to the power socket;
unwind a sufficient length of cable. A yellow mark on the
power cable shows the ideal cable length. Don’t expend the
cable beyond the red mark.
Caution: Make sure the AC power cord is fully
extracted. During the operation a partially extracted
power cord will generate excessive heat.

6
Use of your product
1. Standby Button
zThis button is used to switch between standby mode and operation mode. The initial push turns the
suction power on at the low mode. While the machine is operating, push this button returns the machine to
the standby mode.
2. Suction Power Selection Button
zThere are 4 suction power setting, Low, Medium, High and Turbo. Use (+) or (-) button on the main body
of the machine to select the desired setting. (Fig.8)
zThe suction power class is indicated by the numbers of green indicating lights. For example: three green
lights means the suction power is now at the 3rd high position (total 4 positions).
3. Telescopic Tube
zThe extendable Telescopic Tube gives you added flexibility and control. Depending on your application
and situation, you may adjust the length of the Telescopic Tube to suit your needs. Push and hold the
locking knob, extend or retract the telescopic pole as required. Release the knob and pull the extended
tube slightly to lock it in place.
4. Crevice Tool: Use this accessory tool for corners, crevices and cracks.
5. Main Floor Brush: Connect the main floor brush to the telescopic tube, you can clean the carpet and floor.
6. Multi Duster Brush
zThe Multi Duster Brush (2 in 1) is for removing dust from all type of surfaces such as lampshades,
electric equipment, air conditioner grills, car dashboards etc. Separately it can be used as a sofa
nozzle. (Fig.9)

7
7. Water Brush & Liquid Suction
zThe Water Brush is so versatile that it can be used for vacuuming both solid and liquid dirt and is mainly
for use on hard floor surface.
8. Automatic Cord Storage
zYour system comes with an Automatic Code Storage system. Push the button at the back of the machine
and the cord is retracted automatically. The large button also allows this to be done with your foot.
Product Care and Storage
Always switch off the main switch and disconnect the AC cord from the electrical outlet before cleaning you
machine or replacing any part.
1. General
zYou may wipe the machine with a damp cloth. Synthetic detergent may be used on plastic and metal parts
Caution: If you use your machine for liquid suction. Make sure you
first reduce the amount of water in the tank by about half. It is also
important not to allow the tank to become too full of vacuumed liquid.
Before liquid suction you must change the carpet brush with the Water
Brush
When you finish, empty the tank completely and vacuum up about one
liter of clean water to rinse clean the inside of the Flexible Hose and the
Telescopic Tube. Repeat if necessary.
To dry the inside of Hose & the Tube, detach the Water Brush, and run
your machine for a few minutes without sucking up any dirt. Wash and
dry the water brush separately.
Vacuum soapy liquid or detergent should be avoided, as this causes
frothing inside the water tank.
Caution:While nearing the end of the retraction, hold on to the end of
the cord and guide it into the cord storage compartment. The force and
speed of the retraction may cause the plug to snap back and hit something.

8
if necessary. Make sure you wipe the machine and its parts dry before storage.
zDo not use strong cleaning agents such as benzene or thinner to clean the machine.
zAlways store your product and parts after they are completely dried.
2. Cleaning and Maintenance of the filter assembly.
zIt is high recommended that you pour away the dirty water and clean the container and the filter assembly
after each use. Keeping your home clean using a clean appliance is an advantage that the machine has
over ‘bag’-vacuum cleaner.
zTo empty the water container, rotate the release button and rotate the cover upwards.(Fig.1)
zLift up the cover and remove the water tank with the handle on the tank. (Fig.2)
zRemove the Filter Assembly and empty the container. Thoroughly clean, rinse and leave to dry.(Fig.3)
zRegularly dismantle and clean the filter assembly.
zRemove the curved tube by pulling it from the meshed filter cage.
zPull out the filter cage and remove the sponge filter. Wash and rinse all the components. Dry before
assembling them. (Note: the sponge filter must be equipped on the filter cage during working the
machine.)
zTo remove stubborn dirt from the container and the filter assembly, use normal washing-up liquid but
make sure it is rinsed thoroughly afterwards.
3. Front Sponge Filter
zRotate the release button and rotate the cover upwards.(Fig.1)
zRemove the sponge and insert a new one. It is recommended that you clean the sponge filter if it is dirty
by warm water and fully drying them before putting them back in the cartridge.
4. Air Outlet HEPA Filter
zPush the button on the Air Outlet Grill; remove the Air Outlet Grill from the body. (Fig.12)
zTake out the Air Outlet HEPA Filter. (Fig.13)
zReplace with a new one or wash it if it is dirty. It is recommended to have a wash or replace a new one
each half year.
5. Storage: Store your machine with care and in a cool dry place.
Caution: Use only original spare part.

9
Troubleshooting
Do not disassemble or attempt to repair the machine yourself
Conditions Possible Cause and Solution
zThe machine stops
during operation
and all four suction
power indicator
lights start
blinking together.
zWait for about 30 seconds before you operate the
machine again. This lets the machine reset whilst you
identify one of the following possible causes.
zThe water has turned very dirt and mirky. Empty the
water container and replace with clean water.
zThe water level is above the maximum level. Reduce
the water level.
zThe selected suction power level is too high for the
current cleaning application. Reduce the suction
power.
zThe airflow is blocked. Remove the blockage.
zThe machine does
not start
zAC supply is not properly connected the AC cord to
electrical supply.
zNoticeable
decrease in the
suction power
zThe HEPA filter requires replacement. Change a new
one.
zThere is a blockage. Remove the cleaning tools and
attachments from the machine and remove the
blockage.
zLeakage of water
when using for
cleaning of liquid
waste.
zThe Switch Float is blocked. Unblock it by cleaning.

10
Technical characteristics
Completion
Extra information on ORION company web-site www.orion.ua
Model ORION OVC-023
Power 1200-1400W
Voltage 220/240V~50Hz
Noisy level ≤79dBa
Dust tank capacity 1,5L – loading water, 3L – sucking water
Power cord length 5m
Net weight 9kg
Gross weight 10,5kg
Body size 44 х30 х29cm
Unit box dimension 52,5 х39,5 х42,5cm
Color Red
Vacuum cleaner
Long flexible hose with handle
Telescopic stainless steel tube
Up-down adjustable metal floor brush
Duster brush
Crevice nozzle
Water brush
Air turbo rotating brush
User’s guide
Warranty card
Table of contents
Other Orion Vacuum Cleaner manuals