Orivision EH404 User manual

0
2022
EH404&EH408

Technical Support: support@orivision.cn
1/ 25
Go Back Contents
Contents
1. Overview .................................................................................................................................................................................2
1.1 product description...........................................................................................................................................................2
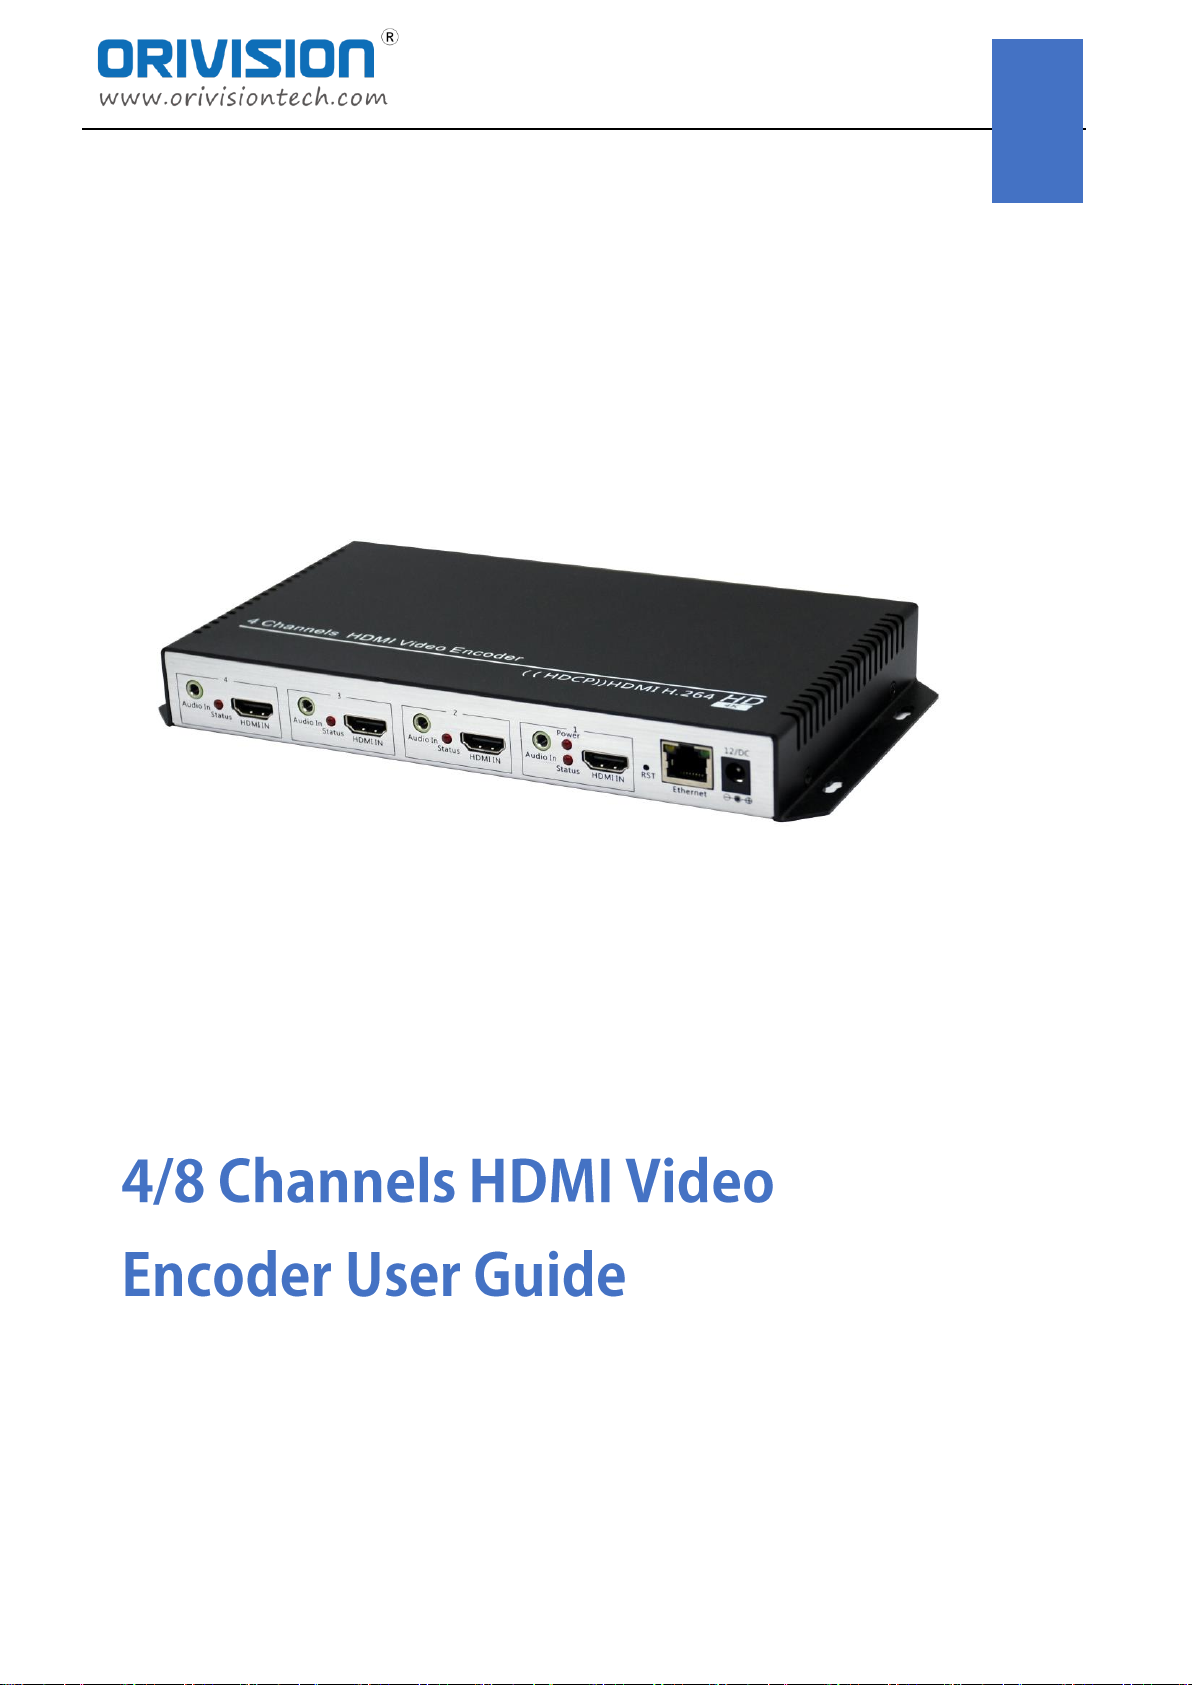
1.2 product picture...................................................................................................................................................................2
1.3 Product’s Parameter .........................................................................................................................................................3
2. Initial installation connection............................................................................................................................................4
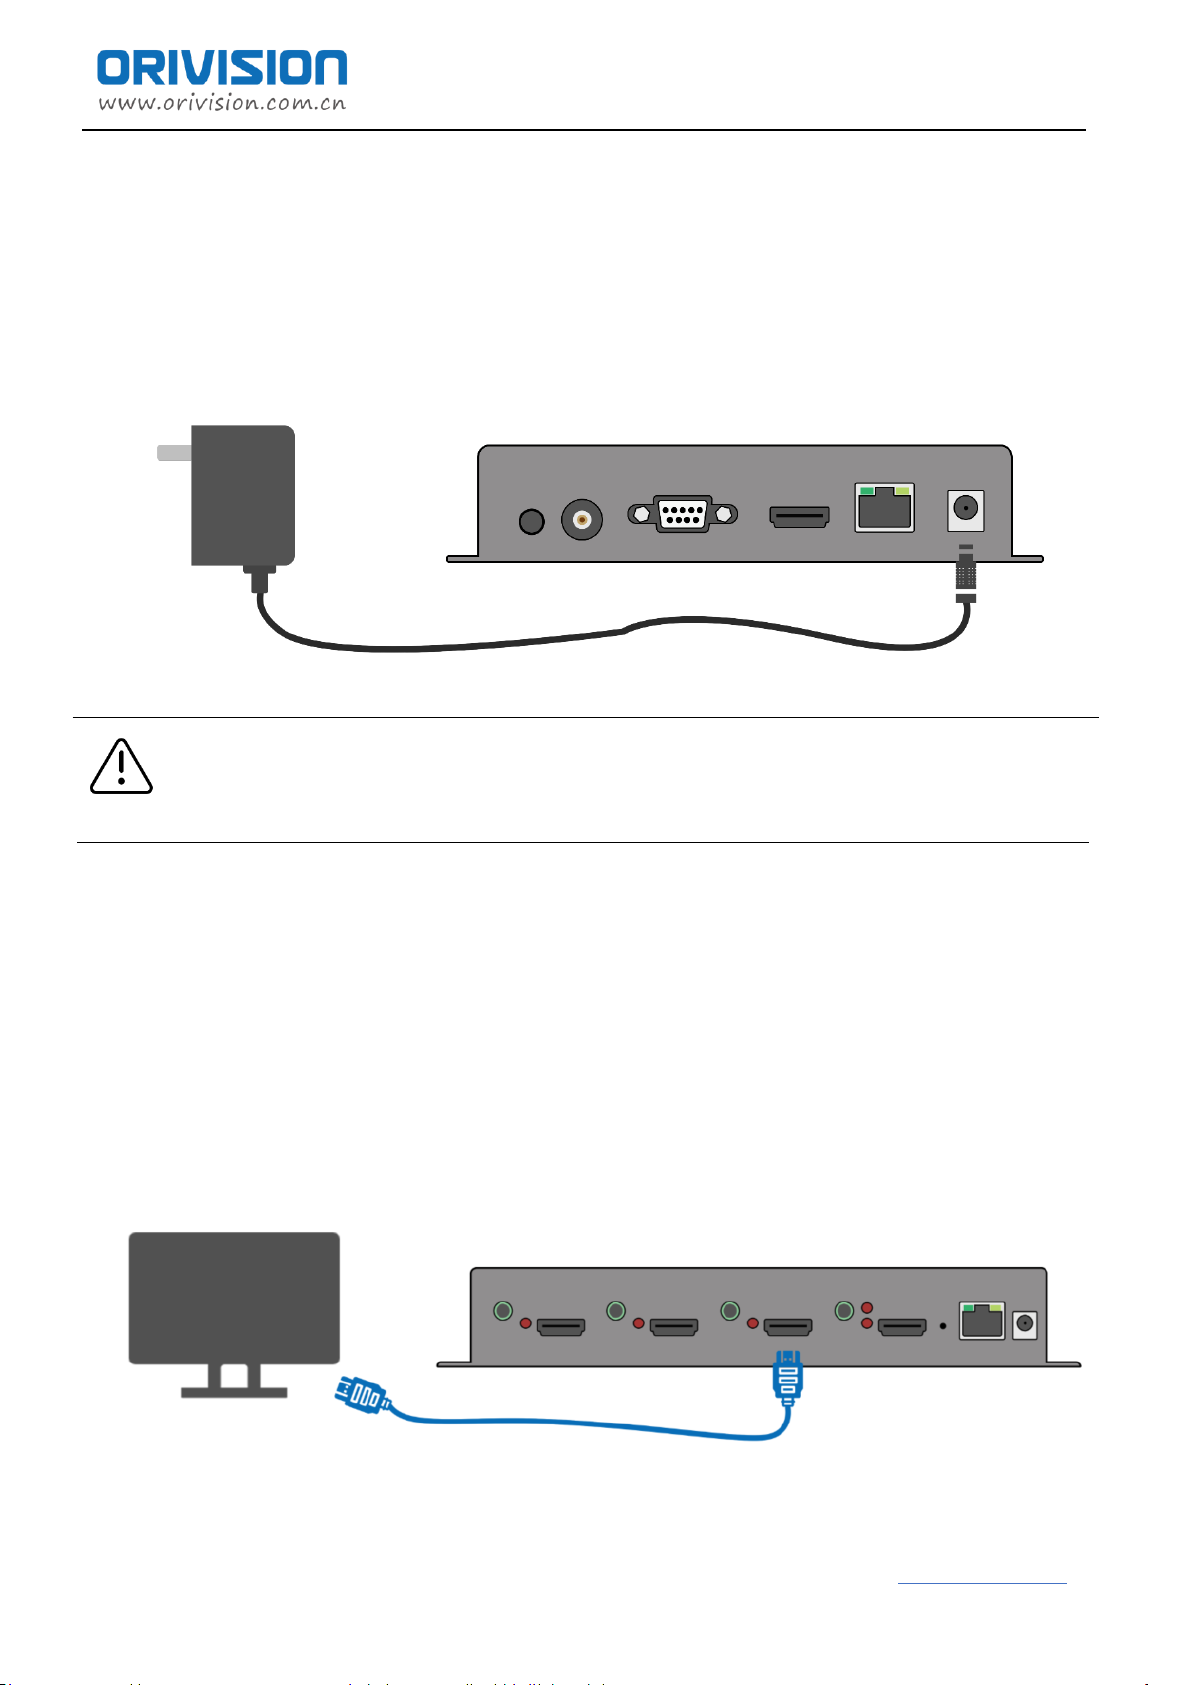
2.1 Connect power...................................................................................................................................................................4
2.2 Connect displayer..............................................................................................................................................................4
2.3 Connect the encoder to user’s computer..................................................................................................................5
2.4 Log in the control web with 192.168.0.31 .................................................................................................................5
3. Introduction to the control page of the encoder......................................................................................................8
3.1 Status.....................................................................................................................................................................................8
3.2 Network ............................................................................................................................................................................. 10
3.3 Media Setting................................................................................................................................................................... 11
3.4 Protocol Setting...............................................................................................................................................................13
3.5 OSD .....................................................................................................................................................................................14
3.6 System Setting.................................................................................................................................................................16
4. How to connect the Encoder to the internet........................................................................................................... 19
5. How to streaming to YouTube/Facebook via RTMP/RTMPS..............................................................................20
6. How to set the SRT protocol in the encoder ...........................................................................................................23

Technical Support: support@orivision.cn
2/ 25
Go Back Contents
1. Overview
1.1 product description
EH404 is a professional hardware video and audio encoder. Which designed to meet the 4CH 4K@30HZ HDMI
Video transmission applications. It supports H.264 high-performance encoding. Also, it supports the most
protocols including HTTP/RTMP/RTMPS/HLS/UDP/RTSP/Onvif, etc.
It's high integration and cost-effective design make this device widely used in the variety of field such as CATV
digital head-end, hotel IPTV system, live streaming broadcast, streaming media server etc. Also, the encoder
works with the online live broadcast platform, such as YouTube, Ustream, Twitter, WOWZA, Facebook Live, etc.
1.2 product picture
▲ZY-EH404
▲ZY-EH409

Technical Support: support@orivision.cn
3/ 25
Go Back Contents
1.3 Product’s Parameter
Video
Input interface
EH404: 4 channels HDMI Input
EH408: 8 Channels HDMI Input
Frame Rate
5-60hz
HDCP
HDCP 1.4
Output interface
EH404:1X Ethernet Port(RJ45)
EH408:2X Ethernet Port(RJ45)
Video Encoding
H.264/Baseline Profile/Main profile/High Profile
Max bitrate
16kbps-12Mbps
Rate control
CBR/VBR
Audio
Input Interface
EH404: 4X External audio and HDMI built-in Audio
EH408: 8X External audio and HDMI built-in Audio
Audio encoding
ACC,G711
Audio Encoder type
LCAAC,EAAC,EAACPLUS
Bit-rate
48k,64k,96k,128k,160k,192k,256k
Sampling Accuracy
24Bit
Audio Data-rate
64kb/s to 384kb/s
Network
RJ45
1000M Ethernet
Protocols
HTTP/RTSP/RTMP/RTMPS/HLS/FLV/ONVIF/Multicast/SRT
Firmware
Enable by uploading files
General
Temperature
0-45℃for woking
-20~60℃for storing
Humidity
<90%, non-condensing
Voltage
EH404:DC 12V/2A
EH408: DC 220V
Power Consumption

Technical Support: support@orivision.cn
4/ 25
Go Back Contents
2. Initial installation connection
2.1 Connect power
Use the standard power adaptor (DC12V/2A) connected to the device(EH404). The power light will be always on
after the device is powered on.
EH408 using 220V Power.
Note
Please use the standard power adaptor provided. Using other unqualified power supplies may damage
the device.
2.2 Connect displayer
Connect the HDMI/VGA/CVBS or SDI cable to one end of the display device such as a monitor and an electronic
screen (DH931&DH921 doesn’t support simultaneous output of HDMI, VGA or CVBS, the user can choose one
of them to output).
▼Using HDMI cable to connect HDMI output interface with HDMI display.

Technical Support: support@orivision.cn
5/ 25
Go Back Contents
2.3 Connect the encoder to user’s computer
Connect the decoder and the computer directly through the network cable.
2.4 Log in the control web with 192.168.0.31
According to the above steps, after connecting the decoder to the computer with a network cable.
▼Setp1: find the "Network & Internet Settings"

Technical Support: support@orivision.cn
7/ 25
Go Back Contents
▼Step4: change the IP to 192.168.0.XXX—— “OK”
▼Step5: Open the WEB browser, and enter the IP address of the decoder directly (the default is 192.168.0.31)
to open the login interface of the decoder. The default username and password of the decoder is admin/admin
and then click "Login".

Technical Support: support@orivision.cn
10 / 25
Go Back Contents
3.2 Network
▼Network: Users can modify the network IP and DNS here
DHCP:When the DHCP function is enabled, you also need to access the switch that automatically assigns an IP address. While
the encoder IP address is dynamically assigned by the switch. You need to view the encoder IP from the switch. If you cannot view
it, you can contact the manufacturer to provide IP inquiry software.
DNS0,DNS1:Please set the DNS in the encoder network settings correctly, when using RTMP live streaming. You can find out
the DNS parameters of your network through the network connection details of your computer. Or log in to the router to check
the status of the WAN port.

Technical Support: support@orivision.cn
11 / 25
Go Back Contents
3.3 Media Setting
▼Channels Setting
Set 1~4 channels input signals by switching the Group 1~4;
Group 1 represent input interface 1;Group 2 represent input interface 2;
Group 3 represent input interface 3;Group 4 represent input interface 4;
Supports two output streams each group
Chanel 1 represent main-stream output; Chanel 2 represent Secondary- stream output
▼Video Setting
Encoder type: Only support H.264
Profile: baseline profile/main profile/ high profile Optional
Output Resolution:
3840*2160,1920*1080,1920*960,1680*1200,1600*900,1440*1050,1440*900,1360*768,1280*720,1280*800,1280*768,1024*768,
1024*576,960*540,850*480,800*600,720*576,720*540,720*480,720*404,704*576,640*480,640*360,480*270,Auto
When you choose auto, the input and output resolutions are the same.
RC Model: VBR/CBR Optional
Frame rate: 5-60fps (when the input resolution is 720i/50,1080i50, the frame rate will choose 25)
GOP: 1-200, it shows picture quality, default setting is advisable.
If your input a 30hz video, it recommend that the GOP should be smaller than 30;
If your input a 60hz video, it recommend that GOP should be smaller than 60
Bitrate: 16-1200K (Network bandwidth setting)

Technical Support: support@orivision.cn
12 / 25
Go Back Contents
The higher the bit rate, the larger the data transmitted
Fluctuate: recommend auto
Note: Modifying the above parameters does not need to reboot the encoder
▼Audio Setting
Audio input mode: Analog- External audio; Digital- HDMI built-in audio
Audio type: LCAAC/EAAC/EAACPLUS
Audio bitrate: 48k, 64k, 96k,128k, 160k, 192k, 256k
▼Server Setting
Enable the corresponding protocols according to the requirements.

Technical Support: support@orivision.cn
14 / 25
Go Back Contents
SRT Protocol
3.5 OSD
▼OSD: User can upload the station logo, picture, etc. through the OSD, and it supports the JPG format.
Note: Insert two groups of text and two pictures at the same time for each group
Tex1 X: 0-1920 is optional, display the left and right position of the text
Tex1 Y: 0-1080 is optional, display the up and down position of the text
Tex1 size: 8-72 is optional
Tex1 Alpha: 0-128 is optional,

Technical Support: support@orivision.cn
15 / 25
Go Back Contents
Tex1 Color: choose the color you want to display
Tex1 Bg Color: choose background color of the text on the video
Content1: input the content of the text you want
TEX2 is the same as TEX1
Pictures Setting
Picture1: disable/ enable ( disable: no images enable: display the images)
Picture1 X: 4-1920 is optional to set the left and right position of the picture
Picture1 Y: 4-1080 is optional to set the up and down position of the picture
Alphal: 0-128 is optional
Name: display the name of the picture1
Upload: choose to upload the image(support *.bmp format of the picture and the file size less than 1M
Picture 2 is the same as Picture 1
Explanation:
1、The set of the three pictures that can
be inserted are the same.
2、Transparent background of the picture
setting: R-177,G-204,B-233

Technical Support: support@orivision.cn
16 / 25
Go Back Contents
3.6 System Setting
▼Change password: It’s used for modifying the login password of WEB
▼System information: used to check the serial number of device, software version number, and hardware
version number;
▼Auto reboot: It can be set to restart after a few hours, if you don't need it, you can choose to disable it.

Technical Support: support@orivision.cn
17 / 25
Go Back Contents
▼NTP settings
If the user needs to enable the NTP function, The encoder must be linked to the WAN; or have an NTP server
on the LAN.
Enable- When this mode is enabled and if the encoder does not get NTP information, the encoder also works.
Must- It means must enable mode. When this mode is enabled, all protocols are unavailable when the encoder
does not get NTP information
Zone sle-Customers choose the correct time zone according to their own time zone, if the list does not have
what you want, please contact us
▼Parameter bakup
This function allows the user to save the setup parameters locally;Or restore the parameter settings by uploading
the parameter file.
▼Firmware upgrade
Contact us (support@orivision.com) to get the newest firmware. After getting the file, pls don’t decompress it,
upload it directly. Reboot the decoder after uploaded successfully.

Technical Support: support@orivision.cn
19 / 25
Go Back Contents
4. How to connect the Encoder to the internet
Step1: Check the IP of the signal source connected to the Network or router. For example: the router's network
IP is 192.168.10.128
Step2: Change the default IP of the decoder 192.168.0.31 to 192.168.10.XXX; The user needs to confirm that the
decoder and encoder or network signal source (Such as IP camera) are in the same network segment.
Step3: Connect the decoder with the user’s PC with cable directly. And log in to the control page through the
default IP 192.168.0.35. Please refer to 3.4 for operation steps
Step4: Find the Network set and change the IP to 192.168.10.XXX and the gatway to 192.168.10.1, then press
the “Setup” button and reboot the encoder.
Step5: wait for a minute, then you can refresh the web and login with the new IP.
Note:
If user can’t log in by new IP, Pls check the DNS of the router. Then reset the encoder and re-login to
the web according to the above steps, modify the IP, gateway, and DNS.
This manual suits for next models
1
Table of contents
Other Orivision Media Converter manuals