Rotaid SOLID PLUS User manual

INSTALLATIEHANDLEIDING • GUIDE D’INSTALLATION • MONTAGEANLEITUNG
INSTALLATION MANUAL • MANUALE DI INSTALAZIONE
MANUAL DE INSTRUCCIONES • INSTRUKCJA MONTAŻU
SOLID PLUS
Rotaid AED Cabinets

pag. 2 Rotaid - Plus
• Installation manual
• Polycarbonate backplate
• Polycarbonate cover
• Alarm (if ordered)
• Fastening materials
Parts-list
This Rotaid package contains: *Screw Set:
4x Tapping screw
4x Plug
1x Nut1x Bolt
2x AA Battery
*Only for alarmed version
2x DIN screw

Rotaid - Plus pag. 3
Rotaid contact information
English instructions
Nederlandse instructies
Instructions en Français
Deutsche Anleitung
Instrucciones en Español
Istruzioni Italiano
Polskie instrukcje
User manual
Keizersveld 52D
5803 AN
Venray
The Netherlands
www.rotaid.com
+31 (0)478 769 052
Index
pag. 4
pag. 5
pag. 6
pag. 7
pag. 8
pag. 9
pag. 10
pag. 11
pag. 4 Rotaid - Plus
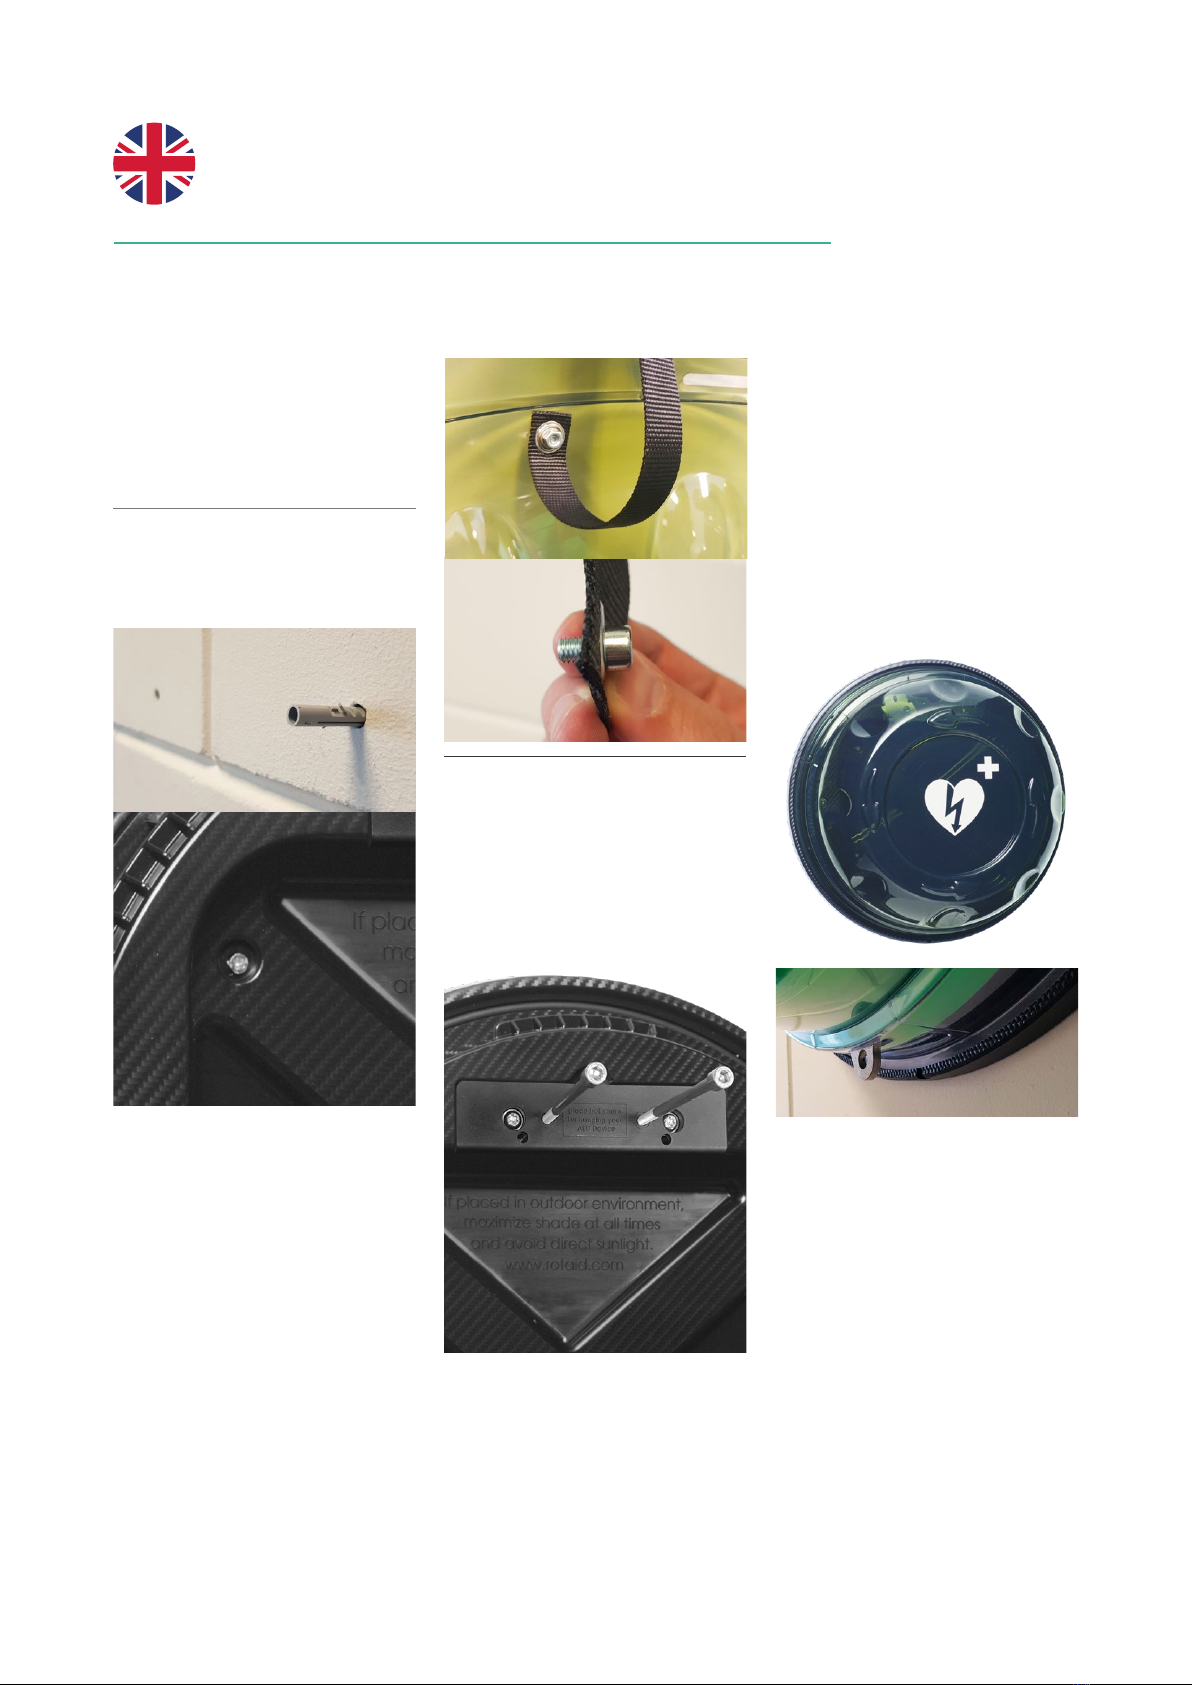
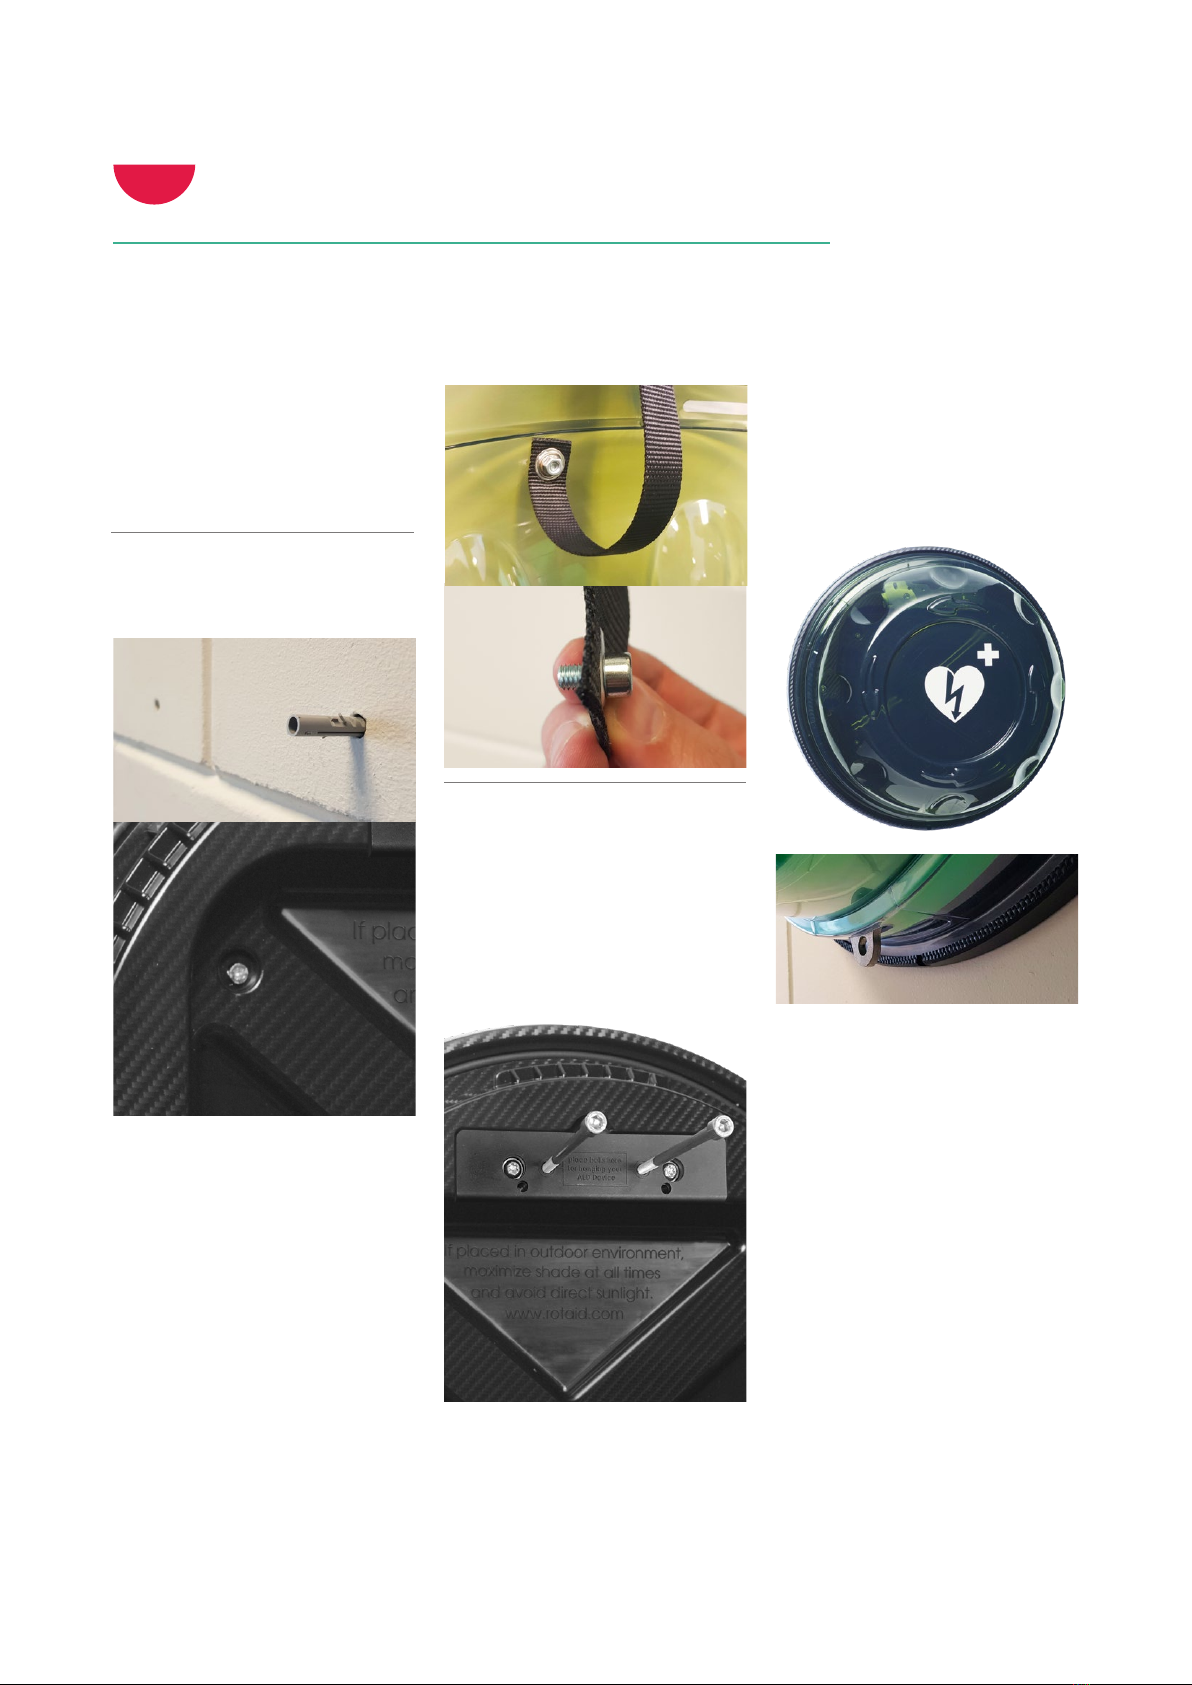
1. Determine the location
where you wish to mount the
Rotaid. Make sure there are no
irregularities present at the desired
location. Please take the re safety
and evacuation regulations into
account. If mounted on a stone or
concrete wall, please use the wall
anchors prior to xation.
2. Mark the 4 holes for drilling
and use the screws and rings for
xation.
3. Use an Allen key (5mm) to
rmly attach the nylon belt to the
back plate.
4. After attaching the belt and
cover, now please mount both
long bolts in the indicated
holes. Mount these by hand
via a screwdriver and do not
overtighten. You can now hang the
AED via its handle on the bolts.
5. You can now place the AED into
the cabinet by using its handle or
carrying case handle.
Please rotate the cover on the
back plate by starting slightly
counterwise and rotate to the right
until the cover reaches the stop.
When correctly placed, the hook
on the bottom of the cabinet falls
through the cover.
Your Rotaid Plus is now ready
for use!
Installation manual
ROTAID SOLID PLUS

Rotaid - Plus pag. 5
1. Bepaal de locatie waar u de
Rotaid wenst te plaatsen. Kies een
plek op de muur of wand die vlak
is en geen onregelmatigheden
heeft. Houd tevens rekening met
brandveiligheidsvoorschriften
en minimale doorgangruimte.
2. Nadat u de locatie heeft
bepaald kunt u middels
de achterwand de vier
bevestigingsgaten markeren.
3. Bevestig nu de kap aan de
achterwand via de nylon band
met behulp van een inbussleutel
(5mm).
4. Na het bevestigen van de
riem en de kap kunt u beide
lange bouten vastdraaien in
de aangegeven gaten van
het ophangblok. Draai de
bouten handmatig met een
schroevendraaier vast totdat u niet
meer verder kunt (gebruik geen
accuboormachine).
U kunt de AED nu via de
handgreep aan de bouten
ophangen.
5. U kunt nu de kap op de
achterwand draaien door deze
enigzins schuin te plaatsen en
tegen de klok in te draaien.
U draait vervolgens met de klok
mee, totdat u niet meer verder
kunt draaien.
indien correct geplaatst zal de
ijzeren haak aan de onderzijde
door de kap vallen.
Uw Rotaid Plus is klaar voor
gebruik!
Installatiehandleiding
EN/NL
ROTAID SOLID PLUS

pag. 6 Rotaid - Plus
1. Commencez par dénir
l’emplacement du Rotaid. L’endroit
sur le mur doit être plane,
exempt d’irrégularités. Tenez
compte également des éventuelles
règles de sécurité incendie et
prévoyez un espace minimum de
passage.
2. Marquez ensuite l’emplacement
des quatre trous de montage en
vous servant de la paroi arrière
comme gabarit.
3. Fixez le couvercle à la paroi
arrière par la bande de nylon à
l’aide d’une clé Allen (5 mm).
4. Après avoir attaché la ceinture
et le couvercle, veuillez maintenant
monter les deux longs boulons
dans les trous indiqués. Montez-
les à la main à l’aide d’un tournevis
et ne serrez pas trop fort. Vous
pouvez maintenant accrocher
le DAE via sa poignée sur les
boulons.
5. Vous pouvez maintenant poser
le couvercle sur la paroi arrière
en le tenent légèrement incliné
et en le tournant dans le sens
inverse des aiguilles d’une montre.
Tournez-le ensuite à fond dans le
sens des aiguilles d’une montre.
Si le couvercle est correctement
positionné, le crochet en fer sortira
par le bas.
Votre Rotaid Plus est maintenant
prêt à l’emploi!
Manuel d’installation
ROTAID SOLID PLUS

Rotaid - Plus pag. 7
1. Legen Sie zuerst fest, wo der
Rotaid positioniert werden soll.
Bitte beachten Sie, dass die
Montagestelle an der Wand eben
ist und keine Unregelmäßigkeiten
aufweist. Bitte sorgen Sie für
eine optimale Zugänglichkeit
zum AED und beachten Sie die
Feuerschutzvorschriften.
2. Nachdem die Montagestelle
festgelegt worden ist, können Sie
dur ch die Grundplatte die vier
Befestigungslöcher markieren.
3. Sie können jetzt die Haube
durch den Nylonriemen mit Hilfe
eines 5 mm Inbusschlüssels
an der Grundplatte befestigen.
4. Nach dem Anbringen des
Gürtels und die Haube, können
Sie die beiden langen Schrauben
montieren in die angegebenen
Löcher. Diese von Hand mit einem
Schraubendreher montieren und
nicht zu fest anziehen. Sie können
den AED nun an seinem Gri an
den Schrauben aufhängen.
5. Sie können nun den AED im
Schrank aufhängen. Benutzen Sie
den Gri am Gerät oder an der
Tasche zum Aufhängen. Die Haube
kann nun auf die Grundplatte
gedreht werden, indem Sie die
Haube ein wenig gegen den
Uhrzeigersinn gedreht aufsetzen
und dann im Uhrzeigersinn bis
zum Anschlag festdrehen. Die
Haube ist korrekt platziert, wenn
die Edelstahl öse an der Unterseite
durch die Önung derHaube fällt.
Ihr Rotaid Plus ist jetzt
einsatzbereit!
Installationsanleitung
FR/DE
ROTAID SOLID PLUS

pag. 8 Rotaid - Plus
1. Determine la localización donde
desea instalar la vitrina. Asegrese
de que no hay irregularidades
en el punto deseado de la pared.
Por favor tome las precauciones
necesarias del centro en cuanto
a extención de incendios. Si el
muro es de cemento opiedra, por
favor utilice los anclajes de pared.
2. Sujete el plafón posterior a la
pared mediante los 4 tornillos
largos y sus arandelas.
3. Con el plafón posterior
asegurado a la pared, utilice una
llave Allen (5 mm) para sujetar
la cinta al plafón posterior.
Asegúrese de que la cinta de nilón
está rmemente sujetada.
4. Después de colocar el cinturón
y la cubierta, ahora monte ambos
pernos largos en los oricios
indicados. Móntelos a mano con
un destornillador y no los apriete
demasiado. Ahora puede colgar
el DEA a través de su asa en los
pernos.
5. Ahora ya puede girar la cubierta
sobre el plafón posterior. Coloque
la cubierta ligeramente girada
hacia la izquierda sobre los
enganches del plafón posterior,
y gire en el sentido de las agujas
del reloj tanto como pueda.
Cuando queda correctamente
cerrada, el enganche en la parte
inferior de la vitrina puede salir
a través del agujero de la cubierta
realizado con este n.
¡Su vitrina Rotaid Plus ya está
preparada para ser usada!
Manual de instalación
ROTAID SOLID PLUS

Rotaid - Plus pag. 9
1. Scegliete il luogo più idoneo
all’installazione delle teca Rotaid.
Assicuratevi che non ci siano
irregolarità murali nella parete
selezionata. Montatela anche
considerando i requisiti vigenti
in materia di prevenzione degli
incendi. In caso di installazione su
pareti di pietra o cemento, usate
un sistema di tasselli a muro.
2. Fissate la piastra posteriore
alla parete tramite le quattro
viti lunghe ed i relativi anelli in
dotazione.
3. Una volta ssata la piastra
posteriore alla parete, usate una
brugola di 5mm per connettere
la cinghia alla piastra posteriore.
Assicuratevi che la cinghia di nylon
sia saldamente collegata.
4. Dopo aver ssato la cintura
e il coperchio, montare ora
entrambi i bulloni lunghi nei
fori indicati. Montarli a mano
tramite un cacciavite e non
serrare eccessivamente. Ora puoi
appendere il DAE tramite la sua
maniglia sui bulloni.
5. Potete adesso ruotare
il coperchio sulla piastra
posteriore. Posizionatelo in senso
leggermente antiorario sulla
piastra posteriore e poi ruotatelo
in senso orario per quanto
possible. Una volta raggiunto il
posizionamento corretto, il gancio
presente sul fondo della teca cade
attraverso l’apposita fessura del
coperchio.
La vostra teca Rotaid Plus è ora
pronta all’uso!
Manuale di installazione
ES/IT
ROTAID SOLID PLUS
pag. 10 Rotaid - Plus
1. Zdecyduj w jakim miejscu
chcesz umieścić Rotaid. Następnie
wybierz punkt ścianie lub na
murze, wktórym powierzchnia
jest gładka i wyrównana.
Przy montażu koni eczne jest
przestganie przepisówrze bezpie
czeństwa przeciwpożaro wego
oraz zachowanie wymaganych w
ymiarów przejść.
2. Po określeniu miejsca
zamocowania oznacz przez ściankę
tylną cztery otwory montażowe.
3. Przymocuj okap do ścianki
tylnej przez taśmę nylonową
używając klucza imbusowego
(5mm).
4. Po przymocowaniu pasa
i pokrowca proszę teraz
zamontować obie długie śruby we
wskazanych otworach. Zamontuj
je ręcznie za pomocą śrubokręta
i nie dokręcaj zbyt mocno. Teraz
możesz zawiesić debrylator za
uchwyt na śrubach.
5. Teraz przykręć okap do ścianki
tylnej, umieszczając go w pozycji
skośnej ora z obracając w lewo.
Następnie kręć w prawo, aż do
oporu. Jeśli okap został prawidło
wo umieszczony, żelazny hak
opadnie na dół (przez okap).
Twój Rotaid Plus jest gotowy do
użycia!
ROTAID SOLID PLUS
Instrukcja instalacji
Other manuals for SOLID PLUS
4
Table of contents
Other Rotaid Medical Equipment manuals


