manuals.online logo
Brands
  1. Home
  2. •
  3. Brands
  4. •
  5. Oru Kayak
  6. •
  7. Boat
  8. •
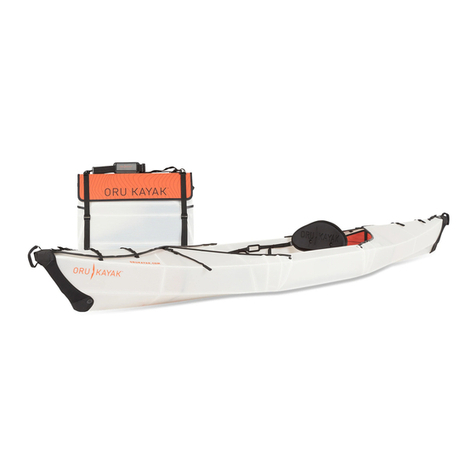
  9. Oru Kayak Beach LT Sport Installation instructions

Oru Kayak Beach LT Sport Installation instructions

IMPORTANT
Read this entire Assembly
Guide before assembling
your Oru Kayak.
Watch the instruction video:
www.orukayak.com/assembly/beachltsport
SERVICE@ORUKAYAK.COM
BEACH LT
SCAN AND
WATCH ON
YOUR PHONE
Assembly Guide (Pages 1-12)
Disassembly Guide (Pages 13-17)
SPORT
WWW.ORUKAYAK.COM 1
10
A
Loosen and slide off the two loops
that go around box. Set shoulder
strap aside (you won’t need it while
kayaking).
Lift the lid off. This will become
the kayak’s floorboard.
Unclip the buckles on the sides.
Remove the loose kayak components
packed into the box. [See page 2 for a
list of loose components.] Additional
components are permanently
attached to the hull/deck.
A
B
C
Step 1: Open the Oru Kayak box
The box contains all the components needed for assembly and
includes space to store gear—such as our 4-piece paddle.
C
C
13 4 5 6 7 8 92
2 ORU KAYAK | BEACH LT SPORT KAYAK ASSEMBLY GUIDE
Shoulder strap: Used to carry
the kayak when in box form.
Stow out of the way while
kayaking.
Floorboard: Reinforces kayak
bottom and holds the seat.
Bow (front) bulkhead/Footrest:
Attached to the front half of
the kayak. Provides structural
rigidity and comfort.
1
2
3
TOP
TOP
TOP
Seat column plate
Seat pad bungee
Getting Familiar components
Backrest: Includes the seat column
and adjustable backrest.
Gel seat pad: Our comfort
ugraded seat. Tucks under the
bungee in the floorboard.
Stern (back) bulkhead:
Provides structural rigidity.
5
TOP
TOP
Seat column
Backrest
Spare parts kit: Extra hardware for
repairs and upkeep.
Zipper channels: Hold the hull
together.
6
Bulkhead channels: Attach to
the inner hull. Hold the two
bulkheads in securely.
7
10
4
Footrest 8
Cockpit tracks: Attached to the skin.
Connect the floorboards to the skin
and provide a track for mounting
accessories an the crossbar.
9
WWW.ORUKAYAK.COM 3
NOTE
The double-walled corrugated poly-
propylene that Oru Kayaks are made
from will naturally show marks and
scratches from use over time. As long
as the hull is not punctured, there is
nothing to worry about. Think of them
like marks and scratches on thick
leather boots.
Hold the two folds at the orange
stickers. Pull as
indicated in the illustration to
open. The skin will be stiff.
Push the ends apart to extend
the box into a long sheet.
Pop the hull flat with your
hands as you extend it,
pushing down the inverted
folds, creating a bowl shape.
A
B
C
A
A
Step 2: Unfold the box
C
PUSH DOWN
SIDES POP UP TO
CREATE BOWL SHAPE
PROFILE VIEW
B
Pull
Pull
1 3 4 5 6 7 8 92
4 ORU KAYAK | BEACH LT SPORT KAYAK ASSEMBLY GUIDE
1
6
2
BOW
(front)
STERN
(back)
Footrest: For stability and to keep
your legs comfortable.
End straps: Help keep the
bow and stern tightly closed.
Fairings: Close the boat at the
bow and stern and include
handles for carrying
the kayak.
1
5
6
2
3
Parts: Hull/deck The box becomes the hull and deck of the kayak. Several key parts are permanently
attached to the hull/deck. The bow (front) and stern (back) of the Oru Kayak are
different, so pay attention to orientation throughout the assembly process.
3
5
Adjustable footrest straps: Clip
to the footrest to keep it in place.
Use the strap keeper slides to
clean up your strap tails.
In box form, these serve as box
closure straps.
Adjustable seatback straps: Clip
to the seatback to keep it in place.
Use the strap keeper slides to
clean up your strap tails.
In box form, these serve as box
closure straps.
4
4Rails: Universal slotted rails,
support all kinds of accesories.
WWW.ORUKAYAK.COM 5
Fold in flaps on sides
of cockpit.
Pull footrest and bulkhead
into hull.
Clip footrest to adjustable
footrest straps as shown.
A
B
C
C
STERN
BOW
A
A
B
C
Footrest
C
Step 3: Attach the footrest
134 5 6 7 8 92
B
bulkhead channels
1Make sure the ends
are inverted.
2Fully tighten the end
strap at bow (front).
Place attached bow
bulkhead in the bulkhead
channels on the cockpit
side of screw. You may
have to hold it there while
starting the next step.
A
B
A2
Step 4: Close the front of the kayak
6 ORU KAYAK | BEACH LT SPORT KAYAK ASSEMBLY GUIDE
A2
A1
1 3 45 6 7 8 92
C
velcro
<
B
o
w
C
o
c
k
p
i
t
>
Step 5: Slide on front zipper channels
The zipper channels seal the deck of the kayak.
Holding the bow of the
kayak, begin to guide the
zipper channel onto the
deck trim (see tip). Do not
force the zipper on as it may
cause damage to the kayak.
Make sure that the
bulkhead stays inside of the
bulkhead channels.
ATIP
Apply downward
pressure and push
forward with your
hands while sliding
the zippers.
incorrect
correct
A
B
and clip the small buckle onto the
buckle on the deck line.
Stretch front fairing over the bow,
B
Tighten by pulling the strap.
Attach velcro to top of
bulkhead, as shown in close-up.
C
screw (behind)
C
velcro
<
B
o
w
C
o
c
k
p
i
t
>
WWW.ORUKAYAK.COM 7
1 3 4 56 7 8 92
A
B
bulkhead channels
Fully tighten the stern (back) end
loop strap.
Place loose stern bulkhead in
bulkhead channels as shown
(make sure the side with velcro
is on top). You may have to hold
it there while starting the next
step.
A
B
stern >
< cockpit
Step 6: Close the back of the kayak
Closing the back of the kayak is similiar to closing the front (Step 4).
8 ORU KAYAK | BEACH LT SPORT KAYAK ASSEMBLY GUIDE
1 3 4 5 67 8 92
Step 7: Slide on rear zipper channels
Holding the stern of the
kayak, begin to guide the
zipper channel onto the deck
trim (see tip). Do not force
the zipper on as it may cause
damage to the kayak.
Continue until both zippers
are on the stern of the kayak.
Check to make sure each
zipper channel is
on correctly.
A
B
C
TIP
Apply downward
pressure and push
forward with your
hands while sliding
the zippers.
WWW.ORUKAYAK.COM 9
Attach velcro to top of bulkhead
as shown, like in Step 4.
Stretch rear fairing over the
stern, and clip the small buckle
onto the buckle on the deckline
and tighten.
D
C
B
bulkhead channels
velcro
(front)
stern >
< cockpit
screw (behind)
1 3 4 5 6 78 92
incorrect
correct
A
A
STERN
BOW
Orient floorboard relative to
hull as shown (seat back plate
towards stern).
Bend floorboard upward as
shown below. Place edges of
the floorboard into channels.
Press center of floorboard
down and push floorboard into
channels (floorboard may not
sit flat until the
next step).
A
B
C
C
B
STERN
BOW
FLOORBOARD CHANNELS
Step 8: Insert the f
FLOORBOARDFLOORBOARD
CHANNELS
CROSSSECTION VIEW
PUSH DOWN
10 ORU KAYAK | BEACH LT SPORT KAYAK ASSEMBLY GUIDE
loorboard
1 3 4 5 6 7 892
Insert the bottom of seat
column into slot of seat
column plate on floorboard.
Clip seat back straps into
buckles on carrying handles.
Connect the two clips to the
cord loops on the back end of
the floorboard channel.
Place seat pad under bungee
on floorboard.
A
B
C
D
A
D
C
CLOSEUP
Pull plate in the direction of
the arrow to insert column.
Step 9: Install the seat
A
B
E
WWW.ORUKAYAK.COM 11
EConnect the tension strap
together and tighten until the
buckle reaches the stop in the
strap.
E E
1 3 4 5 6 7 8 92
WWW.ORUKAYAK.COM 13
ASSEMBLY
CHECKLIST
Loosen the knob on the rear
of the seat one full turn.(over-
turning may cause the knob to
fall off.)
Slide the seat oval to the
desired height.
Re-tighten the knob until the
seatback is secure.
A
D
E
ADJUST FOR COMFORT
Final adjustments ASSEMBLY
CHECKLIST
BEFORE YOU GET IN: A C
ONCE YOU’RE IN:
B
C
D
E
ADJUST THE BACKREST B
Tighten, or loosen the seatback straps,
while leaning against the backrest.
The footrest should keep your legs
comfortably bent, with your knees
splayed outward. To adjust its distance
from you, tighten or loosen adjustable
straps.
12 ORU KAYAK | BEACH LT SPORT
Bow and stern
bulkheads are in
place.
Tension strap is
buckled and tightened.
All footrest seat
buckles are clipped
and tightened.
Bow and stern straps
are tight and the
fairings cover both
ends.
Zipper channels are
tight and no deck trim
is visible underneath.
Decklines are buckled
to the fairings and
tightened.
Congratulations! Your
Oru Kayak is ready for
the water.
IMPORTANT
Read this entire Assembly
Guide before assembling
your Oru Kayak.
Watch the instruction video:
www.orukayak.com/assembly/beachltsport
SERVICE@ORUKAYAK.COM
SCAN AND
WATCH ON
YOUR PHONE
Disassembly
Guide
TIP:
Some water may collect
inside the plastic
corrugated flutes.
To let it drain, stand
the assembled kayak
vertically for about 10
minutes.
10
BEACH LT
SPORT
WWW.ORUKAYAK.COM 13
Disassembling the Oru Kayak is basically a reversal of the assembly, however there are a few tricks.
Follow these simple directions to learn how to pack your Oru Kayak back into its box quickly and easily.
Back on land: Folding your Oru Kayak into its box
14Remove seatback, seat pad, footrest
and both bulkheads.
1
Fully loosen the end straps after
removing the zippers.
2
2
4
1
3
14 ORU KAYAK | BEACH LT SPORT KAYAK ASSEMBLY GUIDE
Moving from bow to stern, unclip the
fairings and remove them from both
ends. Unbuckle the footrest and
seatback unloose the seatback clips.
Unbuckle the thension strap. Do not
loosen the end straps yet.
Remove all three zippers from the
deck of the kayak.
1
Back on land: Folding your Oru Kayak into its box
WWW.ORUKAYAK.COM 15
5
6
TIP: Some water may collect inside the plastic
corrugated flutes. To let it drain, stand the assembled
kayak vertically for about 10 minutes.
DO NOT HOLD
BUNGEE TO
REMOVE FLORBOARD
Lift up on floorboard to remove. If
rubber trim sticks in channels, try
wiggling it.
5Fold either bow or stern inward like an
accordion. Using your knee helps!
Repeat with other end.
PROFILE VIEW
6 6
7Pull footrest and bow bulkhead out of hull.
You will store these parts after the next step.
Back on land: Folding your Oru Kayak into its box
8
8
8
Push the black arrow towards the black
target, and the orange arrow towards
the orange target until box is formed.
The two folded sides will slide past
each other.
16 ORU KAYAK | BEACH LT SPORT KAYAK ASSEMBLY GUIDE
Place footrest, bulkheads and zippers into folded boat,
followed by other loose components, such as the
seat back.
Bring middle female strap to the side of
the box, and clip into the male buckle. Repeat on
the other side.
9
10
9
10
10
WWW.ORUKAYAK.COM 17
Back on land: Folding your Oru Kayak into its box
11
MAKE SURE THE PLATE
IS IN THE CORRECT
ORIENTATION BEFORE
TIGHTENING THE
STRAPS
11
Place the floorboard over the top of the box, inserting
the long sides into the rails. Place and tighten the
shoulder strap loops over the box. Make sure the
protector is centered on the kayak and fully ightened.
© 2023 ORU KAYAK, INC. ALL RIGHTS RESERVED 0116
WE ARE
HERE TO
HELP
For product or assembly
questions contact us:
service@orukayak.com
(415) 630-3717

Other Oru Kayak Boat manuals

Oru Kayak COAST XT User manual

Oru Kayak

Oru Kayak COAST XT User manual

Oru Kayak BAY ST Installation instructions

Oru Kayak

Oru Kayak BAY ST Installation instructions

Oru Kayak INLET User manual

Oru Kayak

Oru Kayak INLET User manual

Oru Kayak Oru Beach User manual

Oru Kayak

Oru Kayak Oru Beach User manual

Oru Kayak Beach LT User manual

Oru Kayak

Oru Kayak Beach LT User manual

Oru Kayak BAY+ User manual

Oru Kayak

Oru Kayak BAY+ User manual

Oru Kayak BAY ST User manual

Oru Kayak

Oru Kayak BAY ST User manual

Oru Kayak LAKE User manual

Oru Kayak

Oru Kayak LAKE User manual

Oru Kayak BAY ST User manual

Oru Kayak

Oru Kayak BAY ST User manual

Oru Kayak HAVEN User manual

Oru Kayak

Oru Kayak HAVEN User manual

Oru Kayak HAVEN TT User manual

Oru Kayak

Oru Kayak HAVEN TT User manual

Oru Kayak The Coast User manual

Oru Kayak

Oru Kayak The Coast User manual

Oru Kayak Beach LT User manual

Oru Kayak

Oru Kayak Beach LT User manual

Oru Kayak BAY User manual

Oru Kayak

Oru Kayak BAY User manual

Oru Kayak COAST XT Installation instructions

Oru Kayak

Oru Kayak COAST XT Installation instructions

Oru Kayak BAY ST User manual

Oru Kayak

Oru Kayak BAY ST User manual

Oru Kayak INLET User manual

Oru Kayak

Oru Kayak INLET User manual

Oru Kayak Beach LT User manual

Oru Kayak

Oru Kayak Beach LT User manual

Oru Kayak Beach LT Installation instructions

Oru Kayak

Oru Kayak Beach LT Installation instructions

Oru Kayak HAVEN TT User manual

Oru Kayak

Oru Kayak HAVEN TT User manual

Oru Kayak COAST XT User manual

Oru Kayak

Oru Kayak COAST XT User manual
Popular Boat manuals by other brands

Everglades 230 DC 2012 owner's manual

Everglades

Everglades 230 DC 2012 owner's manual

Bertram 36' MOPPIE Operator's manual

Bertram

Bertram 36' MOPPIE Operator's manual

Hewescraft Blue Medicine Operation manual and boater's handbook

Hewescraft

Hewescraft Blue Medicine Operation manual and boater's handbook

Grady-White Boats Freedom 325 owner's manual

Grady-White Boats

Grady-White Boats Freedom 325 owner's manual

RS SAILING RS300 owner's manual

RS SAILING

RS SAILING RS300 owner's manual

Supra COMP ts6m manual

Supra

Supra COMP ts6m manual

Axopar 28 OPEN user manual

Axopar

Axopar 28 OPEN user manual

Boston Whaler 180 Dauntless owner's manual

Boston Whaler

Boston Whaler 180 Dauntless owner's manual

Cobalt Digital Inc 210 owner's manual

Cobalt Digital Inc

Cobalt Digital Inc 210 owner's manual

Sea Eagle FoldCat 325FC Instructions and owner's manual

Sea Eagle

Sea Eagle FoldCat 325FC Instructions and owner's manual

Yamaha AR195 2019 Owner's/operator's manual

Yamaha

Yamaha AR195 2019 Owner's/operator's manual

Grady-White Boats Gulfstream 232 owner's manual

Grady-White Boats

Grady-White Boats Gulfstream 232 owner's manual

Bestway 65118E manual

Bestway

Bestway 65118E manual

Hobie Island instructions

Hobie

Hobie Island instructions

Boston Whaler 280 Outrage owner's manual

Boston Whaler

Boston Whaler 280 Outrage owner's manual

Sea Ray 260 Sundancer owner's manual

Sea Ray

Sea Ray 260 Sundancer owner's manual

GEKKO GTS 20 2015 owner's manual

GEKKO

GEKKO GTS 20 2015 owner's manual

Bestway Hydro-Force Caspian owner's manual

Bestway

Bestway Hydro-Force Caspian owner's manual

manuals.online logo
manuals.online logoBrands
  • About & Mission
  • Contact us
  • Privacy Policy
  • Terms and Conditions

Copyright 2025 Manuals.Online. All Rights Reserved.