oset 20.0 Eco User manual
OWNERS MANUAL 2015
OSET 20.0 Eco & 20.0 Racing
OSET Corp
425 Kristen Ct, Unit 6
Montrose, CO 81401, USA
303 990-2390.
http://www.OSETBIKES.com
info@OSETBIKES.com
INS011416 - v1.0

1
INTRODUCTION:
A WORD ABOUT THIS OWNER’S MANUAL AND SAFETY:
Firstly, thank you for purchasing an OSET Electric Mini Trials Bike. This is a
serious piece of machinery designed for use by children in fully controlled and
safe environments. As the purchaser/owner of the machine, YOU are the
responsible adult with the task of keeping the rider(s) safe at all times. If you
defer this task to another adult, it is YOUR RESPONSIBILITY to pass this
owners manual and all relevant information to whoever will take on this role, and
ensure without question that the rider is controlled and taught in a safe manner.
Your OSET is very adjustable and can be specifically set up for the rider. Please
do not allow the machine to be used or adjusted by other children or adults.
There are likely to be many children asking for a ride. DO NOT ALLOW THIS TO
HAPPEN. It is likely you know the abilities, levels of concentration and attention
span of the child you purchased the machine for. EVERY CHILD IS DIFFERENT
and it is impossible for you to properly supervise other children.
Your OSET is driven by a powerful electric motor. The control dials MUST be
adjusted to suit the abilities of the rider. Please remember that even when the
speed is set to a slow setting, if the power and response are at high setting, the
full torque of the bike will still be available. This means that opening the throttle
will propel the machine to the set speed very quickly. Your OSET has great
capabilities, and can grow with the skills of the rider to very high levels, but it is
IMPERITIVE that the responsible adult controls the entire learning process and
gives full attention at all times. IT IS YOUR RESPONSIBILITY TO FORESEE
ALL POTENTIAL SITUATIONS AND CONTROL THE RIDING ENVIRONMENT
ACCORDINGLY. This means not just the machine and the rider, but also the
riding terrain and environment.
Our machines are virtually silent, and can be used in many places that gasoline
bikes can not. They are brilliant for practicing in back yards; front yards, garages,
and even indoors!
OSET Mini Bikes are designed for off road use only and must not be used on
public roads or sidewalks. Please check and obey all local laws. OSET’s may
only be ridden in safe areas where all laws are being followed and all required
permissions are given.
OSET’s are amazingly capable, and can be used from the earliest stages of
learning to ride all the way through to National Children’s Motorcycle Trials
Competitions. The secret of learning to ride well is being able to ride a lot.
OSET’s enable this to happen, and can make the learning process very gratifying
for both the children and the adults. Thanks again for purchasing an OSET, and
we hope you, and your child, will enjoy the ride!
Ian Smith. President, OSET CORP.

2
PLEASE READ THIS OWNER’S MANUAL
PRIOR TO OPERATION!
To ensure optimum performance from your new OSET, and to ensure
safe operation, it is important to fully understand the features of the
machine. This manual contains IMPORTANT INFORMATION that every
owner must fully understand.
PARENTS/GUARDIANS
If a child will operate your OSET, it is YOUR
RESPONSIBILITY to set up the machine, and make sure it is operated
correctly and safely. Your OSET features a speed dial that sets the
speed from a walking pace to top speed. It also has a throttle response
‘map’ dial. This will set the throttle response from very slow, up to very
fast. The most important dial is the power dial; the OSET controller is
capable of outputting a lot of power. This power should be treated with
respect and must be learned. ALWAYS start the rider at the slowest
speed, response and power settings. Even with a slow response, a lot of
power is available, and the rider must learn how to control it. These
controls must be set by the responsible supervising adult. Never allow
the child to alter the setting, or to ride without suitable supervision.
Instructing and practicing in a controlled situation will allow the child to
learn how to operate the machine safely, and under control. The child’s
enjoyment will be greatly enhanced if they feel safe during the initial
learning process. Please follow the instructions contained in this manual
before operating the machine.
SERVICE/WARRANTY
For all questions regarding your OSET Mini Bike, please contact your
local retailer/distributor.
See distributor contact information on the osetbikes.com web site.
OFF ROAD USE ONLY!
OSET Mini Bikes are designed for off road use only and must not be
used on public roads or sidewalks. Please check and obey all local laws.

3
Important Symbols and Terms
This Owner’s Manual uses the following
symbols and terms to call your attention to
Warnings, Cautions and Notes:
Term: WARNING
Meaning: This term calls attention to a Warning. A Warning indicates a
potentially hazardous situation which, if not avoided, could result in bodily injury
or death, in addition to property damage. Read the text accompanying the
warning to be aware of the specific hazard.
Term: CAUTION
Meaning: This term calls attention to a Caution. A Caution indicates a potentially
hazardous situation which, if not avoided, may result in damage to equipment or
inadvertent system failure. Read the text accompanying the Caution to be aware
of the specific hazard and avoid damage or system failure.
Term: NOTE:
Meaning: This term calls attention to a Note. The text accompanying a Note
provides helpful or other important related information.
Please read, understand and follow all Warning, Caution and Note
notices on your OSET electric bike and those included in this
Manual. If you do not understand any of this important information,
please contact your selling dealer/distributor or the OSET Customer
Service Department.

4
WARNING: OFFROAD USE ONLY.
It is illegal and hazardous to use this vehicle on streets and thoroughfares. Use
on streets exposes the rider to hazards from motorists and other vehicles. Use
on streets can lead to accidents resulting in death or serious injury, and property
damage. Check local laws and regulations to find out where and how you may
use this product legally.
WARNING: ADULT SUPERVISION REQUIRED.
This vehicle must be used in the presence of adult supervision to ensure that
safe riding practices are established and followed. Even though a child is of the
recommended age to use this vehicle, not all children have the strength, skills or
judgment needed to operate this vehicle safely. A parent should supervise their
child’s operation of this vehicle at all times. Parents should permit continued use
of this vehicle only if they determine that their child has the ability and judgment
to operate the vehicle safely.
WARNING: FOLLOW SAFE RIDING PRACTICES.
• OPERATOR ONLY! NO PASSENGERS!
• Long hair, loose clothing or items worn by the rider must be covered to prevent
entanglement in moving parts of the vehicle or surroundings while riding.
• Do not exceed the weight limit. Heavier riders may significantly reduce
performance and/or render the vehicle unstable and/or over-tax the brakes and
other control devices. Heavier riders may cause structural damage not covered
by the warranty.
• Do not touch any moving or hot parts.
• Do not ride at night or under other low visibility conditions.
• Do not immerse this vehicle in water.
• Do not ride on steep or uneven surfaces. Steep or uneven surfaces greatly
increase the likelihood of loss-of-control and a fall.
• Do not ride faster than conditions permit for safe operation. Excess speed
greatly increases the likelihood of loss-of-control and a fall.
• The rider should be securely seated on the vehicle ready to ride with the
kickstand up before turning on the vehicle.
WARNING: WEAR PROTECTIVE EQUIPMENT,
ESPECIALLY A HELMET AND EYE PROTECTION.
A high quality helmet approved by your country’s governing body is the single
most effective way to reduce the severity of an injury in the event of an accident.
ALWAYS use an approved helmet when riding this vehicle. As this vehicle is
intended for OFF-ROAD use, there is a very high likelihood that dirt and other
debris will be thrown into the air, presenting the risk of eye injury if protective
eyewear is not used.
OFF-ROAD riding presents many hazards such as loose dirt and gravel,
obstacles and other difficult-to-see-and-avoid conditions. The possibility of a fall
is high. Wear gloves, wrist, knee and elbow protection. Motorcycle leathers can
prevent abrasion injuries in the event of a fall. Failure to use appropriate safety
equipment greatly increases the likelihood of death or serious injury in the event
of an accident.

5
WARNING: PROPER MAINTENANCE OF THIS VEHICLE
IS REQUIRED.
Failure to maintain this vehicle in proper operating condition can lead to an
accident resulting in death or serious injury, and property damage. If you have
any questions about the proper care and maintenance of this vehicle, consult
your selling dealer/distributor or contact OSET Customer Service at
fastened securely and that the tires are properly inflated. Before each ride, check
that the throttle and brake controls are operating freely. Adjust and lubricate the
drive chain as necessary. See pages 18-30 of this manual for additional details
regarding service, repair and maintenance. Check the OSET web site for
maintenance guides. This vehicle should be returned for periodic maintenance to
your selling dealer AT LEAST once per year, but more frequently if used under
severe conditions.
WARNINGS!
Failure to obey all of the warnings & instructions contained in this
manual may result in serious injury or death and permanent
damage to your OSET.
Safety Responsibilities
It’s up to you. We’ve done everything we can to supply you with a safe and
reliable product. Please read, understand and practice the following guidelines
for safe operation of your OSET electric Trials Bike:
• Always follow the Pre-Ride Checklist before every ride.
• Do not operate your OSET if any damage is apparent. Immediately contact
your local retailer/distributor or OSET Customer Service.
•Supervision: Riders must be supervised by responsible adults at all times.
The rider should never be beyond eye and voice range. An adult must ALWAYS
assess and approve the riding conditions and the bike preparedness before the
bike is ridden. Always ensure the rider is cautious, maintaining complete control
and a reasonable speed. Ensure the terrain is suited to the skills of the rider.
• Helmets & Safety Attire: There is no single factor that works better at reducing
the severity of injuries sustained in accidents more than a quality helmet. Please
don’t ever allow your OSET to be ridden without one. Riders should also wear
suitable riding gear - gloves, eye protection and boots. Boots should NOT HAVE
LACES. Shoe laces and loose clothing, or even long hair could potentially get
caught in wheels, chains, or sprockets.
• One Rider Only: Your bike was engineered to carry one rider and no (0)
passengers. Carrying a passenger would overload the machine and alter the
handling. Do not allow this to happen.
• Do not overload the bike: OSET’s are designed for small, lightweight riders.
Exceeding the weight limitations will adversely affect the handling of the
machine, and potentially cause damage.

6
• It’s the law; obey it: Obey all laws. OSET’s are for OFF-ROAD USE ONLY.
OSET bikes can not be used on public roads or sidewalks. The purchaser,
owner, and/or riders of this machine are directly responsible to know and obey all
local, state, and federal laws regarding the riding and use of this machine.
• Weather & Riding Conditions: Bike brakes don’t work well when they’re wet.
Don’t ride in the rain or snow. Please be aware that distance to stop may double
or triple over the distance that it takes under dry conditions. Ride more slowly,
and anticipate your stops by applying the brakes MUCH earlier. Don’t allow
children to ride on slopes that are too steep for their ability.
• Night time: Don’t ride after dark or in low light conditions.
• Maintenance: It worked fine when we put it in the box: Please maintain your
bike. There are instructions here in this manual. We haven’t figured out how to
make a bike that takes care of itself. Check the brakes and the tires and the
tightness of all those important fasteners before each and every ride. Pretend
that you’re a pilot doing a walk-around of his airplane before taking-off. The pilot
knows that his life depends on the airworthiness of his airplane; the rider’s life
depends on the preparedness of your bike. Please have your bike checked by a
qualified mechanic AT LEAST once a year. It’s a small investment in the well-
being of the rider.
•Batteries: We have equipped your OSET electric bike with sealed lead acid
batteries. We have devoted an entire chapter of this manual to the batteries.
Please read and understand this important information. As always, if you have
any questions, please don’t hesitate to contact us.
- Read this manual cover to cover: There is a lot of important information that
you need to know. Do not guess how to adjust the machine, charge it or ride it.
We have recommendations that will instruct how to set –up, maintain, and ride
your OSET. Please read them thoroughly.
- Call us with questions or problems: We can be reached at the numbers
listed on the back cover of this manual. You can also get assistance from the
OSET dealers.

7
IN SUMMARY:
1. SUPERVISION. A responsible adult must supervise at all times.
2. WEAR A HELMET & SAFETY GEAR. The rider must wear a helmet
& appropriate safety gear EVERY TIME.
3. NO PASSENGERS.
4. DO NOT EXCEED THE WEIGHT LIMITATIONS OF THE MACHINE.
5. OBEY ALL LAWS
6. RIDING CONDITIONS. Braking and traction are significantly
reduced in wet or slippery conditions. Terrain varies, so be
responsible!
7. DO NOT RIDE in low light conditions.
8. PLEASE MAINTAIN YOUR BIKE.
9. CARE FOR YOUR BATTERIES.
10. READ, STUDY AND UNDERSTAND THIS ENTIRE MANUAL.
11. If you don’t understand any aspect of the use and care of your
bike, PLEASE call OSET Customer Service.
WARNING!
OSET Bikes are designed to operate at specific voltages only. Use of any
other battery with a voltage higher than that specified will result in motor
failure. OSET CORP considers such modifications and/or changes to its
products to be a material alteration of any such products, thereby voiding
any warranties and/or guarantees in their entirety and will not be
responsible for any injuries, death and/or other damage(s) caused by any
such modifications.

8
Contents
Introduction: - Page 1
Please Read: - Page 2
Warnings, Cautions and Notes: - Page 3
Contents: - Page 8
Specifications –
OSET 20.0 Eco: - Page 9
OSET 20.0 Racing: - Page 10
Unpacking and Assembly: - Page 11
COMPONENT DETAILS:
Switches, dials and indicators - Page 14
Key Switch - Page 14
Charge port - Page 14
Handlebar switch - Page 14
Speed dial - Page 14
Power dial - Page 15
Throttle response dial - Page 15
Charge indicator: - Page 15
Chain Adjustment - Page 15
Motor Performance: - Page 16
Suspension: - Page 17
Daily Maintenance and Cleaning: - Page 18
Cleaning: - Page 18
Front Wheel Removal/Installation: - Page 18
Rear Wheel Removal/Installation: - Page 18
Brake Adjustment - Page 19
Battery Use, Care and Maintenance: - Page 21
Charging Instructions: - Page 21
Important Notes about Charging - Page 22
Battery Removal and Installation - Page 24
Long Term Storage: - Page 24
Battery Disposal: - Page 24
Wiring & wiring diagram - Page 25
Electrical diagnostic flow chart - Page 27
Setting Up Your OSET for Riding: - Page 28
Riding Instructions and Safety Tips: - Page 29
1. Stationary Learning: - Page 29
2. First Ride: - Page 30
3. Learning to Stand Up: - Page 31
4. Learning Some Technique: - Page 31
Contact Us: - Page 34
Limited Warranty: - Page 35

9
SPECIFICATIONS –OSET 20.0 Eco
Performance:
- Maximum Speed - 15/20mph
- Maximum Range - 10 miles
- Weight Limit (Rider) - 100lbs (45.5kg)
NOTE!
Many factors affect speed and range capabilities. Terrain, average speed, rider
weight, tire pressures, wind, hills etc all have an impact.
Chassis:
- Frame & Swing Arm - Steel
- Suspension (Front) - Telescopic air fork, adjustable rebound
- Suspension (Rear) - Spring & oil type, adjustable rebound.
- Wheels - 19” aluminum alloy, 36H alloy hubs.
- Tires - 20” x 2.5”front & rear.
- Brakes - Hydraulic disc, 160mm.
- Foot pegs - Cast Alloy.
- Handlebars - Alloy.
Motor:
- 1200w 48v OSET Neodymium magnet DC motor.
Gearing:
- 10T front sprocket, 86T rear. #219 chain.
Controller:
- 48 volt, 100 amp pulse width modulating, with inline relay and fuse.
- External speed dial, power dial and throttle ‘map/response’ dial
Throttle:
- Twist type with LED battery charge indicator.
Batteries:
- 4 X 12 volt 10 amp hour sealed lead acid AGM. 4 batteries in series.
- Dimensions - 151mm x 65mm x 110mm (each).
Keys, Dials and Ports:
- Key Switch and handlebar switch.
-Throttle map/response dial. Tunable response.
-Speed dial. Speed adjustment
-Power dial. Overall power adjustment.
- 48 Volt Charger Port.
Size:
- Wheelbase - 41.3”(1050mm)
- Seat Height - 21.6” (550mm)
- Ground Clearance - 11.4” (290mm)
- Handlebar Height - 38.6” (980mm)

10
SPECIFICATIONS –OSET 20.0 Racing
Performance:
- Maximum Speed - 15/20mph
- Maximum Range - 10 miles
- Weight Limit (Rider) - 110lbs (50.0kg)
NOTE!
Many factors affect speed and range capabilities. Terrain, average speed, rider
weight, tire pressures, wind, hills etc all have an impact.
Chassis:
- Frame & Swing Arm - Steel & Aluminium
- Suspension (Front) - Telescopic air fork. Adjustable rebound
- Suspension (Rear) - Spring & oil type, adjustable rebound.
- Wheels - 19” aluminum alloy, 36H alloy hub.
- 14” Competition rear wheel, 32H alloy hub
- Tires - 20” x 2.5”front / 14” x 3.0” rear.
- Brakes - Hydraulic disc, 160mm.
- Foot pegs - Forged Alloy.
- Handlebars - Alloy.
Motor:
-1200w 48v OSET Neodymium magnet DC motor.
Gearing:
- 10T front sprocket, 86T rear. #219 chain.
Controller:
- 48 volt, 100 amp pulse width modulating, with inline relay and fuse.
- External speed dial, power dial and throttle ‘map/response’ dial
Throttle:
- Twist type with LED battery charge indicator.
Batteries:
- 4 X 12 volt 10 amp hour sealed lead acid AGM. 4 batteries in series.
- Dimensions - 151mm x 65mm x 110mm (each).
Keys, Dials and Ports:
- Key Switch and handlebar switch.
-Throttle map/response dial. Tunable response.
-Speed dial. Speed adjustment
-Power dial. Overall power adjustment.
- 48 Volt Charger Port.
Size: - Wheelbase - 41.3”(1050mm)
- Seat Height - 21.6” (550mm)
- Ground Clearance - 11.4” (290mm)
- Handlebar Height - 38.6” (980mm)

11
UNPACKING AND ASSEMBLY:
WARNING!
Failure to properly assemble and adjust your bike prior to use may result in an
accident resulting in death, serious injury and/or property damage. If you are
uncertain about any aspect of the assembly and adjustment of your bike, seek
help from a qualified mechanic or the OSET Customer Service Department.
WARNING!
There are no user serviceable elements incorporated into the motor, motor
controller, batteries, battery charger, throttle, or wiring harness of your OSET
electric bike. DO NOT ATTEMPT TO DISASSEMBLE OR ADJUST ANY OF
THESE COMPONENTS. Doing so may cause extensive damage to these
components, will void your warranty, and may cause a hazardous condition. If
you cannot resolve a problem using this owners manual, contact your OSET
authorized dealer, or call the OSET Customer Service Department for
assistance.
NOTE!
If you purchased your OSET at a local retailer your machine may be fully
adjusted and ready to ride. If you purchased your OSET in the carton, please
carefully follow the instructions below and any supplemental instructions to finish
the assembly and adjustment of your OSET.
OSET 20.0E & 20.0R
1. Remove your OSET & Accessory pack from the box and check contents
against the following list:
1/ Bike less front wheel
1/ Front wheel
1/ Accessory Box containing:
1/ Front mudguard (fender)
1/ Rear mudguard
1/ Battery charger c/w power lead & manual
1/ Battery bag
3/ Battery link wires 48V
1/ Disc guard
1/ Disc guard clamp washer
1/ Number board
4/ Black cable ties
2/ Front wheel spacer (these maybe all ready attached to front wheel
and secured with cable tie)
1/ Hex Key set (Allen keys)
1/ Manual for air forks
1/ Manual for rear shock
2. Place your OSET on a solid & level stand, with both wheels off the ground.
3. Remove all the packing materials.
12
4. Using the supplied Allen keys, make sure the steering stem is in the forward
facing position and tighten the top and side bolts securely and evenly. Secure the
handlebars tightly in the steering stem. Double check tightness and alignment.
Adjust the brake lever positions and reach to suit the rider. See page 19.
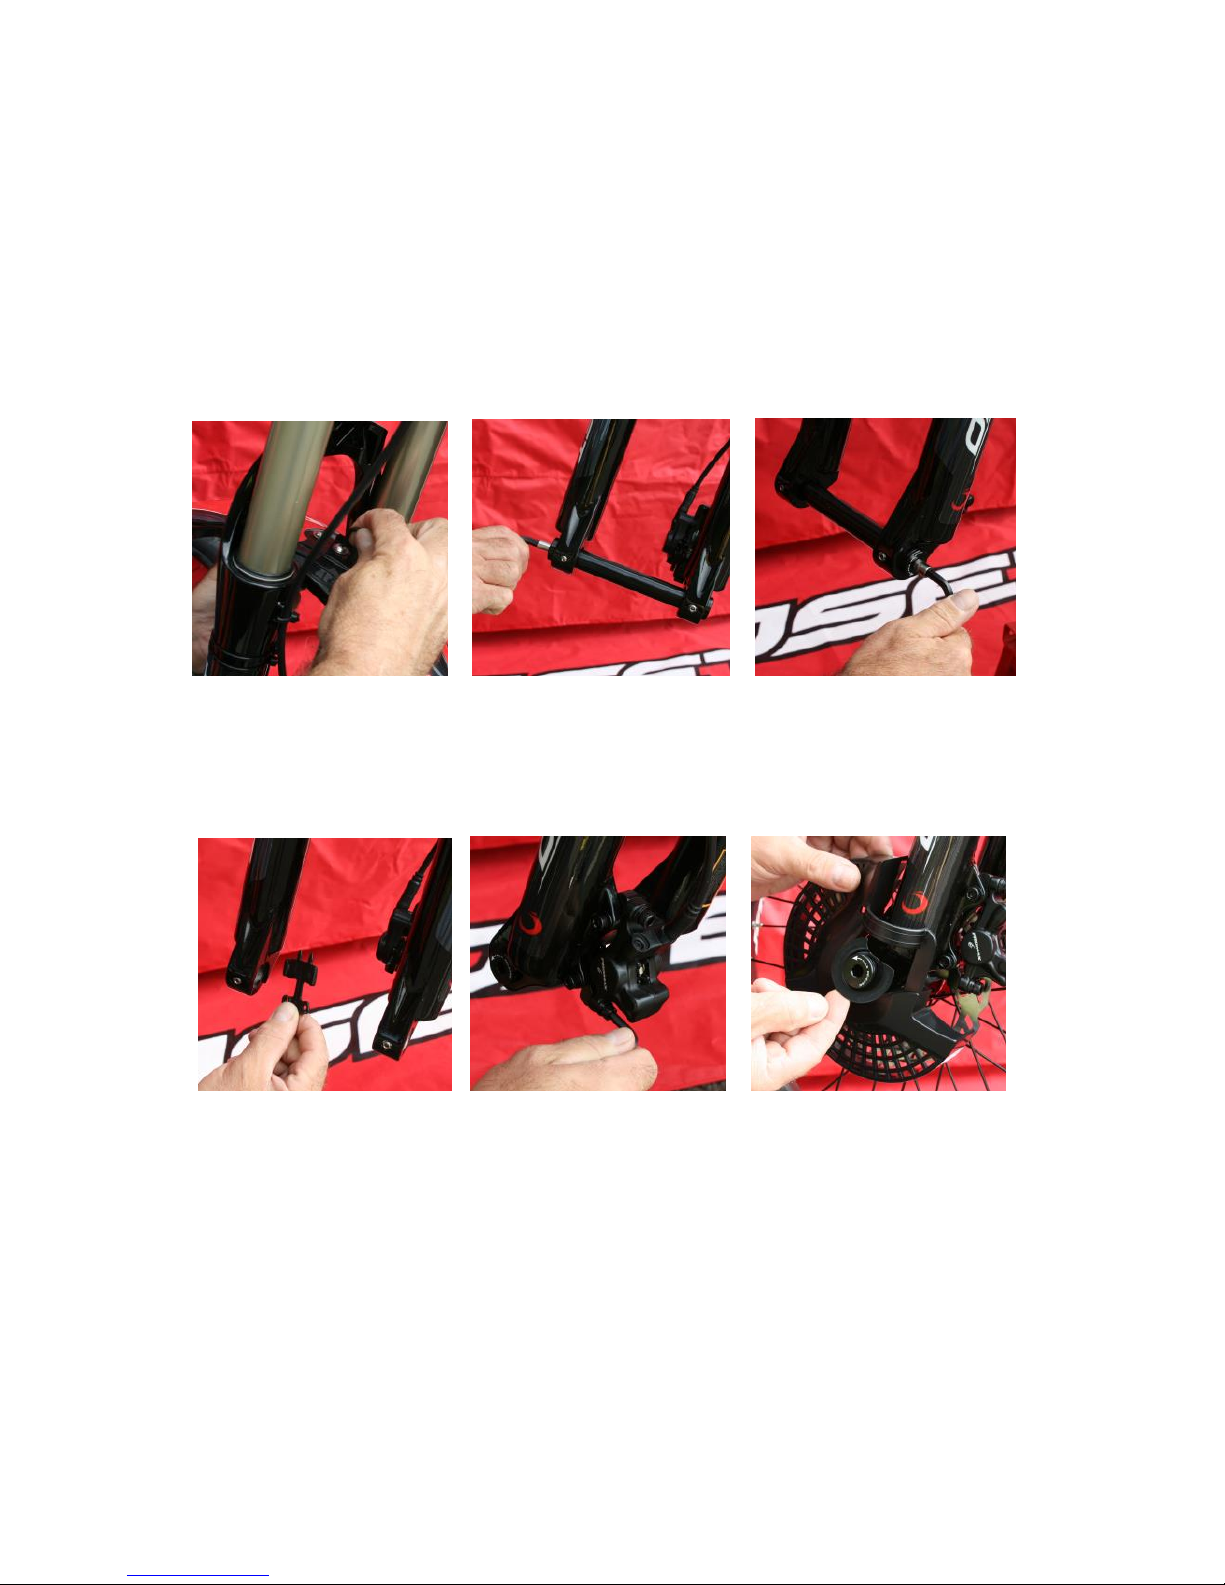
5. Fit front mudguard using the bolts, nuts & spacers provided (picture 1).
6. Fitting Front Wheel.
Using the 8mm Allen wrench remove the axle by first unscrewing and removing
locking Allen bolt (picture 2). This is on right side when sitting on the bike and
unscrews clockwise (left hand thread). Remove axle from the fork legs. This is
unscrewed anti clockwise (right hand thread –picture 3).
1. 2. 3.
7. Remove disk pad spacer (picture 4 - this item is used for transport only, keep
this if you are likely to leave the bike without the front wheel fitted).
8. Loosen top caliper Allen bolts (Picture 5 - 5mm wrench) - so it will move side
to side so as to aid fitting of wheel.
4. 5. 6.
Position wheel between forks being careful not to dislodge hub spacers. If
spacers are not fitted find these from accessory box & fit to wheel ensuring outer
retaining washer with O-ring is pressed right home. Now put disc clamp washer
on axle and partially re-insert axle but leaving at least 15mm proud (picture 6).
9. Fit disc guard making sure the guard retaining washer is in correct position.
Push axle home and screw in tight. Replace locking bolt in opposite side.
10. Spin the front wheel and apply the front brake. Do this twice. While holding
the front brake on - tighten caliper bolts. This will centre the caliper and help to
give even wear of the pads and free running of the front wheel.
11. Adjusting rear caliper. Ensure rear wheel is clear of ground and turn by hand
and check brakes are not binding if they are, loosen cap screws and adjust.

13
Be aware that because the wheel can be moved back and forth for chain
adjustment the caliper does also - so make sure it does not rub on the outer
diameter of disc.
12. Install the front number plate using the supplied ‘zip-ties’. This attaches to
the handlebars and the forks (picture 7).
7. 8. 20.0, 48v Only 9. 20.0, 48v Only
13. Check tire pressure of both tires and confirm they are properly inflated to 20-
40 psi. Light riders can use lower pressures.
14. Batteries are placed in the bike for ease of shipping, it will need connecting. It
is vital that connections are made correctly. The battery bag should be installed
before connecting the positive (red) and negative (black) leads. Install the
batteries as indicated (picture 8 & 9)
WARNING!
Failure to properly install the batteries may result in an accident resulting in
death, serious injury and/or property damage. If you are uncertain about any
aspect of the assembly and adjustment of your bike, seek help from a qualified
mechanic or the OSET Customer Service Department.
15. Unpack charger from its box and read manual. CHECK THAT THE
VOLTAGE SWITCH IS SET CORRECTLY FOR YOUR COUNTRY (120 or
240v). Charge the batteries while thoroughly reading the complete owners
manual. (See charging Instructions on page 21).
16. Compress and check each brake lever in turn. The lever should not
compress completely to the bar. Each individual brake should hold the bike
securely when you push the OSET against the brake. If your brake needs
adjustment, follow the instructions on page 19. Learning riders should be aware
which lever operates which brake.
17. For maximum battery life, always fully charge before operating your OSET for
the first time and never store with discharged batteries. (See page 21 for
charging instructions).
18. While your batteries are charging, please Read Your Owners Manual
completely.
Now your OSET is fully assembled, adjusted and checked. Once the
batteries are fully charged, your OSET will be ready to ride safely.

14
WARNING!
The power must be switched to the off position before attaching and plugging in
the charger.
SWITCHES, DIALS & INDICATORS:
The key switch is located on top of the tank, in front of the rubber bung. The
charge port can be found on the left side of the frame next to the steerer tube.
Key Switch: A
The key switch turns the power on
and off. When the rider is sitting on
the bike, this is located in front of
them above the rubber tank bung.
The key is removable, and should
be removed when the bike is not in
use.
Charger Port: B
When it’s time to recharge the bike,
the battery charger connector
attaches to this port. Before
attaching, ensure that the power is
switched to the off position. Please
refer to the battery and charging
section, page 21, of this manual for
more information.
Handlebar switch:
This switch is in addition to the key
switch and provides extra
functionality. The key switch MUST
be in the ‘on’position for the
handlebar switch to operate. With
the key switch in the ‘on’ position,
the handlebar switch can be used
to turn the bike on and off. The
responsible adult can remove the key
when the bike is not in use.
3 Dial Adjustment:
Speed dial:
The speed dial is located underneath the
rubber bung for convenience. This must
only be changed by a responsible adult.
When dial is turned to the fully clockwise
position, the bike will have a maximum
speed, when in the anti-clockwise
position the speed will be reduced to its
minimum.
A
B

15
Power dial:
This is the most important
adjustability feature on the bike and
must ALWAYS start with the lowest
setting, and make changes in very
small increments. It may appear
that the highest power will be
suitable for an advanced rider, but it
must be understood that there is a
lot of power available. It is a great
feature to have such a range
available, but it MUST be treated
with respect. ALWAYS adjust from
lower to higher, in very small
increments.
Throttle response dial:
It must be treated very carefully as
the range of adjustability is
enormous. THIS DIAL IS TO BE
ADJUSTED BY A RESPONSIBLE
ADULT ONLY. The function of this
dial is to adjust the ‘response’ of the
bike. Fully anti-clockwise will give
the slowest throttle response.
Fully clockwise will give the
quickest response. Refer to page
27 for instructions on setting these
controls.
CHARGE INDICATOR:
The battery charge indicator is
located on the throttle assembly
and shows the state of the
batteries. The indicator lights can
be checked at any time to
determine if the main power is off or
on. Always turn the power off and
remove the key when the bike is not
in use.
WARNING!
It is very important to keep everyone clear of the bike when changing and
checking the speed and response settings. The dial is sensitive to small
adjustments. Do not guess at changes. Always check before the rider gets back
on to ensure the desired setting is correct for the abilities of the rider.
DRIVE TRAIN:
Your OSET features a traditional chain and sprockets. It is direct drive, with no
gears. With the motor mounted in the swingarm, suspension movement has no
effect on tension. However, the chain does need to be checked and adjusted
regularly, especially when the bike is new. The chain must be checked before
every ride and adjusted as necessary. There should be very little slack in the
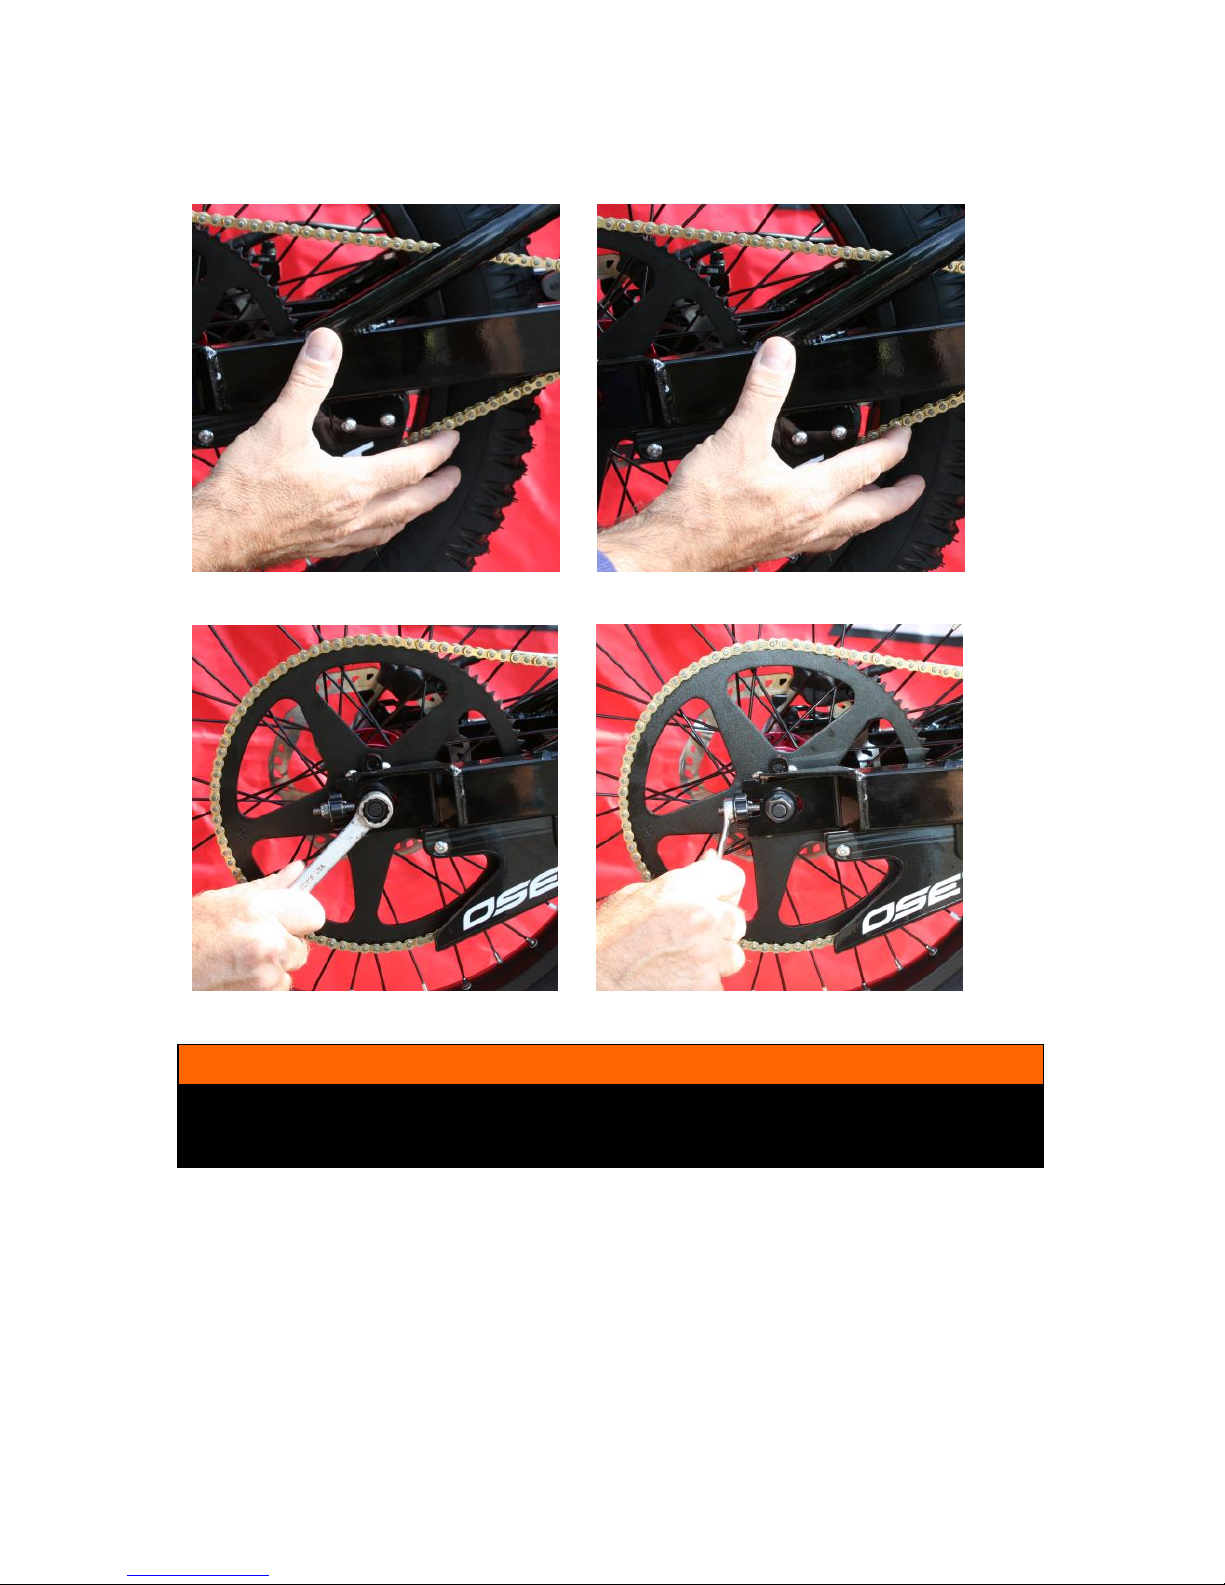
chain. Adjustment is done as follows:
1. Ensure power is turned off.
2. Loosen axle nuts.
3. Turn adjustment nuts evenly on both sides. Very small movements can
make a big difference. Do not tighten so much there is no slack at all. It
should be ‘taught’, not ‘tight‘. Rotate wheel by hand and check chain tension.
4. Lubricate the chain & check the sprocket bolts for tightness.
16
5. Reverse the above procedure, ensuring all bolts are tight.
6. Check the wheel for alignment and the chain for tension. See page 19 for
wheel alignment information.
These two pictures show the correct tension. When pushing up on the chain, it
should only move 5-10mm.
Axle Nut (15mm) Chain tensioner nut (10mm).
WARNING!
Failure to maintain and adjust the chain and align the wheel correctly could result
in the chain jumping off the sprockets, causing a potentially dangerous and
damaging condition
MOTOR PERFORMANCE & MAINTENANCE:
The OSET motor has been designed for high performance. Do not power wash
the motor. Check that the sprocket bolt is tight periodically. Water proof grease
can be applied around the shaft where it enters the motor for additional
protection from the elements. Similarly, a bead of silicone can be applied where
the casings join for additional weather protection.

17
WARNING!
The motor can get hot. It is designed to withstand high temperatures. However,
sustained maximum output is not recommended. The motor is designed to
withstand pulses of maximum output, not sustained.
SUSPENSION:
OSET’s feature adjustable front and rear suspension. The available adjustability
is a great feature. Separate owner’s manuals are provided. Please read for
further information on how to best set up the suspension.
Front Suspension: OSET 20.0
The front suspension is an ‘air’ fork. A specific air pump is required to add
pressure which can be purchased from OSET. The fork is also adjustable for
rebound with a simple dial.
Rebound dial. Fork air pump (not supplied)
Rear Suspension:
Your OSET is equipped with a single coil
spring type rear shock. For a harder/stiffer
ride at the rear tighten the adjustment ring
in a clockwise direction.
For a softer ride, loosen the adjuster by
turning anti-clockwise. It also features a
very effective rebound dial. Optional
springs are available from OSET to adjust
the spring rate.
Adjustment ring
Rebound Dial

18
DAILY MAINTENANCE AND CLEANING:
- Keep your OSET clean and dry. Clean using the recommended
procedure.
- Check all components for tightness and adjustment, including
handlebars, levers, axles, chain, brakes.
- Check the wheel spokes for tightness. It is normal for spokes to
loosen in operation. PLEASE CHECK after every initial ride, and
then regularly afterwards. If you need guidance please consult a
skilled wheel builder or call OSET customer service.
- Check the speed, power and response setting before each ride.
- Check the tires for proper inflation. Also, inspect the tires for
damage.
CLEANING:
Cleaning and maintaining your OSET correctly will provide a more enjoyable
ownership and riding experience. By hand cleaning the bike, you can
simultaneously inspect all of the components. We recommend cleaning be done
with a damp cloth and slow running water. Care must be taken when washing.
This is an electric machine, and water should never reach sensitive
components. If a hose is used, cover sensitive parts. Never use a power
washer as it may cause irreparable damage to sensitive components.
WARNING!
Water and electrical components do not mix! Do not get water onto the controller,
throttle or wiring. Failure to follow this instruction could result in permanent
damage, and could cause erratic machine behavior, leading to possible injury or
death.
FRONT WHEEL REMOVAL AND INSTALLATION:
Please refer to the section on assembling your OSET bike (page 12) for
information on installing the front wheel, and reverse the instructions for removal.
REAR WHEEL REMOVAL AND INSTALLATION:
1. Ensure power is switched off and the key removed.
2. Lift the bike onto a block or stand so the wheels are off the ground.
3. Loosen the axle bolts.
4. Loosen the chain adjustment nuts to the point where the wheel can be pushed
forward, and the chain slipped off to the right of the sprockets.
5. Pull back on the wheel to remove it.

19
Ref 3 Ref 4
Ref 5 Ref 6
6. To re-install the wheel reverse the above procedures. Ensure the chain is
correctly adjusted and lubricated, the wheel is aligned, and all nuts and bolts
are tight
BRAKE ADJUSTMENT:
A separate owners’manual is provided with full details on brake maintenance
and adjustment. Please read for full information.
The brakes are self adjusting to a point, but correct alignment is vital to get the
maximum performance. The pads must be equidistant from the disc for maximum
efficiency.
Visually inspect the pads as you spin the wheel. Check that alignment is good
and pad to disc distance is even. If adjustments are needed follow the
instructions below:
- Using an Allen wrench, loosen the caliper mounting bolts, allowing the caliper
to move freely from left to right.
This manual suits for next models
1
Table of contents
Other oset Motorcycle manuals


