OTC Wireless WiJET User manual

802.11b WiJET Wireless Projector/Monitor
Adaptor
Technical Manual
www.otcwireless.com

2
WiJET
802.11b Wireless Projector/Monitor Adapter
Technical Manual
Copyright
Information in this document is subject to change without notice. Complying with
all applicable copyright laws is the responsibility of the user. No part of this
document may be reproduced or transmitted in any form or by any means,
electronic or mechanical, for any purpose, without the express written permission
of the seller. If, however, your only means of access is electronic, permission to
print one copy is hereby granted.
The seller provides this documentation without warranty, term, or condition of any
kind. The seller may make improvements or changes in the product(s) and/or the
program(s) described in this documentation at any time.
Other product and company names herein may be trademarks of their respective
owners.
Copyright 2001, 2003 OTC Wireless, Inc. All rights reserved.
Rev 1.02 March 4, 2003

3
Table of Contents
Table of Contents................................................................................................................ 3
Chapter 1 - Introduction...................................................................................................... 4
WiJET Wireless Projector/Monitor Adapter ...................................................................... 5
Specifications................................................................................................................ 5
Model........................................................................................................................ 5
Chapter 2 - Installation........................................................................................................6
Safety Statements........................................................................................................ 6
Installing the Hardware............................................................................................... 6
Power ...................................................................................................................... 6
VGA Connection .................................................................................................... 6
Status LED’s ........................................................................................................... 6
Hardware Reset Button........................................................................................... 6
Installing the Software ................................................................................................ 7
System Requirements for User Software................................................................ 7
Installation for the WiJET Presentation Session Manager ..................................... 7
Installation for the WiJET Administration Tool..................................................... 7
System Requirements for Web-based Utility program........................................... 8
Chapter 3 – Using the WiJET ............................................................................................. 9
Using the WiJET in a Meeting.................................................................................... 9
Configuring your Computer to control the WiJET..................................................... 9
WiJET Presentation Session Manager...................................................................... 10
Configuring your Wireless Adaptor to Connect to the WiJET............................. 11
Automatically Configuring the Wireless Adaptor ................................................ 12
Manually Configuring the Wireless Adaptor........................................................ 14
Configuring the Wireless Adaptor for Windows XP............................................ 14
Start or Resume Your WiJET Presentation Session ............................................. 18
Stop Your WiJET Presentation Session................................................................ 18
Exit the WiJET Presentation Session Manager .................................................... 18
Chapter 4 – Using the Web Based Utility......................................................................... 19
Introducing the Web Based Utility ........................................................................... 19
Accessing the Web Based Utility ............................................................................. 19
Configuring Your PCMCIA Adaptor Automatically ........................................... 19
Configuring Your WiFi Adaptor Manually .......................................................... 20
WiJET Firmware Version..................................................................................... 21
Configuration ........................................................................................................ 21
Administration ...................................................................................................... 23
Firmware and Banner Page Upload ...................................................................... 24
Chapter 5 – Troubleshooting ............................................................................................ 25
Appendix A:...................................................................................................................... 28
Appendix B:...................................................................................................................... 29
European Community (EC) Directives Conformity and Restrictions .............................. 30
Industry Canada Compliance Information Statement....................................................... 30

4
Chapter 1 - Introduction
The advantages of the WiJET become obvious in any conference room where the ideal
location of the projector or display screen makes it difficult for a laptop or desktop to
connect to it while allowing the speaker to maintain audience interest. All too frequently,
projectors placed in the middle of the room force the speaker to present from the middle
of the room, because of the VGA cable that exists between the projector and the
presenter’s laptop.
The WiJET solves this problem by allowing any laptop or desktop with an 802.11b WiFi
adaptor to give the presentation from anywhere in the conference room that the presenter
desires. Wherever the presenter feels would garner the most amount of interest from the
audience. Truly freedom from wires allows for more flexibility in meetings.
Another application of the WiJET is in a situation where multiple presenters must give
presentations in rapid succession. The WiJET allows for fast handover of the projector or
monitor without the hassle of removing and reattaching the VGA cable. Using the easy-
to-use Presentation Session Manager, the presenters can effortlessly connect to the
WiJET, give a presentation, and disconnect from the WiJET to allow another user to
connect to it without touching a single cable. Contrast this to physically disconnecting
and reconnecting the VGA cable as well as configuring the laptop to output to the
laptop’s VGA connector and it is easy to see how the WiJET can make multiple people
giving presentations effortless.
A third application that showcases the advantages of the WiJET is where there are
multiple conference rooms with multiple projectors. A WiJET in every conference room
will substantially save setup time when the presenter comes into the room. The presenter
only simply selects the WiJET number displayed on the projector/monitor screen and he
is instantly connected to the projector and able to start his presentation. This removes a
lot of setup time associated with presenters moving from room to room to give their
presentations, ultimately saving IT costs.
In summary, the WiJET is a tool that will change how people come to view conferences
and meeting rooms. Instead of a static meeting place, the conference rooms can now
become a dynamic meeting place where new thoughts and ideas are exchanged and
created.
The WiJET is an 802.11b®compliant product designed specifically for wirelessly
connecting projectors and monitors to computers. It connects to the existing VGA
connector of the projector/monitor and offers 802.11b®connectivity up to 11Mbps.

5
WiJET Wireless Projector/Monitor Adapter
Specifications
Model WiJET
Standard 802.11b
Projector/Monitor
Interface
Standard 15-pin VGA connector
Display resolution &
color
Automatically set to user’s display resolution up to XGA (1024x768)
Automatically set to user’s color depth up to 16-bit True-Color
Software supplied User software run on Windows 2000
Web-browser-based Administrative Utility to allow user to upload
customized banner page, set WEP, set channel and upload firmware
upgrades
Frequency 2.4GHz – 2.495GHz
RF Channels 11 channels (US, Canada), 13 channels (Europe), 13 channels (Japan)
Transmission power 14dBm at antenna input typical
Receiver sensitivity -80dBm @1e-5 BER typical
Antenna Support antenna diversity with one externally connected (RSMA
connector) Dipole antennae with ~5dBi gain and an internal dipole
antennae with ~0 dBi gain
Data Rate 2, 5.5, 11Mbps
Modulation CCK, Direct Sequence Spread Spectrum
Link Distance ~1200 ft in open space; 300 ft typical indoor environment
Network Types Ad hoc mode for dedicated presentation link
Network Security 64bit or 128-bit WEP
DC Voltage 5V
Current consumption 1.7A (max. reached in transmit-mode)
LED Indicators Power, Wireless Link
Dimensions 4.4”x6.25”x1.5”
Operating Temperature -10°C – 50°C
Operating Humidity 10% to 85% non-condensing
Regulation Compliance FCC, CE
Key Features
Interoperable with any PCs/Laptops equipped with Windows OS and an industry standard IEEE
802.11b-compliant wireless interface cards
Simple user interface with the supplied Windows-based client software
Plug & Play—
o No need to reconfigure the wireless card in a user’s PC if the card uses an driver with I/O
control
o No need to change IP address settings of the wireless card in a user’s PC
2, 5.5, 11Mbps data rate with auto detection dedicated to the presentation link
Direct access to video buffer to allow fast real-time updates of the projected images—no long and
embarrassing pauses or broken images
Up to1024x768 resolution for optimized speed/resolution tradeoff
Automatic selection of clear channel to minimize interference
Automatic detection of nearby active WiJETs to prevent ambiguous links
User customizable WiJET-ready banner image to allow the display of information such as meeting
agenda, conference logo, etc. before and between presentations
Web browser based configuration utility for upgrading firmware and setting encryption keys
Standard VGA connector to allow the use with an
y
presentation pro
j
ecto
r

6
Chapter 2 - Installation
Safety Statements
Use only the power supply provided with this product or the manufacturer's
authorized replacement power supply.
Connect the power cord to a properly grounded electrical outlet that is near
the product and easily accessible.
Refer service or repairs, other than those described in the user
documentation, to a professional service person.
DANGER: Do not set up this product or make electrical connections during
a lightning storm.
Installing the Hardware
Power
Power is supplied to the WiJET via a 1.7 amps 5volt DC power adaptor.
WARNING: Do not exceed more than 12A@120VAC/10A@240VAC total
current connected to the WiJET!
VGA Connection
This is a standard 15 pin female VGA connector where you will connect the WiJET to
either a monitor or a projector via a straight-thru monitor cable (either purchased
separately or with the one that comes with the projector or monitor).
Status LED’s
There are two status LED’s on the WiJET. From the front of the unit, the LED on the left
is the power indicator while the LED on the right is the link status and video out
indicator. During boot-up, the link status LED will initially remain unlit. When the link
LED blinks red, it means the WiJET is ready for connection to a PC. Upon connection
from a computer, the LED will turn solid green. Upon disconnection, the LED will revert
back to blinking red again.
Hardware Reset Button
The hardware reset button is located at the back of the WiJET. It requires a bent paper
clip to access the hardware reset switch.
The hardware reset button has two functions. The first function is to reboot the WiJET,
the second function is to set the WiJET back to its factory default.

7
To reboot the WiJET, A light tap is all that is required.
To reset the WiJET back to the factory settings, follow the steps below:
1. Turn on WiJET or reboot the WiJET
2. When the banner shows up, you now have 10 seconds to do step 3
3. Insert a pin or unbent paper clip into the hardware reboot location.
Caution: Please note that resetting the WiJET to its factory default means losing all
configuration and encryption information you may have set through the web
interface!
You have now reset the WiJET back to its factory default!
Installing the Software
The following details the steps involved in installing the software needed to control the
WiJET.
System Requirements for User Software
To use the WiJET’s utility software, your computer must meet the following
requirements.
WiFi enabled computer (either built-in or add-on NIC).
Windows 98/2000/XP
Installation for the WiJET Presentation Session Manager
Insert the Installation Disc in your computer’s CD-ROM drive. The install program
should then auto-start. If the program does not auto-start, go to “My Computer” and
double click on the Installation Disc icon. Click on setup.exe once you can see the CD’s
contents.
Simply follow the instruction that comes up on each of the windows during the
installation process. When installation finishes, you will be brought back to your
desktop.
Installation for the WiJET Administration Tool
To install the WiJET Administration Tool, you must first install the WiJET PSM. If you
do not install the WiJET PSM, installation of the WiJET Administration tool will fail.

8
Insert the Installation Disc in your computer’s CD-ROM drive. The install program
should then auto-start. Click “Cancel” and then “exit setup” to stop the installation of the
WiJET PSM utility. Click on “Start”, “Run”, and then type in “x:\” where x is the drive
letter of your CD-ROM.
Click on the “Administration” folder and double click on “setup.exe”. Follow the
instruction that comes up on each of the windows during the installation process. When
you are done, there will be an additional icon in the Start button menu item. For
instructions on how to use the Administration Tool, please see Chapter 4 – Using the
Web Based Utility.
System Requirements for Web-based Utility program
A Web-based Utility program is built into the WiJET. It is used to change the settings of
the WiJET. To use the WiJET’s Web-based Utility software, your computer must meet
the following requirements:
(1) A Web browser must be installed on the computer. The supported Web browsers
include Internet Explorer 5.0 and above, Netscape 6.0 and above, Mozilla 1.0 or above
and Opera 6.05 or above. JavaScript for the browser must be enabled.
(2) WiFi enabled computer (either built-in or add-on NIC).
In order to configure it, you only need to know the factory default settings. An optional
Windows-based WiJET Administration Utility is available if automatic launch of the
Web-based Utility from a computer with Windows OS is desired. See Chapter 3 for
detailed information of configuring the WiJET.

9
Chapter 3 – Using the WiJET
Using the WiJET in a Meeting
The most important benefit of replacing a VGA cable with a wireless connection in using
a presentation projector or monitor is to enable fast handover of the projector or monitor
control among multiple meeting participants. The WiJET Presentation Session Manager
(PSM) is a simple user interface allowing quick rotation of presentation among multiple
presenters. The following simple steps sketch out how a successful WiJET Wireless
Presentation Meeting unfolds:
1. Copies of the installation CD are kept with the WiJET in the meeting room. The
meeting host, before the presentations start, identifies the meeting participants
who do not yet have the WiJET Presentation Session Manger installed on their
computers and hands them the installation CD’s. The installation is automatic and
does not require rebooting the computer.
2. The meeting host asks all meeting participants to establish a wireless connection
to the WiJET before the meeting starts. Most participants can accomplish this by
clicking just one button (“Select”, see below). This wireless connection is kept
alive throughout the meeting even if only one presenter can use the projector or
monitor at a given time. Confirming wireless connections before the meeting
starts assures a smooth presentation session.
3. At any given time, by clicking just one button (“Connect”, see below) in the PSM,
one designated presenter can start the presentation and exclude other presenters
from using the projector/monitor.
4. At the click of one button (“Stop”, see below) in the PSM, the incumbent
presenter yields the floor (the projector/monitor) to another presenter while still
maintaining a live wireless link to the WiJET.
5. At the click of one button (“Connect, see below) in the PSM, a waiting presenter,
owing to the already established wireless link, can instantaneously take over the
projector/monitor.
The normal meeting etiquettes have to be followed to determine how the control of the
projector/monitor should be rotated among presenters. The WiJET and its PSM make the
rotation easy and quick and thereby make the meeting dynamic.
Configuring your Computer to control the WiJET
The WiJET is designed to be in the “Ad-Hoc” mode instead of the “Infrastructure” mode.
This means you have to configure your Wireless card to connect to the WiJET, but do not
have to change any of your network settings (IP address, etc.).

10
The steps below will detail how to connect to the WiJET either using the automatic
wireless device configuration (only for WiFi cards with a driver supporting MAC I/O), or
to configure your WiFi device manually.
WiJET Presentation Session Manager
When the WiJET is first turned on, it will undergo a boot up sequence that results in a
banner screen with two important pieces of information. On the top left hand corner will
be a name like WiJET0001 or WiJET0005. This is the SSID of the WiJET and will be
the SSID used to configure your network card to control the WiJET. The number on the
right is the channel number the WiJET is on.
You have to start the WiJET Presentation Session Manager (PSM) to control the WiJET.
The WiJET PSM program is located under the Programs Folder in the Windows Start
menu, WiJET Utility as shown in Figure 1.
Figure 1 Location of WiJET program
Once the program icon is selected, the WiJET PSM will start. The PSM does not open a
window, but rather starts out as a tray icon as shown in Figure 2.
Figure 2 PSM Tray Icons
To activate the main window of the PSM, either double click on the PSM Tray Icon or
right click on the icon and select “Open” as shown in Figure 3.

11
Figure 3 Right Clicking the PSM icon will give you a submenu
A window should appear like the window in Figure 4. There are 4 action buttons in the
PSM: “Select”, “Connect”, “Stop”, and “Cancel”. Clicking “Cancel” simply makes the
PSM vanish from your Desktop. The other 3 action buttons are described below.
Figure 4 The WiJET Presentation Session Manager
Configuring your Wireless Adaptor to Connect to the WiJET
PLEASE NOTE: For those users whose computer’s wireless adapter card (PCMCIA,
mini-PCI or external USB device) uses a driver with MAC I/O control, the WiJET
Presentation Session Manager automatically configures the card to connect to WiJET.
For users with a wireless card that has a legacy driver without the MAC I/O control or
with an external, driver-less Ethernet Station radio, such as OTC’s ACR-201, manual
configuration of your card is necessary. The WiJET Presentation Session Manager
informs you whether your card can be configured automatically or not. Please read the
details given below.
In general, the steps to configure your Wireless Adaptor should be as follows.

12
1) Use the automatic configuration utility unless your operating system is Windows
98
2) If the automatic configuration succeeds, you are ready to use the WiJET!
3) If the automatic configuration fails, manually configure your wireless adaptor.
For Windows 98 users, please see the section “Manually Configuring the Wireless
Adaptor”. For XP users, please see the section “Configuring the Wireless Adaptor for
Windows XP”.
Automatically Configuring the Wireless Adaptor
To configure your Wireless Adaptor automatically to use the WiJET, click on the Select
button. A separate window should pop up as in Figure 5.
Figure 5 WiJET Select Window
Select your WiJET from the dropdown list. Note that you can only see two WiJET
numbers at one time and there are a total of 9 possible WiJET SSID numbers. To see the
other WiJET SSID numbers, simply click the up and down arrows at the side of the drop
down box like in Figure 6.

13
Figure 6 Using the up and Down arrows on the Drop Down window
The WiJET number to select appears on the upper left corner of the WiJET-ready banner
page on the projector/monitor screen in your meeting room. It is important that you make
this proper determination as there may be other WiJETs operating in the vicinity.
When you have selected your WiJET number, simply click OK. You will see a
“Configuring Device” message show up on the WiJET Select window. A few moments
later, you should be seeing a window pop up telling you that configuration has succeeded
as in Figure 7.
Figure 7 Setup completed
Click the “OK” button and it should return you to the WiJET PSM window.
If, after you have made the WiJET selection and have seen the “Configuring Device”
message in the “WiJET Select” Window, the “Automatic setup not available” window
(Figure 8 below) pops up, then your computer’s wireless card either is not properly
installed or it uses a legacy driver that does not support MAC I/O. You will need to
manually configure your wireless card with its utility program. The steps are as follows.

14
Figure 8 Automatic setup not available
Manually Configuring the Wireless Adaptor
Looking at the banner page on the projector/monitor screen in your meeting room,
determine the SSID that the WiJET is currently set on. The SSID that the WiJET is on is
displayed on the top left hand corner of the screen and is in the format of WiJET000x,
where x is a number from 1 – 9. The channel number the WiJET is on is displayed on the
top right hand corner of the screen and is a number from 1 – 11 for the US or 1 – 13 for
Europe.
Open the Configuration Utility program (which may be called a different name for your
wireless card) for your wireless card, and do the following:
1. Change the “Network type” to “Ad Hoc” or “Peer-to-Peer”. It should not be in
the “Infrastructure” mode.
2. Change the “SSID” of the wireless card to that of the WiJET, that appears on the
projector/monitor screen.
3. Optionally, change the “Channel” to that of the WiJET, the number between 1
and 11 (or 1 and 13 for Europe) that appears on the upper right corner of the
WiJET-Ready-Image.
4. Observe the indications on the utility program of your wireless card to assure that
it is connected to the WiJET.
Configuring the Wireless Adaptor for Windows XP
To configure your Wireless Adaptor for Windows XP, you must first know if your
Wireless Adaptor is natively supported under Windows XP. The easiest way to know
this is to see if an icon is in your system tray as in Figure 9.
Figure 9 Network Adaptor with native support under Windows XP
15
If your system tray looks like the figure shown in Figure 9, your wireless card is natively
supported under Windows XP and you should read the rest of this section as it will
instruct you in how to connect your wireless adaptor to the WiJET under Windows XP.
If you do not have the addition Wireless Network Connection icon in your system tray,
you should see if you have some sort of Wireless configuration utility in your system tray
instead, as in Figure 10.
Figure 10 Network Adaptor utility provided by 3rd party; No native support in XP.
If your system tray looks like the figure shown in Figure 10, your wireless card is not
natively supported by Windows XP and you should go to the section above labeled
“Manually Configuring the Wireless Adaptor”.
To configure the natively supported network adaptor, double-click the wireless network
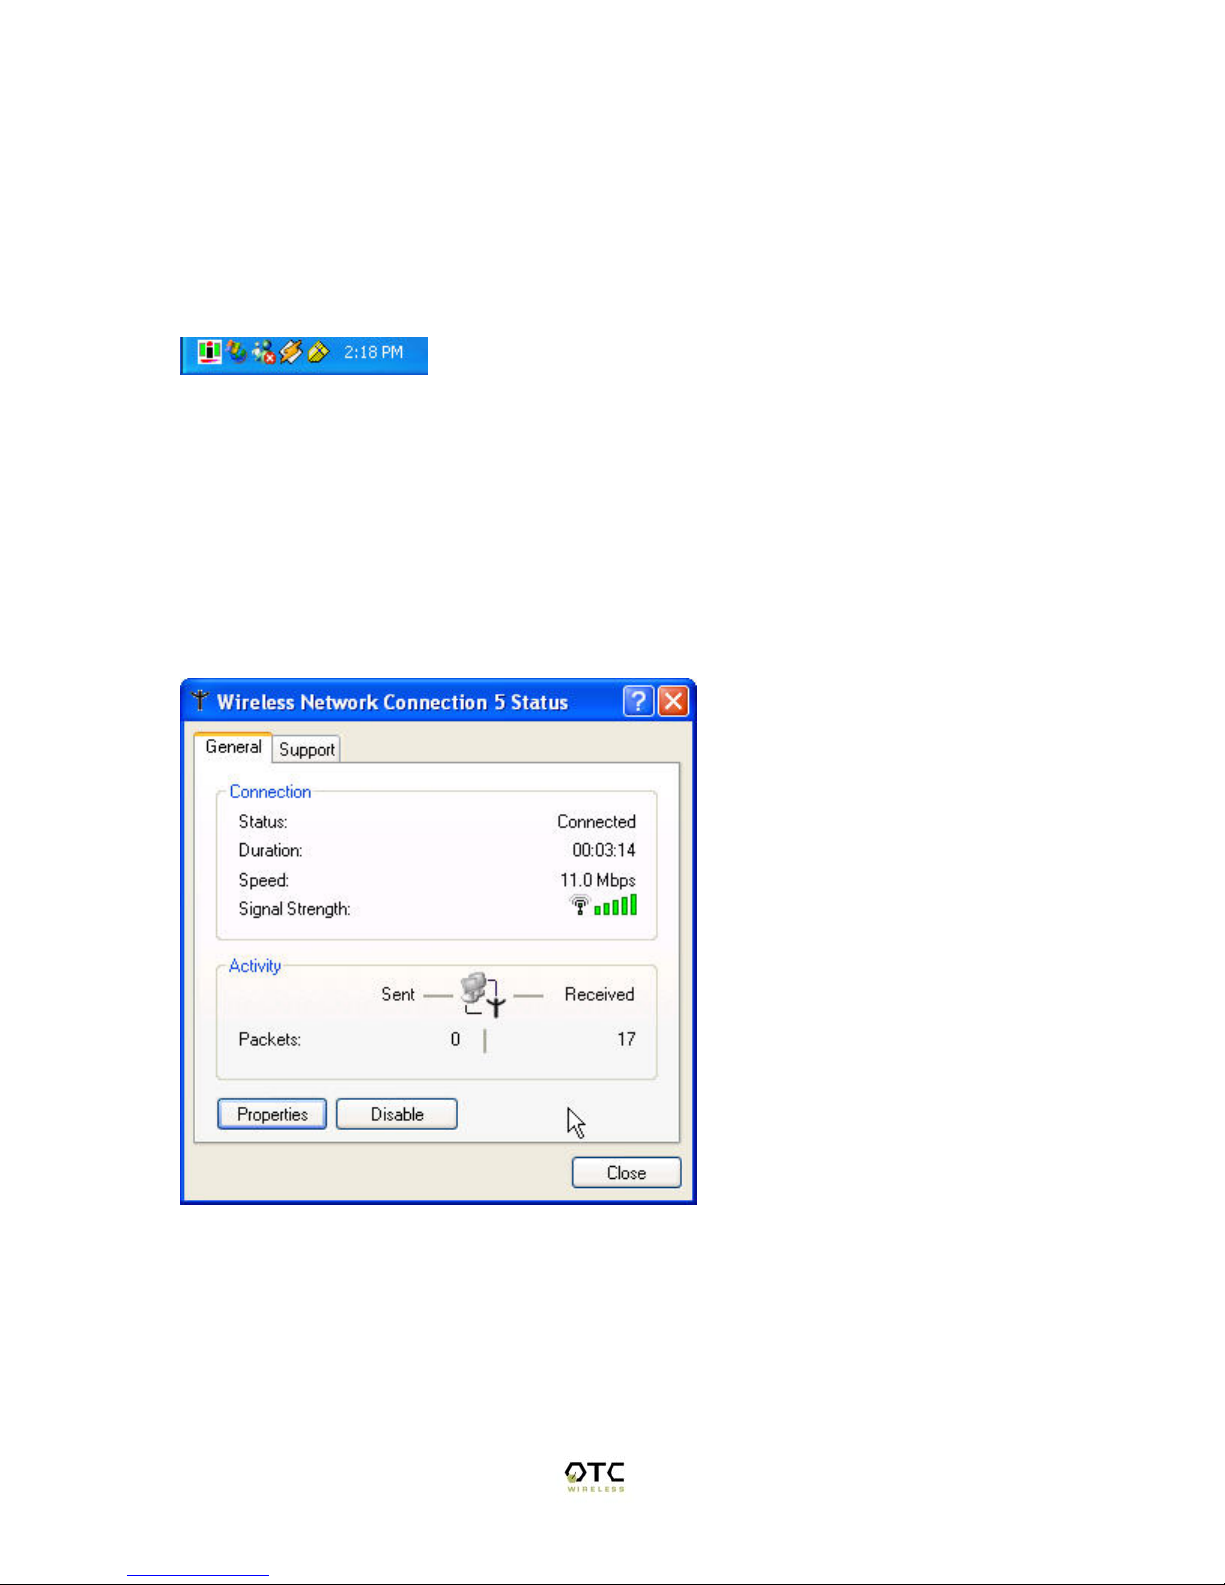
connection icon in the system tray. You should get a figure much like Figure 11.
Figure 11 Wireless Network Connection Status Window
Click the Properties button. A new window much like Figure 12 should appear.
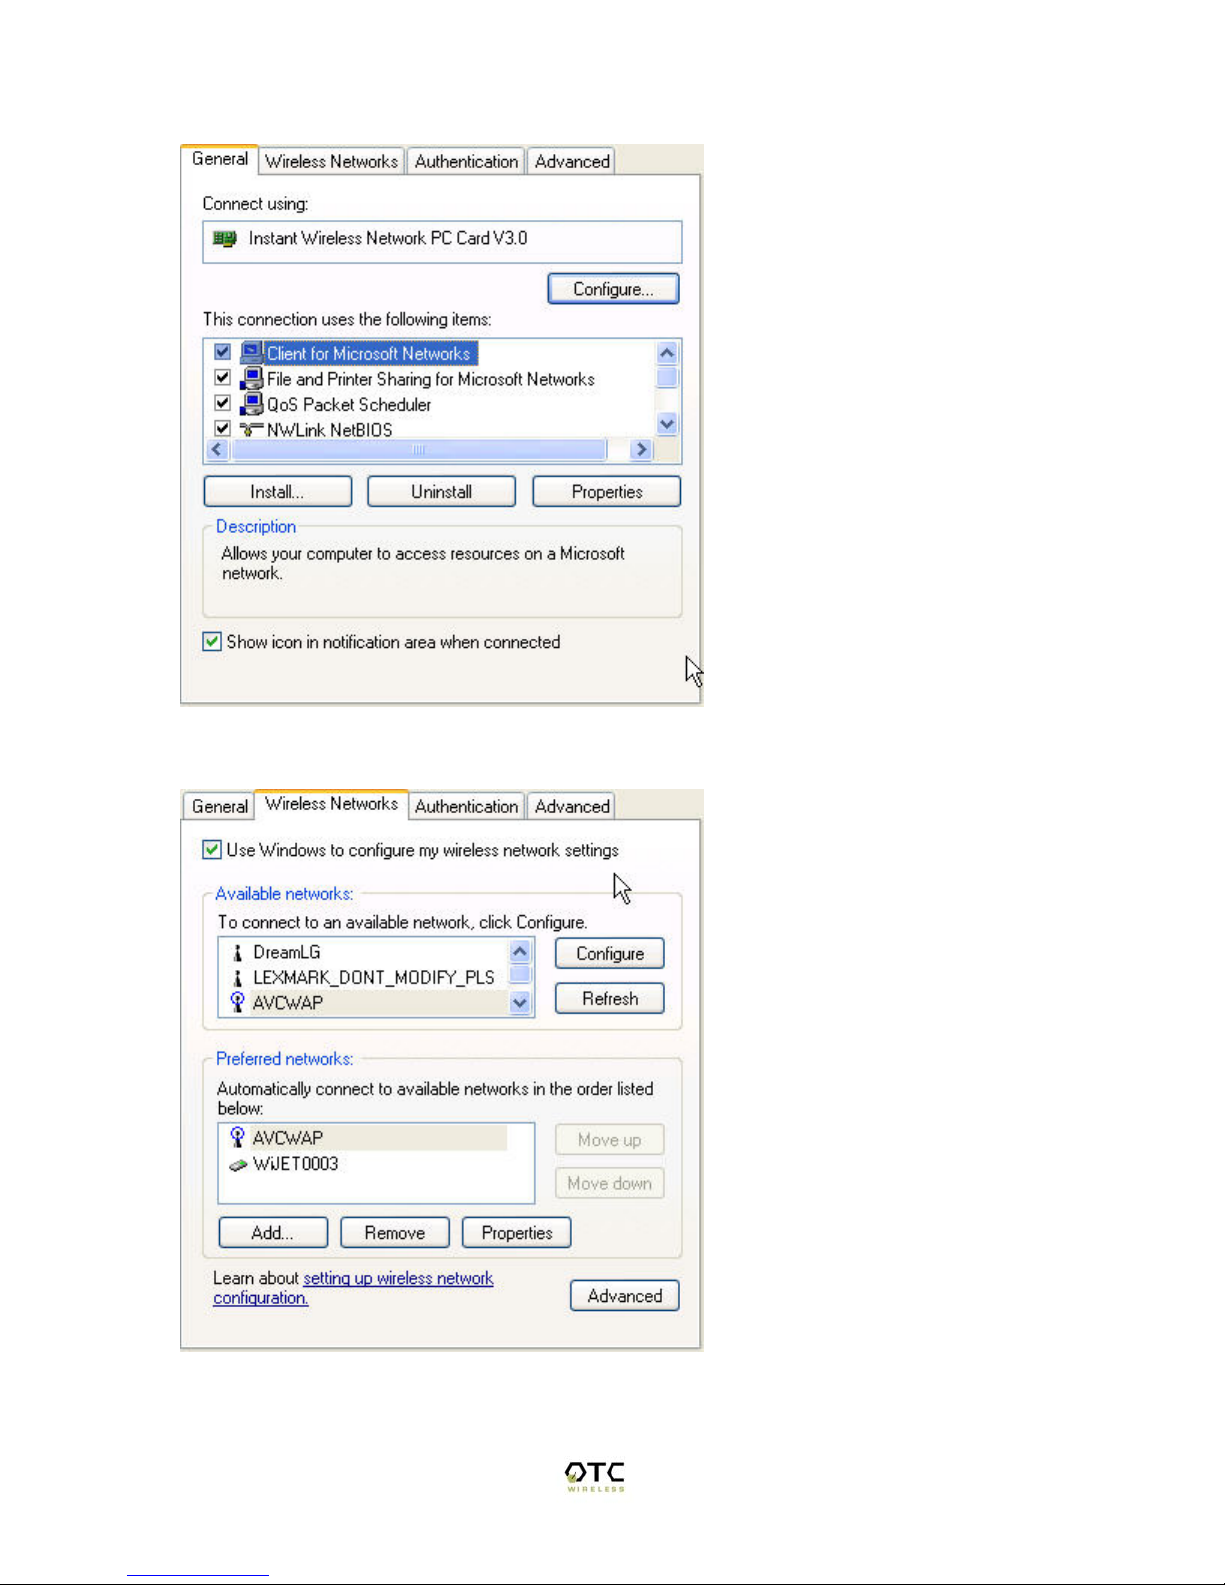
16
Figure 12 Network Properties for Wireless Adaptors
Click on the “Wireless Networks” tab and you should see a figure like Figure 13.
Figure 13 Wireless Networks tab.
17
Here you will find the various networks that your wireless card has been able to detect.
To allow for a connection to the WiJET, you must click the “Advanced” button. A figure
like Figure 14 should appear.
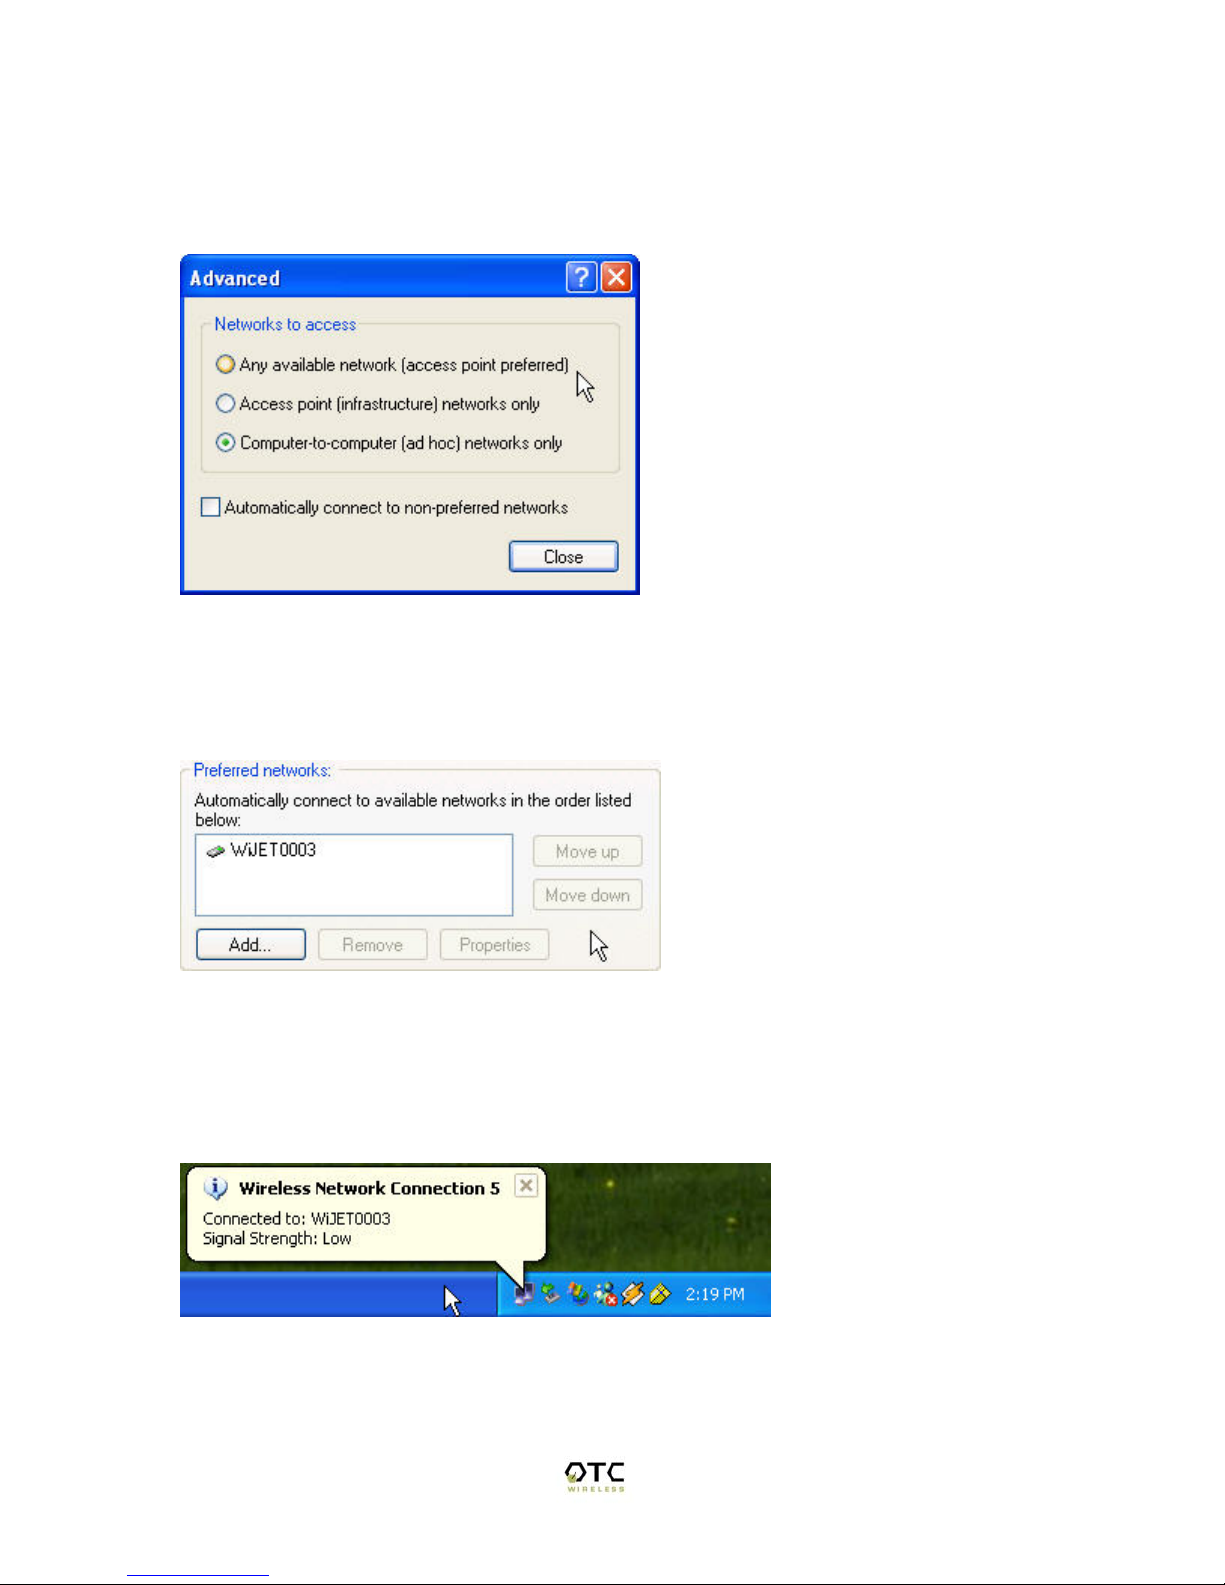
Figure 14 Advanced Network Settings Window
Set the configuration to be “Computer-to-computer (ad hoc) networks only” and click the
“Close” button. Take note of the Preferred Networks area. You should see only ad hoc
networks now as in Figure 15.
Figure 15 Preferred networks changed to Ad Hoc networks only
If there is more than one ad hoc network, you must use the “Move up” and “Move down”
buttons to move the WiJET you wish to have connected to the top. When you are done,
press the “OK” button. At that time you should be back to the desktop and your system
tray should display an image much like Figure 16.
Figure 16 Connected to WiJET
Congratulations, you have connected your XP machine to the WiJET. You are now
ready to start your WiJET presentation session.

18
Start or Resume Your WiJET Presentation Session
Once you have successfully configured the wireless card to connect to the WiJET, either
manually or automatically, and when it is your turn to make a presentation, click
“Connect” and you should find yourself connected to the WiJET. There will be no
confirmation window alerting you that your connection is live, and your projector or
monitor should now display your Desktop. If you have a graphic background, you will
notice that it has been replaced by a generic blank gray background.
Various abnormal conditions, such as RF interference and TCP/IP time-out, however rare
in occurrence, can cause the communication between the WiJET and the PSM to be
interrupted. The WiJET continuously monitors a pre-defined exchange between the
WiJET and a presenter’s computer (even when there is no display updates) in order to
detect an interruption of the link. Certain abnormal conditions that cause interruption of
the link may be localized on the current presenter’s computer and/or its wireless card. To
prevent the WiJET from being locked up by the current presenter, the WiJET returns
itself to an “available for connection” state and alerts the users of a link interruption by
putting the WiJET-ready banner page back on the projector/monitor screen. When this
“alert” banner page unexpectedly re-appears in the middle of a presentation, the presenter
can click the “Connect” button to try to resume a WiJET Presentation Session. If the
abnormal condition is temporary, the presentation session should resume instantaneously.
If the abnormal condition persists but is localized on the current presenter’s computer
and/or its wireless card, another presenter can still make use of the projector/monitor by
clicking the “Connect” button on his/her PSM.
Stop Your WiJET Presentation Session
If at any time you wish to disconnect your computer from the WiJET, simply bring up the
WiJET PSM and click on the “Stop” button. Clicking the “Stop” button does not
terminate the wireless connection between your computer and the WiJET. It simply
yields the control of the WiJET so that the next presenter can have control of the WiJET
and make a presentation. The wireless connection to the WiJET stays live after clicking
the “Stop” button so a presenter can quickly get back to another turn of presentation.
Exit the WiJET Presentation Session Manager
Either clicking the “Close” button in the PSM, or right-click the WiJET Tray Icon and
then click “Exit” will terminate the WiJET User Software. The Tray Icon will disappear
from your Windows start menu.
Upon termination, the WiJET software restores your wireless card to its original settings
if the card has been automatically configured.
19
Chapter 4 – Using the Web Based Utility
Introducing the Web Based Utility
Along with the software based utility that is available on the install CD, the WiJET also
has a Web Based Utility that allows you to configure other aspects of the WiJET. This
includes the initial banner page that you see when the WiJET is first powered.
Accessing the Web Based Utility
There are two ways of accessing the Web Based Utility. One way is to install the WiJET
Administration Tool as described in Chapter 2 – Installation for the WiJET
Administration Tool. The other way is to configure your radio manually, and then
manually opening your web browser to access the web based utility.
Configuring Your PCMCIA Adaptor Automatically
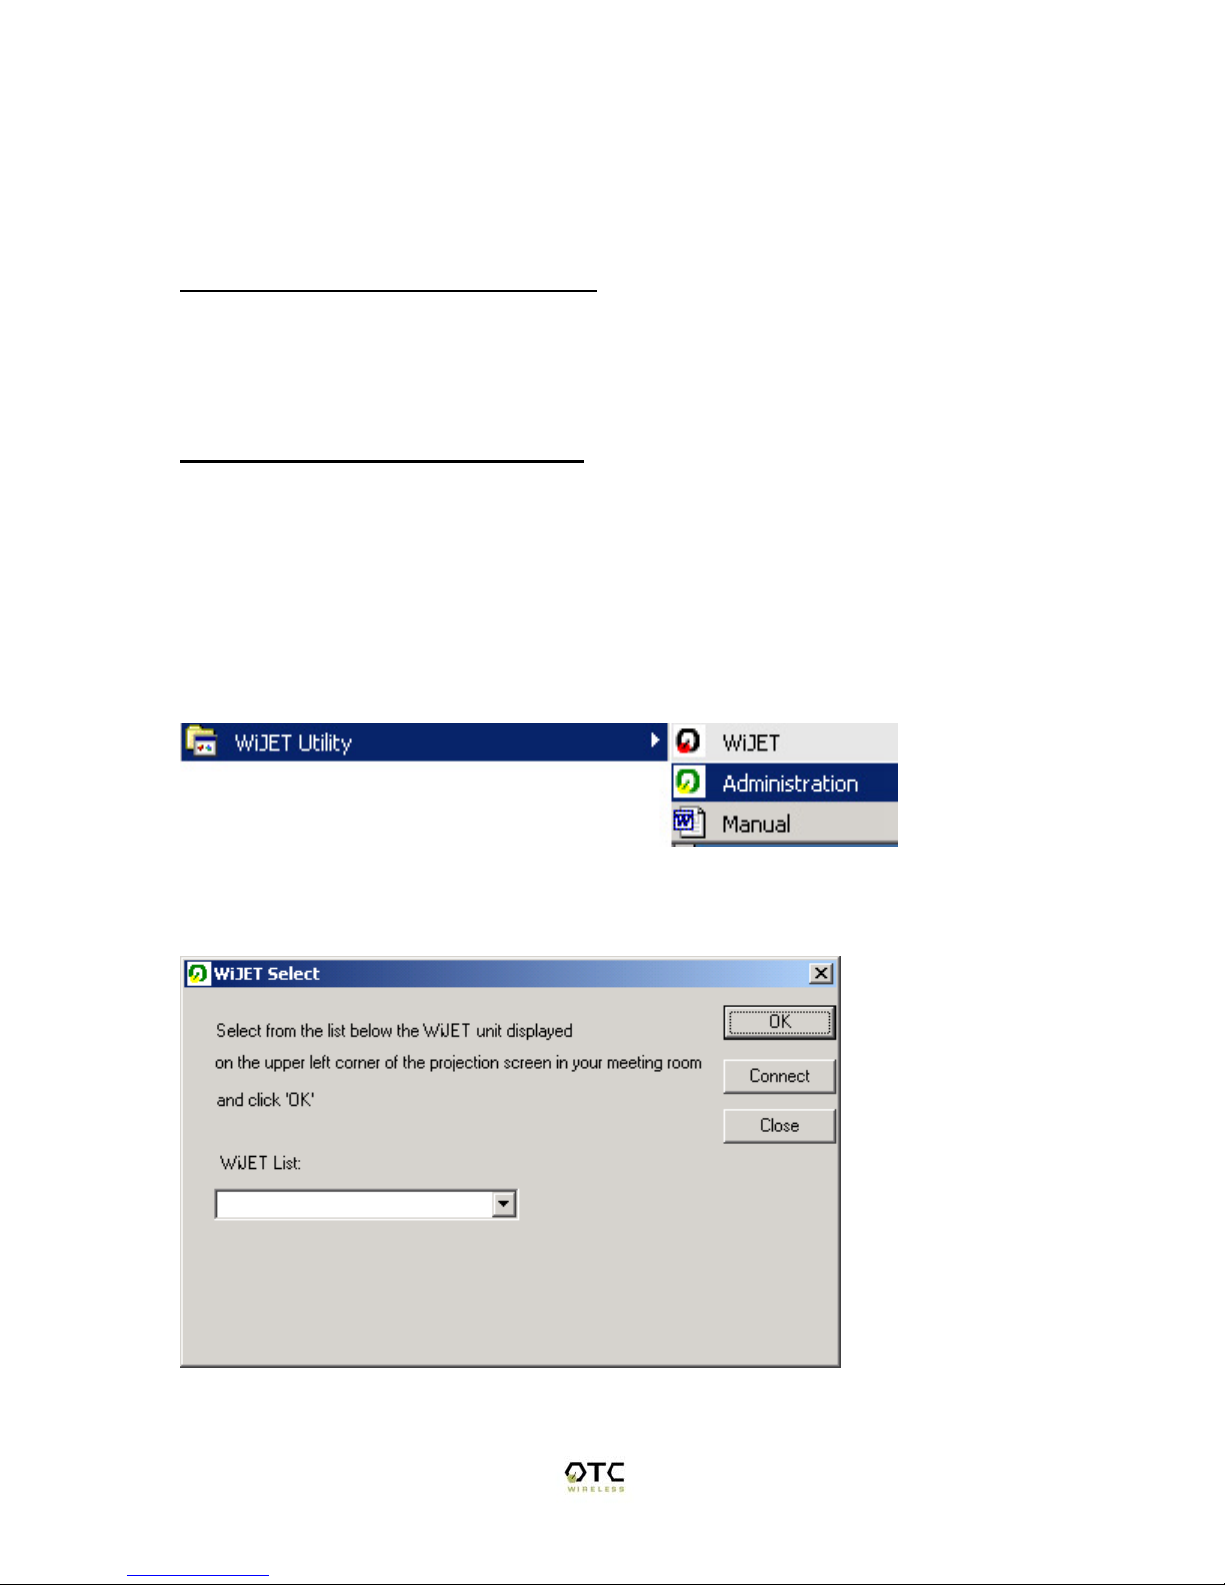
To configure your PCMCIA Adaptor automatically to access the Web Based Utility,
click on “Start”, “Program Files”, and then “WiJET Utility”. You should see a screen like
Figure 17 below.
Figure 17 WiJET Utility
If you click on “Administration”, a window like Figure 18 will appear.
Figure 18 WiJET select Screen for Administration Tool
20
Select from the WiJET list the WiJET number and click “OK”. There should be a
message that states “Configuring your Wireless Card” before a “Setup Completed”
window appears.
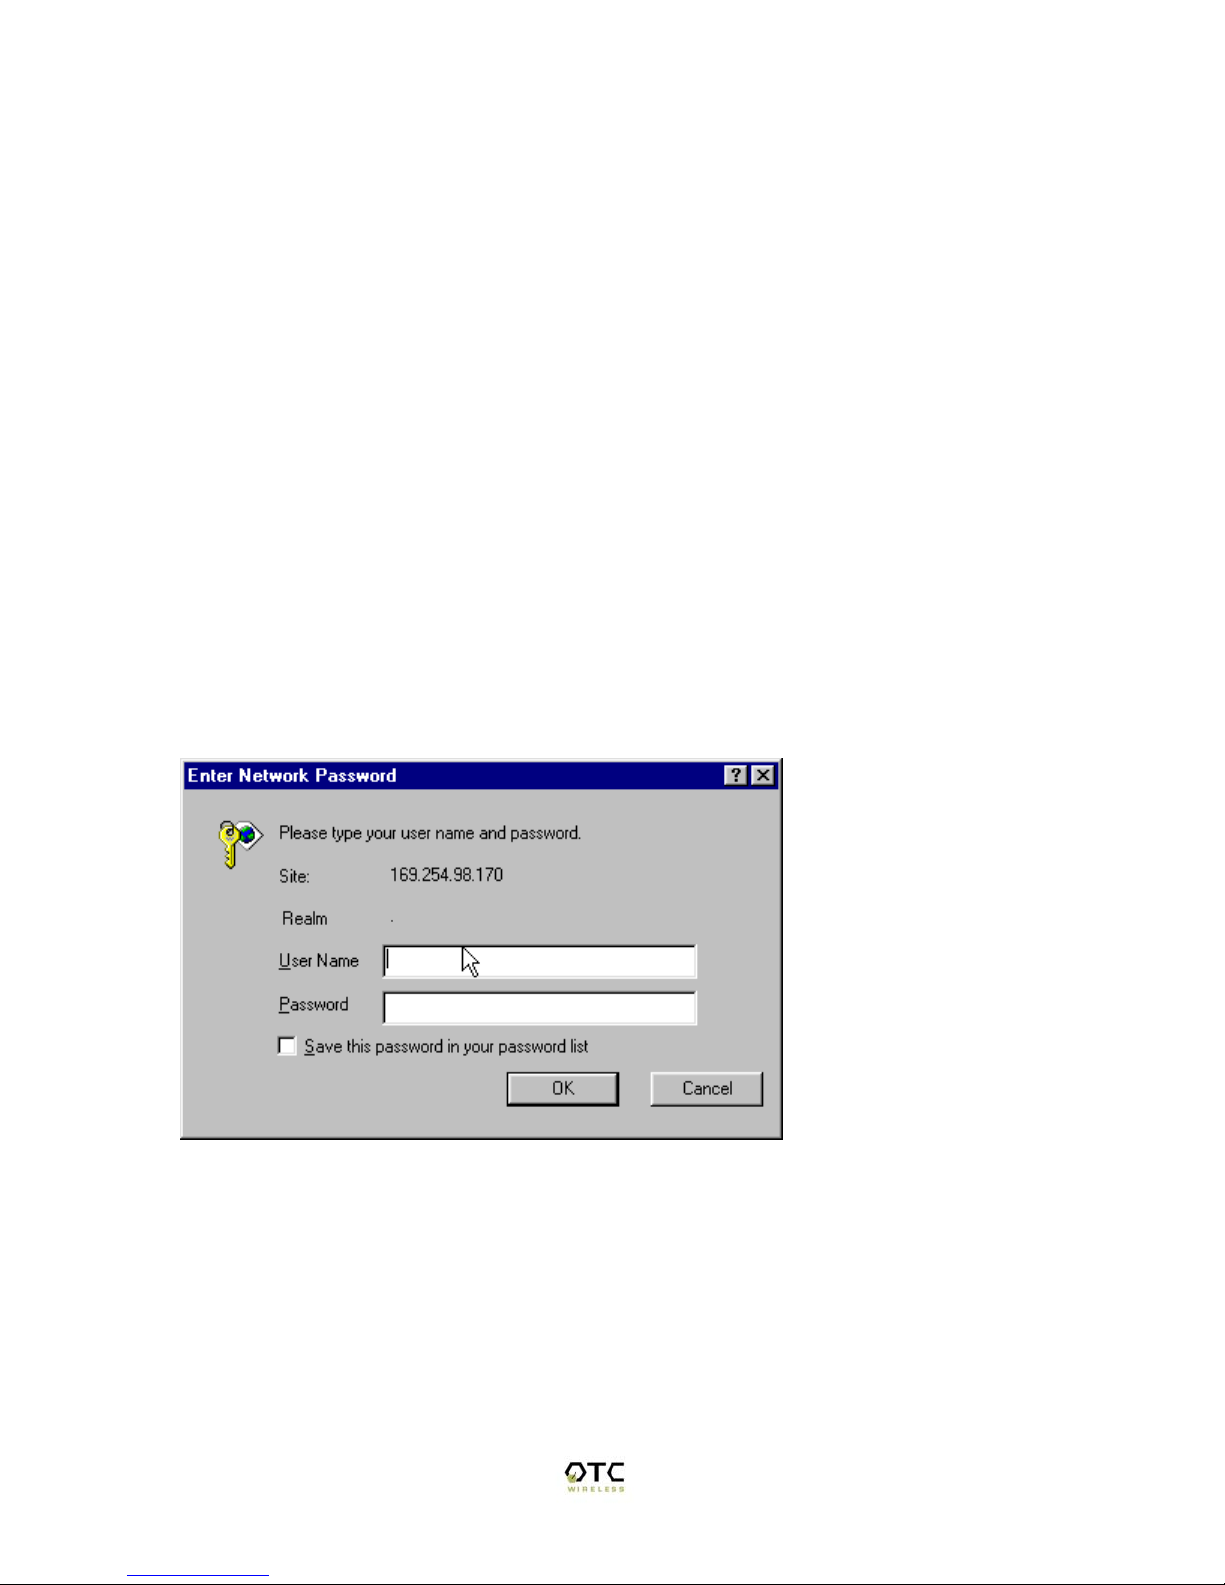
Click OK on the Setup Completed window and click on connect. A web browser should
appear and you should be prompted with a User Name and Password.
Configuring Your WiFi Adaptor Manually
To access the Web Based Utility on the WiJET, you must setup your WiFi card as
instructed in Chapter 3 - Configuring your computer to Control the WiJET. Once you
have setup your Wireless Card to be able to control the WiJET, you must connect to the
WiJET using the PSM.
After you have connected your computer to the WiJET via the PSM, open a web browse
and enter your computer’s current IP address plus one; For example, if your computer’s
current IP address is 192.168.11.224, try entering 192.168.11.225.
When you successfully reach the web site, you should reach the following web page.
Figure 19 Logon Screen
The User Name is admin and the password is public. Once you have pushed the OK
button you should see the following web page as in Figure 20
Table of contents
Other OTC Wireless Adapter manuals


