Otone BluWall Direct User manual

User Manual
Notice d’utilisation
Benutzerhandbuch
Инструкция
BluWall Direct Wi-Fi
nfc

Introduction
Thank you for choosing Otone Audio’s BluWall Direct Wi-Fi and Bluetooth speaker. Your new portable
Multi-Zone Wi-Fi speaker brings you great audio performance and user-friendly operation with cutting
edge style.
This cutting edge piece of audio kit give you so many options it’s hard to know where to start but don’t
worry we’ll make it easy for you, so you can get exactly what you want, when you want it, wherever
you are!
OTONE Audio is committed to creating innovative audio products to meet your home and travel
needs. To get the most from your new speaker, please be sure to read this User Manual completely. It
contains all of the necessary information to connect and operate your speaker to get the best out of it.
We’re always keen to hear you thought on how we could improve our products or you ideas for new
ones, if you’d like to get in touch please do so by going to the contact page on our website.

User Manual
BluWall Direct speaker
3.5mm Aux cable Warranty card
Power adaptor for
interchangeable plugs
Box contents:

jStatus light (white-WiFi / blue-Bluetooth / purple-USB
/ green-Aux-in)
k start-up/shut-down
lMode
m Play/pause
n-Volume decrease
o+Volume increase
pCharge indicator light. When not connected to
power supply: red-low battery. When connected to
power supply: red-charging / green-fully charged.
q Power adapter socket
r Headphone line-out jack
s Aux line-in jack
s USB port for playback from external storage (e.g. USB
hard drive).
Button and Connection Functions

Getting Started
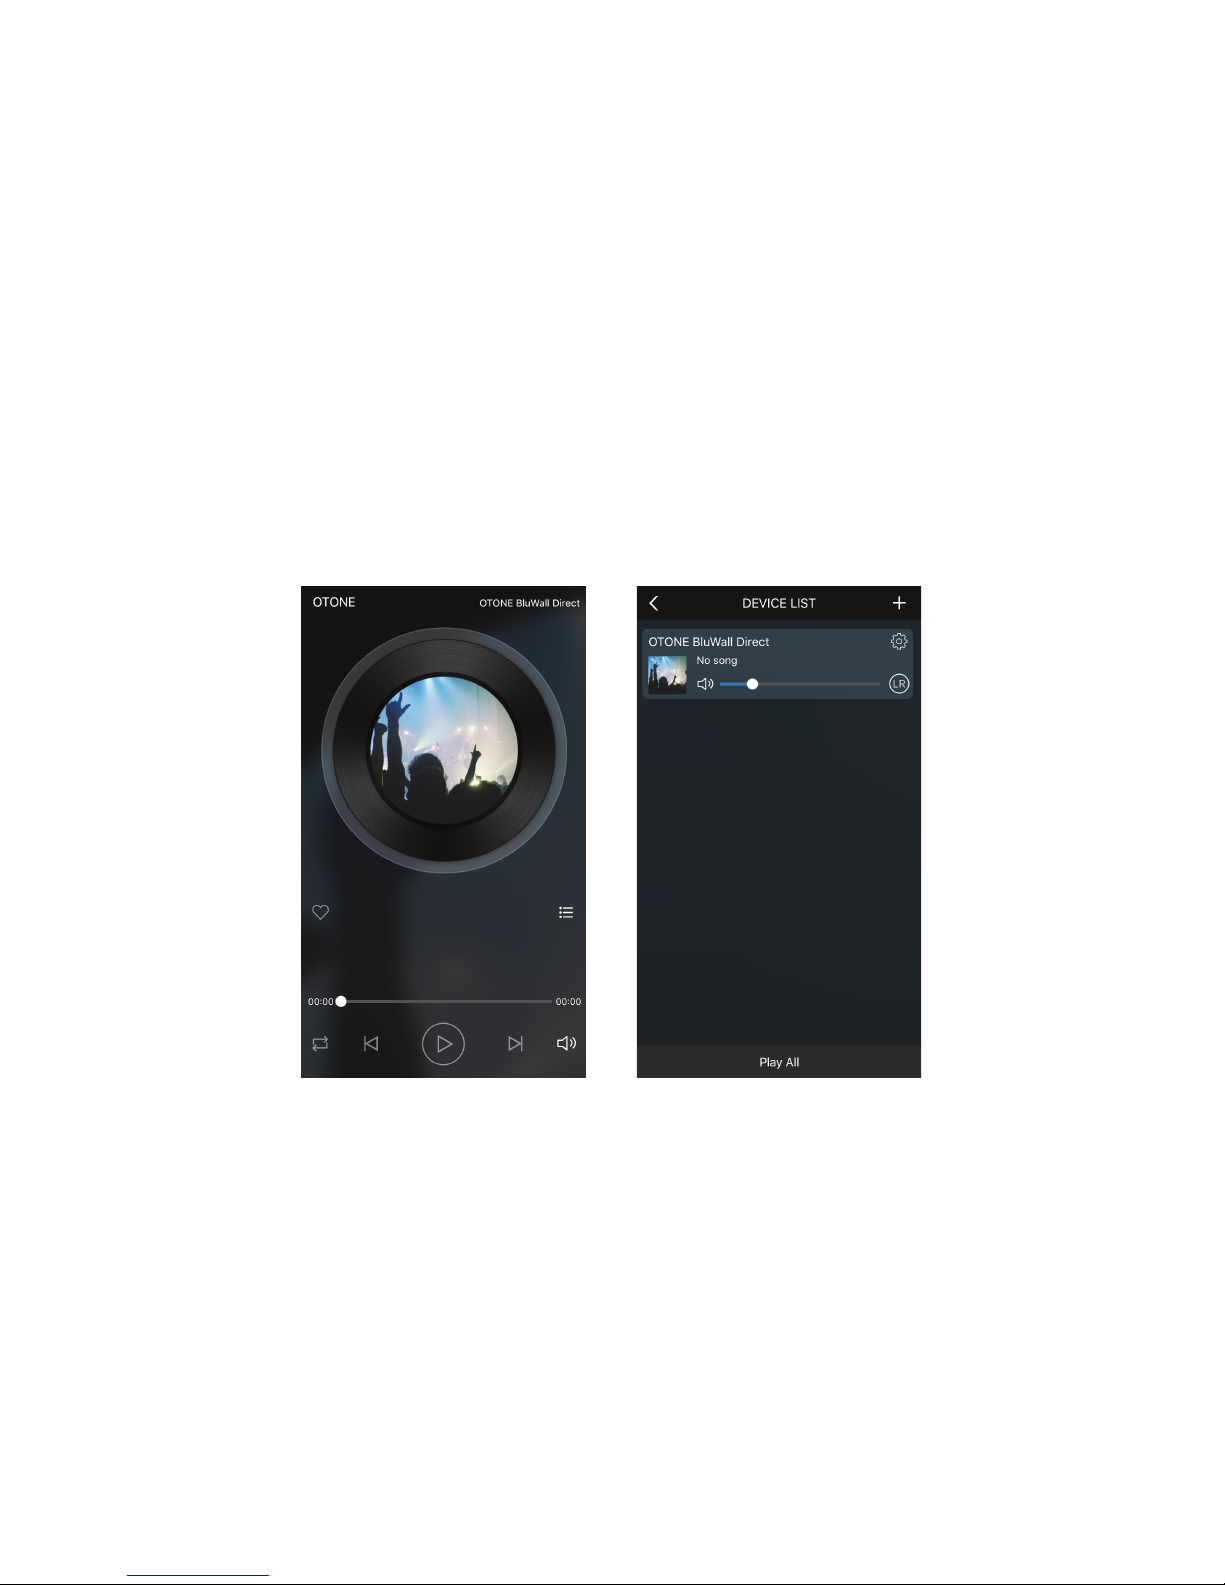
Before starting, please download the ocial OTONE App for iOS or Android device.
* iOS users, please search in the App Store for ‘OTONE’, then download and install;
* Android users, please search in the Google Play Store for ‘OTONE’, then download and install;
* Alternatively you can visit www.otoneaudio.com to download.
Initial Set Up and Playback
BluWall Direct (BWD) oers you a number of dierent options for music playback from you device,
depending on the type of set-up you want. Each mode will give you a slightly dierent way to enjoy
your music and you can connect up to eight BWD speakers together over Wi-Fi!
If you want you can play dierent songs over dierent speakers in dierent zones of your home and
garden… or how about linking multiple speakers in the park to bring music to your picnic… what
about a festival? You can bring home audio quality sound to a tent-lled eld in the middle of
nowhere!
There are so many options but don’t worry, it’s really simple and we’ll guide you through setting it up.
Firstly choose your playback mode:
*Wi Direct - Allows you to connect your phone directly to BWD speakers over a mobile Wi-Fi
connection. Best for pairing multiple speakers when no home Wi-Fi network is available.
*Cloud Play - Allows BWD to play music stored on the cloud or a local device via a high-speed Wi-Fi
internet connection. Best for pairing multiple speakers over a home Wi-Fi network.
*Bluetooth – Allows you to connect your phone to one BWD speaker wirelessly. Best for quick
connection when only using one speaker. (Note: audio will not be as high quality as when playing over
a Wi-Fi connection).
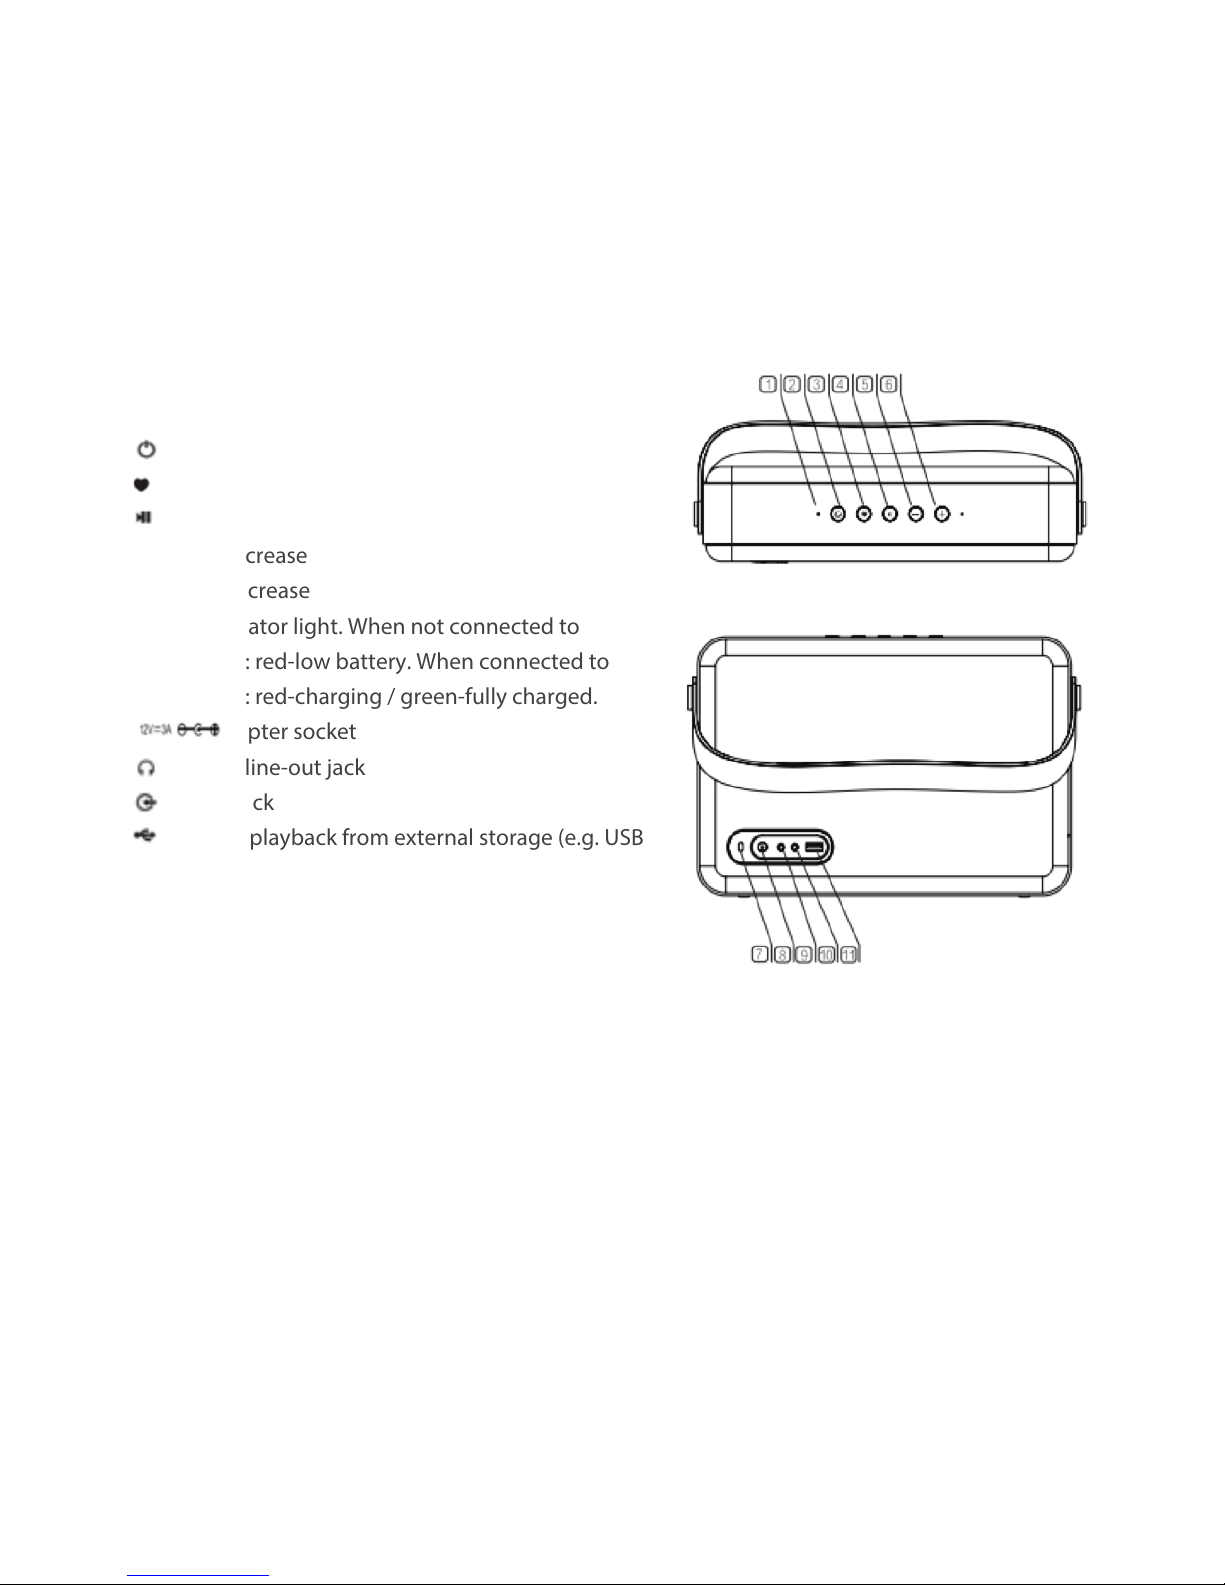
*USB – Allows wired digital connection for playback from external storage device e.g. ash
drive/external hard drive/HHD etc.
*Aux-in – Allows a wired, analogue connection to any device with a 3.5mm headphone jack e.g. laptop,
PC, television etc.
-6-

Set Up
Direct connection to BluWall Direct
Even without a WiFi network, you can connect your mobile device to multiple BWD speakers using
Wi-Fi Direct. (Note: when in direct connection mode it is only possible to play music stored locally on
your device).
Please follow the steps below to connect your device:
Step 1: Press and hold the power button (2) for 3 seconds, until the white power indicator light starts to
ash. After a further 5-10 seconds the white light will stop ashing and remain solid white. (Note: If
connecting to multiple speakers it is advised to switch them on one at a time, then connect each in
turn).
Step 2: Go into the Wi-Fi settings screen on your mobile device and switch on Wi-Fi.
Step 3: In your WiFi settings screen, nd the network named ‘OTONE BWD ****’, then select to connect
to your BWD speaker;

Step 4: Open the OTONE App. You will now be taken
to the App music playback home screen.
Step 5: At the top right of the screen you will see the
name of the BWD speaker you have connected to. If
you would like to add one or more devices to your set
up you can do so by pressing on the name, then press
‘+’ at the top right of the next screen.
Follow the on screen prompts to connect up to seven
additional BWD speakers.
Step 6: When prompted to “Press the WPS button”.
Press the Vol- and Vol+ (5)&(6) buttons on you speaker
simultaneously (you will hear a ‘Beep’ from your
speaker).
Then press ‘Next’ and then “Connect” on the App.
By default there is no password set, if you are asked for
one, enter the local network password and press
“Connect”.

Step 8: Once you have nished connecting additional
speakers, press ‘OTONE’ at the top left of the screen
and this will take you to the music source screen.
Alternatively you can also ‘swipe’ right to reveal the
source screen.
Step 9: Select your music source. Note: When using
the direct connection mode you will only be able to
play from music stored locally on your device. So
select My Music, and then choose a song, album or
playlist to play from the list.

Step 10: Once you have selected a song, the App will show the music control interface screen. This
gives you various options to control playback such as; continuous play/repeat modes, VTX digital bass
enhancement, track play/pause/forward/back etc, you can also save favorites songs for later or add
them to a queue to play next.

Cloud Play (connecting to a local/home network)
If you are in a place with a local/home network you can use this to connect your mobile and device and
speakers together. This creates a more stable connection and enables multiple devices to be
connected at the same time over he network (e.g. laptops, tablets etc).
This also enables you to access a wider range of online content, such as internet radio stations and
other streaming services.
To set up cloud play follow the steps below:
Step 1: Connect your mobile device to the network router. To do this go into the Wi-Fi settings screen
on your mobile device and switch on Wi-Fi.
Step 2: In your WiFi settings screen, nd the network you want to connect to, then select it. Note: you
may need to enter a password when prompted (this is usually printed on the rear or underside of the
network router), if not ask the owner of the network for the password.

Step 3: Once connected to the network, launch the OTONE App.
Step 4: Connect your speaker to the network router. For the rst time connection, the App screen will
display “No speaker found”. This is normal. Please click “Add a Device”
Step 5: To connect your speaker, please follow the same steps as for connecting your mobile device i.e.
nd the network you want then enter the password.
Step 6: After entering the password, press
‘Yes” to connect
Step 7: When prompted to “Press the WPS
button”. Press the Vol- and Vol+ (5)&(6) buttons
on your speaker simultaneously (you will hear a
‘Beep’ from your speaker).
Then press ‘Next’ on the App.
Step 8: If you network router has a WPS button
(please refer to your router’s manual), press this
button also.

Step 9: You should now be connected to the router and will be automatically taken to the App music
playback home screen.
Step 10: If you would like to add one or more devices to your set up you can do so repeating Steps 5-8
above.
Always stay connected to the latest news through internet radio
You can also use the OTONE App to play the radio. Simply choose one of the radio Apps from the
music source screen.

Playing music with Bluetooth
Step 1: Press the power button (2) briey after turning the device on. The indicator light will change to
blue and the device will switch to Bluetooth mode.
Step 2: Go into your mobile device Bluetooth settings and search for ‘OTONE BWD’ in the device’s
Bluetooth device list. Press to connect and that’s it! Your BWD speaker is now ready to use.
Step 3: Launch the OTONE Control App and choose the music you want to play.
Play music via the USB interface (portable hard drive etc)
Step 1: Press the power button (2) briey after turning the device on. The indicator light will change to
purple and the device will switch to USB mode.
Step 2: Insert your USB (or other mass storage/HHD) device into the USB port (11) on the rear of the
speaker.
Step 3: Launch the OTONE App and choose the music you want to play.

Auxiliary Line In (AUX)
BluWall Direct is equipped with a 3.5mm professional audio interface for simple and easy analogue
connection to any device with a 3.5mm headphone jack e.g. mobile phone, laptop, PC, television etc,
and will work as external speakers.
Step 1: Press the power button (2) briey after turning the device on. The indicator light will change to
green and the device will switch to USB mode.
Step 2: Insert your one end of your 3.5mm cable into the AUX-in jack (10) on the rear of the speaker
and the other end into your audio source.

Wi-Fi
Network protocol
Network platform support
Intelligent terminal controller
Power voltage
Power adapter
USB
AUX input
Audio format
Signal to noise ratio (A-weighted)
Distortion factor
Frequency scope
Sensitivity (complete machine)
Rated power
Speaker drivers
Transmission protocol
Dimension (about)
Weight [Kg] (net weight)
Wi-Fi 802.11a/b/g/n Wi-Fi Encryption WEP,
WAP/WPA2
You will experience the best performance with
broadband speeds in excess of 2MB/sec
HTTP/HTTPS, UPnP
Supporting Skysound Internet Digital Audio
Platform
Android/iOS cellphone, tablet personal
computer(*)
110-240V, 50/60 Hz
Power adapter 12 V DC/3A
2.0
3.5mm port
DRA, MP3, FLAC, WAV
≥ 82 dB
≤1 %
50 Hz-20KHz
85dB/W/m
Power of full frequency >2.7 W Power of
low pitch>11W
Two mid-high range ldrivers, one low range
subwoofer plus one low range passive radiator
A2DP, 2.4GHz
298×192×70mm (W×H×D))
1.9kg
Product Specication
OTONE BluWall Direct – Portable Multi-zone Wi-Fi Speaker

The battery is installed in the equipment when leaving the factory. The battery must be charged for
about three hours before initial use. After the battery is charged fully, it can operate for about eight
hours.
(*) Support software
Troubleshooting
Most of the problems related to use of BluWall Direct can be easily solved by reading through the
following Frequently Asked Questions section.
Please visit the ocial Otone Audio website www.otoneaudio.com/support for more relevant
information and problem solutions.

FAQ’s
Q: No reaction after pressing the power button?
A: Please check whether the battery is low or empty. Please connect BWD to a power outlet, using the
power adaptor provided then try holding down the power button again.
Q: Streaming is sometimes stuck in the Cloud Play mode?
A: Please check whether your Wi-Fi network is stable, or whether too much network bandwidth is
occupied by another device. If you want to experience the best performance with broadband speeds
in excess of 2MB/sec
Q: What if there is no sound when streaming?
A: Please check whether the volume is set too low, whether the pause button has been pressed or
whether the auxiliary line in cable is attached.
Q: What if there is no reaction when using the mobile APP to control the audio?
A: Please check whether the connection between the mobile App and the speaker is stable. Your audio
source device and BDW speaker should be connected to the same Wi-Fi network or connected directly
to the BWD speaker via the OTONE Control App.
Q: What if there is no reaction after inserting a USB device?
A: Please check whether the USB device is inserted correctly, or whether the USB device is damaged or
corrupted.
Q: How do you turn the device o?
A: Press and hold the power button (2) for 3 seconds, the device will go into standby mode.
BWD is tted with power save mode, if no audio input is detected for 15 minutes the speaker will
automatically go into standby mode.

1 – DEFINITIONS
The following terms and expressions, shall unless the context requires otherwise, have the meanings set out below:
The Manufacturer: OTONE Audio Limited.
The Purchaser: The original purchaser of the unit.
Unit: The original OTONE Audio speaker system.
UK: The United Kingdom.
The Service Centre: Any body/organisation/sub-contractor whom has been authorised to carry out work on behalf of the manufacturer.
Fault or any other variation of the word: Any manufacturing defects in materials and/or workmanship under normal use.
Opening times: 9am-5pm Monday-Friday, except bank and/or public holidays. Purchaser’s Address: The details that appear on the warranty
registration.
Return to base: Whereby the purchaser shall be responsible for the safe delivery and all costs associated with the delivery of the unit to the Service
Centre.
The manufacturer is ONLY liable for repair and return delivery back to the purchaser.
DOA: Dead On arrival - Units that are faulty on the date of purchase or within the rst 30 days after the purchase date.
2 – WARRANTY
OTONE Audio Limited, shall warrant to the purchase of the unit for a period of 2 years from the date of purchase, any unit conrmed as faulty will be
either repaired or exchanged at the manufacturer’s cost.
3 – PROCEDURE
The warranty procedure set out herewith must be followed strictly by the purchaser. The purchaser is required to contact the Service Centre on the
following number :+44 (0)161 924 2269 (UK) during the opening times. The model number, Serial Number, Fault Description, Purchase Date and
Address are required to be supplied to the Service Centre, by the purchaser. The Service Centre will investigate the nature of the fault and validity of
the manufacturer warranty. If the unit is determined as faulty and:
Either: A- is within the rst 30 days of purchase, the Service Centre will arrange for the faulty unit to be collected (please note the manufacturer does
not guarantee a next day or a.m./p.m. collection) and a replacement unit of the same/similar specication will be delivered at the same time to the
purchaser’s address.
Or: B- is reported after the rst 30 days but within the rst 2 years of purchase, the purchaser will arrange for the faulty unit to be delivered to the
Service Centre. The faulty unit will be repaired within 5 working days from receipt of the faulty unit. Once tested it will be dispatched to the
purchaser’s address.
Please note the following: • Should any dispute arise with the purchase date, a copy of the sales receipt will be required to be forwarded by the
purchaser to the Service Centre. • Any unit that is reported as faulty within the DOA period that has been security marked in anyway (e.g. security
label, security ink etc.) shall be repaired not replaced. • OTONE Audio Limited reserves the right to replace any unit with a similar model of the same
or better specication without the purchaser’s consent. • DOA units should be reported to the Service Centre within 30 days from date of purchase. •
Deliveries and collections will be arranged during the stated opening times.
Warranty

OTONE Audio Limited
2nd Floor Station House,
Stamford New Road,
Altrincham
Cheshire
WA14 1EP
England
Tel: +44 (0)161 924 2269
Email: [email protected]
www.otoneaudio.co.uk
Please note the warranty is void if any of the following occur:
Any physical damage including but not limited to, cracked PCB’s or abused housing and/or bezel, any failure damages due to customers
mishandling, improper maintenance or use against the operating instructions, any damage due to misuse, abuse or negligence.
If any alteration/modication has been made to the unit and/or it has been serviced by a person not authorised by the manufacturer.
If any serial number or appliance plate is removed or defaced.
Where no fault is found by the Service Centre on units returned for service, the manufacturer may, at its discretion, charge the customer a
handling fee to cover transport and investigation.
The limited warranty is given by OTONE Audio Limited. This limited warranty is only eective upon registration of the unit within 7 days of the
purchase date. Please see overleaf for details on product registration.
The manufacturer warrants this product free against any and all manufacturing defects in material and workmanship under normal use and is
limited to repair, adjustment and/or replacement free of charge.
The manufacturer does NOT warrant that the product will meet the purchaser’s requirements in that the operation of the unit will be
uninterrupted or error-free, or that all errors will be corrected. The manufacturer is not responsible for problems caused by changes in the
operating characteristics of any device that may be attached to the unit.
The manufacturer will NOT be responsible for any direct, indirect, special, consequential or incidental loss of prots or savings arising out of
use or inability to use the unit. In no case shall the manufacturer’s liability exceed the purchase value of the unit. This restriction of liability
does not aect the purchaser’s statutory rights as a consumer or his rights with a distributor/dealer.
PROUDUCT REGISTRATION
Please register your product online with OTONE Audio by visiting
www.otoneaudio.com and click on 'Service' and then 'Register your OTONE product'
Limited Warranty

Table of contents
Other Otone Speakers manuals