manuals.online logo
Brands
  1. Home
  2. •
  3. Brands
  4. •
  5. OttLite
  6. •
  7. Home Lighting
  8. •
  9. OttLite T96G5R User manual

OttLite T96G5R User manual

ENGLISH
CONGRATULATIONS!  
You’ve purchased the finest in natural 
lighting technology with your new  
OttLite® product.
PRODUCT REGISTRATION FORM
Please complete the enclosed Product 
Registration Form and return it today  
by mail, or register online by going to: 
www.OttLite.com/warranty.
WARNING: To prevent electric shock,
make sure the lamp is not plugged in
until all assembly steps are complete.
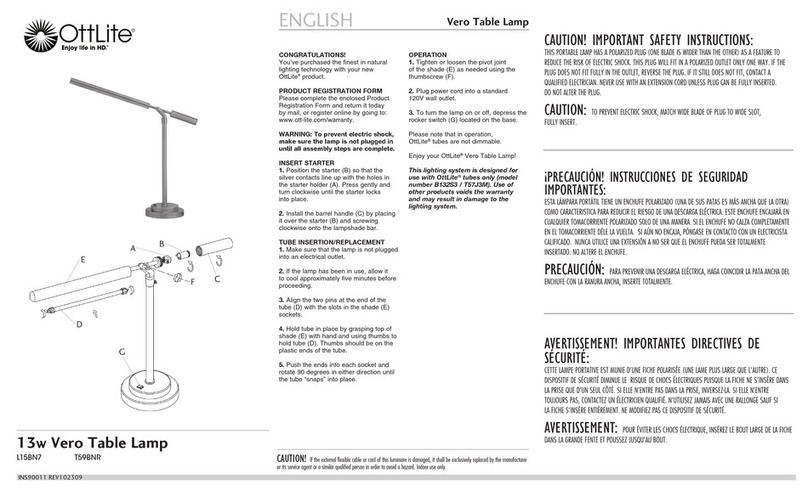
LAMP ASSEMBLY
Your Universal Craft Lamp is capable of 
clamping to a table edge or sitting on a 
flat surface in a free-standing position.
CLAMP USE
1. Loosely assemble lower clamp (B) as 
shown in diagram using thumbscrew (C) 
to hold the pieces together.
2. Sandwich the table between upper 
and lower clamp pieces and tighten 
thumbscrew until snug. Use care to not 
over-tighten.
3. Plug the lamp into a standard 120V 
outlet.
4. To turn the lamp on or off depress the 
rocker switch located in the cord mount-
ed power box.
FREE-STANDING USE
1. Loosely assemble lower clamp (B), as 
shown in diagram, using thumbscrew (C) 
to hold the pieces together.
2. Place stand (A), as shown, between 
upper and lower clamp pieces.
3. Tighten thumbscrew to snugly hold the 
stand. Place lamp as desired.
4. Place back-stand (F) over the thumb-
screw (C). Back-stand should face the 
opposite direction of stand (A). 
5. Plug the lamp into a standard 120V 
outlet.
6. To turn the lamp on or off, rotate the 
wheel of the in-line switch.
TUBE INSERTION/REPLACEMENT
1. Make sure the lamp is not plugged into 
an electrical socket.
2. If the lamp has been in use, allow it 
to cool approximately 5 minutes before 
proceeding.
3. Remove the shade (E) by pulling it 
away from the lamp.
4. To install a tube in the socket, hold 
the tube (D) firmly at the base and push 
it straight into the socket until it “snaps” 
into place.
5. To remove a tube already installed in 
the lamp, grasp it firmly in your hand and 
pull it straight out of the socket. Do not
twist or turn the tube while removing it
from the socket.
6. Replace the shade by aligning the 
shade guide notches with the grooves in 
the lamp head (E); push shade firmly into 
lamp head. A “click” should be heard.
Please note that in operation, OttLite® 
tubes are not dimmable.
Enjoy your OttLite® Universal Craft lamp!
This lighting system is designed for
use with OttLite® tubes type (style
number PL13-A). Use of other products
voids the warranty and may result in
damage to the lighting system.
For more information on purchasing
replacement tubes/bulbs please go to
www.OttLite.com/replacement13wtube
CAUTION! IMPORTANT SAFETY INSTRUCTIONS:
THIS PORTABLE LAMP HAS A POLARIZED PLUG (ONE BLADE IS WIDER THAN THE OTHER) AS A FEATURE TO REDUCE
THE RISK OF ELECTRIC SHOCK. THIS PLUG WILL FIT IN A POLARIZED OUTLET ONLY ONE WAY. IF THE PLUG DOES
NOT FIT FULLY IN THE OUTLET, REVERSE THE PLUG. IF IT STILL DOES NOT FIT, CONTACT A QUALIFIED ELECTRICIAN.
NEVER USE WITH AN EXTENSION CORD UNLESS PLUG CAN BE FULLY INSERTED. DO NOT ALTER THE PLUG.
CAUTION: TO PREVENT ELECTRIC SHOCK, MATCH WIDE BLADE OF PLUG TO WIDE SLOT, FULLY INSERT.
CAUTION: BALLAST REQUIRES PROPER VENTILATION FOR PROPER OPERATION. A MINIMUM OF 6
INCHES OF AIR SPACE MUST BE PROVIDED ON ALL SIDES EXCEPT WHERE PLUGGED INTO AN ELECTRICAL OUTLET.
AVERTISSEMENT! IMPORTANTES DIRECTIVES DE
SÉCURITÉ:
CETTE LAMPE PORTATIVE EST MUNIE D’UNE FICHE POLARISÉE (UNE LAME PLUS LARGE QUE L’AUTRE). CE
DISPOSITIF DE SÉCURITÉ DIMINUE LE RISQUE DE CHOCS ÉLECTRIQUES PUISQUE LA FICHE NE S’INSÈRE DANS
LA PRISE QUE D’UN SEUL CÔTÉ. SI ELLE N’ENTRE PAS DANS LA PRISE, INVERSEZ-LA. SI ELLE N’ENTRE
TOUJOURS PAS, CONTACTEZ UN ÉLECTRICIEN QUALIFIÉ. N’UTILISEZ JAMAIS AVEC UNE RALLONGE SAUF SI
LA FICHE S’INSÈRE ENTIÈREMENT. NE MODIFIEZ PAS CE DISPOSITIF DE SÉCURITÉ.
AVERTISSEMENT: POUR ÉVITER LES CHOCS ÉLECTRIQUE, INSÉREZ LE BOUT LARGE DE LA FICHE
DANS LA GRANDE FENTE ET POUSSEZ JUSQU’AU BOUT.
AVERTISSEMENT: LA RESISTENCIA NECESITA UNA ADECUADA VENTILACIÓN PARA FUNCIONAR
CORRECTAMENTE. DEBE PROVEERSE UN ESPACIO DE AIRE DE UN MÍNIMO DE 6” EN TODOS LOS LADOS,
EXCEPTO DONDE ESTÁ CONECTADA A UN TOMACORRIENTE.
¡PRECAUCIÓN! INSTRUCCIONES DE SEGURIDAD
IMPORTANTES:
ESTA LÁMPARA PORTÁTIL TIENE UN ENCHUFE POLARIZADO (UNA DE SUS PATAS ES MÁS ANCHA QUE LA OTRA)
COMO CARACTERISTICA PARA REDUCIR EL RIESGO DE UNA DESCARGA ELÉCTRICA. ESTE ENCHUFE ENCAJARÁ EN
CUALQUIER TOMACORRIENTE POLARIZADO SOLO DE UNA MANERA. SI EL ENCHUFE NO CALZA COMPLETAMENTE
EN EL TOMACORRIENTE DÉLE LA VUELTA. SI AÚN NO ENCAJA, PÓNGASE EN CONTACTO CON UN ELECTRICISTA
CALIFICADO. NUNCA UTILICE UNA EXTENSIÓN A NO SER QUE EL ENCHUFE PUEDA SER TOTALMENTE
INSERTADO. NO ALTERE EL ENCHUFE.
PRECAUCIÓN: PARA PREVENIR UNA DESCARGA ELÉCTRICA, HAGA COINCIDIR LA PATA ANCHA DEL
ENCHUFE CON LA RANURA ANCHA, INSERTE TOTALMENTE.
PRECAUCIÓN: LA RESISTENCIA NECESITA UNA ADECUADA VENTILACIÓN PARA FUNCIONAR
CORRECTAMENTE. DEBE PROVEERSE UN ESPACIO DE AIRE DE UN MÍNIMO DE 6” EN TODOS LOS LADOS,
EXCEPTO DONDE ESTÁ CONECTADA A UN TOMACORRIENTE.
Universal Craft Lamp
CAUTION! If the external flexible cable or cord of this luminaire is damaged, it shall be exclusively replaced by the manufacturer
or its service agent or a similar qualified person in order to avoid a hazard. Indoor use only.
INS110013 REV051011
13w Universal Craft Lamp
T96G5R 915PN3 GX7903
ŐŕŕĮōŊŕņ
A
ED
B
C
F
All manuals and user guides at all-guides.com
FÉLICITATIONS! Vous avez fait l’achat 
de la plus innovatrice technologie naturelle 
et de renom en éclairage avec votre  
produit OttLite.®
FORMULAIRE
D’ENREGISTREMENT DE PRODUIT
Compléter le formulaire d’enregistrement 
qui est inclus pour votre produit et nous le 
retourner dès aujourd’hui par le retour du  
courrier, ou enregistrez-vous en ligne en 
allant à :www.OttLite.com/warranty.
AVERTISSEMENT: Pour éviter les chocs
électriques, assurez-vous que la lampe
ne soit pas branchée avant d’avoir
effectué toutes les étapes de montage.
ASSEMBLAGE DE LA LAMPE
Votre Lampe Artisanale Universelle peut 
s’attacher à un coin de table ou être placée 
sans support sur une surface de table.
UTILISATION DE LA PINCE
1. Montez la pince inférieure (B) en suivant 
les instructions du schéma à l’aide de la vis 
à oreilles (C) pour maintenir l’ensemble.
2. Placez la table entre la pince supérieure 
et la pince inférieure et resserrez fermement 
la vis à oreilles. Attention de ne pas trop 
serrer.
3. Branchez la lampe dans une prise 
standard de 120V et votre lampe est prête  
à fonctionner.
4. Pour allumer ou éteindre la lampe, 
presser simplement le bouton de 
l’interrupteur basculant localisé sur le boitier 
d’alimentation monté sur cordon. 
UTILISATION SANS SUPPORT
1. Montez la pince inférieure (B) en suivant 
les instructions du schéma à l’aide de la vis 
à oreilles (C) pour maintenir l’ensemble.
2. Placez le socle (A) entre les pinces inféri-
eure et supérieure comme indiqué sur le 
schéma.
3. Resserrez la vis à oreilles pour attacher 
solidement le socle. Placez la lampe dans la 
position désirée.
4. Placez la base de résistance (F) sur la vis 
à oreilles (C). La base de résistance (F) doit 
être orienté dans la direction opposé du 
socle (A). 
5. Branchez la lampe dans une prise 
standard de 120V.
6. Pour allumer ou éteindre la lampe, faites 
pivoter la roulette de l’interrupteur.
INSERTION/REMPLACEMENT DU TUBE
1. Assurez-vous que la lampe n’est pas 
branchée dans une prise de courant 
électrique.
2. Si la lampe a été utilisée, laissez-la refroi-
dir pendant environ 5 minutes avant  
de continuer.
3. Retirez l’abat-jour (E) en le sortant 
directement de la lampe.
4. Pour installer un tube (D) dans la douille, 
attrapez-le fermement par la base et  
placez-le directement dans la douille jusqu’à 
ce qu’il s’enclenche en position.
5. Pour retirer un tube déjà installé dans la 
lampe, attrapez-le fermement et sortez-le 
directement de la douille. Ne faites pas
pivoter ou ne tournez pas le tube.
6. Replacez l’abat-jour en alignant les 
encoches de l’abat-jour sur les onglets de  
la tête de lampe (E); poussez l’abat-jour  
fermement dans la tête de lampe jusqu’à  
ce vous entendiez un déclic.
Veuillez noter qu’une fois en marche, 
l’intensité des tubes fluorescents OttLite® 
ne peut pas être réglée.
Profitez de votre lampe artisanale 
Universelle d’OttLite® !
Ce système d’éclairage est conçu
pour être utilisé avec les tubes OttLite®
type (numéro de style PL13-E).
L’utilisation d’autres produits annule la
garantie et pourrait endommager le sys-
tème d’éclairage.
Pour plus d’information sur l’achat d’ampoules
ou de tubes de remplacement, visiter le
www.OttLite.com/replacement13wtube
¡FELICITACIONES! Usted acaba de
adquirir la mejor tecnología de iluminación
natural con su nuevo producto OttLite.®
FORMULARIO DE REGISTRO
Por favor, llene el Formulario de Registro
de Producto anexo y envíelo por correo hoy
mismo, o regístrese en línea visitando:
www.OttLite.com/warranty
ADVERTENCIA: Para prevenir un choque
eléctrico, cerciórese de que la lámpara
no se conecte hasta que se complete el
ensamblaje y todos los pasos.
ENSAMBLAJE DE LÁMPARA
Su Lámpara Universal de Trabajo puede
sujetarse al borde de una mesa o puede
colocarse sobre una superficie plana en un
posición autoestable.
USO DE LA GRAPA
1. Ensamble, sin apretar mucho, la grapa
inferior (B), como se muestra en el
diagrama usando el tornillo de mariposa (C)
para sostener juntas las piezas.
2. Haga como un sándwich poniendo la
tabla entre las piezas de arriba y de abajo
y apriete el tornillo mariposa hasta que
encaje. Tenga cuidado de no apretar
demasiado.
3. Conecte la lámpara en un tomacorriente
estándar de 120V.
4. Para encender o apagar la lámpara presione
el interruptor oscilante ubicado en el mecanismo
de prender y apagar montado en el cable.
USO AUTOESTABLE
1. Ensamble, sin apretar mucho, la grapa
inferior (B), como se muestra en el
diagrama, usando el tornillo de mariposa
(C), para sostener juntas las piezas.
2. Coloque el soporte (A) como se
muestra, entre las piezas inferior y superior
de la grapa.
3. Apriete el tornillo de mariposa para sos-
tener ligeramente el soporte. Coloque la
lámpara en la posición deseada.
4. Coloque la base de contrapeso (F) sobre
el tornillo ( C). Este contrapeso (F) debe
estar orientado en sentido contrario a la
base (A).
5. Conecte la lámpara en un tomacorriente
estándar de 120V.
6. Para encender y apagar la lámpara, gire
la rueda del interruptor en línea.
INSTALACIÓN/REEMPLAZO DE TUBO
1. Cerciórese de que la lámpara no esté
conectada en un tomacorriente.
2. Si la lámpara ha estado en uso, permita
que se enfríe durante aproximadamente
5 minutos antes de proseguir.
3. Retire la pantalla (E) halándola bien dere-
cho hacia fuera de la lámpara.
4. Para instalar un tubo en el soquete,
sostenga firmemente el tubo (D) en su base
y empuje el tubo bien derecho hacia dentro
del soquete hasta que “encaje” en su lugar.
5. Para retirar un tubo ya instalado en la
lámpara, tómelo firmemente en su mano
y hálelo bien derecho hacia fuera del
soquete. No doble o tuerza el tubo
mientras lo retira del soquete.
6. Reemplace la pantalla alineando las
muescas de la guía de la pantalla con las
ranuras del cabezal de la lámpara (E);
empuje firmemente la pantalla hacia dentro
del cabezal de la lámpara. Se escuchará
un “clic”.
Por favor tenga en cuenta que durante la
operación, los tubos OttLite® no son
graduables.
¡Disfrute su lámpara de Universal de
OttLite®!
Este sistema de iluminación está
diseñado para ser utilizado únicamente
con tubos OttLite® tipo (número de
estilo PL13-E).El uso de otros productos
anula la garantía y pudiera resultar en
daños al sistema de iluminación.
Para más información acerca de la comprar de
tubos o bombillos de repuesto, favor visitar:
www.OttLite.com/replacement13wtube
FRANÇAIS
ESPAÑOL Lampe Artisanale Universelle
ATTENTION! Si le câble ou le cordon souple externe de ce lampadaire est endommagé, celui-ci doit être remplacé exclusive-
ment par le fabricant, son agent de service ou toute personne compétente afin d’éviter tout danger. Pour usage à l’intérieur seulement.
¡PRECAUCIÓN! Si el cable o cordón flexible externo de esta luminaria está dañado, debe ser exclusivamente reemplazado por
el fabricante o su agente de servicio o una persona calificada similar a fin de evitar un riesgo. Sólo para uso en interiores.
13w Universal Lamp
T96G5R 915PN3
INS110013 REV051011
ŐŕŕĮōŊŕņ
A
ED
B
C
F
Lámpara Universal de Trabajo
All manuals and user guides at all-guides.com

This manual suits for next models

1

Other OttLite Home Lighting manuals

OttLite S02GGJ User manual

OttLite

OttLite S02GGJ User manual

OttLite CS33600C User manual

OttLite

OttLite CS33600C User manual

OttLite workwell WW10SK1 User manual

OttLite

OttLite workwell WW10SK1 User manual

OttLite 13N86006 User manual

OttLite

OttLite 13N86006 User manual

OttLite PL-0360Q User manual

OttLite

OttLite PL-0360Q User manual

OttLite CS59029 User manual

OttLite

OttLite CS59029 User manual

OttLite 15991CH8 User manual

OttLite

OttLite 15991CH8 User manual

OttLite SlimLine 315G53 User manual

OttLite

OttLite SlimLine 315G53 User manual

OttLite 290009 User manual

OttLite

OttLite 290009 User manual

OttLite A34G5B User manual

OttLite

OttLite A34G5B User manual

OttLite SanitizingPRO SC1AP00S User manual

OttLite

OttLite SanitizingPRO SC1AP00S User manual

OttLite DMKCH9 User manual

OttLite

OttLite DMKCH9 User manual

OttLite CSA77WGC User manual

OttLite

OttLite CSA77WGC User manual

OttLite AY5009-FFP User manual

OttLite

OttLite AY5009-FFP User manual

OttLite CSNQC00Z-CA User manual

OttLite

OttLite CSNQC00Z-CA User manual

OttLite 2YMWG9 User manual

OttLite

OttLite 2YMWG9 User manual

OttLite Dawson User manual

OttLite

OttLite Dawson User manual

OttLite Creative Curves LED Desk Lamp User manual

OttLite

OttLite Creative Curves LED Desk Lamp User manual

OttLite U83WG2 User manual

OttLite

OttLite U83WG2 User manual

OttLite A64PN9 User manual

OttLite

OttLite A64PN9 User manual

OttLite Purify User manual

OttLite

OttLite Purify User manual

OttLite CSR07G5W-CA User manual

OttLite

OttLite CSR07G5W-CA User manual

OttLite T81G5T User manual

OttLite

OttLite T81G5T User manual

OttLite L15BN7 User manual

OttLite

OttLite L15BN7 User manual

Popular Home Lighting manuals by other brands

Clearance the lighting collection BARHAM 1 Installation and user instructions

Clearance

Clearance the lighting collection BARHAM 1 Installation and user instructions

IDTOLIGHT AGADIR installation instructions

IDTOLIGHT

IDTOLIGHT AGADIR installation instructions

roblight Ara 5 user manual

roblight

roblight Ara 5 user manual

La Redoute GJK101 Assembly instructions

La Redoute

La Redoute GJK101 Assembly instructions

Royal Sovereign RDL-65U owner's manual

Royal Sovereign

Royal Sovereign RDL-65U owner's manual

Maretti TULIP 13.0340.04 quick start guide

Maretti

Maretti TULIP 13.0340.04 quick start guide

RH ROBESON quick start guide

RH

RH ROBESON quick start guide

Philips 40738-06-16 user manual

Philips

Philips 40738-06-16 user manual

Springdale Lighting SAR15110LED Assembly instructions

Springdale Lighting

Springdale Lighting SAR15110LED Assembly instructions

Safavieh LIT4314A manual

Safavieh

Safavieh LIT4314A manual

Costco JK1658 Assembly instructions
Costco

Costco JK1658 Assembly instructions

EKVIP 022493 operating instructions

EKVIP

EKVIP 022493 operating instructions

Safavieh LIT4038A quick start guide

Safavieh

Safavieh LIT4038A quick start guide

Philips 322031716 user manual

Philips

Philips 322031716 user manual

HerzBlut Bi Bob Instruction and installation manual

HerzBlut

HerzBlut Bi Bob Instruction and installation manual

Rebel Light KOM1015.1 user manual

Rebel Light

Rebel Light KOM1015.1 user manual

Lumina CLOE instructions

Lumina

Lumina CLOE instructions

Philips 56450-17-16 user manual

Philips

Philips 56450-17-16 user manual

manuals.online logo
manuals.online logoBrands
  • About & Mission
  • Contact us
  • Privacy Policy
  • Terms and Conditions

Copyright 2025 Manuals.Online. All Rights Reserved.