manuals.online logo
Brands
  1. Home
  2. •
  3. Brands
  4. •
  5. OttLite
  6. •
  7. Home Lighting
  8. •
  9. OttLite L15BN7 User manual

OttLite L15BN7 User manual

ENGLISH
CONGRATULATIONS!
You’ve purchased the finest in natural
lighting technology with your new
OttLite®product.
PRODUCT REGISTRATION FORM
Please complete the enclosed Product
Registration Form and return it today
by mail, or register online by going to:
www.ott-lite.com/warranty.
WARNING: To prevent electric shock,
make sure the lamp is not plugged in
until all assembly steps are complete.
INSERT STARTER
1. Position the starter (B) so that the
silver contacts line up with the holes in
the starter holder (A). Press gently and
turn clockwise until the starter locks
into place.
2. Install the barrel handle (C) by placing
it over the starter (B) and screwing
clockwise onto the lampshade bar.
TUBE INSERTION/REPLACEMENT
1. Make sure that the lamp is not plugged
into an electrical outlet.
2. If the lamp has been in use, allow it
to cool approximately five minutes before
proceeding.
3. Align the two pins at the end of the
tube (D) with the slots in the shade (E)
sockets.
4. Hold tube in place by grasping top of
shade (E) with hand and using thumbs to
hold tube (D). Thumbs should be on the
plastic ends of the tube.
5. Push the ends into each socket and
rotate 90 degrees in either direction until
the tube “snaps” into place.
OPERATION
1. Tighten or loosen the pivot joint
of the shade (E) as needed using the
thumbscrew (F).
2. Plug power cord into a standard
120V wall outlet.
3. To turn the lamp on or off, depress the
rocker switch (G) located on the base.
Please note that in operation,
OttLite®tubes are not dimmable.
Enjoy your OttLite®Vero Table Lamp!
This lighting system is designed for
use with OttLite®tubes only (model
number B132S3 / T57J3M). Use of
other products voids the warranty
and may result in damage to the
lighting system.
CAUTION! IMPORTANT SAFETY INSTRUCTIONS:
THIS PORTABLE LAMP HAS A POLARIZED PLUG (ONE BLADE IS WIDER THAN THE OTHER) AS A FEATURE TO
REDUCE THE RISK OF ELECTRIC SHOCK. THIS PLUG WILL FIT IN A POLARIZED OUTLET ONLY ONE WAY. IF THE
PLUG DOES NOT FIT FULLY IN THE OUTLET, REVERSE THE PLUG. IF IT STILL DOES NOT FIT, CONTACT A
QUALIFIED ELECTRICIAN. NEVER USE WITH AN EXTENSION CORD UNLESS PLUG CAN BE FULLY INSERTED.
DO NOT ALTER THE PLUG.
CAUTION: TO PREVENT ELECTRIC SHOCK, MATCH WIDE BLADE OF PLUG TO WIDE SLOT,
FULLY INSERT.
AVERTISSEMENT! IMPORTANTES DIRECTIVES DE
SÉCURITÉ:
CETTE LAMPE PORTATIVE EST MUNIE D’UNE FICHE POLARISÉE (UNE LAME PLUS LARGE QUE L’AUTRE). CE
DISPOSITIF DE SÉCURITÉ DIMINUE LE RISQUE DE CHOCS ÉLECTRIQUES PUISQUE LA FICHE NE S’INSÈRE DANS
LA PRISE QUE D’UN SEUL CÔTÉ. SI ELLE N’ENTRE PAS DANS LA PRISE, INVERSEZ-LA. SI ELLE N’ENTRE
TOUJOURS PAS, CONTACTEZ UN ÉLECTRICIEN QUALIFIÉ. N’UTILISEZ JAMAIS AVEC UNE RALLONGE SAUF SI
LA FICHE S’INSÈRE ENTIÈREMENT. NE MODIFIEZ PAS CE DISPOSITIF DE SÉCURITÉ.
AVERTISSEMENT: POUR ÉVITER LES CHOCS ÉLECTRIQUE, INSÉREZ LE BOUT LARGE DE LA FICHE
DANS LA GRANDE FENTE ET POUSSEZ JUSQU’AU BOUT.
¡PRECAUCIÓN! INSTRUCCIONES DE SEGURIDAD
IMPORTANTES:
ESTA LÁMPARA PORTÁTIL TIENE UN ENCHUFE POLARIZADO (UNA DE SUS PATAS ES MÁS ANCHA QUE LA OTRA)
COMO CARACTERISTICA PARA REDUCIR EL RIESGO DE UNA DESCARGA ELÉCTRICA. ESTE ENCHUFE ENCAJARÁ EN
CUALQUIER TOMACORRIENTE POLARIZADO SOLO DE UNA MANERA. SI EL ENCHUFE NO CALZA COMPLETAMENTE
EN EL TOMACORRIENTE DÉLE LA VUELTA. SI AÚN NO ENCAJA, PÓNGASE EN CONTACTO CON UN ELECTRICISTA
CALIFICADO. NUNCA UTILICE UNA EXTENSIÓN A NO SER QUE EL ENCHUFE PUEDA SER TOTALMENTE
INSERTADO. NO ALTERE EL ENCHUFE.
PRECAUCIÓN: PARA PREVENIR UNA DESCARGA ELÉCTRICA, HAGA COINCIDIR LA PATA ANCHA DEL
ENCHUFE CON LA RANURA ANCHA, INSERTE TOTALMENTE.
Vero Table Lamp
CAUTION! If the external flexible cable or cord of this luminaire is damaged, it shall be exclusively replaced by the manufacturer
or its service agent or a similar qualified person in order to avoid a hazard. Indoor use only.
INS90011 REV102309
13w Vero Table Lamp
L15BN7 T59BNR
FÉLICITATIONS! Vous avez fait l’achat
de la plus innovatrice technologie
naturelle et de renom en éclairage
avec votre produit OttLite.®
FORMULAIRE D’ENREGISTREMENT
DE PRODUIT
Compléter le formulaire d’enregistrement
qui est inclus pour votre produit et nous le
retourner dès aujourd’hui par le retour du
courrier, ou enregistrez-vous en ligne en
allant à :www.ottlite.com/warranty.
AVERTISSEMENT: Pour éviter les
chocs électriques, assurez-vous que
la lampe ne soit pas branchée avant
d’avoir effectué toutes les étapes de
montage.
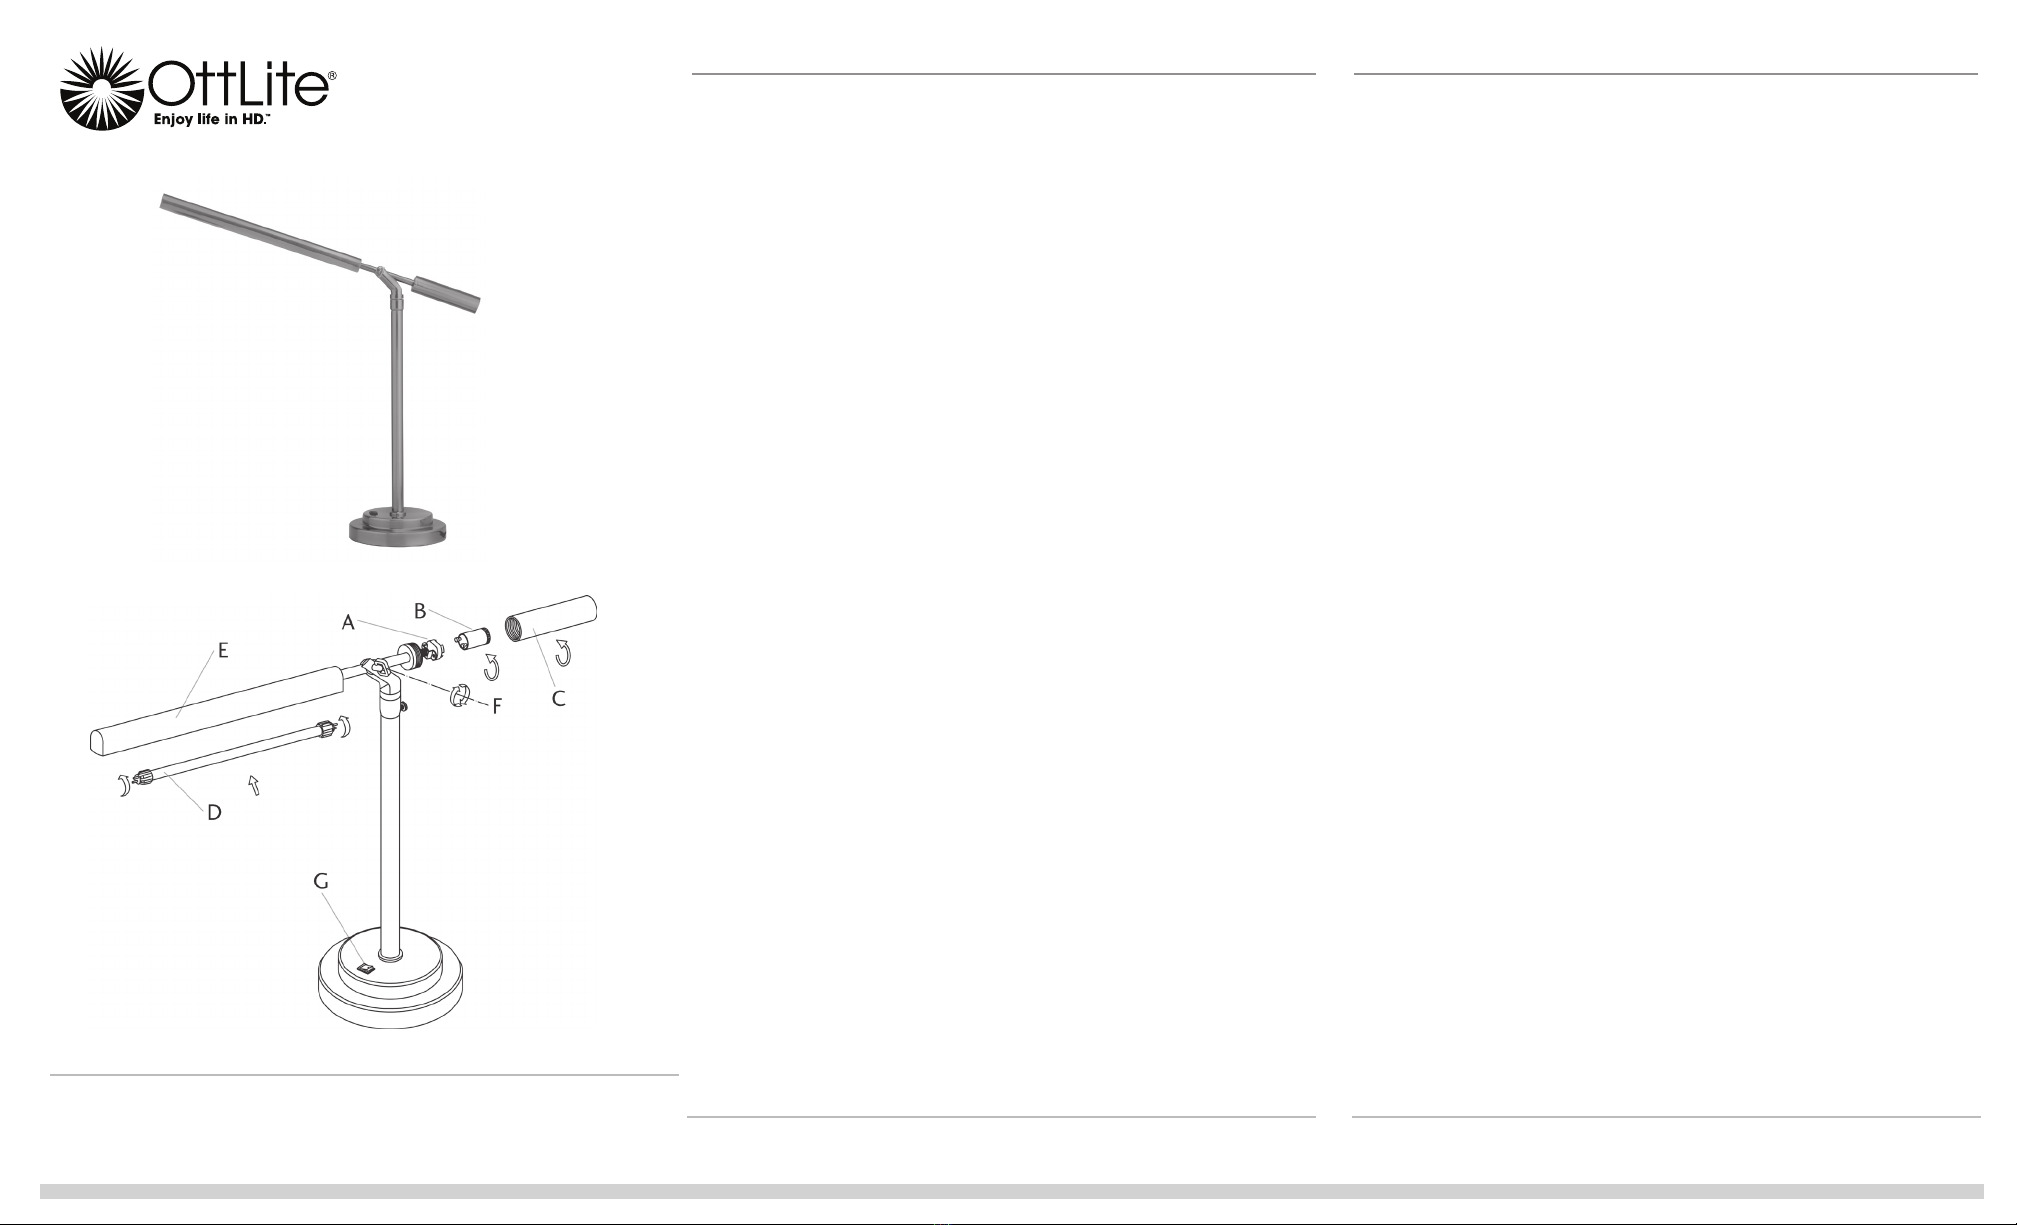
INSÉRER LE DÉMARREUR
1. Positionnez le démarreur (B) afin que
les contacts argent soient alignés avec
les trous dans le support du démarreur
(A). Appuyez gentiment et faites tourner
dans le sens des aiguilles d’une montre
jusqu’à ce que le démarreur s’enclenche
dans sa position.
2. Installez la poignée du corps (C) en la
plaçant au-dessus du démarreur (B) et en
vissant dans le sens des aiguilles d’une
montre sur la barre de l’abat-jour.
INSERTION/REMPLACEMENT
DU TUBE
1. Assurez-vous que la lampe n’est pas
branchée dans une prise de courant
électrique.
2. Si la lampe était allumée, laissez-la
refroidir pendant approximativement cinq
minutes avant de continuer.
3. Alignez les deux goupilles à l’extrémité
du tube (D) avec les fentes présentes
dans les douilles de l’abat-jour (E).
4. Maintenez le tube en place en
attrapant le sommet de l’abat-jour (E)
à la main et en utilisant les pouces
pour maintenir le tube (D). Les pouces
doivent être sur les extrémités en
plastique du tube.
5. Enfoncez ces extrémités dans chaque
douille et faites tourner de 90 degrés
dans une ou l’autre direction, jusqu’à ce
que le tube soit en place.
FONCTIONNEMENT
1. Serrez ou desserrez, suivant le besoin,
le joint du pivot de l’abat-jour (E) en
utilisant la vis à oreilles (F).
2. Branchez le cordon d’alimentation dans
une prise murale standard de 120V.
3. Pour allumer ou éteindre la lampe,
appuyez sur l’interrupteur à bascule (G)
situé sur la base.
Veuillez noter qu’une fois en marche,
l’intensité des tubes fluorescents OttLite®
ne peut pas être réglée.
Profitez pleinement de votre lampe de
table OttLite®Vero !
Ce système d’éclairage est conçu
pour être utilisé avec les tubes
OttLite®uniquement (numéro de
modèle B132S3 / T57J3M). L’utilisation
d’autres produits annule la garantie
et pourrait endommager le système
d’éclairage.
¡FELICITACIONES! Usted acaba
de adquirir la mejor tecnología de
iluminación natural con su nuevo
producto OttLite.®
FORMULARIO DE REGISTRO
Por favor, llene el Formulario de Registro
de Producto anexo y envíelo por correo
hoy mismo, o regístrese en línea
visitando: www.ottlite.com/warranty.
ADVERTENCIA: Para prevenir un
choque eléctrico, cerciórese de que
la lámpara no se conecte hasta que
se complete el ensamblaje y todos
los pasos.
INSERTAR EL INICIADOR
1. Ponga en posición el iniciador (B) de
manera que los conctactos plateados
se alinien con los orificios del sujetador
(A) del iniciador. Presione suavemente y
gire en la dirección de las manecillas del
reloj hasta que el iniciador se cierre en
su lugar.
2. Instale el asa del tambor (C)
colocándola sobre el inciador (B) y
atornillando en la dirección de las
manecillas del reloj sobre la barra de
la pantalla.
INSTALACIÓN/REEMPLAZO
DE TUBO
1. Asegúrese que la lámpara no esté
conectada a un tomacorriente.
2. Si la lámpara ha estado en uso,
permita que se enfríe durante cinco
minutos antes de proseguir.
3. Alinie los dos pines en el final del
tubo (D) con las ranuras de los soquetes
de la pantalla (E).
4. Sujete el tubo en su lugar tomando con
la mano la parte superior del tubo (E) y
usando los dedos para sujetarlo (D). Los
dedos deben estar sobre los extremos de
plástico del tubo.
5. Empuje los extremos hacia cada
soquete y rote 90 grados hacia cada lado
hasta que el tubo “enganche” en su lugar.
FUNCIONAMIENTO
1. Apriete o afloje como se necesario
la unión del muñon de la pantalla (E),
usando el tornillo pequeño (F).
2. Conecte el cable a un tomacorriente
de pared estándar de 120V.
3. Para encender o apagar la lámpara,
accione el interruptor oscilante (G)
ubicado en la base.
Por favor tenga en cuenta que durante
la operación, los tubos OttLite®no son
graduables.
¡Disfrute su Lámpara de mesa Vero
OttLite®!
Este sistema de iluminación está
diseñado para ser utilizado
únicamente con tubos OttLite®
(modelo número B132S3 / T57J3M).
El uso de otros productos anula la
garantía y pudiera resultar en daños
al sistema de iluminación.
FRANÇAIS
ESPAÑOL Lampe de table Vero
ATTENTION! Si le câble ou le cordon souple externe de ce lampadaire est endommagé, celui-ci doit être remplacé exclusive-
ment par le fabricant, son agent de service ou toute personne compétente afin d’éviter tout danger. Pour usage à l’intérieur seulement.
¡PRECAUCIÓN! Si el cable o cordón flexible externo de esta luminaria está dañado, debe ser exclusivamente reemplazado por
el fabricante o su agente de servicio o una persona calificada similar a fin de evitar un riesgo. Sólo para uso en interiores.
13w Vero Table Lamp
L15BN7 T59BNR
INS90011 REV102309
Lámpara de mesa Vero

This manual suits for next models

1

Other OttLite Home Lighting manuals

OttLite CSA77WGC User manual

OttLite

OttLite CSA77WGC User manual

OttLite J8600C User manual

OttLite

OttLite J8600C User manual

OttLite PL-0360Q User manual

OttLite

OttLite PL-0360Q User manual

OttLite Purify User manual

OttLite

OttLite Purify User manual

OttLite T81G5T User manual

OttLite

OttLite T81G5T User manual

OttLite AY5009-FFP User manual

OttLite

OttLite AY5009-FFP User manual

OttLite 286SV9 User manual

OttLite

OttLite 286SV9 User manual

OttLite CSR07G5W-CA User manual

OttLite

OttLite CSR07G5W-CA User manual

OttLite A64PN9 User manual

OttLite

OttLite A64PN9 User manual

OttLite SlimLine 315G53 User manual

OttLite

OttLite SlimLine 315G53 User manual

OttLite workwell WW10SK1 User manual

OttLite

OttLite workwell WW10SK1 User manual

OttLite A34G5B User manual

OttLite

OttLite A34G5B User manual

OttLite T96G5R User manual

OttLite

OttLite T96G5R User manual

OttLite 2YMWG9 User manual

OttLite

OttLite 2YMWG9 User manual

OttLite CS59029 User manual

OttLite

OttLite CS59029 User manual

OttLite 20G48BZ1 User manual

OttLite

OttLite 20G48BZ1 User manual

OttLite 15991CH8 User manual

OttLite

OttLite 15991CH8 User manual

OttLite 290009 User manual

OttLite

OttLite 290009 User manual

OttLite Dawson User manual

OttLite

OttLite Dawson User manual

OttLite 964008 User manual

OttLite

OttLite 964008 User manual

OttLite J8600C User manual

OttLite

OttLite J8600C User manual

OttLite S02GGJ User manual

OttLite

OttLite S02GGJ User manual

OttLite SanitizingPRO SC1AP00S User manual

OttLite

OttLite SanitizingPRO SC1AP00S User manual

OttLite CS2QC00Z User manual

OttLite

OttLite CS2QC00Z User manual

Popular Home Lighting manuals by other brands

Philips 40735-11-16 user manual

Philips

Philips 40735-11-16 user manual

IKEA FRYEBO manual

IKEA

IKEA FRYEBO manual

GTV BENFICA 2 Assembly instruction

GTV

GTV BENFICA 2 Assembly instruction

marset POLO A Assembly instructions

marset

marset POLO A Assembly instructions

Dale Tiffany TT13008 Assembly instructions

Dale Tiffany

Dale Tiffany TT13008 Assembly instructions

Ingo Maurer Aka_Tsuki instructions

Ingo Maurer

Ingo Maurer Aka_Tsuki instructions

KMART SLR-21071 installation instructions

KMART

KMART SLR-21071 installation instructions

IMMAX BEAM quick start guide

IMMAX

IMMAX BEAM quick start guide

OTT-LITE TECHNOLOGY Davenport 2559246K manual

OTT-LITE TECHNOLOGY

OTT-LITE TECHNOLOGY Davenport 2559246K manual

Dale Tiffany TF101115 Assembly instructions

Dale Tiffany

Dale Tiffany TF101115 Assembly instructions

RH ROUSSEAU Assembly/installation instructions

RH

RH ROUSSEAU Assembly/installation instructions

V-TAC VT-7413 instruction manual

V-TAC

V-TAC VT-7413 instruction manual

Philips Ledino 69075/87/26 brochure

Philips

Philips Ledino 69075/87/26 brochure

Philips Ledino 57917/31/16 brochure

Philips

Philips Ledino 57917/31/16 brochure

Growth Product 18078-001 Assembly instructions

Growth Product

Growth Product 18078-001 Assembly instructions

Emos DCAZ08 instructions

Emos

Emos DCAZ08 instructions

FLOS LUMINATOR manual

FLOS

FLOS LUMINATOR manual

Philips LivingColors 69143/67/PU brochure

Philips

Philips LivingColors 69143/67/PU brochure

manuals.online logo
manuals.online logoBrands
  • About & Mission
  • Contact us
  • Privacy Policy
  • Terms and Conditions

Copyright 2025 Manuals.Online. All Rights Reserved.