Otto BCX 180 User manual

User‘s manual
OTTO Compressed Air Gun P 2x310 PMT
(corresponds to BCX 300)
Index: 01. January 2019
© Hermann Otto GmbH 2019
Languages:
Italiano, English, Deutsch

2
Italiano
ISTRUZIONI PER USO CSG II MODELLI MP & P
*I vari modelli si dierenziano dalla forma della culla e dal tipo
di prodotto estruso.
1. IDENTIFICAZIONE PRODOTTO
1) Corpo pistola
2) Culla porta materiale
3) Leva di comando
4) Impugnatura
5) Regolatore di pressione
6) Alimentazione 1\4 gas maschio
7) Cilindro
8) Valvola di scarico rapido
9) Ghiera posteriore
10) Marcatura CE
11) Fori scarico aria
12) Switch ritorno pneumatico
PNEUMATIC APPLICATOR GUN
mod. - xxx/xxx xx - cod. xxxxxxx
P.M.T. srl con unico socio
Via G.Marconi 3/7 - 24051 Antegnate (BG) ITALIA
MAX PRESSURE 10 bar (145 psi)
mese - anno
FAC-SIMILE
2798
3
4
10
6
11
5
1
12
H
D
L
13 798
3
4
12
110
6
11
5
1
H
D
L
2
ATTENZIONE : non inserire mai le mani all’interno della culla / tubo.
Forte rischio di schiacciamento per le dita e gli arti, non inserire
mai le mani all’interno del culla/tubo porta materiale quando la
macchina è in funzione.
Per evitare qualsiasi rischio non intrudurre in nessun caso o si-
tuazione le mani o le dita all’interno della macchina; in caso di
blocco, guasto o altro caso di malfunzionamento, per prima cosa
scollegare o sezionare l'alimentazione dell'aria compressa; se
non si è certi sul da farsi contattare il vostro rivenditore senza
operare in nessun modo sulla macchina.
1. IDENTIFICAZIONE PRODOTTO
1) Corpo pistola
2) Ghiera Anteriore
3) Leva di comando
4) Impugnatura
5) Regolatore di pressione
6) Alimentazione 1\4 gas maschio
7) Cilindro
8) Valvola di scarico rapido
9) Ghiera posteriore
10) Marcatura CE
11) Fori scarico aria
12) Switch ritorno pneumatico
13) Tubo porta materiale

3Manuale CSG II MP - Italiano
1.2. INDICAZIONI RUMORE EMESSO E VIBRAZIONI
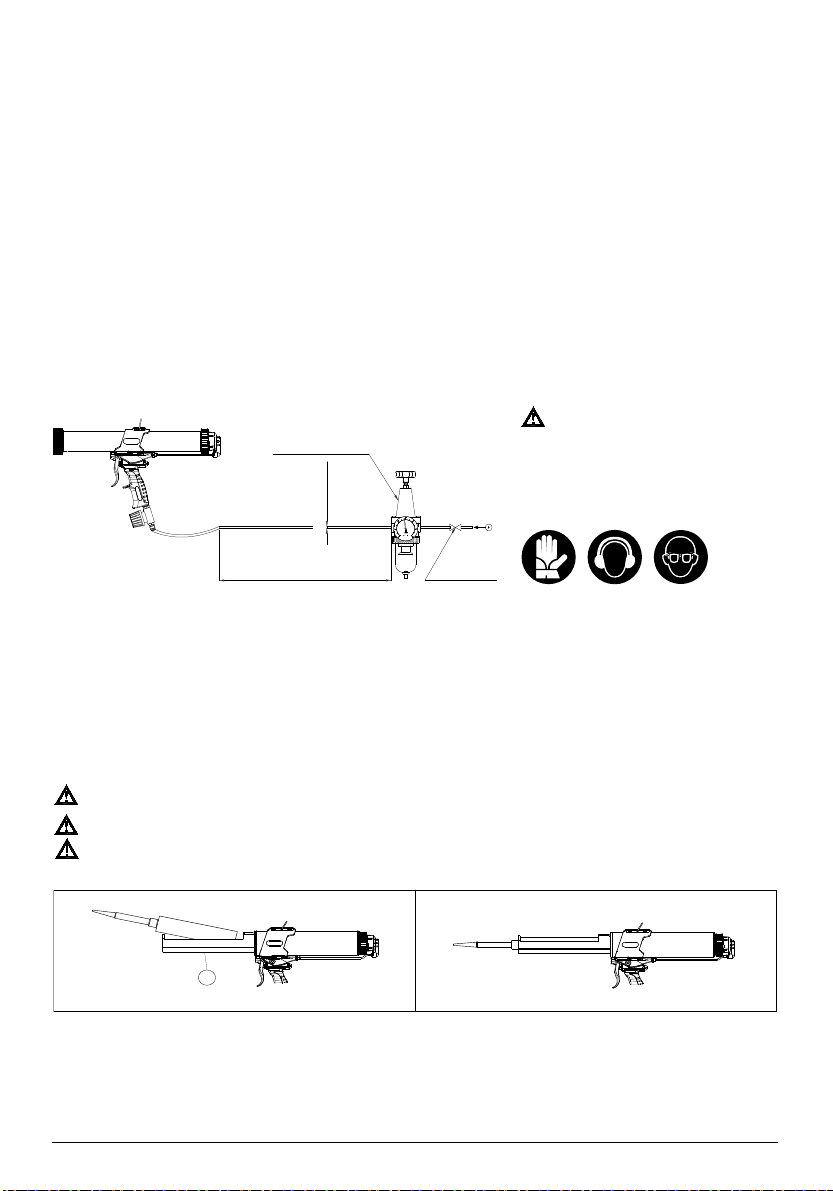
Il livello di pressione acustica equivalente ponderato a in fase di rilascio della leva equivalente ponderato in scala A, misurato a 100
cm. di distanza orizzontale con prodotto sigillante e la pistola alimentata con 6 Bar/87 PSI è 89 dB con incertezza di 3 dB, il livello di
pressione sonora ponderato A al posto di lavoro è di 78 dB con incertezza di 3 dB, si prescrive quindi l'uso di cue anti rumore. Il
sistema mano/braccio è sottoposto a un livello di vibrazioni di 0,72 m/s2 con incertezza K di 0,54 m/s2 .
1.3. IMMAGAZZINAGGIO
La pistola è fornita in scatola di cartone singola KEB BIANCO ST/B343, spessore onda bassa 2.8-3 mm.
Conservare a una temperatura compresa tra i -5°C e i 45°C, in ambiente con umidità non superiore al 70%.
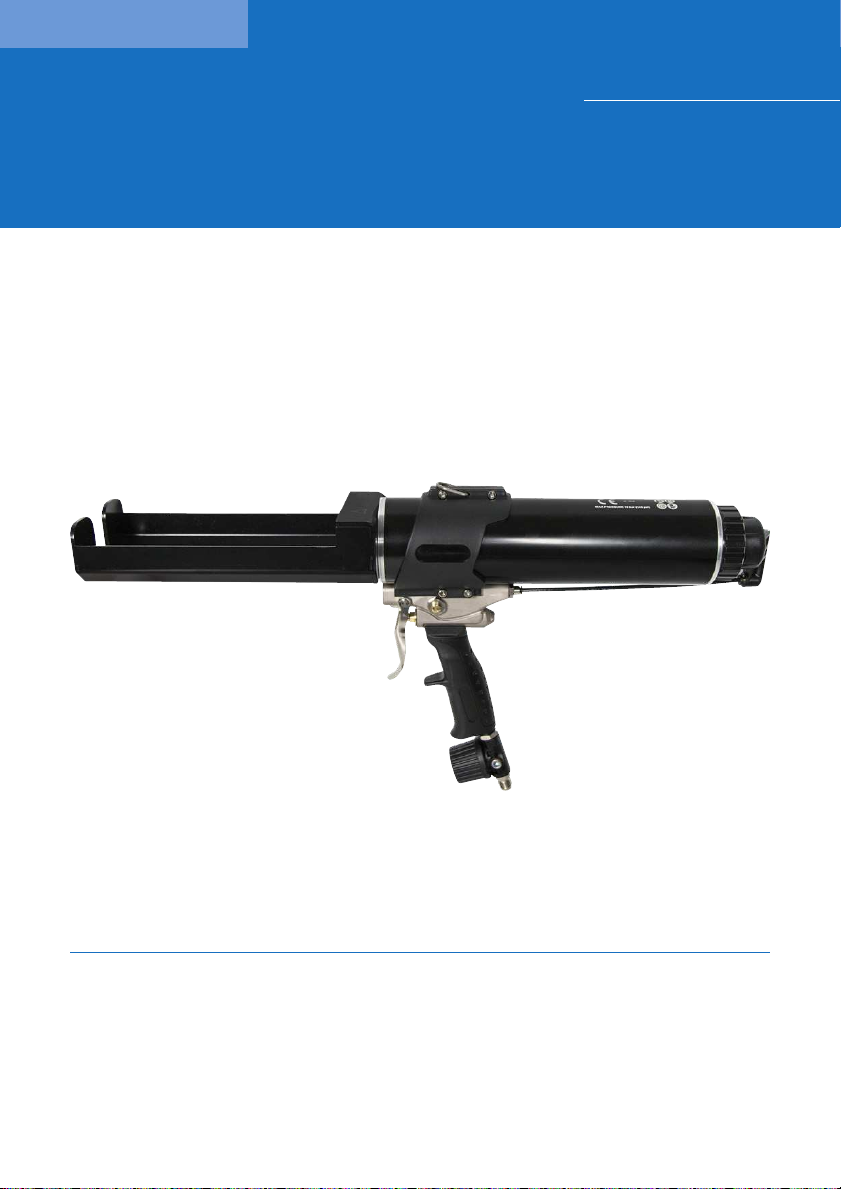
In questo manuale le macchine della famiglia CSG II MP verranno citate indierentemente come Apparecchi, Applicatori o Macchine.
2. ATTENZIONE
Questo simbolo attira la Vs. attenzione sui punti che interessano la Vostra sicurezza. Leggere attentamente e rispettare
scrupolosamente le prescrizioni contenute.
Prima di utilizzare la macchina leggere le istruzioni per l’uso e rispettarLe scrupolosamente. Conservare sempre questo manuale
e mantenerlo sempre a disposizione durante l'utilizzo della macchina.
Prima di qualsiasi intervento di riparazione, manutenzione e rifornimento scollegare o sezionare l'alimentazione dell'aria.
Se l'applicatore necessitasse interventi di riparazione e manutenzione straordinaria consultare il rivenditore della pistola o
personale specializzato, in quanto interventi eseguiti da persone non autorizzate annullano la garanzia.
All’atto della scelta e prima dell’uso del prodotto da estrudere con l'applicatore, vericare, in base all’apposita scheda di sicurezza del
prodotto stesso, la compatibilità con l'apparecchio, l’ambiente di lavoro e con i dispositivi di protezione individuali utilizzati.
Durante l’uso indossare i propri indumenti e dispositivi di protezione (protezioni individuali), secondo le indicazioni della scheda di
sicurezza del prodotto utilizzato. Si prescrive comunque sempre l’uso d’occhiali di protezione e cue anti rumore.
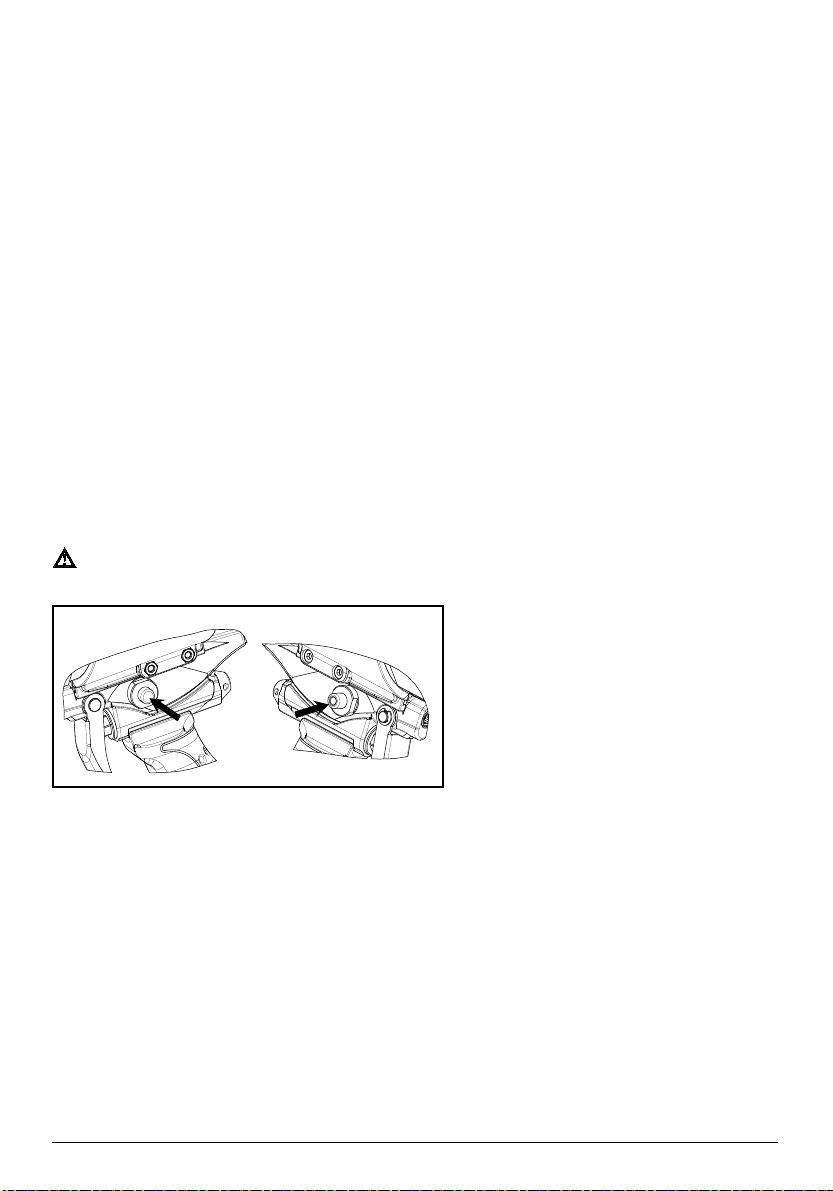
Durante le fasi di attrezzaggio sussiste il rischio di abrasioni alle mani, quindi è prescritto l'uso di guanti.
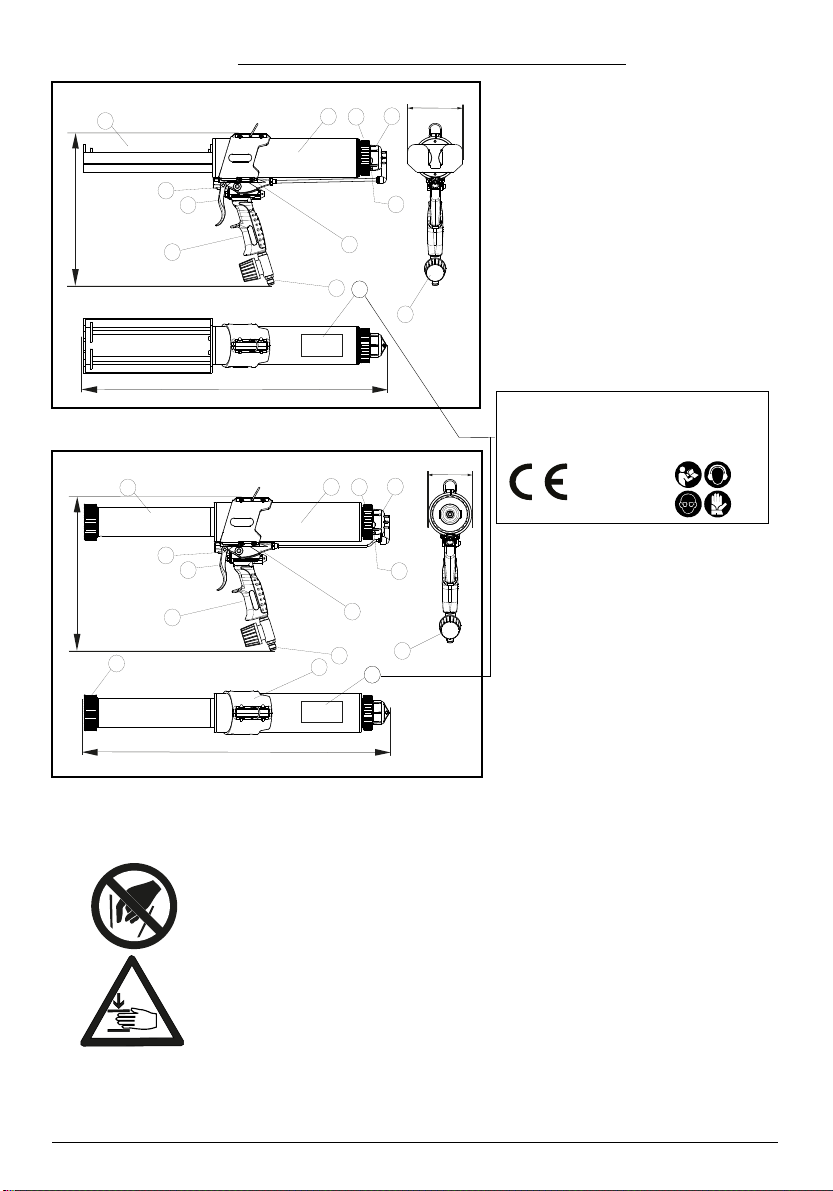
Modello # Predispo-
sizione di
Base
Cartuccia Sacchetto Cartuccia
(ml)
Ratio Sacchetto
(ml)
L
(mm)
H
(mm)
D
(mm)
Peso
Netto (g)
Raccordo
BCX 180
- - 180 10:1 -260 263 78 705 1/4"GAS maschio
BCX 300 -- 2 x 300 1:1 -307 263 78 1125 1/4"GAS maschio
BCX 300
Short 2x190 1:1 1/4"GAS maschio
CTX 400 --380 1 : 1 - 2 : 1 - 10 : 1 -307 263 78 1100 1/4"GAS maschio
MP 450 Per
sacchetto
≤ 310 ≤ 600 410 263 78 1300 1/4"GAS maschio
1.1. DATI TECNICI
#Predisposizione di Base: è la modalità con cui viene assemblata la pistola in fabbrica e fornita al cliente.
3. USI PREVISTI E VIETATI
3.1 Uso previsto
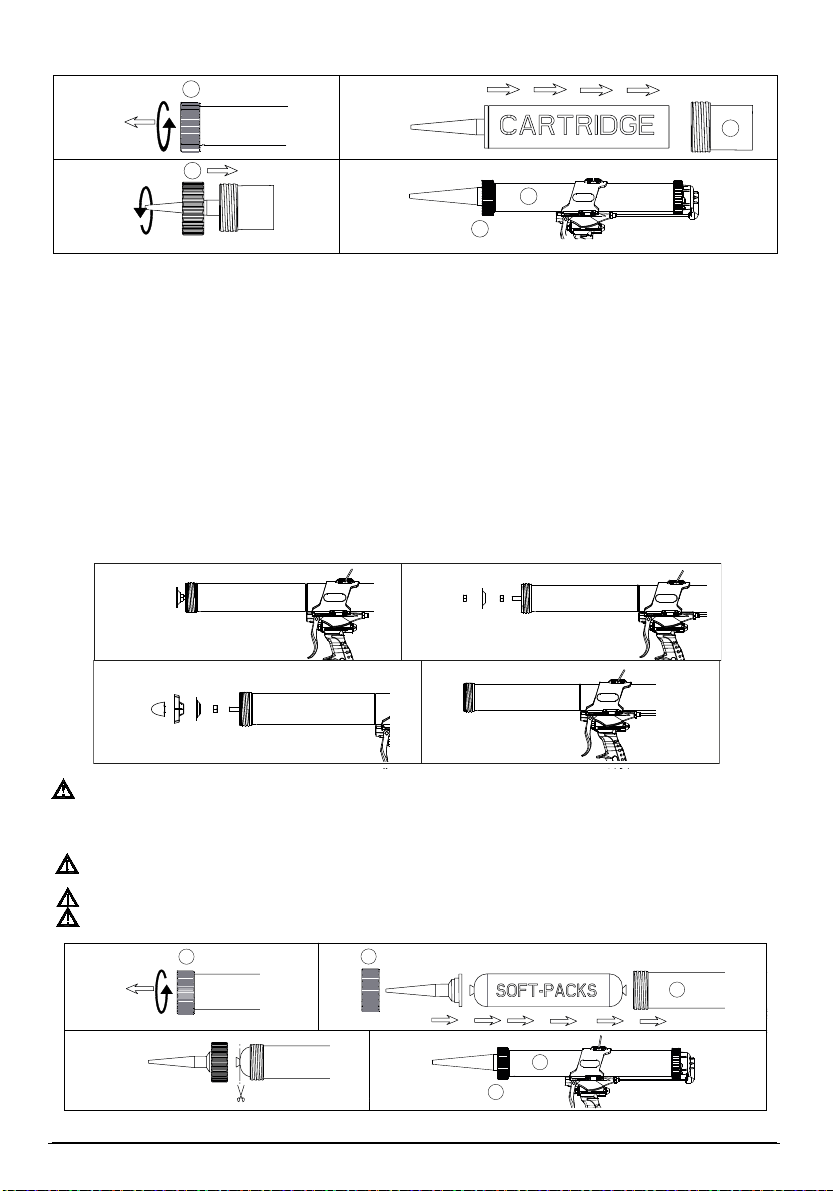
3.1.1 Estrusione di prodotti chimici per sigillatura (silicone, mastice, colle, etc.) contenuti nelle apposite cartucce in plastica,
le cartucce devono essere della tipologia e delle dimensioni adatti per l'applicatore ( coassiale, side by side, ecc)
vedi tabella iniziale. La CSG II MP 450 può essere utilizzata con cartucce in plastica, d'alluminio e soft packs.
3.1.2 Inizare i lavori di applicazione solo dopo aver letto e appreso i contenuti di questo manuale e le informazioni riportate
nella scheda tecnica e di sicurezza del prodotto che si stà utilizzando, indossando tutti i DPI indicati.
3.1.3 Disconettere l'aria dall'applicatore prima di eettuare qualunque lavoro di manutezione, pulizia o rifornimento oltre che
in qualunque caso che veda la ghiera anteriore non avvitata ( CSG II MP 450) o l'assenza della cartuccia in tutti gli altri
modelli; le sopracitate operazioni sono da eettuarsi solo come previsto da questo manuale.
3.1.4 Operare solo in condizioni di sicurezza come riportato su questo manuale, in un area di lavoro ben illuminata, con buona
visibilità e buona ventilazione; l'area di lavoro deve essere agevole per l'operatore, priva da impedimenti pericolosi e
ostacoli che non consentano un lavoro corretto e privo di rischi; La presenza di personale non addetto o non autorizzato
deve essere limitato alla sola necessità, la conoscenza delle misure di sicurezza standard e anti-incedio è obbligatoria.
3.2 Usi scorretti regionevolmente prevedibili
3.2.1 Operare applicando parzialmente le indicazioni ambientali e di sicurezza riportate da questo manuale o senza aver
appreso questo manuale
3.2.3 Eseguire qualsiasi operazione senza aver vericato la presenza e la relativa chiusura della ghiera anteriore (CSG II MP 450)
3.3 Uso vietato
3.3.1 Qualunque uso diverso dalla estrusione dei prodotti sopraelencati, o contenuti in contenitori non standard e/o non
adatti all'applicatore in vostro possesso.

4
Italiano
3.3.2 Utilizzare materiali sfusi di qualsiasi genere.
3.3.3 Operare l'applicatore senza aver letto e compreso questo manuale, o senza indossare i DPI indicati
3.3.4 Utilizzare in atmosfere potenzialmente esplosive di qualsiasisi classicazione o utilizzare prodotti che generano atmosfere
potenzialmente esplosive, compresi anche liquidi detergenti, pulitori e lubricanti.
3.3.5 Utilizzare l’apparecchio senza aver avvitato a fondo la ghiera anteriore o peggio senza la ghiera anteriore ( CSG II MP 450)
3.3.6 Utilizzare l'applicatore senza la presenza della cartuccia all'interno della culla (modelli con culla).
3.3.7 Coprire i fori di scarico dell'aria posteriori o sullo switch del ritorno pneumatico
3.3.8 Utilizzare in prossimità di polveri o altri materiali volatili, sopratutto se inammabili.
3.3.9 Immergere la pistola in solventi o acidi.
3.3.10 Utilizzare per la pulizia della pistola solventi e/o detergenti a base di idrocarburi idrogenati (1.1.1 Tricoluro di Etile, Cloruro
di Metilene, ecc.) perchè potrebbero ossidare i pezzi galvanizzati causando reazioni chimiche anche di tipo esplosivo, per
la pulitura non devono mai essere utilizzate sostanze fortemente acide o basiche.
3.3.11 Tenere la pistola ad una distanza minore di 30 cm dal viso durante l’uso, nella fase di rilascio della leva o dell'utilizzo del
ritorno pneumatico l’aria in uscita dai fori di scarico rapido (11 ) e dalla valvola di ritorno potrebbe risultare pericolosa
al viso.
3.3.12 Dirigere la pistola verso se stessi, altre persone, animali, piante o cose diverse dall’oggetto da trattare.
3.3.13 Eseguire rifornimento, pulizia e manutenzione senza aver sezionato o scollegato l'aria compressa dall'applicatore
3.3.14 Superare i 10 Bar / 145 PSI
3.3.15 Modicare, manomettere in qualsiasi modo l'applicatore o rimuovere una o più parti che lo compongono.
4. MESSA IN FUNZIONE a cura dell'operatore
4.1 Impianto di alimentazione d’aria
La pistola va collegata ad un impianto d’aria compressa aventi le caratteristiche specicate:
• Umidità aria max 5%; • Temperatura aria da -10° C a +70° C; • Capacità impianto di almeno 500 l/min; • Impianto dotato di lubrica-
tore, lubricazione: 3 - 4 gocce di lubricante ogni 1000 l/min
La pistola è dotata di un attacco 1/4 gas maschio, al quale collegarsi secondo le speciche esigenze. Il tubo deve essere un tubo
spiralato per posa mobile conduttivo. Il consumo d’aria è ridotto e proporzionale al numero di volte in cui si rilascia la leva per erogare il
prodotto e al numero di volte in cui viene utilizzato il ritorno pneumatico.
Riduttore di pressione
con ltro e manometro
Ø 6 mm
Rubinetto
Lunghezza max tubo 10 m
Pressione di lavoro 4-8 bar
58-116 PSI Prima della messa in funzione e dell'utilizzo della
pistola indossare correttamente i dispositivi di
protezione individuale prescritti:
• Guanti protettivi
• Cue anti rumore
• Occhiali di protezione
4.2 Rifornimeto per cartuccia a cura dell'operatore
Scollegare sempre l' apparecchio dall’alimentazione d’aria durante le operazioni di sostituzione della cartuccia ed in qualsiasi
momento in cui la ghiera anteriore sia svitata dal tubo ( CSG II MP 450) , per evitare che un accidendale pressione sulla leva di
comando causi lesioni per schiacciamento, espulsione di materiali o altre situazioni di pericolo.
Controllare sempre la data di scadenza del materiale di rifornimento.
Non inserire mai nell'applicatore cartucce danneggiate o non perfettamente integre.
2
4.2.3

5Manuale CSG II MP - Italiano
4.2.1 Far retrocedere il pistone no a ne corsa utilizzando il ritorno pneumatico ( vedi 5.2 ), dopo di che staccare o sezionare
l'alimentazione dell’aria
4.2.2 Aprire la cartuccia ( utilizzando gli appositi utensili e stando attenti a non ferirsi) ed avvitare poi in senso orario l’ugello
di plastica in dotazione con la cartuccia o adatto ad essa.
4.2.3a Svitare in senso antiorario la ghiera anteriore (2) e toglierla dalla pistola (solo CSG II MP 450).
4.2.3 Inserire la cartuccia all'interno della culla assicurandosi che sia saldamente all'interno ( modelli con culla), inserire la
cartuccia nel tubo spingendola no in fondo (solo CSG II MP 450 ).
4.2.4a Avvitare in senso orario la ghiera anteriore no ad esercitare una buona pressione sulla cartuccia. ( solo CSG II MP 450)
Se l’intero pistone tendesse a girare aiutarsi con un cacciavite piatto inserendolo nelle razze del raschiatore blu.
Montaggio kit per sacchetti ( solo Mod. CSG II MP 450 )
4.2.5.1 Prima di operare munirsi di due chiavi sse da 13 mm e chiave a brugola da 5 mm, prima di eettuare l'operazione far
avanzare il pistone no a ne corsa, dopo di che staccare l'alimentazione e rimuovere la ghiera anteriore; a mano portare il
pistone completamente fuori dal tubo.
4.2.5.2 Utilizzando le due chiavi sse, bloccare il dado C e svitare e rimuovere il dado di ssaggio A, rimuovere anche il pressore
metallico per cartuccia B (standard)
4.2.5.3 Avvitare in ordine: bullone di ssaggio C (se rimosso al punto precedente), pressore per cartuccia B, supporto plastico
(blu) F, raschiatore E, e utilizzando la brugola da 5 mm il pressore in alluminio D per sacchetto.
4.2.5.4 Assicurarsi di aver stretto in maniera ottimale i vari componenti assicurandosene tramite le chiavi precedentemente utilizzate.
4.3 Rifornimeto per sacchetto ( solo Mod. CSG II MP 450 ) a cura dell'operatore
Scollegare sempre l' apparecchio dall’alimentazione d’aria durante le operazioni di sostituzione della cartuccia ed in qualsiasi
momento in cui la ghiera anteriore sia svitata dal tubo ( CSG II MP 450) , per evitare che un accidendale pressione sulla leva di
comando causi lesioni per schiacciamento, espulsione di materiali o altre situazioni di pericolo.
Controllare sempre la data di scadenza del materiale di rifornimento.
Non inserire mai nella pistola sacchetti danneggiati o non perfettamente integri.
13
4.2.3 a 4.2.3
4.2.4a
2
2
2
13
4.2.5
.3 4.2.5.4
CBED
4.2.5.1 4.2.5.2
A B C
4.3.1 4.3.2
4.3.3
2
2
2
13
13
4.3.4

6
Italiano
Per attivare Per interrompere
4.3.1 Svitare in senso antiorario la ghiera anteriore (2) e toglierla dalla pistola.
4.3.2 Inserire ed agganciare l’ugello per sacchetto alla ghiera anteriore (2) (spingendo indietro il pistone nel caso sia in posizione
avanzata) secondariamente inserire il sacchetto nel tubo porta materiale (13) no in fondo facendo in modo che sporga solo la
parte da tagliare.
4.3.3 Tagliare il sacchetto appena sotto la fascetta metallica di chiusura.
4.3.4 Avvitare in senso orario la ghiera anteriore (2) con all'interno l’ugello in plastica al tubo porta materiale (13).
4.3.5 Prima di inserire il sacchetto nel tubo porta materiale assicurarsi di aver montato il kit per estru-
sione di sacchetti come illustrato in seguito
5- USO
5.1 Operazioni standard
5.1.1 Per il collegamento pneumatico dell’aria di alimentazione vedi 4.1.
5.1.2 Prima di operare l'applicatore vericare sempre:
a) Apertura del sezionatore e del regolatore di pressione d’aria dell'impianto di alimentazione.
b) Apertura del regolatore di pressione sulla macchina.
5.1.3 Per il rifornimento di sacchetti o cartucce vedi 4.2. e seguenti.
5.1.4 Per attivare l'applicatore e cominciare il lavoro operare sulla leva di comando.
5.1.5 Al termine dell’utilizzo scollegare la macchina dall’alimentazione d’aria; se la cartuccia non fosse terminata, si consiglia di
chiuderla anteriormente per non far seccare il prodotto in essa contenuto.
5.2 Uso dello switch per il ritorno pneumatico
Sul lato del corpo del vostro applicatore è presente un pulsante color oro, è il pulsante di attivazione del ritorno pneumatico (12).
Questo pulsante consente di arretrare in maniera automatica le aste con i pistoni in modo da ri-portare gli stessi alla posizione di
partenza, liberando così il contenitore del materiale utilizzato.
5.2.1 Per attivarlo è sucente premere il pulsante dalla parte dove non è presente il foro, immediatamente le aste arretreranno
no alla posione iniziale, quando il processo è terminato potrete udire una fuoriuscita d'aria costante.
5.2.2 Per interrompere il processo basta agire dalla parte opposta, cioè la parte del pulsante dove è presente il foro, riportando il
pulsante nella sua posizione originario; questo fermerà il processo di arretramento o la fuoriuscita d'aria.
ATTENZIONE! utilizzare il ritorno pneumatico solo per liberare il contenitore del materiale dai pistoni di spinta. Non utilizzare
MAI senza materiale all'interno della macchina, il movimento è repentino e pericoloso! MAI INTRODURRE LE MANI O CORPI
ESTRANEI NELLA CULLA O NEL TUBO PORTA MATERIALE
6- REGOLAZIONE
6.1 Regolazione della velocità di estrusione e della pressione d’aria in ingresso.
Svitare in senso anti orario la manopola del regolatore di pressione per ottenere una diminuzione della pressione dell'aria con
conseguente minor velocità di estrusione. Viceversa avvitare in senso orario la manopola del riduttore di pressione per ottenere
un graduale aumento della pressione dell'aria con conseguente maggior velocità di estrusione.
La pressione di utilizzo standard della macchina è da 4 a 10 BAR (58/145 PSI) a seconda della densità del materiale; nel caso di
estrusione di un materiale molto denso o di una maggiore densità del prodotto a causa di una minore temperatura dell’ambiente
lavorativo, agire direttamente sul riduttore di pressione del sistema di alimentazione. Aumentare la pressione dell’aria per ottenere
una maggiore forza di spinta della macchina.

7Manuale CSG II MP - Italiano
7- RISCHI RESIDUI
• Getto d'aria: si presenta principalmente al momento del rilascio della leva quando, dai fori di scarico, viene espulsa l'aria
contenuta nel tubo porta materiale; si verica anche durante l'uso dello switch per il ritorno pneumatico, prestare attenzione a
non avvicinare occhi e orecchie; prestare anche attenzione alla vicinanza di polveri o sostanze pericolose volatili all'apparecchio.
Utilizzare sempre gli occhiali protettivi, nell'eventualità di polveri volatili utilizzare adeguati dispositivi di protezione individuali
a protezione dell'apparato respiratorio, vericarne sempre l'ecacia in relazione alle sostanze implicate.
• Lesioni alle mani: si presenta principalmente durante le operazioni di caricamento e/o manutenzione ordinaria, i letti e
l'utilizzo di utensili per l'apertura delle cartucce e sacchetti possono causare tagli o abrasioni. Utilizzare sempre guanti protettivi.
• Colpo di frusta del tubo: si presenta principalmente durante le operazioni di scollegamento della pistola dall'impianto
principale, il tubo scollegato dalla pistola subisce un movimento repentino e inconsulto; utilizzare sempre il sezionatore
sull'impianto
8- PULIZIA E MANUTENZIONE ORDINARIA a cura dell'operatore
Tutte le attività di pulizia e manutenzione ordinaria devono essere eseguite solo ed esclusivamente con la macchina scollegata
dall'impinato di alimentazione principale prima di scollegare l'applicatore
Pulizia
Manutenzione ordinaria
FREQUENZA CAUSE DESCRIZIONE
Ad ogni ricarica Residui di materiale fresco rimuovere sempre con attenzione i residui di materiale da ogni superce delle pistola, smaltire
secondo le norme vigenti nel paese di utilizzo.
Ogni settimana Polveri o sporco pulire con attenzione i fori di scarico dell'aria (11 punto 1) con un panno pulito e detergente
e vericare che non siano ostruiti
Ogni 2 settimane Polveri, sporco o residui di
materiale
pulire con attenzione il letto della ghiera frontale (2) con un panno pulito e detergente e il
rispettivo letto sul tubo porta cartuccia (CSG II MP 450)
Ogni 2 settimane Polveri o sporco pulire con attenzione il raccordo tra la pistola e l'impianto di alimentazione (6) con un panno
pulito e detergente
Ogni mese Polveri o sporco pulire con attenzione la pistola nel suo complesso con un panno pulito e detergente,
prestare attenzione all'impugnatura che deve risultare sempre di facile presa.
Ogni 2 settimane Polveri, sporco o residui di
materiale
Dopo aver rimosso il tubo porta materiale ( solo CSG II MP 450), pulire con attenzione l'asta
o le aste di trasmissione con un panno pulito e detergente, pulire anche l'interno della culla
porta materiale o del tubo porta materiale
FREQUENZA OPERAZIONE DESCRIZIONE
Ogni 2 settimane Ingrassaggio letti Ingrassare con grasso lubricante il letto dello ghiera (2) e il rispettivo letto sul tubo porta
cartuccia (CSG II MP 450)
Ogni settimana Ingrassaggio interno tubo porta
materiale
Ingrassare con un pennello la supercie interna del tubo porta materiale
(CSG II MP 450)
Ogni 2 settimane Polveri, o sporco o residui di
materiale
pulire con attenzione il letto della ghiera frontale (2) e il rispettivo letto sul tubo porta
cartuccia con un panno pulito e detergente
Ogni 2 settimane Ingrassaggio asta/e di trasmissione Dopo aver rimosso il tubo porta materiale (solo CSG II MP 450)ingrassare con grasso
lubricante l'asta o le aste di trasmissione.
*Gli intervalli temporali sono da intendere come tempo di lavoro eettivo.
9- MANUTENZIONE STRAORDINARIA a cura del manutentore / rivenditore
• Sostituzione guarnizioni tubo porta materiale: dopo un elevato periodo di utilizzo potrebbero vericarsi perdite d'aria dalla
parte posteriore del tubo porta materiale, deve essere sostituito l'OR dello scarico, contattare il vostro rivenditore.
• Sostituzione guarnizione labbro del pistone di spinta: dopo un elevato periodo di utilizzo potrebbe
vericarsi l'eventualità di una eccessiva usura della guarnizione a labbro di cui è equipaggiato il pistone di spinta, causando una
perdita prestazionale e di aria dalla parte frontale della pistola, la guarnizione a labbro deve essere sostituita, contattare il vostro
rivenditore.
10- GUASTI E ROTTURE a cura del manutentore / rivenditore
Nell'eventualità di guasti e/o rotture di parti della pistola non tentare la riparazione, non operare la pistola con riparazioni di
fortuna o con parti danneggiate, usurate o sostituite con componenti non originali.
Le riparazioni devono essere eseguite presso una ocina autorizzata o direttamente dal produttore, contattare il vostro rivenditore.

8
Italiano
12 - GARANZIA
Le pistole e relativi equipaggiamenti, se non consumabili, sono coperti da garanzia, come da regolamenti comunitari europei. Si
sostituiranno gratuitamente tutti i pezzi che verranno riscontrati come difettosi dal nostro ucio tecnico, solo se resi non mano-
messi o imbrattati e franco nostra fabbrica. La ditta produttrice declina ogni responsabilità per danni a persone e cose derivanti
da un uso improprio, o esplicitamente vietato da questo manuale, dei prodotti, pertanto ne prescrive e subordina l'uso solo dopo
completa ed attenta lettura di queste istruzioni d'uso. Pistole o equipaggiamenti venduti smontati, modicati o non completi (su
richiesta particolare del committente) a causa del mancato collaudo ed approvazione del nostro ucio tecnico non sono coperti di
garanzia.
INCONVENIENTI CAUSE INTERVENTI CORRETTIVI
Dopo aver caricato il materiale e collegato
la pistola all'impianto, premendo la leva di
comando non accade nulla
Mancata alimentazione Vericare l'apertura del sezionatore sull'impianto, vericare i
regolatori di pressione, vericare eventuali perdite lungo il tubo
Estrusione irregolare o lenta. Prodotto molto denso Aumentare la portata d’aria tramite il regolatore di usso. Aumentare
la pressione d’aria tramite il riduttore di pressione
Perdita di pressione e di potere di
estrusione della pistola.
Ghiera anteriore lenta labbro della
cartuccia danneggiato.
Avvitare a fondo la ghiera consultare le istruzioni d’uso relative alla
cartuccia
Sostituire la cartuccia danneggiata.
La pistola non opera correttamente Parti danneggiate o sporche Eseguire operazioni di pulizia e manutenzione ordinarie, se il
problema è dovuto a parti danneggiate contattre il vostro rivenditore
11- RISOLUZIONE DEI PROBLEMI FREQUENTI

9Manuale CSG II MP - English
USER’S INSTRUCTIONS FOR CSG II MODELS MP E P
* The various products are dierentiated by the cradle length and the
extruded product type.
1. PRODUCT DESCRIPTION
1) Body of the gun
2) Cradle of material
3) Control lever
4) Handle
5) Pressure regulator
6) Feeding: ¼ gas male
threaded connector
7) Cylinder
8) Dump valve
9) Rear ring nut
10) CE mark
11) Exhaust air outlets
12) Pneumatic switch
PNEUMATIC APPLICATOR GUN
mod. - xxx/xxx xx - cod. xxxxxxx
P.M.T. srl con unico socio
Via G.Marconi 3/7 - 24051 Antegnate (BG) ITALIA
MAX PRESSURE 10 bar (145 psi)
mese - anno
FAC-SIMILE
2798
3
4
10
6
11
5
1
12
H
D
L
13 798
3
4
12
110
6
11
5
1
H
D
L
2
CAUTION: never put your hands inside the cradle/tube!
Considerable risk of ngers and limbs being crushed. Never put
your hands inside the material cradle/tube when the machine is
running.
In the case of blockage, fault or other type of malfunctioning, rst
disconnect or shut o the compressed air power supply; if you are
unsure how to proceed, contact your dealer without performing
any operations on the machine.
1. PRODUCT DESCRIPTION
1) Body of the gun
2) Front ring nut
3) Control lever
4) Handle
5) Pressure regulator
6) Feeding: ¼ gas male
threaded connector
7) Cylinder
8) Dump valve
9) Rear ring nut
10) CE mark
11) Exhaust air outlets
12) Pneumatic switch
13) Material holder tube

10
English
1.2. Noise emissions and vibrations
When the lever is released, the level of A-weighted equivalent acoustic pressure measured at 100 cm of horizontal distance with
sealant and the gun supplied with 6 Bar/87 PSI is 89 dB +/-3 dB, the level of A-weighted acoustic pressure at the work site is 78 dB
+/-3 dB. Therefore, hearing protection ear mus must be worn. The hand/arm system vibration level is 0.72 m/s2 +/-0.54 m/s2.
1.3. Storage
The applicator is supplied in a single KEB WHITE ST/B343 cardboard box, with a 2.8-3 mm. thickness low ute; the gun is held in a
polyethylene bag. Keep at a temperature between -5°C and 45°C, with ambient humidity not exceeding 70%.
In this manual, machines of the CSG II MP family are referred to as devices, applicators or machines.
2. CAUTION
This symbol draws your attention to safety related issues. Read carefully the recommendations included and strictly comply with
them.
Before using the machine, read the instructions and follow them carefully. Keep this manual for future reference and always have it
available during use.
Before any repair, maintenance and rell operations, disconnect the air feed.
Contact the gun vendor or specialized personnel if the applicator requires repair and extraordinary maintenance> Any operations
performed by unauthorized persons will void the warranty.
When choosing the product to extrude and before using the applicator, check the product compatibility with the work environment
and the adopted individual protection devices, according to its safety data sheet.During usage, safety devices (individual protections)
are to be worn on top of one’s clothes, in compliance with the product safety data sheet.
Using safety glasses and ear defenders is recommended in any case.
During replenishing material tooling operations hand abrasions may be possible, therefore wearing gloves is recommended.
3. INTENDED AND FORBIDDEN USES
3.1 Intended uses
3.1.1 Extrusion of sealants (silicone, mastic, glues, etc.) contained in specic plastic cartridges. The cartridges must be of a suitable
type and size for the applicator (coaxial, side by side, etc.). See the table above. The CSG II MP 450 can be used with plastic,
aluminium cartridgesand soft packs.
3.1.2 Begin the application works only after having read and understood the content of this manual and the information provided on the
technical data and safety sheet of the product you are using, wearing all specied PPE.
3.1.3 Disconnect the air from the applicator before performing any maintenance, cleaning or lling and ensure that the front ring nut is
unscrewed (CSG II MP 450) or that the cartridge has been removed (all other models). Maintenance, cleaning or lling must be done only
as explained in this manual.
3.1.4 Work only in safe conditions as described in this manual, in a well-lt work area with good visibility and good ventilation; the work area
must be easy for the operator to move about in, free of any harmful obstacles or obstructions that prevent work from being performed
properly and without risk. The presence of unskilled or unauthorised personnel must be restricted only to necessity, and the knowledge
of standard safety and re prevention measures is mandatory.
3.2 Reasonably foreseeable incorrect uses
3.2.1 Working partially applying the environmental and safety instructions this manual contains or without having
understood this manual.
3.2.2 Performing any operation without having checked for the presence and tightening of the front nut.
3.3 Forbidden uses
3.3.1 Do not use for any purpose other than extrusion of the products listed above or of products contained in non-standard
and/or unsuitable containers for the applicator in your possession.
3.3.2 Never cover exhaust air outlets.
3.3.3 Operating the applicator without having read and understood this manual, or without wearing the specied PPE
3.3.4 Using in potentially explosive atmospheres of any classication or using products that generate potentially explosive
atmospheres, also including cleansing liquids, cleaners and lubricants.
1.1. Technical details
#Basic setup: It is the mode with which the gun is assembled at the factory and provided to the client.
Model #Basic
setup Car-
tridge
Soft-
pack
Cartrid-
ge (ml)
Ratio Soft-pack
(ml)
L
(mm)
H
(mm)
D
(mm)
Net
Weight (g)
Connection
BCX 180
- - 180 10:1 -260 263 78 705 1/4"GAS male
BCX 300 -- 2 x 300 1:1 -307 263 78 1125 1/4"GAS male
BCX 300
Short 2x190 1:1 1/4"GAS male
CTX 400 --380 1 : 1 - 2 : 1 - 10 : 1 -307 263 78 1100 1/4"GAS male
MP 450 For
soft-pack
≤ 310 ≤ 600 410 263 78 1300 1/4"GAS male

11 Manuale CSG II MP - English
3.3.5 Using the device without tightening the front ring nut properly, or worse without the front nut. (CSG II MP 450)
3.3.6 Do not use the applicator without the cartridge inside the holder (models with holder).
3.3.7 Do not cover the rear exhaust air outlet holes or on the pneumatic return switch.
3.3.8 Never use in environments where dusts or other volatile materials are present, especially if inammable.
3.3.9 Never immerse the gun in solvents or acids.
3.3.10 When cleaning the machine , never use hydrogenated hydrocarbons based solvents and/or detergents
(1.1.1 Ethyl trichloride, methylene chloride, etc.) as they could oxidize the galvanized components thus triggering chemical
reactions also of explosive nature; never use highly acid or basic substances when cleaning.
3.3.11 Do not hold the gun less than 30 cm from your face during use, during release of the lever or when using the pneumatic
return. The blast of air exiting the exhaust air outlet holes (1) and the return valve is powerful and may be cause injury.
3.3.12 Do not point the gun at yourself, other people, animals, plants or anything other than the object to be treated.
3.3.13 Replenishing, cleaning and maintaining without having isolated or disconnected the compressed air supply
from the applicator.
3.3.14 Exceeding 10 bar / 145 PSI at the device’s inlet.
3.3.15 Do not modify or tamper with the applicator in any way or remove any of its parts.
4. START-UP to be carried out by the operator
Pressure reducer
with lter and gauge
Ø 6 mm
Fast tap
Max. tube length: 10 m.
Operating pressure: 4-8 bar
58/116 PSI Before gun start-up and usage, wear the recom-
mended individual safety devices:
• Safety gloves
• Ear defenders
• Safety glasses
4.1 Air feeding system
Connect the machine to a compressed air system featuring the following characteristics:
• Max. air humidity 5%; • Air temperature from -10° C to +70° C • System capacity 500 l/min at least • System equipped with
lubricator, pressure reducer and gauge.Lubrication must be: 3-4 drops of lubricant every 1000 l/min.
The machine is equipped with a ¼ gas male threaded connector, to which connection is possible according to specic needs.
The tube shall be a wound conductive tube for dynamic laying with resistance lower than 1 Mega Ohm and bursting pressure at
least twice the maximum pressure of the system. Air consumption is reduced and proportional to the number of times in which
the product supply lever is released.
4.2 Bag rell to be carried out by the operator
Always disconnect the device from the air supply when replacing the cartridge and whenever the front ring nut is unscrewed from the
tube (CSG II MP 450), in order to prevent accidental pressure on the control lever causing injury through crushing, expulsion of
materials or other dangerous situations.
Always control the rell material expiry date.
Never introduce damaged or not fully intact bags or cartridges in the gun.
2
4.2.3
13
4.2.3 a 4.2.3
4.2.4a
2
2
2
13

12
English
If the piston assembly tends to rotate, use a slotted screwdriver inserted in the spokes of the blue scraper to adjust.
4.3 Cartridge rell (only CSG II MP 450) to be provided by the operator
Always disconnect the device from the air supply when replacing the cartridge and whenever the front ring nut is unscrewed from the
tube (CSG II MP 450), in order to prevent accidental pressure on the control lever causing injury through crushing, expulsion of
materials or other dangerous situations.
Always control the rell material expiry date.
Never introduce damaged or not fully intact bags or cartridges in the gun.
4.2.1 Push back the piston to the end of the stroke using the pneumatic return (par. 5.2), then disconnect or shut o the air supply
4.2.2 Open the cartridge (using appropriate tools and taking care to avoid injury), then screw on the plastic nozzle supplied with
or adapted to the cartridge in a clockwise direction.
4.2.3a Unscrew the front ring nut (2) anti-clockwise and remove it from the gun (CSG II MP 450 only).
4.2.3 Insert the cartridge into the holder, ensuring it is rmly inside (models with holder). Insert the cartridge into the tube,
pushing it all the way in (CSG II MP 450 only).
4.2.4a Screw on the front ring nut clockwise until it is pressed rmly against the cartridge (CSG II MP 450 only.)
Assembly of bag kit (only Mod. CSG II MP 450)
4.2.5.1 Before starting, prepare two 13 mm spanners and a 5 mm Allen wrench.
Totally unscrew the knob of the pressure reducer on the machine anti-clockwise, then slowing slowly, clockwise with the
control level pressed until the piston inside starts to slowly move, stop pressing the control lever and remove the front nut
when the lever reaches it and stops. Afterwards, press the control lever again with one hand on the grip and one on the
pipe, as recommended, until the piston completely comes out of the pipe. Now disconnect or switch o the power supply.
4.2.5.2 Tighten the nut C with the two open ended spanners and unscrew and remove the locking nut A, also remove the metal
cartridge presser B (standard).
4.2.5.3 In the following order, tighten: the locking nut C (if removed to the previous position), the cartridge presser B, the (blue)
plastic support F, the scraper E, and with the 5 mm allen key the aluminium plastic bag presser D.
4.2.5.4 Ensure all components are tightened properly with the spanners and key previously employed.
4.3.1 Unscrew the front ring nut (2) anti-clockwise and remove it from the gun.
4.3.2 Insert and attach the bag nozzle to the front ring nut (2) (pushing back the piston if it is in the forward position). Then,
insert the bag all the way in the material holder tube (13) until only the part to be cut protrudes.
4.3.3 Cut the bag just below the metal clamp.
4.3.4 Screw on the front ring nut (2) clockwise with the material holder tube (13)plastic nozzle inside.
4.3.5 Before inserting the bag in the material holder tube, ensure you have installed the bag extrusion kit as shown below.
4.3.1 4.3.2
4.3.3
2
2
2
13
13
4.3.4
4.2.5
.3 4.2.5.4
CBED
4.2.5.1 4.2.5.2
A B C

13 Manuale CSG II MP - English
5- USE
5.1.1 See 4.1 for connection to the pneumatic air feed
5.1.2 Before using the gun, always check:
a) Open the disconnector and the supply system’s air pressure regulator.
b) The opening of the pressure regulator on the gun.
5.1.3 See 4.2 and following points for bag or cartridge rell.
5.1.4 Use the control lever to activate the gun and start working.
5.1.5 Disconnect the air feed to stop using the gun; if some material is left inside the cartridge, close it at the front to avoid
product dry up.
5.2 Using the pneumatic return switch
The gold-coloured button on the side of the applicator is the pneumatic return activation button (12). This button automatically
slides back the rods with the pistons to return them to the starting position, thus releasing the container.
5.2.1 To activate it, press the button on the side without the hole. The rods move back to the initial position. When the process
is completed, you will hear constant airow.
5.2.2 To interrupt the process, press the opposite side, i.e. the side of the button with the hole, returning the button in its origi-
nal position. This will stop the return or the air release.
ATTENTION! Use the pneumatic return only to release the container from the thrust pistons. NEVER use it with no material inside
the machine; the movement is sudden and dangerous! NEVER PUT YOUR HANDS OR FOREIGN OBJECTS INSIDE THE HOLDER OR
IN THE MATERIAL HOLDER TUBE
6- ADJUSTMENT
6.1 Regulation of the extrusion speed and inlet air pressure.
Loosen the pressure regulator knob by turning it anti-clockwise to decrease the air pressure with consequent slower
extrusion speed.On the contrary, tighten the pressure reducer knob by turning it clockwise to gradually increase the air
pressure with consequent faster extrusion speed.
7- RESIDUAL RISKS
• Blast of air: occurs mainly when the lever is released, when air from the material holder tube is expelled through the exhaust
air outlets. It also occurs when the pneumatic return switch is used. Keep away from the eyes and ears. Keep dangerous volatile
powders or substances away from the device.
Always wear protective goggles. If volatile powders are used, wear appropriate personal protective gear to protect your
respiratory system. Always check its eectiveness for the substances involved.
• Lesions to hands: it may mainly occur during loading and/or ordinary maintenance operations, the threads and the use of
cartridges and bags opening tools can cause cuts or abrasions. Always use safety gloves.
• Tube whiplash: it mainly occurs when disconnecting the gun from the main system. The disconnected gun tube can move
suddenly and unexpectedly; always use the disconnector on the main system before disconnecting the gun.
8- CLEANING AND ORDINARY MAINTENANCE to be carried out by the operator
Always disconnect the machine from mains power before disconnecting the applicator forcleaning and routine maintenance.
To activate To stop

14
English
Ordinary maintenance
FREQUENCY OPERATION DESCRIPTION
Every 2 weeks Threads greasing Grease the ring nut thread (2) as well as the relevant cartridge holder tube thread,
with lubricating grease. (CSG II MP 450 )
Every week Material holder tube inner
greasing
Grease the material holder tube inner surface with a brush.(CSG II MP 450 )
Every 2 weeks Dusts, lth or material residues Carefully clean the front ring nut thread (2) and the relevant cartridge holder tube
thread with a clean cloth and a detergent.
Every 2 weeks Grease the transmission rod
or rods.
After removing the material holder tube (CSG II MP 450 only) grease the
transmission rod or rods.
Cleaning
FREQUENCY CAUSES DESCRIPTION
On each charge Fresh material residues Always carefully remove material residues from the gun surfaces, dispose in
compliance with the applicable regulations in the country of use.
Every week Dusts or lth Carefully clean the exhaust air outlets (11.1) with a clean cloth and a detergent and
check for potential clogging.
Every 2 weeks Dusts, lth or material residues Carefully clean the front ring nut thread (2) with a clean cloth and a detergent and
the relevant thread on the cartridge holder tube. (CSG II MP 450 )
Every 2 weeks Dusts or lth Carefully clean the connector between the gun and the feeding system (6) with a
clean cloth and a detergent.
Every month Dusts or lth Carefully clean the gun with a clean cloth and a detergent, especially the handle, as
ease of holding is a priority.
Every 2 weeks Dusts, lth or material residues After removing the material holder tube (CSG II MP 450 only), carefully clean the
transmission rod or rods with a clean cloth and a detergent, also clean the inside of
the Material holder tube or Cradle of material.
* Time slots are to be intended as actual working time.
9- EXTRAORDINARY MAINTENANCE to be carried out by the maintenance operator / dealer
• Material holder tube gaskets replacement: after extensive use air leakages on the back of the material holder tube may occur.
The outlet OR needs to be replaced. Contact your dealer.
• Replacement of the thrust piston lip gasket : after extensive use an excessive waste of the thrust piston lip seal may occur, thus
leading to a lower performance and air leakage on the front of the gun. The lip seal needs to be
replaced. Contact your dealer.
10- FAULTS AND BREAKDOWNS to be carried out by the maintenance operator / dealer
In the event of faults and/or breakdowns of gun components, do not try to repair them. Do not use the gun with temporary
repairs or damaged or worn out components, or with non-original components used as a replacement. Repairs shall be carried
out by authorized workshops or directly by the manufacturer. Contact your dealer.
11- FREQUENT ISSUES
12 - WARRANTY
The guns and their tools are covered by the warranty, if not subject to wear and tear, in compliance with European regulations.
All components deemed faulty will be replaced by our technical department with no charges, only if returned without tam-
pering or stains and if delivered DDP to our plant. The manufacturing company is not liable for personal injuries or damage to
property due products or gun misuses, which are expressly forbidden by this manual. In addition the company recommends to
carefully comply with the user’s instructions. The sale of disassembled, altered or incomplete guns or tools (upon specic request
of the client) is not covered by warranty as our technical department could not test and approve them.
INCONVENIENTS CAUSES REMEDIAL ACTIONS
After charging the material and connecting
the gun to the system, nothing occurs when
pushing the lever.
No feeding. Check disconnector opening on the system. Check pressure
regulators. Check for potential leakages in the tube.
Irregular or slow extrusion Very thick product. Increase air capacity with the ow regulator. Increase air pressure
with the pressure regulator.
Loss of pressure and extrusion power of
the gun.
Slow front ring nut. Damaged
cartridge lip
Tighten the ring nut properly. Check cartridge user’s instructions.
Replace the damaged cartridge.
The gun does not work properly. Damaged or dirty components. Carry out cleaning and ordinary maintenance operations. If the
issue is due to damaged components, contact your dealer.

15 Manuale CSG II MP - Deutsch
BEDIENUNGSANLEITUNGEN FÜR CSG II MODELLE MP E P
* Die Modelle unterscheiden sich durch die Kartuschenaufnahme
und die Art des ausgepressten Materials.
1. PRODUKTBESCHREIBUNG
1) Pistolenkörper
2) Kartuschenaufnahme
3) Presshebel
4) Gri
5) Druckregler
6) ¼-Gas-Druckluftzufuhr mit
Außengewinde
7) Materialrohr
8) Schnellentlüftungsventil
9) Hinterer Gewindering
10) CE-Kennzeichnung
11) Entlüftungsönungen
12) Pneumatikschalter
PNEUMATIC APPLICATOR GUN
mod. - xxx/xxx xx - cod. xxxxxxx
P.M.T. srl con unico socio
Via G.Marconi 3/7 - 24051 Antegnate (BG) ITALIA
MAX PRESSURE 10 bar (145 psi)
mese - anno
FAC-SIMILE
2798
3
4
10
6
11
5
1
12
H
D
L
13 798
3
4
12
110
6
11
5
1
H
D
L
2
ACHTUNG: Unter keinen Umständen die Hände in dem
Rohr oder in die Führung einführen!
Schwere Quetschgefahr für Finger und Hände! Unter kei-
nen Umständen die Hände in die Materialführung oder in
dem Rohr einführen, während die Maschine in Betrieb ist.
Bei Blockieren, zuallererst die Druckluftzufuhr abtrennen
oder unterbrechen. Im Zweifelsfall wenden Sie sich bitte
an Ihren Händler und verwenden Sie die Maschine nicht.
1. PRODUKTBESCHREIBUNG
1) Pistolenkörper
2) Vorderer Gewindering
3) Presshebel
4) Gri
5) Druckregler
6) ¼-Gas-Druckluftzufuhr mit
Außengewinde
7) Materialrohr
8) Schnellentlüftungsventil
9) Hinterer Gewindering
10) CE-Kennzeichnung
11) Entlüftungsönungen
12) Pneumatikschalter
13) Materialrohr

16
Deutsch
1.1. TECHNISCHE DATEN
1.2. GERÄUSCHBILDUNG UND VIBRATIONEN
Der A-bewertete äquivalente Schalldruckpegel beim Loslassen des Hebels, gemessen in einem horizontalen Abstand von 100
cm, bei mit Dichtsto befüllter und mit einem Druck von 6 bar/87 PSI gespeister Pistole beträgt 89 dB, mit einer Unsicherheit
von 3 dB; der A-bewertete äquivalente Schalldruckpegel am Arbeitsplatz beträgt 89 dB, mit einer Unsicherheit von 3 dB; somit
ist die Verwendung von Lärmschutz-Kopfhörern vorgeschrieben.Hand und Arm sind einer Vibration von 0,72 m/s2 ausgesetzt
(mit einer Unsicherheit K von 0,54 m/s2 ).
1.3. LAGERUNG
Der Applikator wird in einem weißen, 2,8 – 3 mm starken Einzelkarton mit acher Welle KEB BIANCO ST/B343 geliefert und ist in
einem PE-Beutel enthalten. Zwischen -5 °C und 45 °C, trocken bei max. 70 % Feuchtigkeit lagern.
In dieser Bedienungsanleitung werden die Maschinen der Familie CSG II MP unterschiedslos als Geräte, Applikatoren
oder Maschinen bezeichnet.
2. ACHTUNG
Dieses Symbol macht auf Ihre Sicherheit betreende Punkte aufmerksam. Lesen Sie sie aufmerksam durch und halten Sie sich
strikt an die gegebenen Anweisungen.
Vor dem Gebrauch der Maschine die Gebrauchsanweisungen lesen und diese strikt befolgen. Diese Bedienungsanleitung
aufbewahren und während der Verwendung der Maschine stets gribereit zur Verfügung halten.
VorallenReparatur-,Wartungs- undBefüllungsarbeitenmuss dasGerätvon derDruckluftzufuhr getrenntoder dieseunterbrochen
werden.
Falls eine Reparatur oder eine außergewöhnliche Wartung der Pistole erforderlich sein sollte, den Händler oder Fachpersonal
kontaktieren, da von nicht autorisierten Personen durchgeführte Eingrie an der Pistole zur Nichtigkeit der Garantie führen.
Berücksichtigen Sie bitte vor dem Auswählen des mit der Applikator zu spritzenden Produkts und vor Gebrauch der Applikator
anhand des Sicherheitsdatenblatts des Produkts, dessen Verträglichkeit mit der Arbeitsumgebung und eventuellen persönlichen
Schutzausrüstungen.
Halten Sie sich beim Gebrauch der Applikator an das Sicherheitsdatenblatt des verwendeten Produkts und tragen Sie geeignete
Schutzkleidung und–ausrüstungen (persönliche Schutzausrüstungen). Die Verwendung von Schutzbrillen und Gehörschutz ist
immer vonnöten.
Beim Laden von Material besteht die Gefahr, sich an den Händen Schürfwunden zuzuziehen. Es ist daher das Tragen von
Handschuhen vorgesehen.
3. ZWECKMÄSSIGE UND VERBOTENE VERWENDUNG
3.1 Zweckmäßige Verwendung
3.1.1 Auspressen von chemischen Dichtstoen (Silikon, Mastix, Kleber usw.) aus speziellen Kunststokartuschen,
deren Art und Größe für die Pistole geeignet sein müssen (koaxial, nebeneinander usw.); bitte hierzu die erste
Tabelle beachten. Die Pistole CSG II MP 450 kann mit Kartuschen aus Kunststo oder Aluminium sowie Soft Packs
(Beuteln) bestückt werden.
3.1.2 Vor der Inbetriebnahme des Geräts müssen Sie die Bedienungsanleitung sowie das Sicherheitsdatenblatt des
verwendeten Modells gelesen und verstanden haben. Während des Betriebs müssen alle vorgesehenen persönli
chen Schutzausrüstungen getragen werden.
3.1.3 Vor allen Wartungs-, Reinigungs- oder Befüllungsarbeiten sowie dann, wenn der vordere Gewindering nicht
festgeschraubt ist (CSG II MP 450) bzw. wenn keine Kartusche eingesetzt ist (alle anderen Modelle), die
Luftzufuhr unterbrechen; die vorgenannten Eingrie dürfen nur unter Einhaltung der in dieser Bedienungsanleitung
gemachten Vorgaben durchgefühfrt werden.
3.1.4 Arbeiten Sie stets unter sicheren Bedingungen, wie in dieser Bedienungsanleitung beschrieben, in einem gut
beleuchteten Arbeitsumfeld mit guter Sicht und ausreichender Belüftung. Die Arbeitsumgebung muss für den
Bediener komfortabel sein, das heißt, frei von gefährlichen Hindernissen, die das korrekte Arbeiten beeinträchti
gen oder Risiken bergen. Die Anwesenheit unbefugter oder nicht zuständiger Personen sollte auf das nötige Mini
#Grundeinstellungen: es ist der Modus, mit dem die Schusswae in der Fabrik zusammengebaut und an den Kunden versandt.
Modell # Grun-
deinstellun-
gen
Patrone Beutel Patrone
(ml)
Ratio Beutel
(ml)
L
(mm)
H
(mm)
D
(mm)
Rein-
gewicht
(g)
Kreuzung
BCX 180
- - 180 10:1 -260 263 78 705 1/4"GAS männlich
BCX 300 -- 2 x 300 1:1 -307 263 78 1125 1/4"GAS männlich
BCX 300
Short 2x190 1:1 1/4"GAS männlich
CTX 400 --380 1 : 1 - 2 : 1 - 10 : 1 -307 263 78 1100 1/4"GAS männlich
MP 450 Für
beutel
≤ 310 ≤ 600 410 263 78 1300 1/4"GAS männlich

17 Manuale CSG II MP - Deutsch
4. INBETRIEBNAHME vom Bediener durchzuführen
4.1 Luftzufuhrsystem
Die Maschine ist an ein Druckluftsystem mit folgenden Merkmalen anzuschließen:
• Max. Luftfeuchtigkeit: 5 %; • Lufttemperatur: von -10 °C bis +70 °C; • Kapazität des Systems: min. 500 l/min; •
System mit Schmier vorrichtung, Druckregler und Druckmesser. Vorgeschriebene Schmiermittelmenge: 3 - 4 Tropfen Schmier-
mittel alle 1000 l/min.
Die Maschine verfügt über einen ¼“-Gas-Anschluss mit Außengewinde, an den man sich gemäß den jeweiligen Anforderungen
anschließt. Beim Schlauch muss es sich um eine für das mobile Verarbeiten geeignete Spiralleitung handeln mit einem Wider-
stand von weniger als 1 Megaohm und einem Berstdruck, der dem Zweifachen des maximalen Anlagendrucks entspricht. Der
Luftverbrauch ist gering und hängt davon ab, wie oft man beim Auspressen des Produkts den Hebel auslässt.
Filter- und Regelventil
Ø 6 mm
Hahn
Max. Schlauchlänge 10 m
Betriebsdruck 4 - 8 bar
58-116 PSI
Vor der Inbetriebnahme und der Verwendung
der Pistole die vorgeschriebenen persönlichen
Schutzausrüstungen korrekt anlegen:
• Schutzhandschuhe
• Gehörschutz
• Schutzbrille
mum beschränkt werden. Außerdem müssen allen Anwesenden die Sicherheits- und Brandschutzvorschriften
bekannt sein.
3.2 Vorhersehbare unzweckmäßige Verwendung
3.2.1 Bedienung unter nur teilweiser Beachtung der in dieser Bedienungsanleitung genannten Umweltschutz- und
Sicherheitsvorschriften oder wenn diese Bedienungsanleitung nicht verstanden wurde.
3.2.2 Ausführung beliebiger Operationen, ohne geprüft zu haben, ob der vordere Gewindering vollständig angeschraubt
ist. (CSG II MP 450)
3.3 Verbotene Verwendung
3.3.1 Jede andere Verwendung als das Auspressen der oben aufgeführten Produkte oder von Produkten, die in vom
Standard abweichenden und/oder nicht für Ihre Pistole geeigneten Behältern enthalten sind.
3.3.2 Die Verwendung loser Materialien jeglicher Art.
3.3.3 Bedienung des Geräts, ohne diese Bedienungsanleitung gelesen und verstanden zu haben oder ohne die
vorgesehenen Schutzausrüstungen zu tragen.
3.3.4 Verwendung in potenziell explosionsgefährdeter Atmosphäre beliebiger Klassizierung oder Verwendung von
Produkten, die eine potenziell explosionsgefährdete Atmosphäre generieren, einschließlich
Reinigungsüssigkeiten, Reinigungsgeräten und Schmiermitteln.
3.3.5 Verwendung des Geräts, ohne den vorderen Gewindering fest angeschraubt zu haben oder gar ohne den
Gewindering. (CSG II MP 450)
3.3.6 Mit verschlossenen Entlüftungsönungen.
3.3.7 Die Verwendung der Pistole ohne in den Träger (bei Modellen mit Träger) eingelegte Kartusche.
3.3.8 Die Luftaustrittsönungen hinten oder auf dem pneumatischen Rückführschalter abdecken.
3.3.9 Das Eintauchen der Pistole in Lösungsmittel oder Säuren.
3.3.10 Für die Reinigung der Pistole keinesfalls Lösungsmittel und/oder Reinigungsmittel auf Grundlage von hydrierten Was
serstoen verwenden (1.1.1 Ethyltrichlorid, Dichlormethan, usw.), da diese zur Oxidation von galvanisierten Teilen
und somit zu explosiven chemischen Reaktionen führen können. Für die Reinigung nie zu saure oder zu basische
Stoe verwenden.
3.3.11 Die Pistole während des Gebrauchs mindestens 30 cm vom Gesicht entfernt halten, da die beim Auslassen des
Hebels und des Rückkehrventils aus den Luftaustrittsönungen (11) austretende Luft für das Gesicht gefährlich
resultieren könnte.
3.3.12 Die Pistole keinesfalls gegen sich selbst, andere Personen, Tiere, Panzen oder Gegenstände richten, die nicht
Gegenstand der Bearbeitung sind.
3.3.13 Befüllen, Reinigen und Warten, ohne die Druckluftzufuhr des Geräts getrennt oder unterbrochen zu haben.
3.3.14 Überschreiten des Eingangsdrucks von 10 bar / 145 psi.
3.3.15 Die Bearbeitung oder Veränderung der Pistole oder das Entfernen eines oder mehrere Teile der Pistole

18
Deutsch
2
4.2.3
4.2 Befüllung mit Beutelware vom Bediener durchzuführen
Das Gerät beim Auswechseln der Kartusche und dann, wenn der vordere Gewindering nicht auf das Rohr geschraubt ist
(CSG II MP 450), stets von der Luftzufuhr trennen, damit bei einem unbeabsichtigten Betätigen des Hebels Quetschverletzungen,
ein Austreten von Materialien oder andere Gefahrensituationen vermieden werden..
Das Ablaufdatum des nachzufüllenden Materials immer kontrollieren.
Keinesfalls beschädigte oder nicht perfekte Beutelware oder Kartuschen einsetzen.
4.2.1 Den Kolben mit dem pneumatischen Rückführschalter (siehe 5.2) bis zum Anschlag nach hinten schieben und dann die
Luftzufuhr unterbrechen oder ganz trennen.
4.2.2 Die Kartusche önen (geeignete Werkzeuge verwenden und vorsichtig vorgehen, um Verletzungen zu vermeiden) und
dann die der Kartusche beiliegende oder eine für diese passende Kunststodüse im Uhrzeigersinn festschrauben.
4.2.3a Den vorderen Gewindering (2) durch Drehen entgegen den Uhrzeigersinn lösen und von der Pistole abziehen
(nur CSG II MP 450).
4.2.3 Die Kartusche fest in den Träger einsetzen (bei Modellen mit Träger) und die Kartusche in das Rohr einführen und bis
zum Anschlag hineindrücken (nur CSG II MP 450).
4.2.4a Den vorderen Gewindering (2) durch Drehen im Uhrzeigersinn anschrauben, bis ein gewisser Druck auf die Kartusche
entsteht (nur CSG II MP 450).
Einbauen des Beutelwaren-Satzes (nur CSG II MP 450).
4.2.5.1 Zur Vorbereitung zwei xe Schlüssel von 13 mm und einen Inbusschlüssel von 5 mm bereitlegen.
Den Gri des Druckreglers an der Maschine gegen den Uhrzeigersinn vollständig abschrauben und dann bei
gedrücktem Steuerhebel langsam im Uhrzeigersinn drehen, bis der Kolben im Inneren beginnt, sich langsam zu
bewegen. Die Bewegung stoppen, sobald der Kolben den vorderen Gewindering erreicht, den Steuerhebel loslassen
und den Gewindering abnehmen. Anschließend, mit einer Hand am Gri und der anderen am Schlauch wie empfohlen,
erneut den Steuerhebel drücken, bis der Kolben vollständig aus der Leitung austritt. Nun die Zufuhr sperren oder
trennen.
4.2.5.2 Mit den beiden Maulschlüsseln die Mutter C blockieren und die Befestigungsmutter A abschrauben und entfernen,
ebenso wie den metallischen Kartuschendrücker B (Standard).
4.2.5.3 Nun der Reihe nach Folgendes anschrauben: den Befestigungsbolzen C (wenn wie im vorstehenden Punkt erklärt
entfernt), den Kartuschendrücker B, die Kunststohalterung (blau) F, den Schaber E, und, mit Hilfe des 5-mm-
Inbusschlüssels, den Aluminiumdrücker D für Beutelware.
4.2.5.4 Vergewissern Sie sich, die verschiedenen Bauteile mit den vorab verwendeten Schlüsseln gut angezogen zu haben.
13
4.2.3 a 4.2.3
4.2.4a
2
2
2
13
4.2.5
.3 4.2.5.4
CBED
4.2.5.1 4.2.5.2
A B C

19 Manuale CSG II MP - Deutsch
4.3 Befüllen mit Kartuschen (nur CSG II MP 450). vom Bediener durchzuführen
Das Gerät beim Auswechseln der Kartusche und dann, wenn der vordere Gewindering nicht auf das Rohr geschraubt ist
(CSG II MP 450), stets von der Luftzufuhr trennen, damit bei einem unbeabsichtigten Betätigen des Hebels Quetschverletzungen,
ein Austreten von Materialien oder andere Gefahrensituationen vermieden werden..
Das Ablaufdatum des nachzufüllenden Materials immer kontrollieren.
Keinesfalls beschädigte oder nicht perfekte Beutelware oder Kartuschen einsetzen.
Falls sich der gesamte Bolzen dreht, behelfen Sie sich mit einem achen Schraubenschlüssel, den Sie zwischen
die Spei chen des blauen Abstreifers stecken.
4.3.1 Den vorderen Gewindering (2) durch Drehen entgegen den Uhrzeigersinn lösen und von der Pistole abziehen.
4.3.2 Die Düse für den Beutel einsetzen und am vorderen Gewindering (2) einhaken (steht der Kolben weiter vorne,
diesen nach hinten schieben); dann den Beutel in das Materialrohr (13) so weit einführen, dass nur der abzuschneidende
Teil hervorragt.
4.3.3 Den Beutel direkt unterhalb des metallenen Verschlussbands abschneiden.
4.3.4 Den vorderen Gewindering (2) bei eingelegter Kunststodüse im Materialrohr (13) im Uhrzeigersinn festschrauben.
4.3.5 Vor dem Einsetzen des Beutels in das Materialrohr sicherstellen, dass das Beutel-Auspress-Kit wie nachstehend
dargestellt montiert wurde.
5- BEDIENUNG
5.1 Standard-Operationen
5.1.1 Für den Druckluftanschluss verweisen wir auf den Punkt 4.1.
5.1.2 Vor dem Verwenden der Pistole prüfen Sie bitte immer:
a) Den Trennschalter und den Druckluftregler der Versorgungsanlage önen.
b) Dass der Druckregler auf der Pistole oen steht.
5.1.3 Für die Befüllung mit Beutelware oder Kartuschen verweisen wir auf den Punkt 4.2. und nachstehende.
5.1.4 Zum Aktivieren der Pistole und um mit der Arbeit beginnen zu können, den Presshebel betätigen.
5.1.5 Am Ende des Gebrauchs die Pistole von der Luftzufuhr trennen. Sollte die Kartusche noch nicht leer sein, empehlt es sich, sie
vorne zu schließen, damit das in ihr enthaltene Produkt nicht austrocknet.
5.2 Verwendung des pneumatischen Rückführschalters
Auf der Seite der Pistole bendet sich ein goldfarbener Schalter; dieser dient der Aktivierung der pneumatischen Rückführung
(12). Mit diesem Schalter lassen sich die Stangen mit den Kolben zurücksetzen, d. h. sie werden in die Ausgangsposition geführt
und der Behälter wird vom verwendeten Material befreit.
5.2.1 Zur Aktivierung reicht es, den Schalter auf der lochlosen Seite zu drücken; die Stangen fahren sofort in die
Ausgangsstellung zurück; sobald der Vorgang abgeschlossen ist, hört man das Geräusch des konstanten Luftaustritts.
5.2.2 Zur Unterbrechung des Vorgangs reicht es, den Schalter auf der Seite mit dem Loch zu drücken, d. h. ihn wieder in seine
ursprüngliche Stellung zu bringen; hierdurch werden das Zurücksetzen oder der Luftaustritt beendet.
ACHTUNG! Den pneumatischen Rückführschalter nur betätigen, um den Behälter vom Material der Schubkolben zu befreien.
NIEMALS betätigen, wenn sich kein Material in der Maschine bendet; die Bewegung erfolgt plötzlich und ist gefährlich!
NIEMALS HÄNDE ODER FREMDKÖRPER IN DEN TRÄGER ODER DAS MATERIALROHR EINFÜHREN.
Zum Aktivieren Zum Unterbrechen
4.3.1 4.3.2
4.3.3
2
2
2
13
13
4.3.4

20
Deutsch
6- EINSTELLUNG
6.1 Einstellung der Auspressgeschwindigkeit und des Drucks der Luftzufuhr.
Den Gri des Druckreglers im Uhrzeigersinn drehen, um den Luftdruck und somit die Auspressgeschwindigkeit zu reduzieren.
Umgekehrt den Gri des Druckreglers gegen den Uhrzeigersinn drehen, um den Luftdruck und somit die Auspressgeschwindigkeit
zu erhöhen.
7- RESTRISIKEN
• Luftstrom: Hauptsächlich beim Loslassen des Hebels wird aus den Austrittsönungen die im Materialrohr enthaltene Luft
ausgestoßen; auch bei Betätigung des pneumatischen Rückführschalters kommt es zur Erzeugung eines Luftstrahls; sich dem
Luftstrahl nicht mit den Augen oder Ohren nähern; auch auf Stäube oder üchtige Gefahrenstoe in der Nähe des Geräts achten.
Stets eine Schutzbrille tragen; falls üchtige Stäube auftreten könnten, eine angemessene persönliche Schutzausrüstung zum
Schutz der Atemwege tragen und stets ihre Wirksamkeit in Bezug auf die betroenen Stoe überprüfen.
• Handverletzungen: Dieses Risiko ist vor allem beim Befüllen und/oder bei ordentlicherWartung gegeben. Die Gewinden und die
Verwendung von Werkzeugen für das Önen der Kartuschen und Beutelware können zu Schnitt- oder Schürfverletzungen
führen. Tragen Sie immer Schutzhandschuhe.
• Schleudertrauma durch den Schlauch: Dieses Risiko ist vor allem beim Trennen der Pistole von der Hauptanlage gegeben. Der
von der Pistole getrennte Schlauch kann eine plötzliche und unerwartete Bewegung ausführen. Betätigen Sie immer den
Trennschalter der Druckluftanlage bevor Sie die Pistole entkoppeln.
8- REINIGUNG UND ORDENTLICHE WARTUNG vom Bediener durchzuführen
Vor dem Durchführen jeglicher Reinigungs- und ordentlichen Wartungsarbeiten ist die Maschine von der
Hauptversorgungsanlage zu trennen, bevor die Pistole abgetrennt wird.
Reinigung
Ordentliche Wartung
HÄUFIGKEIT URSACHEN BESCHREIBUNG
Nach jedem Nachfüllen Frische Materialrückstände Materialrückstände gründlich von der Pistole entfernen und sie in Übereinstimmung
mit den im jeweiligen Land geltenden Vorschriften entsorgen.
Wöchentlich Staub und Schmutz Mit einem sauberen Lappen und einem Reinigungsmittel die Entlüftungsönungen
(11) gründlich säubern und darauf achten, dass sie nie verschlossen sind.
Alle 2 Wochen Staub, Schmutz oder
Materialrückstände Den vorderen Gewindering (2) und das entsprechende Gewinde auf dem
Kartuschenrohr mit einem sauberen Lappen und Reinigungsmittel gründlich
säubern. (CSG II MP 450)
Alle 2 Wochen Staub und Schmutz Die Verbindung zwischen Pistole und Luftzufuhr (6) mit einem sauberen Lappen und
Reinigungsmittel gründlich säubern.
Monatlich Staub und Schmutz Die Pistole in ihrer Ganzheit mit einem sauberen Lappen und Reinigungsmittel
säubern und dabei insbesondere dem Gri Beachtung schenken, der bequem in der
Hand liegen muss.
Alle 2 Wochen Staub, Schmutz oder
Materialrückstände Nach dem Entfernen des Materialrohr (nur CSG II MP 450) reinigen Sie die Stange
oder die Antriebsstangen sorgfältig mit einem sauberen Tuch und Reinigungsmittel,
reinigen Sie auch das Innere der Kartuschenaufnahme oder Materialrohr.
* Die zeitlichen Abstände beziehen sich auf die eektiven Einsatzzeiten.
HÄUFIGKEIT VORGANGSWEISE BESCHREIBUNG
Alle 2 Wochen Die Gewinden schmieren. Das Gewinde des Gewinderings (2) sowie das entsprechende Gewinde auf dem
Kartuschenrohr einfetten. (CSG II MP 450)
Wöchentlich Das Materialrohr innen einfetten. Mit einem Pinsel die Innenäche des Materialrohrs einfetten. (CSG II MP 450)
Alle 2 Wochen Staub, Schmutz oder
Materialrückstände entfernen. Den vorderen Gewindering (2) und das entsprechende Gewinde auf dem
Kartuschenrohr mit einem sauberen Lappen und Reinigungsmittel gründlich
säubern.
Alle 2 Wochen Die Getriebestange schmieren. Nach dem Entfernen des Materialrohrs (nur CSG II 450) die Antriebsstangen schmieren.
* Die zeitlichen Abstände beziehen sich auf die eektiven Einsatzzeiten.
This manual suits for next models
4
Table of contents
Languages:
Other Otto Power Tools manuals
Popular Power Tools manuals by other brands

Chicago Electric
Chicago Electric 42831 Assembly and operating instructions

Flexco
Flexco Novitool Aero 300 Safety and operating manual

Parkside
Parkside PLBS 30 A1 Operation and safety notes

Titan
Titan SF1500XP Safety and operating manual

Zenit Powertools
Zenit Powertools HAG-2011 instruction manual

pela tools
pela tools 50841 manual