Outland Living FT410-TC Series User manual

FIRE TABLE
PROPANE TO NATURAL GAS APPLIANCE
CONVERSION KIT
FMI BRANDS INC.
101 – 3570 194 Street, Surrey, BC, Canada V3Z 1A5 | Email: info@outlandliving.com
USA, Canada Toll Free: 1-888-514-1663 | Tel: (+1) 778-294-0988
Hours of Operation: 8:30AM - 4:00PM (Pacific Time) | Customer Service in English only
D.518.000.V2 (English)Outland Living and the Outland Flame are registered trademarks of FMI Brands Inc.
NGCK-AT #518 • AUTO IGNITION + THERMOCOUPLE • INPUT RATING: 42,500 Btu/h
APPLIANCE MODELS ACCEPTABLE TO BE USED WITH THIS KIT
NGCK-AT 518 (AUTO IGNITION + THERMOCOUPLE MODELS)
TICK SERIES NAME MODEL NUMBERS SERIES NUMBERS
OUTLAND FIRE TABLE FMPPC2E-410 FT410-TC
WARNING:
This conversion kit shall be installed by a qualified service
agency in accordance with the manufacturer’s Instructions
and all applicable codes and requirements of the Authority
Having Jurisdiction. If the information in these instructions
is not followed exactly, a fire, explosion or production of
carbon monoxide may result causing property damage,
personal injury or loss of life. The qualified service agency
is responsible for the proper installation of this kit. The
installation is not proper and complete until the operation
of the converted appliance is checked as specified in the
manufacturer’s instructions supplied with the kit.

Natural Gas Conversion Kit
En-2 NATURAL GAS CONVERSION KIT - OUTLAND LIVING®FIRE TABLE - FMPPC2E-410
CONTENTS
1. Natural Gas Conversion Kit Manual
2. Natural Gas Valve (marked with Yellow Cap)
3. Heat Shrink Tubing (70mm)
4. Low Pressure Natural Gas Hose with 3/8” male Quick Disconnect
Inlet Fitting and 5/8”-18UNF Outlet Connector; MAX. WP 1/2 PSI; 3/8”
diameter, 3.657 m / 12ft length (marked with Yellow Cap)
5. 3/8” female Quick Disconnect with 3/8”-18 NPT Inlet Connector;
MAX. WP 1/2 PSI (marked with Yellow Cap)
6. Marking and Warning Label (Side/Tag 1):
Conversion Statement Label
7. Marking and Warning Label (Side/Tag 2):
Conversion Identification Label
8. Marking and Warning Label - Hang Strap
TABLE DE FEU OUTLAND FMPPC2E-410 FT410-TC
518
518
518
42,500 Btu/h
0.25
2.9 mm
42 500 B tu/h
0,25
ENSEMBL E DE CONVERSI ON AU GAZ NATURE L OUTLAND
Distr ibué par : FMI BR ANDS INC
101 – 3570 Rue 19 4, Surrey (C.- B.)
Canada V 3Z 1A5 • 1.88 8.514.1663
518
2,9 mm
OUTL AND NATURAL GA S CONVERSIO N KIT
Distr ibuted by: FM I BRANDS INC
101 – 3570 194 St reet, Surre y,B C
Canada V 3Z 1A5 • 1.88 8.514.1663
NGCK-TAG2-518_V1
NGCK-TAG1-518_V1
OUTLAND FIRE TABLE FMPPC2E-410 FT410-TC
TAG 1, SIDE 1 • ÉTIQUETTE 1 / CÔTÉ 1 TAG 2, SIDE 1 • ÉTIQUETTE 2 / CÔTÉ 1
TAG 1, SIDE 2 • ÉTIQUETTE 1 / CÔTÉ 2 TAG 2, SIDE 2 • ÉTIQUETTE 2 / CÔTÉ 2
2.5 in x 4 in (63.5 mm x 101.6 mm)
TABLE DE FEU OUTLAND FMPPC2E-410 FT410-TC
518
518
518
42,500 Btu/h
0.25
2.9 mm
42 500 B tu/h
0,25
ENSEMBL E DE CONVERSI ON AU GAZ NATURE L OUTLAND
Distr ibué par : FMI BR ANDS INC
101 – 3570 Rue 194 , Surrey (C.- B.)
Canada V 3Z 1A5 • 1.88 8.514.1663
518
2,9 mm
OUTL AND NATURAL GA S CONVERSIO N KIT
Distr ibuted by: FM I BRANDS INC
101 – 3570 194 St reet, Surre y,B C
Canada V 3Z 1A5 • 1.88 8.514.1663
NGCK-TAG2-518_V1
NGCK-TAG1-518_V1
OUTLAND FIRE TABLE FMPPC2E-410 FT410-TC
TAG 1, SIDE 1 • ÉTIQUETTE 1 / CÔTÉ 1 TAG 2, SIDE 1 • ÉTIQUETTE 2 / CÔTÉ 1
TAG 1, SIDE 2 • ÉTIQUETTE 1 / CÔTÉ 2 TAG 2, SIDE 2 • ÉTIQUETTE 2 / CÔTÉ 2
2.5 in x 4 in (63.5 mm x 101.6 mm)

1-888-514-1663 | WWW.OUTLANDLIVING.COM En-3
REQUIRED TOOLS (Not Included):
• Philips Screwdriver #2 (medium)
• Adjustable Wrench
• Utility Knife
• Lighter Wand
• Soap Water Spray Bottle
CAUTION:
The gas supply shall be shut off prior to disconnecting the
electrical power, before proceeding with the conversion.
NATURAL GAS CONVERSION KIT – CONVERSION INSTRUCTIONS
WARNING:
Your natural gas conversion kit comes with a quick-disconnect
(part 5) which should be installed by a professional certified
natural gas fitter. Once the quick-disconnect is properly
installed, proceed to the next step.
NATURAL GAS CONVERSION KIT RATINGS
GAS ORIFICE SIZE*
*Injector size marked clearly
on the gas valve orifice.
2.9 mm
MANIFOLD PRESSURE 7 in WC
INLET PRESSURE 0.25 PSIG
INPUT RATING 42,500 Btu/h
Tested by CSA International
ANS Z21.97-2017/CSA 2.41-2017 Outdoor Decorative Gas Appliances
OUTLAND PROPANE TO NATURAL GAS APPLIANCE
CONVERSION KIT MANUAL
OUTLAND PART NUMBER: 518
NOTE: This assembly
instruction manual is for
OUTLAND Fire Table model
FMPPC2E-410 (FT410-TC) only.

Natural Gas Conversion Kit
En-4 NATURAL GAS CONVERSION KIT - OUTLAND LIVING®FIRE TABLE - FMPPC2E-410
GLASS ROCKS
NOT SHOWN SIDE PANEL
OFF
STEP 1
a. Ensure the fire table gas control knob is in the OFF position.
b. Remove side panel.
STEP 2
a. Close the valve on the LP (propane) cylinder.
b. Disconnect and remove the LP cylinder from the fire table.
CLOSE VALVE ON LP
(PROPANE) CYLINDER
DISCONNECT AND REMOVE
LP CYLINDER FROM FIRE TABLE

1-888-514-1663 | WWW.OUTLANDLIVING.COM En-5
STEP 3
a. Disconnect the igniter cable. Slide protective cap back to expose the cable connection.
Grasp the cable at the base and pull firmly.
b. Disconnect the thermocouple cable. Grasp the cable at the base and pull firmly.
c. Disconnect the thermocouple ground wire.
Remove the screw to release the wire.
d. Locate the black OUTLAND heat shrink
tubing on the gas hose coupling and
**carefully** remove it using a utility knife.
e. Remove the propane hose. Uncouple it from
the gas appliance valve assembly using a
wrench (not provided).
REMOVE THE
PROPANE HOSE
STEP 4
Remove the (4x) screws holding the gas valve mounting bracket in place.
Remove the gas valve mounting bracket assembly.
SCREW #1
SCREW #2
SCREW #3
SCREW #4
DISCONNECT
THE IGNITER
CABLE
DISCONNECT THE
THERMOCOUPLE
CABLE
DISCONNECT THE
THERMOCOUPLE
GROUND WIRE

Natural Gas Conversion Kit
En-6 NATURAL GAS CONVERSION KIT - OUTLAND LIVING®FIRE TABLE - FMPPC2E-410
STEP 5
Disassemble the propane gas valve.
Remove the gas control knob by gripping firmly and pulling straight out. Remove the two screws
located next to the exposed valve stem. This will release the base ring, faceplate and the propane
gas valve and hose assembly, which you can set aside. Label and save this propane valve for
converting back to propane if required.
BASE RING
FACEPLATE
MOUNTING BRACKET
PROPANE GAS VALVE
GAS HOSE
COUPLING
(2X) SCREWS
GAS KNOB
CSA TAGS
THERMOCOUPLE
SOCKET
GAS ORIFICE
VALVE STEM
IGNITER GAS HOSE
COUPLING
GROUND TERMINAL
GROUND TERMINAL
SCREW
STEP 6
Assemble the natural gas valve (part 2).
a. Take the new NATURAL GAS valve (marked
with Yellow Cap) and insert the stem through
the mounting bracket, faceplate, and gas knob
base ring ensuring the coupling is facing down.
b. Align the openings of the gas valve, mounting
bracket, faceplate, and gas knob base ring and
insert the two screws.
c. Attach the gas knob by aligning the flat side
keyway to the flat side of the gas valve stem
and firmly press-fitting.

1-888-514-1663 | WWW.OUTLANDLIVING.COM En -7
STEP 6 (continued)
Assemble the natural gas valve (part 2). Note: Ensure the arrow on the knob
aligns with the OFF indicator on the
valve cover when the valve is set in
the closed position. To check, push
and turn the knob clockwise until it
stops. The arrow on the knob should
be aligned with the OFF indicator on
the valve cover at this point.
NATURAL
GAS VALVE
OFF
GAS HOSE COUPLING
(ENSURE COUPLING
FACES DOWN)
STEP 7
Slide the heat shrink tubing (part 3) over the burner venturi tube.
STEP 8
Mount the new natural gas bracket assembly.
Use the same 4x screws which held the propane gas valve assembly.
Important: Ensure the gas valve orifice is aligned to sit inside the burner venturi tube.
BURNER VENTURI TUBE
GAS VALVE ORIFICE
NATURAL GAS VALVE
HEAT SHRINK TUBING

En-8 NATURAL GAS CONVERSION KIT - OUTLAND LIVING®FIRE TABLE - FMPPC2E-410
Natural Gas Conversion Kit
APPLY THE HEAT
SHRINK TUBING
Position the heat shrink tubing so that it generously
overlaps the connection where the gas valve orifice
enters the burner venturi tube and extends past the
air inlet holes in the burner tube.
*** For the best looking decorative flame quality it
is important to ensure all the air gaps and air inlet
holes are completely covered.***
Use a lighter wand, or lit match, to apply flame heat
close to and directly underneath and around the
heat shrink tubing. Don’t burn a single spot too long.
Have a steady hand and use a slow back and forth
motion with the flame. Ensure the heat shrink tubing
cinches snugly over the entire circumference and
no visible gaps in the ends remain. The heat shrink
tubing must set firmly around the parts, forming a
good seal, so no air gets in.
TIP: Once you have positioned the heat shrink tubing in place, you do not need to hold on to it
during the heat application. The flame will naturally shrink and contract the heat shrink tubing,
conforming to the parts underneath and sealing off the air holes.
Oh Darn it!
If, for some reason, after applying the heat shrink tubing, there are visible gaps or exposed air
holes around the venturi connection area, we suggest you use common high heat electrical tape
to close those gaps.
STEP 9
Apply the heat shrink tubing (part 3).

1-888-514-1663 | WWW.OUTLANDLIVING.COM En-9
STEP 10
Attach the natural gas hose (part 4).
If the natural gas hose is not preassembled to
the natural gas valve, remove the yellow cap
and attach the natural gas hose to the gas valve
coupling. Use a wrench to firmly tighten.
WARNING:
Pay attention not to cross thread the
coupling during tightening. Do not over
tighten. (Max torque: 33.9 N/M)
ATTACH THE
NATURAL GAS HOSE
CONNECT THE
IGNITER CABLE
CONNECT THE
THERMOCOUPLE
CABLE
CONNECT THE
THERMOCOUPLE
GROUND WIRE
STEP 11
a. Connect the igniter cable to the
gas valve.
b. Connect the round
thermocouple cable to the
thermocouple socket.
c. Attach the thermocouple
ground wire connection to the
gas valve ground terminal. Use
the screw provided on the gas
valve. Ensure the connection is
firmly set under the screw.

Natural Gas Conversion Kit
En -10 NATURAL GAS CONVERSION KIT - OUTLAND LIVING™FIRE TABLE - FMPPC2E-410
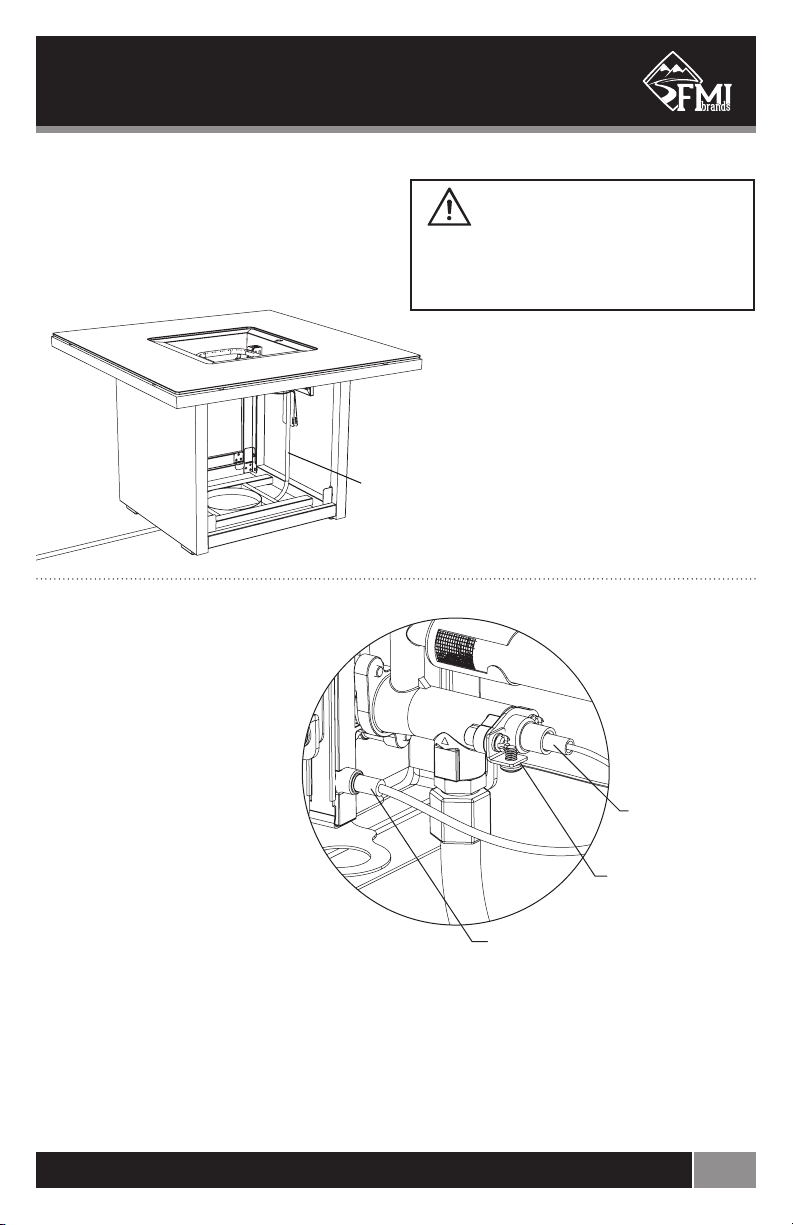
STEP 12
Test the Igniter to verify the correct
installation and ensure proper spark.
Locate the igniter and the thermocouple
inside the burner tray inside your Fire
Table (under protective shield). Ensure
igniter cover is not covered by glass
rocks. This helps air circulate.
Turn the gas knob until it clicks. A
small spark ignition should be visible
at the tip of the igniter. If the spark is
not working clean dust from igniter tip
and thermocouple post. Try again. If
still not working you have not installed
the igniter cable correctly. Reattach the
igniter cable. Retest. Repeat process
until you verify the spark works.
STEP 13
Install the supplied Quick-Disconnect
(part 5). The quick-disconnect should be
installed by a professional certified natural
gas fitter. Once the quick-disconnect is
properly installed, proceed to the next step.
Low Pressure NaturalLow Pressure Natural
Gas Hose withGas Hose with
3/8” male Quick3/8” male Quick
Disconnect InletDisconnect Inlet
Fitting and 5/8”-18UNFFitting and 5/8”-18UNF
Outlet Connector;Outlet Connector;
MAX. WP 1/2 PSI; 3/8”MAX. WP 1/2 PSI; 3/8”
diameter, 3.657 m /diameter, 3.657 m /
12ft length (marked12ft length (marked
with Yellow Cap)with Yellow Cap)
3/8” female Quick3/8” female Quick
Disconnect withDisconnect with
3/8”-18 NPT Inlet3/8”-18 NPT Inlet
Connector; MAX. WPConnector; MAX. WP
1/2 PSI (marked with1/2 PSI (marked with
Yellow Cap)Yellow Cap)
STEP 14
Confirm that
the control
knob on the
fire table is
in the OFF
position.
STEP 15
Confirm that
the valve on
your natural
gas box gas
supply is
closed OFF.
OFFOFF
ENSURE IGNITER AND THERMOCOUPLE (UNDER
IGNITER COVER) IS FREE FROM DUST AND NOT
BLOCKED BY GLASS ROCKS
OFF

1-888-514-1663 | WWW.OUTLANDLIVING.COM E n -11
STEP 18
LEAK TEST:
Mix a solution of liquid soap and water in a
spray bottle and perform a leak test on all
fittings prior to use.
Spray the solution on all critical hose junctions
and inspect for bubbles forming around any of
the connections.
a. Quick-disconnect coupling connection at
gas supply.
b. Gas hose coupling connection at fire table
gas valve.
If growing bubbles appear it indicates that
there is a gas leak. If a leak is detected
immediately shut off the gas at the source.
Retighten all connections and try again. If the
leak persists do not attempt repairs. Call a
professional certified gas fitter for assistance.
Call OUTLAND for replacement parts.
QUICK-
DISCONNECT
COUPLING
CONNECTION
AT GAS SUPPLY
GAS HOSE
COUPLING
CONNECTION
AT FIRE TABLE
GAS VALVE
STEP 16
Attach the gas hose
to your installed
quick-disconnect
natural gas source
(house line).
STEP 17
Turn on the gas flow from your source valve.
ONON

Natural Gas Conversion Kit
En -12 NATURAL GAS CONVERSION KIT - OUTLAND LIVING®FIRE TABLE - FMPPC2E-410
STEP 19
ONCE YOU HAVE CONFIRMED THERE ARE NO GAS LEAKS (see
‘Leak Test’ section above), VERIFY THE RELATIONSHIP OF IGNITER
TO BURNER, PRIOR TO COMPLETING CONVERSION:
a. Reference the appliance Owner’s Manual for ignition sequence.
b. Test the Ignition to verify the correct installation: Push the knob
in and quickly turn to the 12:00 position. Do not release the gas
knob. The ignitor will spark and ignite the gas.
**IMPORTANT: You must hold the knob in for 10 seconds to
heat up the thermocouple.**
If the thermocouple is not given time to heat up, the
thermocouple will shut off the gas supply and the flame will
go out. After 10 seconds, once the thermocouple is heated,
release the knob and the fire table should stay lit.
c. Verify the flame. Upon igniting the appliance, visually verify
that the burner is indeed burning as demonstrated in the
image here. The presence of flames will confirm that the
burner is burning. To test the adjustment of the gas input rate
(flame height and intensity), turn the gas knob left or right.
Adjust rocks with poker to reveal flame.
Refer to your Owner’s Manual for further details.
STEP 20
If after lighting attempts there are no flames present, as
demonstrated in the image here, the appliance is likely
not burning. If this is the case, IMMEDIATELY turn the gas
knob to the ‘OFF’ position, if it is not already, and repeat the
ignition procedure.
Repeat the push-in and turn to high flame motion 2-3 times
consecutively until the burner ignites. Remember to keep
holding in the gas knob for at least 10 seconds once you
see a visible ignition. If the thermocouple is not given time
to heat up, or the ground wire connection is loose, the
thermocouple will shut off the gas supply and the flame will go out.
For more information about the thermocouple please see section “What is a Thermocouple?”.
PUSH THE KNOB IN AND
QUICKLY TURN TO THE
12:00 POSITION. HOLD FOR
10 SECONDS. RELEASE.

1-888-514-1663 | WWW.OUTLANDLIVING.COM En -13
STEP 20 (continued)
The appliance should light within the first three tries. Never let the gas knob flow open for more
than 5 seconds without lighting. If the gas does not ignite within 5 seconds, turn off the valve and
wait 5 minutes for the gas to dissipate. Check the gas supply is open. Check connections. If your
appliance has an electric igniter, clean and clear the igniter of any debris or dust. Ensure igniter
cover is not covered by glass rocks. This helps air circulate. Repeat ignition procedure.
MAKE SURE THE SILICONE
COVER ON THE IGNITER
CABLE WIRE IS PRESSED UP
AGAINST THE GAS VALVE
CONNECTION
ENSURE THAT
BOTH CABLES ARE
FIRMLY ATTACHED
TO THE CORRECT
SOCKETS
LOCATE THE
THERMOCOUPLE GROUND
WIRE. ENSURE THE GROUND
SCREW IS TIGHT ON THE
WIRE CONNECTOR.
What is a Thermocouple?
A thermocouple is a temperature sensitive safety feature
mounted underneath the igniter cover and connected
to the gas valve. The thermocouple is designed to shut
off the gas supply to prevent un-burnt gas from free-
flowing through the burner if the table top flames go out
unexpectedly.
TIPS:
a. During ignition, the thermocouple needs to heat up for
at least 10 seconds for the fire table to work properly.
b. Ensure the thermocouple cable is firmly plugged into
the correct socket. The thermocouple will automatically
shut off the gas valve if the cable is not connected
properly.
c. The thermocouple requires a ground wire connection
to the gas valve to complete the electrical circuit. If the
ground connection is loose, the gas will not flow, or will intermittently shut off.
d. Ensure that the round thermocouple cable is firmly plugged into the gas valve socket. The
thermocouple will automatically shut off the gas if the cable is not connected properly.
THERMOCOUPLE
IGNITER
FIRE TABLE WON’T LIGHT? IGNITION PROBLEM?
If your fire table still fails to ignite, turn the knob to the ‘OFF’ position. Reference the appliance
Owner’s Manual for ignition troubleshooting, and/or call Customer Service at 1-888-514-1663.

Natural Gas Conversion Kit
En -14 NATURAL GAS CONVERSION KIT - OUTLAND LIVING®FIRE TABLE - FMPPC2E-410
TABLE DE FEU OUTLAND FMPPC2E-410 FT410-TC
518
518
518
42,500 Btu/h
0.25
2.9 mm
42 500 Btu/h
0,25
ENSEMBLE DE CONVERSION AU GAZ NATUREL OUTLAND
Distribué par : FMI BRANDS INC
101 – 3570 Rue 194, Surrey (C.-B.)
Canada V3Z 1A5 • 1.888.514.1663
518
2,9 mm
OUTLAND NATURAL GAS CONVERSION KIT
Distributed by: FMI BRANDS INC
101 – 3570 194 Street, Surrey, BC
Canada V3Z 1A5 • 1.888.514.1663
NGCK-TAG2-518_V1
NGCK-TAG1-518_V1
OUTLAND FIRE TABLE FMPPC2E-410 FT410-TC
TAG 1, SIDE 1 • ÉTIQUETTE 1 / CÔTÉ 1 TAG 2, SIDE 1 • ÉTIQUETTE 2 / CÔTÉ 1
TAG 1, SIDE 2 • ÉTIQUETTE 1 / CÔTÉ 2 TAG 2, SIDE 2 • ÉTIQUETTE 2 / CÔTÉ 2
2.5 in x 4 in (63.5 mm x 101.6 mm)
STEP 21
AFFIX MARKING AND WARNING LABEL AFTER CONVERSION, TESTING AND VERIFICATION
SEQUENCES ABOVE ARE COMPLETE AND PRIOR TO FIRST USE. The marking and warning
label has two sides, containing specific TAG 1 and TAG 2 content, and requires specific action as
instructed below to be in strict compliance with CSA guidelines.
ATTENTION: Check first that the appliance is not hot before handling and affixing tag.
INSTRUCTION:
a. TAG 1: IN STRICT COMPLIANCE WITH CSA GUIDELINES THE RESPONSIBLE PARTY SHALL
MARK THE TICK BOX NEXT TO APPLICABLE MODEL.
b. TAG 2: IN STRICT COMPLIANCE WITH CSA GUIDELINES THE RESPONSIBLE PARTY SHALL
MARK THE DATE OF CONVERSION AND THEIR IDENTITY WITH PERMANENT MARKING.
MARKING & WARNING LABELS (English and French):

1-888-514-1663 | WWW.OUTLANDLIVING.COM En -15
STEP 22
Your Outland Fire Table is now converted to Natural Gas.
Follow normal igniting procedures as per your Owner’s Manual.
STEP 21 (continued)
IN STRICT COMPLIANCE WITH CSA GUIDELINES, THE
RESPONSIBLE PARTY SHALL AFFIX THE MARKING &
WARNING LABEL IN CLOSEST PROXIMITY TO EXISTING
PRODUCT RATING PLATE, IN A CONSPICUOUS
LOCATION, ON THE APPLIANCE BEING CONVERTED:
After Steps A and B above are complete, affix the label on the appliance, using the supplied hang
strap, in the location as shown on the applicable model appliance picture below.
MODEL HANG TAG LOCATION
FMPPC2E-410
(FT410 -TC)
HANG TAG HOLE
LOCATION
PLASTIC HANG STRAP
CSA TAGS
CAUTION!
HOSE IS A TRIP HAZARD
!
WARNING:
TRIP HAZARD! ENSURE
THE GAS HOSE IS PLACED
IN AN AREA WHERE
IT IS UNLIKELY TO BE
TRIPPED OVER (SUCH AS
PATHWAYS OR TRAILS)
OR SUBJECT TO OTHER
ACCIDENTAL DAMAGE.

Natural Gas Conversion Kit
En -16 NATURAL GAS CONVERSION KIT - OUTLAND LIVING®FIRE TABLE - FMPPC2E-410
WARNING:
This is NOT a toy.
The fire table is a decorative gas appliance only. NEVER cook food on the fire table.
Wait at least 30 minutes after turning off the fire table to allow it to cool down before
putting ANY cover over the fire table.
Please ensure that all adults and children which use or are near a unit in use are aware of
the hazard of high-surface temperatures present on the unit during use and should use
caution and stay away to avoid burns or clothing ignition.
Children should be supervised at all times when using this unit without exception.
Solid fuels shall not be burned in this appliance.
Elevation and temperature affect the performance (flame height) of gas appliances.
Never leave the Fire Table unattended while in operation.

1-888-514-1663 | WWW.OUTLANDLIVING.COM En -17
PRE-IGNITION INSPECTIONS
GAS HOSE INSPECTION
Clean and inspect the hose before each use of the appliance.
Attention: If there is evidence of abrasion, wear, cuts, or leaks, the hose must be replaced prior to
the appliance being put into operation.
Only use a replacement hose by OUTLAND Living.
BURNER & ORIFICE INSPECTION
Inspect the burner prior to each use. Ensure the orifice holes are not plugged and the burner tube
is not damaged or compromised. Clean any plugged burner orifices with a small paper clip.
The burner must be replaced prior to the appliance being put into operation if there is evidence
of damage. Replacement burners are available from FMI Brands Inc.
Always inspect and clear all valve and gas orifices of any foreign debris including spider webs
prior to lighting. If any doubt there may be a nest inside, use a pipe cleaner up the tube. See
section ‘REMOVING INSECT NESTS’.
BURNER TUBE INSPECTION
Inspect the burner tube under the appliance and ensure the mesh screen is in place, prior to each
use.
ATTENTION: If the screen is dislodged perform an insect nest inspection, prior to ignition. See
section ‘REMOVING INSECT NESTS’.

Natural Gas Conversion Kit
En -18 NATURAL GAS CONVERSION KIT - OUTLAND LIVING®FIRE TABLE - FMPPC2E-410
REMOVING INSECT NESTS
Clean the burner tubes often and especially if the appliance has been sitting unused for a period
of time. You must remove the gas valve to gain access to the burner tube for cleaning.
BURNER TUBE CLEANING INSTRUCTIONS:
STEP 1
Ensure the appliance valve(s) are OFF and the natural gas supply valve is closed.
STEP 2
Locate and remove the gas valve body assembly mounting screws.
WARNING:
Small critters like spiders and earwigs can
quickly build nests inside the burner tube
which can obstruct gas flow and impact
the flame height and heat performance
of your appliance. More seriously, a
nest or blockage of the burner tube can
cause a back-flame event, damage to
your appliance, or even extreme operator
injuries!
Screw #4
Screw #3
Screw #2
Screw #1

1-888-514-1663 | WWW.OUTLANDLIVING.COM En -19
STEP 3
Remove the gas valve body assembly.
STEP 4
Use a flashlight to look inside the burner tube. Use a long flexible pipe cleaner, or long small
utensil to clean out any debris or nest material. An air tool to blow out the burner is helpful, but
please wear eye protection.
STEP 5
When the burner tube is determined to be clear, reinstall the gas valve body assembly.
IMPORTANT: Align gas valve orifice inside burner tube.
REMOVING INSECT NESTS (continued)
Burner
Tube
Use a pipe cleaner or
long small utensil here
to clean out any debris
or nest material

En-20 NATURAL GAS CONVERSION KIT - OUTLAND LIVING®FIRE TABLE - FMPPC2E-410
Natural Gas Conversion Kit
WARNING! HOT SURFACE! GLASS. FRAGILE! HANDLE WITH CARE
FOR REPLACEMENT PARTS AND ACCESSORIES PLEASE VISIT
WWW.OUTLANDLIVING.COM
Fire Table accessories, replacement rocks and parts can be purchased at:
www.outlandliving.com or by calling 1-888-514-1663.
The Owner’s Manual is available as a free download from www.outlandliving.com.
Replacement part orders can be sent by mail to the address on the cover of this booklet.
Should you have any questions or comments regarding this appliance, please do not hesitate to
This manual suits for next models
1
Table of contents
Other Outland Living Outdoor Fireplace manuals
Popular Outdoor Fireplace manuals by other brands

Coleman
Coleman 5055-707 Assembly and instruction sheet

tepro
tepro GLADSTONE instruction manual

Outdoor GreatRoom Company
Outdoor GreatRoom Company Denali DENBR-1242 installation instructions

Endless Summer
Endless Summer WAF501CS Cleaning and care

BREEO
BREEO LUXEVE user guide

Crosley
Crosley c09003a instruction manual

bluu
bluu FIRE BOWL instruction manual

Montigo
Montigo CFPO-2 Installation & maintenance manual

Sunnydaze Decor
Sunnydaze Decor NB-MS201 Assembly and instruction sheet

Coleman
Coleman 5062-707 Assembly and instruction sheet

Bond
Bond WOODLEAF HYFP50086-5 owner's manual

Firegear
Firegear Key West KWCH-1 Owners & installation manual