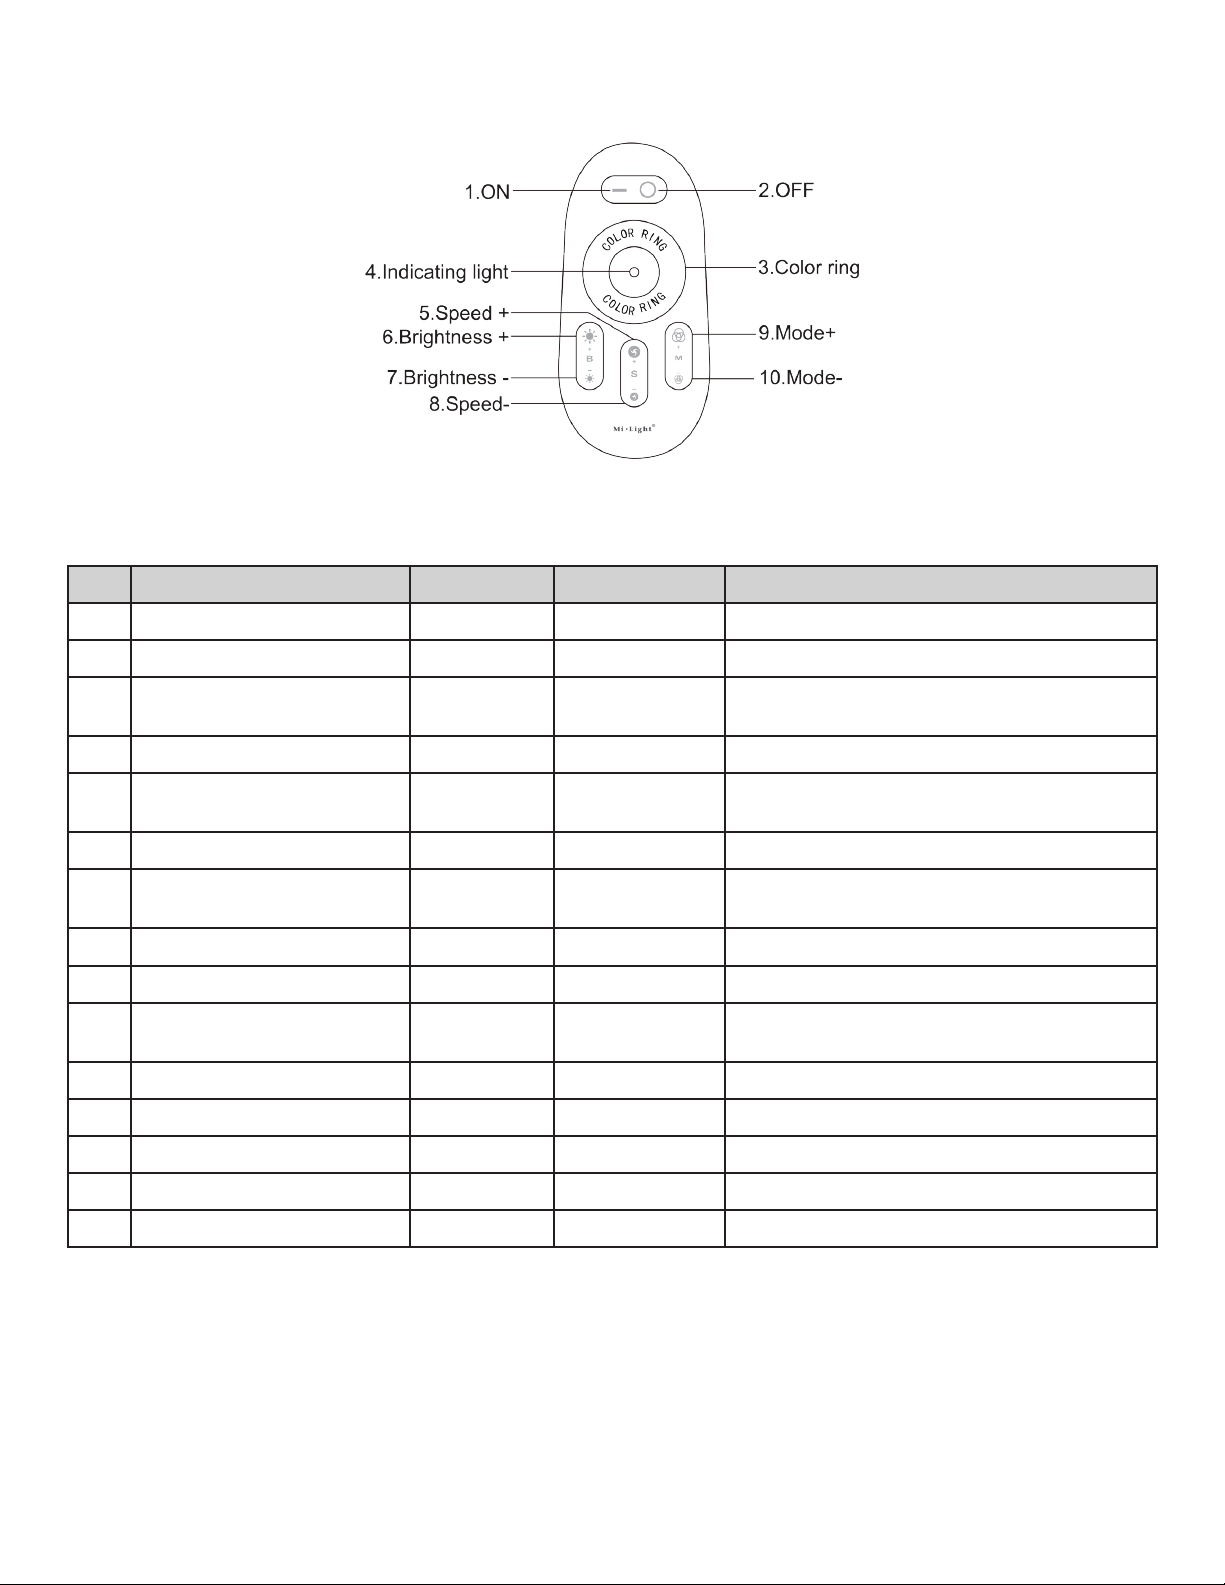
manuals.online logo
Brands
  1. Home
  2. •
  3. Brands
  4. •
  5. Outwater
  6. •
  7. Controllers
  8. •
  9. Outwater LED-RGBW-CR User manual

Outwater LED-RGBW-CR User manual

1
OPERATING INSTRUCTIONS FOR LED-RGBW-CR
Web: www.outwater.com
Phone: 1-800-631-8375
Thank you for purchasing our 2.4G Touch Screen RGBW LED Controller. Please read the instructions carefully before using.
1. Product Description
This system is a high-performance RGBW LED touch remote controller that adopts the most advanced PWM control
technology, controlling all RGBW LED products with ve lines and four circuits (common anode), featuring 640,000
colors and 20 automatic changing modes.
It features a memory function that allows the previous settings to be resumed when the unit is powered ON again
making this controller ideal for use in RGBW LED strip lights, LED modules, and so on.
The technology in the 2.4G high-frequency wireless remote control oers low power consumption, long distance
transmission, strong anti-interference, high speed telecommunications, etc.
The remote is designed to appear fashionable and elegant, with simple, practical functions of color changing and
brightness dimming. The capacitive touch screen design makes the remote easy to use.
The modular design and easy screwed terminals enable the controller to be used with all kinds of LED lighting products.
2. Technical Data
Remote
Size 110x52x20mm
Power AAA battery *2pcs
Material ABS
Fabrication Processing Multicolor Printing & UV Varnish
Controller
Size 85x45x23mm
Working Voltage DC12V~24V
Control Way R G B W Four Channels
Max Load Per Channel 6A
Total Output Max 10A
Output Connection Common Anode
Telecontrol Distance 30 Meters
Programs 20 Kinds
2
3. Function of Keys
4. Program List
5. Programming
Code Matching:
For a new kit (remote + controller), the remote can only work when it is programmed to the controller.
To program the controller, correctly connect the power supply, LED controller, and LED load. Switch OFF the power, then
switch it ON again. Press Key 5 once (within 3 seconds) the moment you see the light is ON. The LED light will blink twice
slowly when done correctly.
No. Mode Brightness Speed Remarks
1 Static Color Adjustable Not Adjustable Choose Any Color by Touching the Color Ring
2 Static White Color Adjustable Not Adjustable White Only
3 Color/White Static Coexist Adjustable Not Adjustable Color Ring Free to Choose.
Brightness Adjusts Only for Color Light
4 All Colors Gradually Change Adjustable Adjustable White (O)
5Four Colors Gradually
Change Adjustable Adjustable
6 Four Colors Jump to Change Adjustable Adjustable
7Seven Colors Jump to
Change (with White Color) Adjustable Adjustable
8 Red/White Jumps to Change Adjustable Adjustable
9 Blue/White Jumps to Change Adjustable Adjustable
10 Green/White Jumps to
Change Adjustable Adjustable
11 Red Jumps to Change Adjustable Adjustable
12 Blue Jumps to Change Adjustable Adjustable
13 Green Jumps to Change Adjustable Adjustable
14 White Jumps to Change Adjustable Adjustable
15 Circulation Mode Adjustable Not Adjustable All the Modes Cycle
3
Code Clearing:
The code can be cleared as needed.
The kit (remote + controller) will stay in the original state after code clearing. It can only work when code rematching is
done.
To clear the code, correctly connect the power supply, LED controller, and LED load. Switch OFF the power, then switch it
ON again. Press and hold Key 5 (within 3 seconds) the moment you see the light is ON. The LED light will blink nine times
swiftly when done correctly.
Attention:
1. The product for sale is a kit comprised of a remote and a controller. The user can re-program it freely as needed. One
remote can control countless controllers, but one controller can only be controlled by a maximum of four remotes.
2. Please check the battery installation and controller (totally discharge the power), when you program after switching
OFF and switching ON.
6. Connection
7. Attention
1. Please check whether the input voltage of that constant voltage power supply is in accordance with the controller.
Please check the connection of both the cathode and anode, otherwise the controller will be broken.
2. DO NOT connect wires with the power ON. Only switch the power ON when the wires are properly connected to
avoid a short circuit.
3. To improve the sensitivity of the touch ring, make sure your ngers are not on it when installing the batteries. Wait at
least 3 seconds after the batteries have been installed before handling the remote. If the touch ring sensitivity is low,
install a fresh set of batteries.
4. DO NOT use the controller in areas with lots of metal or strong electromagnetic waves as the remotes distance can be
seriously aected.

Popular Controllers manuals by other brands

GIC PR-43 Series quick start guide

GIC

GIC PR-43 Series quick start guide

Nexmosphere XM-350 quick start guide

Nexmosphere

Nexmosphere XM-350 quick start guide

Vector TRI2 Series Product data sheet

Vector

Vector TRI2 Series Product data sheet

AUTOTERM PU-16 manual

AUTOTERM

AUTOTERM PU-16 manual

Minebea Intec Maxxis 5 operating instructions

Minebea Intec

Minebea Intec Maxxis 5 operating instructions

iSMA CONTROLLI MDS420R quick start guide

iSMA CONTROLLI

iSMA CONTROLLI MDS420R quick start guide

SALUPO SEWAGE PLUS Instruction and installation manual

SALUPO

SALUPO SEWAGE PLUS Instruction and installation manual

Maxcess FIFE DP-20 PLUS user manual

Maxcess

Maxcess FIFE DP-20 PLUS user manual

Toshiba OIS50 Specifications

Toshiba

Toshiba OIS50 Specifications

PHYSITEMP TCAT-2DF operating manual

PHYSITEMP

PHYSITEMP TCAT-2DF operating manual

Toshiba PROSEC T1-16S user guide

Toshiba

Toshiba PROSEC T1-16S user guide

IDEC HS9Z-FL54 manual

IDEC

IDEC HS9Z-FL54 manual

Titan Controls Helios 17 instruction manual

Titan Controls

Titan Controls Helios 17 instruction manual

CEBEK R-11 manual

CEBEK

CEBEK R-11 manual

HDL M/R4.16.1 manual

HDL

HDL M/R4.16.1 manual

Peaktronics DHC-100 instruction manual

Peaktronics

Peaktronics DHC-100 instruction manual

Sentry BPRV Installation, operation & maintenance manual

Sentry

Sentry BPRV Installation, operation & maintenance manual

LAE electronic CDC122T1R2 Instructions for installation and use

LAE electronic

LAE electronic CDC122T1R2 Instructions for installation and use

manuals.online logo
manuals.online logoBrands
  • About & Mission
  • Contact us
  • Privacy Policy
  • Terms and Conditions

Copyright 2025 Manuals.Online. All Rights Reserved.