Overmax Flow Control User manual

Flow Color
IT
LT
FR
HR
PL
ES
EN
NL
DE
UK
Instrukcja obsługi / User Manual /
Bedienungsanleitung / Manuale d’uso /
Manuel de l’Utilisateur / Manual de usuario /
Handleiding / Посібник користувача /
Vartotojo vadovas / Korisnički priručnik
1
3
5
2
4
6
7
9
8
10
11
13
12
14

15
17
16
18
19
21
20
22

23
25
24

PL Wprowadzenie
Drogi Kliencie!
Dziękujemy za obdarzenie nas zaufaniem i wybranie marki Overmax.
Dzięki wykorzystaniu wysokiej jakości materiałów i nowoczesnych rozwiązań
technologicznych oddajemy w Twoje ręce produkt idealny do codziennego
użytkowania. Jesteśmy pewni, że dzięki ogromnej staranności wykonania
spełni on Twoje wymagania. Przed użyciem produktu zapoznaj się dokładnie
z poniższą instrukcją obsługi.
Jeśli masz jakiekolwiek uwagi lub pytania do zakupionego produktu, skontaktuj
Ważne informacje
1. Dzieci nie powinny mieć dostępu do urządzenia. Nie pozwalaj dziecku
bawić się urządzeniem.
2. Produkt zawiera ochronę przed przypadkowym kontaktem.
3.
Ostrzeżenie: Zachowaj przynajmniej 20 cm od kontrolera w trakcie
używania produktu.
Informacje o urządzeniu
Zakres częstotliwości: 2412-2484MHz dla 802.11b/g/n(HT20)
Emitowana moc częstotliwości radiowej: 11,93dBm
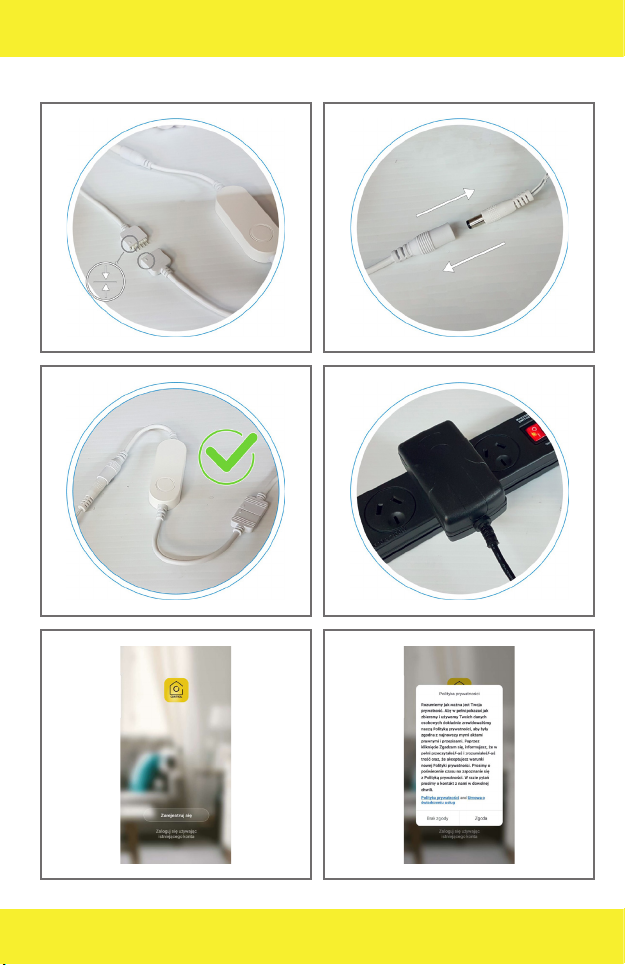
Prawidłowe podłączenie
1.
Krok pierwszy: podłącz taśmę LED do kontrolera tak aby strzałki na
złączach stykały się (rys. 1).
2. Krok drugi: złącz kable jak wskazano na rys. 2.
3. Krok trzeci: upewnij się, że kable są prawidłowo złączone (rys. 3).
4. Krok czwarty: podłącz zasilacz do źródła zasilania (rys. 4).
PL
5.
Tak podłączony zestaw możesz sterować za pomocą pilota lub aplikacji
Overmax Control.
Pobieranie aplikacji
Wyszukaj w iOS Store / Google Play aplikację „Overmax Control” albo zeskanuj
QR kod i ściągnij aplikację. Możesz ją ściągnąć na iOS i Android.
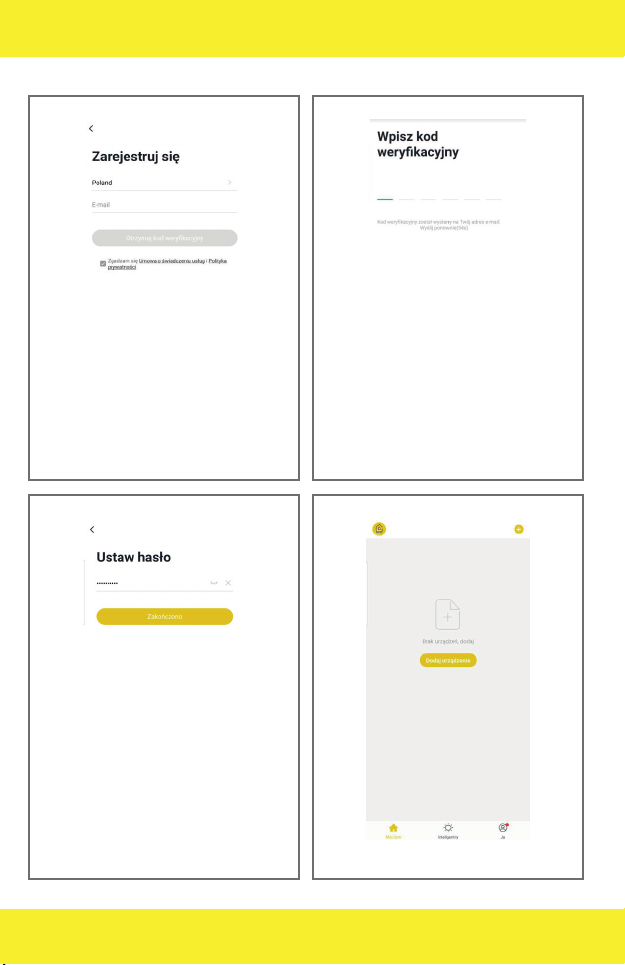
Rejestracja nowego użytkownika
1.
W celu zarejestrowania się w aplikacji kliknij „Zarejestruj się” (rys. 5)
a następnie przeczytaj i zaakceptuj Politykę Prywatności (rys. 6).
2.
Wpisz swój numer telefonu lub adres e-mail w celu otrzymania kodu
weryfikacyjnego (rys. 7).
3. Wpisz kod weryfikacyjny w puste pole (rys. 8).
4. Wpisz indywidualne hasło i kliknij „Zakończono” (rys. 9).
Logowanie do istniejącego konta
1.
W celu zalogowania się na istniejące konto, kliknij „Zaloguj się używając
istniejącego konta” (rys. 5).
2. Wybierz odpowiedni kraj/region.
3.
Wpisz prawidłowy numer telefonu lub adres e-mail oraz hasło, następnie
zaloguj się.

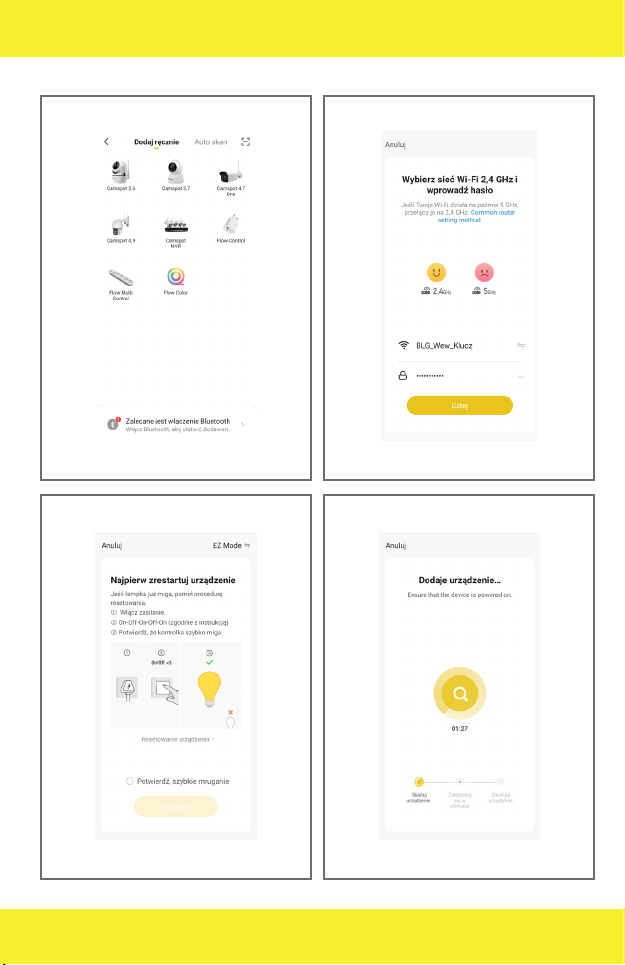
PL Dodawanie urządzenia ręcznie (rys. 10)
1. Wybierz urządzenie Flow Color z listy (rys. 11).
2.
Wybierz sieć Wi-Fi, z którą urządzenie ma się połączyć. Wprowadź
hasło i kliknij „Dalej” (rys. 12). Uwaga: Obsługiwane są jedynie sieci
Wi-Fi 2.4GHz.
3.
Jeżeli lampka urządzenia nie miga szybko, zresetuj je przytrzymując
przycisk włączenia na kontrolerze przez 5 s (rys. 13).
4.
Urządzenie podczas dodawania musi znajdować się w niewielkiej
odległości od routera (rys. 14).
5.
Poprawne dodanie urządzenia oznajmi komunikat „Dodano pomyślnie”
(rys. 15). Możesz teraz wybrać swoje urządzenie z listy dodanych urządzeń
(rys. 16).
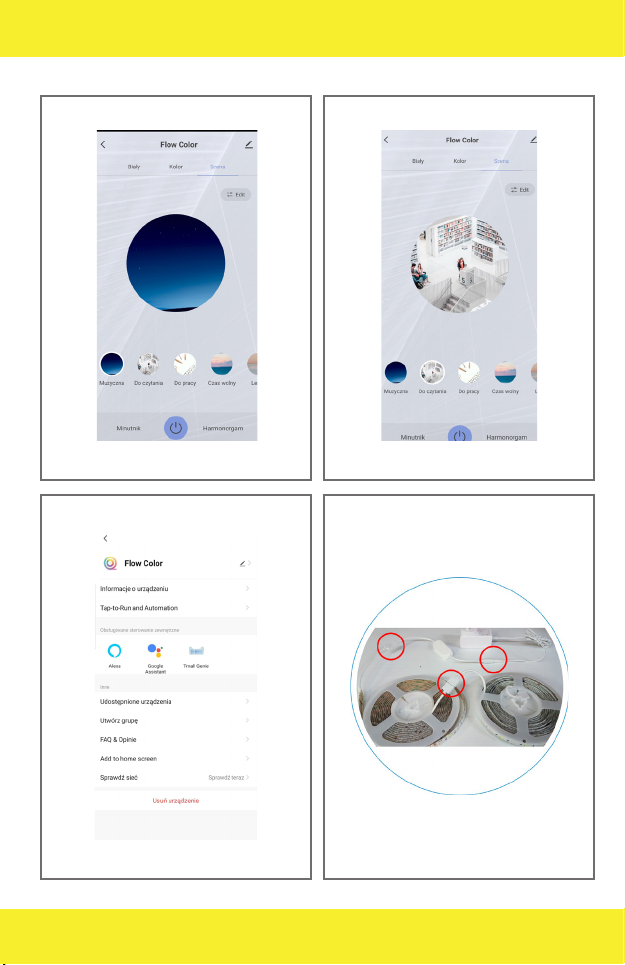
Użytkowanie
1.
Istnieje możliwość ustawienia światła białego (rys. 17) lub w kolorze
(rys. 18).
2.
W trybie Sceny możesz wybrać konfiguracje przeznaczone do
synchronizacji światła z muzyką, czytania, pracy, a także wiele innych
(rys. 19).
Ustawienia
1.
Aby przejść na stronę ustawień, kliknij ikonkę znajdującą się w prawym
górnym rogu (rys. 20).
2.
W ustawieniach znaleźć można informacje o urządzeniu, możliwość
udostępniania urządzenia, stan sieci bezprzewodowej, etc. Istnieje
również możliwość usunięcia urządzenia oraz dodania go do innego
konta (rys. 21).
Other manuals for Flow Control
2
Table of contents
Languages:
Popular Lighting Equipment manuals by other brands


Qazqa
Qazqa Suplux SL 3 Black 103062 instruction manual

Commercial Electric
Commercial Electric 54568141 Use and care guide

CREE LIGHTING
CREE LIGHTING 304 Series installation instructions

Goobay
Goobay 49867 user manual

ECOMAN ITALIA
ECOMAN ITALIA LED T8 instruction manual

Alkalite
Alkalite Krypton KT-81 user manual


