OXO Nest tot User manual

Instruction Manual
Nest™Booster Seat
with Straps
IMPORTANT! KEEP FOR FUTURE REFERENCE

1 2
Congratulations on your OXO Tot Nest™Booster Seat, a Booster that brings
kids to the family table from as young as nine months. We designed the Nest™with a soft, remov-
able cushion, as well as a high back and sides, to make any grown-up chair comfortable for your
little one. We also made it easy to clean and store so after-meal tidying is comfortable for you, too.
Every OXO Tot product, from our booster seats to our sippy cups, is tested in real homes with real
parents and children (including our own!) to ensure they’re up for life’s everyday adventures.
Please read instructions carefully before using your Nest Booster Seat.
Complies with ASTM F2640:2018
CONTENTS
Assembling Booster Seat...................................................4
Included .................................................................. 4
Attaching Booster to Chair ....................................... 4
Strapping Child into Booster..................................... 5
Removing and Storing Booster Straps .......................6
Reattaching Booster Straps........................................6
Care, Cleaning & Storage.................................................. 7
Replacement Parts ............................................................7
Limited Warranty..............................................................7
Registration ......................................................................7
Contact Us.........................................................................8
Notes................................................................................9

3 4
WARNING
!
Failure to follow these warnings and the assembly instructions could result in serious injury or death.
• Prevent serious injury or death from sliding out, falls or tipping over. Children have suffered head injuries,
including skull fractures, after falling with or from booster seats.
• ALWAYS secure child with the restraint system adjusted to fit child snugly. Use the restraint system until
child is able to get in and out of the product without help (around 2 ½ years old). Adjust to fit snugly.
• Stay near and watch your child during use.
• NEVER allow child to push away from a wall or table.
• ALWAYS secure BOTH chair back and chair bottom straps when using on an elevated adult chair.
• NEVER use on table, countertop, stool or swivel chair.
• NEVER lift and carry with child in booster seat.
• NEVER use in a motor vehicle or as a bath seat.
• Before each use, always check to be sure the product is properly secured to an adult chair.
• Discontinue use of Booster Seat when child’s weight exceeds 50 lbs (23 kg).
• For your child’s safety, read the labels and the owner’s manual before using the product.
• Follow assembly instructions carefully. If you experience any difficulties, please contact our customer
service department at 1-800-545-4411 or 0114 290 1455(UK). Outside U.S. and UK contact your local
• Save this owner’s manual for future use.
ASSEMBLING THE BOOSTER SEAT

5 6
1
Test Booster attachment to ensure it is securely attached
to chair.
Release safety harness by unbuckling two waist straps
from crotch strap. Place child on Booster and place crotch
strap between child’s legs. Buckle two waist straps into
crotch strap buckle. You will hear a “click” when
buckles lock.
Note: Pull on harness to check that both belts are locked
into the buckle.
2
Adjust waist straps until child is snug in Booster.
To loosen, slide the strap adjusters towards the center.
To tighten, slide the strap adjusters away from the
center. To remove child, release buckles by unbuckling
two waist straps from crotch strap.
Test strap security after adjusting straps. Do not leave
child unattended.
Strapping Child into Booster
• Always secure child with the restraint system to fit child snugly. Do not remove chair straps. All straps can be removed for Booster
storage.
WARNING
!
1
2
3
Safety harness
Chair back & bottom
attachment straps
Booster comes with chair back and bottom attachment
straps and safety harness attached. Unbuckle all buckles
before beginning attachment.
Position Booster securely on chair as far back on seat as
possible. Wrap chair bottom attachment strap around base
of chair and buckle under seat. You will hear a “click” when
buckle locks.
Wrap chair back attachment straps around chair back and
buckle behind seat. You will hear a “click” when buckle locks.
Ensure both sets of straps are tight by adjusting the straps
until there is no slack. Pull loose end of strap to tighten.
ASSEMBLY
Attaching Booster to ChairIncluded
Only use on chairs that have a back. Never use on table, countertop, stool or swivel chair.
WARNING
!

7 8
2
Removing and Storing Booster Straps
Reattaching Booster Straps
1
2
To reattach waist and crotch straps, push t-straps through
slots in the seat cushion. Push chair back and chair bottom
attachment straps through slots on back and sides of Booster.
Note: Chair back and chair bottom attachment straps are
interchangeable.
Pull on straps to ensure that the t-straps are secure and will
not go through the slot.
1
Remove Booster from chair by unbuckling chair bottom and
chair back attachment straps. Before removing straps from
Booster, buckle all chair attachment and harness buckles.
This will ensure straps stay together for storage.
To remove straps, flip Booster over and push t-straps
through slots. Pull on the other end of straps to remove.
Roll all straps up and place in elastic pocket on underside
of Booster.
1
Removing Cushion Replacing Cushion
1
To remove cushion for cleaning, first remove waist and
crotch straps. Pull up to unsnap the cushion from the chair.
Wipe clean or hand wash. WARNING: Do not place cushion
in dishwasher or washing machine. Material will shrink and
not fit on the chair properly.
After cleaning cushion, press cushion into seat, ensuring
all three pegs snap into their holes. Press down to secure.
Gently pull on cushion to test security before next use.

109
CARE, CLEANING & STORAGE
CARE
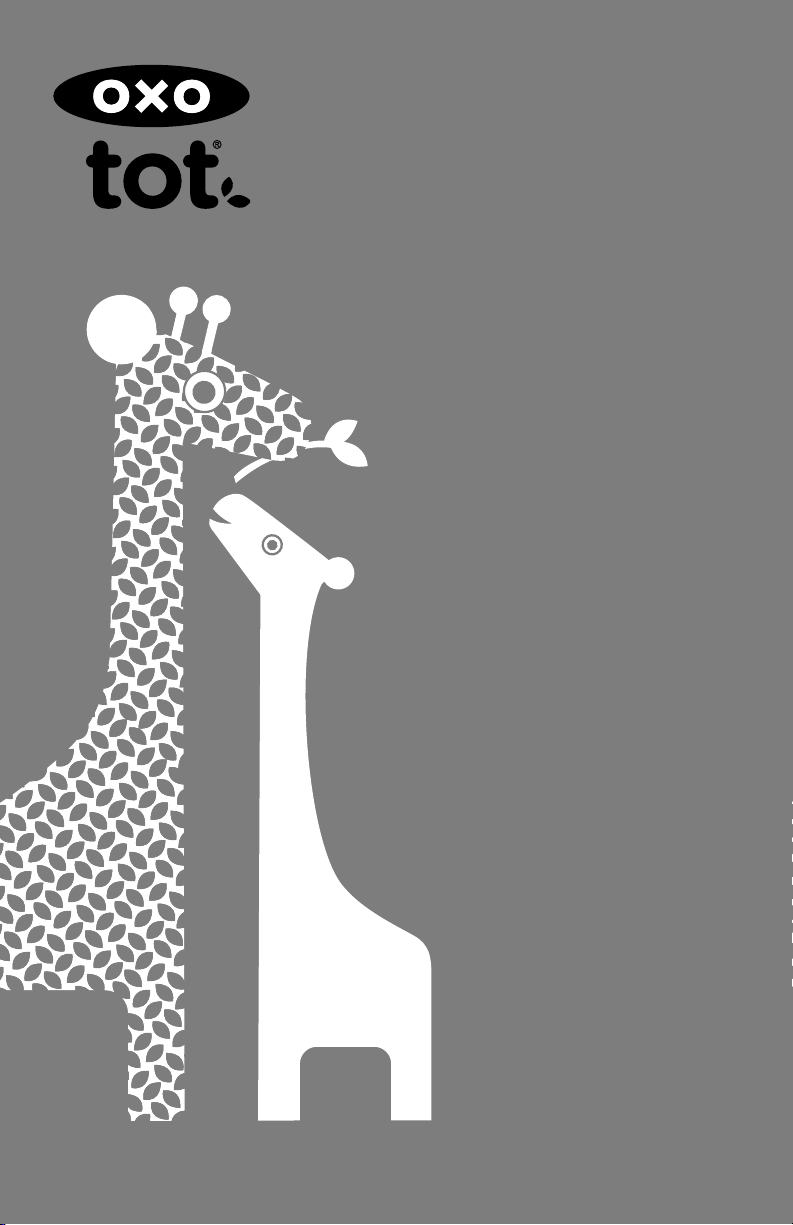
− Before each use, always check to be sure the product is properly secured to an adult chair
− Booster Seat is not for outdoor use
− Protect from excessive exposure to water and moisture
− Discontinue use of Booster Seat if parts are missing, damaged or broken
CLEANING
− All parts are surface wash only
− Wash with mild soap and water; rinse with clean water and wipe dry
− Do not use abrasive cleaners or scrubbing pads
− Do not put cushion in dishwasher or washing machine
STORAGE
− Store all parts in a cool, dry location
− Do not store or use outside or where Booster Seat can be exposed to moisture or water
REPLACEMENT PARTS
If parts are missing, damaged or broken, contact OXO Customer Service. See page 8 for contact
information.
LIMITED WARRANTY
OXO warrants that this product is free from defects in workmanship for two years from the date
of purchase. A receipt indicating the purchase date is required for warranty claims. This warranty
does NOT cover damage resulting from normal wear and tear, accident, misuse, abuse, alterations,
attempts at repair or use with unauthorized attachments or the failure to follow instructions
provided with the product. For warranty and service questions please contact OXO customer service.
SATISFACTION GUARANTEE
OXO offers a 60 day satisfaction guarantee.
REGISTRATION
We need to reach you in the event of a recall or safety alert! If you are a U.S. or UK resident,
please complete the enclosed, self-addressed postage-paid card. All international and U.S. residents
can also register online at www.oxotot.com.
CONTACT US
If parts are missing, damaged or broken, for replacement parts or to report a problem, contact:
OXO U.S. Customer Service
Hours: Monday – Friday, 8:00am – 5:00pm (ET)
Phone: (800) 545-4411
Fax: (717) 709-5350
Mail: OXO International, Inc. at 1331 S Seventh St. Ste 202, Chambersberg, PA 17201-9912
Email: [email protected]
Website: www.oxo.com
OXO UK Customer Service
Hours: Monday – Friday, 9:00am – 5:00pm
Phone: 0114 290 1455
Fax: 0114 242 0406
Mail: OXO Customer Service, Helen of Troy House, 1-4 Jessops Riverside, 800 Brightside Lane,
Sheffield. S9 2RX
Email: [email protected]
Website: www.oxo.com
Outside the U.S. and UK

www.oxo.com
OXO®, OXO TotTM, NestTM and related logos are trademarks of Helen of Troy Limited.
In the United Kingdom and Ireland, OXO is a registered trade mark of Premier Foods plc and used under licence.
©2014 OXO. Illustration by Petit Collage.
Table of contents
Popular Toilet manuals by other brands

Thetford
Thetford C-200 series instructions

BERNSTEIN
BERNSTEIN Dusch basic Operator's manual

Ideal-Standard
Ideal-Standard Waverley Assembly and installation instructions

Thornthwaite
Thornthwaite A50154 installation manual

LUXE BIDET
LUXE BIDET Neo 70 installation manual

Swiss Madison
Swiss Madison Daxton SM-1T125 installation instructions