Ozito CSE-355 User manual

Electric
Chainsaw
1800W
Instruction Manual
2 Year Replacement Warranty
CSE-355
CAUTION: Read this instruction manual before using this tool.
To view the full range visit: www.ozito.com.au
1010

1
TABLE OF CONTENTS
SPECIFICATIONS……………………………………….
PACK CONTENTS………………………………………
KNOW YOUR PRODUCT………………………………
INTRODUCTION………………………………………..
ELECTRICAL SAFETY…………………………………..
GENERAL SAFETY INSTRUCTIONS………………….
ADDITIONAL SAFETY INSTRUCTIONS FOR
CHAINSAWS…………………………………………….
OPERATION……………………………………………..
USING THE CHAINSAW……………………………….
MAINTENANCE…………………………………………
SPARE PARTS……………………………………………
DESCRIPTION OF SYMBOLS………………………….
WARRANTY………………………………………………
Page 2
Page 2
Page 3
Page 4
Page 4
Page 5
Page 7
Page 9
Page 13
Page 15
Page 15
Page 16
Page 18

Power: 1800W
Bar Length: 355mm (14”)
Chain Speed: 15m/s
Chain Type: Oregon® 91PJ052X
Chain Pitch: 9.5mm (3/8”)
Sharpening File: 5/32”
Chain Oiling: Automatic
Oil Tank Capacity: 140ml
Tool Weight: 4.55kg
2
SPECIFICATIONS - MODEL NO. CSE-355
1 x Chainsaw CSE-355
1 x Chain
1 x Chain Bar and Cover
1 x Bottle of Chain Oil
1 x Spanner/Chain Tension Adjustor
1 x Instruction Manual
PACK CONTENTS

KNOW YOUR PRODUCT
3
1. Rear handle
2. On/off switch
3. Lock-off switch
4. Front handle
5. Hand guard/chain brake
6. Chain
7. Guide bar
8. Bar securing nut
9. Side panel
10. Chain oiling filler cap
11. Oil level window
12. Cord retainer
13. Bar securing nut cover (fitted)
14. Spanner/chain tension adjustor
12
1
11
5
8
2
4
6
9
3
13
14
7
10

4
INTRODUCTION
The Ozito CSE-355 Electric Chainsaw is ideal for felling small to
medium sized trees, cutting small logs and sawn timber, and
trimming branches.
Safety features include an automatic chain brake that will engage in
the event of kickback and bucking spikes which assist with the cutting
action and help reduce the possibility of kickback.
Automatic chain oiling keeps both the bar and chain lubricated, this
reduces the level of friction and helps prolong the life of these
components.
This product is intended for DIY use only.
Warning! When using mains-powered equipment, basic safety precautions,
including the following, should always be followed to reduce risk of fire,
electric shock, personal injury and material damage.
Read and understand the manual prior to operating this tool.
Save these instructions and other documents supplied with this machine for
future reference.
The electric motor has been designed for 230V and 240V only. Always check that
the power supply corresponds to the voltage on the rating plate.
Note: The supply of 230V and 240V on Ozito tools are interchangeable for
Australia and New Zealand.
This tool is double insulated in accordance with AS/NZS 60745; therefore
no earth wire is required.
If the supply cord is damaged, it must be replaced by an electrician or a power
tool repairer in order to avoid a hazard.
Note: Double insulation does not take the place of normal safety precautions
when operating this tool. The insulation system is for added protection against
injury resulting from a possible electrical insulation failure within the tool.
Using an Extension Lead
Always use an approved extension lead suitable for the power input of this tool.
Before use, inspect the extension lead for signs of damage, wear and ageing.
Replace the extension lead if damaged or defective. When using an extension
lead on a reel, always unwind the lead completely. Use of an extension lead not
suitable for the power input of the tool or which is damaged or defective may
result in a risk of fire and electric shock.
ELECTRICAL SAFETY

5
GENERAL SAFETY INSTRUCTIONS
Warning! Read all instructions. Failure to follow all instructions listed below
may result in electric shock, fire and/or serious injury. The term "power tool" in
all of the warnings listed below refers to your mains-operated (corded) power
tool or battery-operated (cordless) power tool.
SAVE THESE INSTRUCTIONS
1) WORK AREA
a) Keep work area clean and well lit. Cluttered and dark areas invite accidents.
b) Do not operate power tools in explosive atmospheres, such as in the
presence of flammable liquids, gases, or dust. Power tools create sparks
which may ignite the dust or fumes.
c) Keep children and bystanders away while operating a power tool.
Distractions can cause you to lose control.
2) ELECTRICAL SAFETY
a) Power tool plugs must match the outlet. Never modify the plug in any
way. Do not use any adapter plugs with earthed (grounded) power tools.
Unmodified plugs and matching outlets will reduce risk of electric shock.
b) Avoid body contact with earthed or grounded surfaces such as pipes,
radiators, ranges and refrigerators. There is an increased risk of electric
shock if your body is earthed or grounded.
c) Do not expose power tools to rain or wet conditions. Water entering a
power tool will increase the risk of electric shock.
d) Do not abuse the cord. Never use the cord for carrying, pulling or
unplugging the power tool. Keep cord away from heat, oil, sharp edges or
moving parts. Damaged or entangled cords increase the risk of electric shock.
e) When operating a power tool outdoors, use an extension cord suitable
for outdoor use. Use of a cord suitable for outdoor use reduces the risk of
electric shock.
3) PERSONAL SAFETY
a) Stay alert, watch what you are doing and use common sense when
operating a power tool. Do not use a power tool while you are tired or
under the influence of drugs, alcohol or medication. A moment of inattention
while operating power tools may result in serious personal injury.
b) Use safety equipment. Always wear eye protection. Safety equipment such
as dust mask, non-skid safety shoes, hard hat, or hearing protection used for
appropriate conditions will reduce personal injuries.
c) Avoid accidental starting. Ensure the switch is in the off position before
plugging in. Carrying power tools with your finger on the switch or plugging in
power tools that have the switch on invites accidents.
d) Remove any adjusting key or wrench before turning the power tool on. A
wrench or a key left attached to a rotating part of the power tool may result in
personal injury.

e) Do not overreach. Keep proper footing and balance at all times. This
enables better control of the power tool in unexpected situations.
f) Dress properly. Do not wear loose clothing or jewellery. Keep your hair,
clothing and gloves away from moving parts. Loose clothes, jewellery or
long hair can be caught in moving parts.
g) If devices are provided for the connection of dust extraction and collection
facilities, ensure these are connected and properly used. Use of these
devices can reduce dust related hazards.
4) POWER TOOL USE AND CARE
a) Do not force the power tool. Use the correct power tool for your
application. The correct power tool will do the job better and safer at the rate
for which it was designed.
b) Do not use the power tool if the switch does not turn it on and off. Any
power tool that can not be controlled with the switch is dangerous and must
be repaired.
c) Disconnect the plug from the power source before making any
adjustments, changing accessories, or storing power tools. Such preventive
safety measures reduce the risk of starting the power tool accidentally.
d) Store idle power tools, unplugged & out of the reach of children and do
not allow persons unfamiliar with the power tool or these instructions to
operate the power tool. Power tools are dangerous in the hands of
untrained users.
e) Maintain power tools. Check for misalignment or binding of moving parts,
breakage of parts and any other condition that may affect the power tools
operation. If damaged, have the power tool repaired before use. Many
accidents are caused by poorly maintained power tools.
f) Keep cutting tools sharp and clean. Properly maintained cutting tools with
sharp cutting edges are less likely to bind and are easier to control.
g) Use the power tool, accessories and tool bits etc., in accordance with
these instructions and in the manner intended for the particular type of
power tool, taking into account the working conditions and the work to
be performed. Use of the power tool for operations different from intended
could result in a hazardous situation.
5) SERVICE
a) Have your power tool serviced by a qualified repair person using only
identical replacement parts. This will ensure that the safety of the power tool
is maintained.
b) If the supply cord is damaged, it must be replaced by the manufacturer, its
service agent or similarly qualified persons in order to avoid a hazard.
6
GENERAL SAFETY INSTRUCTIONS (cont.)

7
ADDITIONAL SAFETY INSTRUCTIONS FOR CHAINSAWS
This appliance is not intended for use by persons (including children) with
reduced physical, sensory or mental capabilities, or lack of experience and
knowledge, unless they have been given supervision or instruction concerning use
of the appliance by a person responsible for their safety.
Recommendations for the use of a residual current device with a rated residual
current of 30mA or less.
• Keep all parts of the body away from the saw chain when the chain saw is
operating. Before you start the chain saw, make sure the saw chain is not
contacting anything. A moment of inattention while operating chain saws may
cause entanglement of your clothing or body with the saw chain.
• Always hold the chain saw with your right hand on the rear handle and your
left hand on the front handle. Holding the chain saw with a reversed hand
configuration increases the risk of personal injury and should never be done.
• Wear safety glasses and hearing protection. Further protective equipment
for head, hands, legs and feet is recommended. Adequate protective clothing
will reduce personal injury by flying debris or accidental contact with the saw chain.
• Do not operate a chain saw in a tree. Operation of a chain saw while up in a
tree may result in personal injury.
• Always keep proper footing and operate the chain saw only when standing
on fixed, secure and level surface. Slippery or unstable surfaces such as
ladders may cause a loss of balance or control of the chain saw.
• When cutting a limb that is under tension be alert for spring back. When
the tension in the wood fibres is released the spring loaded limb may strike the
operator and/or throw the chain saw out of control.
• Use extreme caution when cutting brush and saplings. The slender material
may catch the saw chain and be whipped toward you or pull you off balance.
• Carry the chain saw by the front handle with the chain saw switched off
and away from your body. When transporting or storing the chain saw
always fit the guide bar cover.Proper handling of the chain saw will reduce
the likelihood of accidental contact with the moving saw chain.
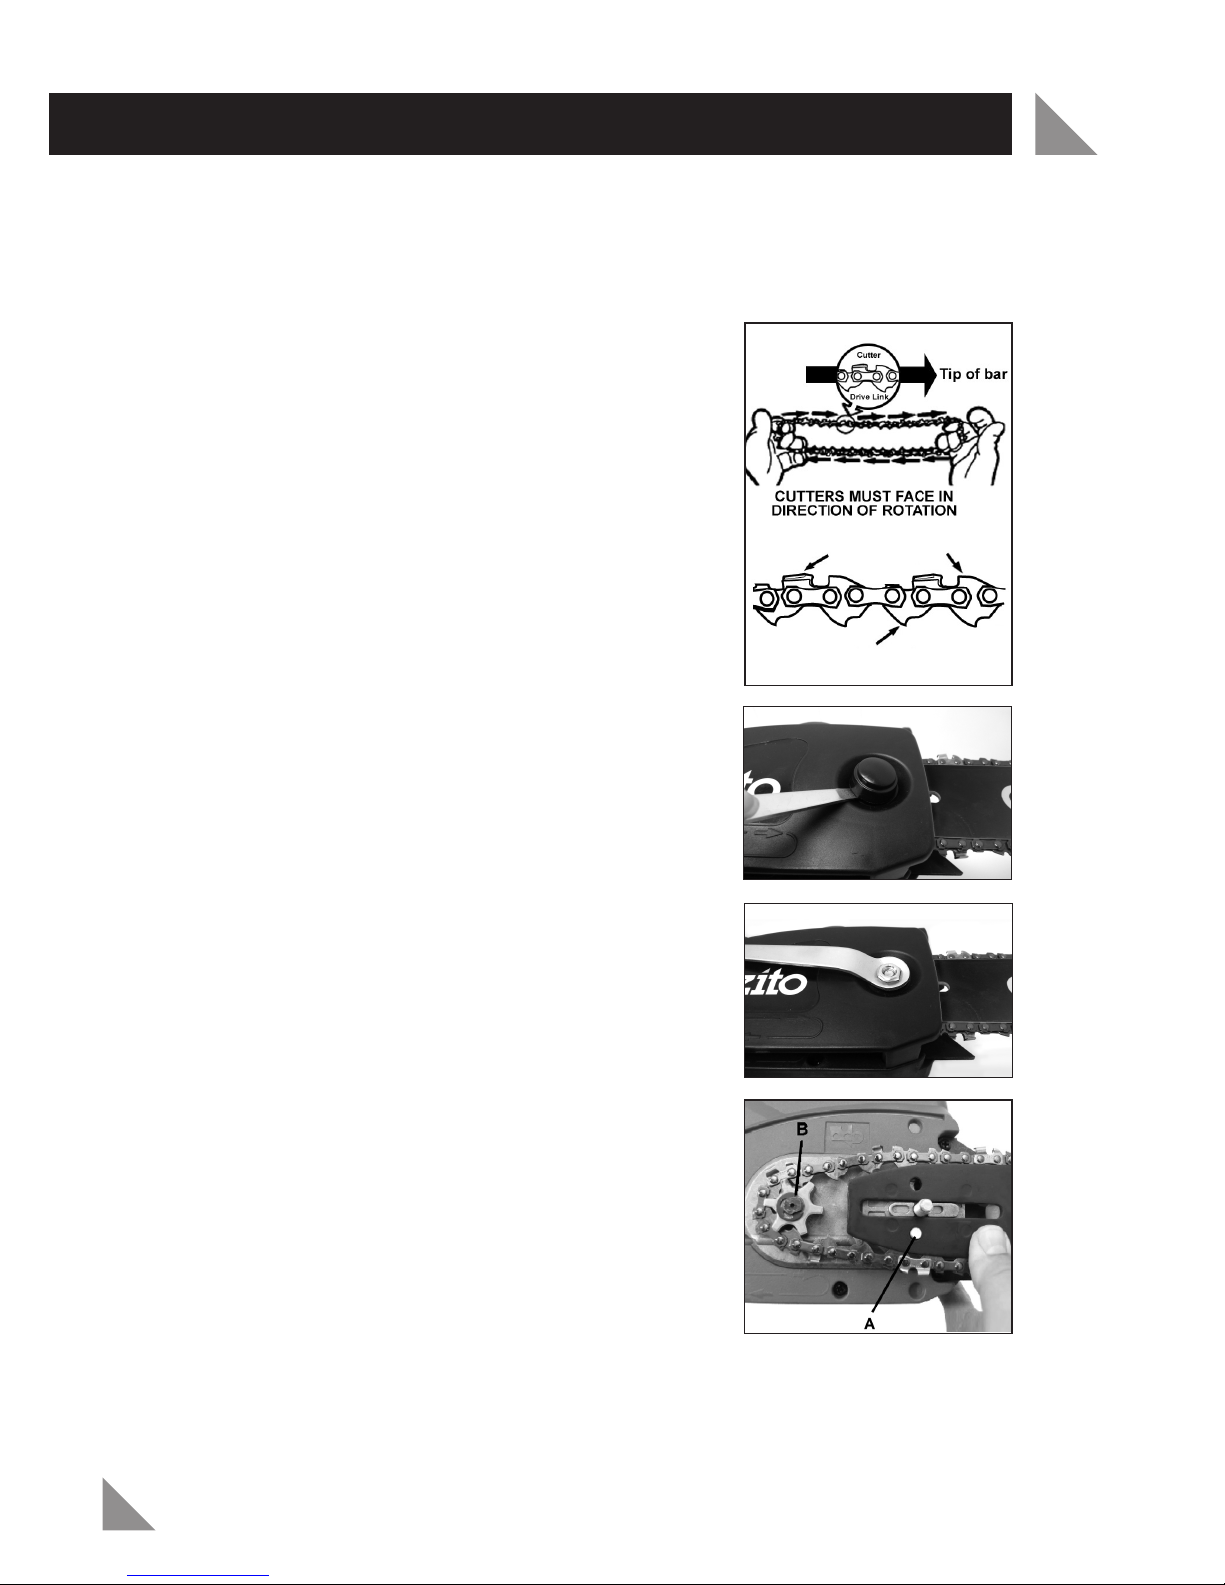
• Follow instructions for lubricating, chain tensioning and changing
accessories. Improperly tensioned or lubricated chain may either break or
increase the chance for kickback.
• Keep handles dry, clean, and free from oil and grease. Greasy, oily handles
are slippery causing loss of control.
• Cut wood only. Do not use chain saw for purposes not intended. For
example: do not use chain saw for cutting plastic, masonry or non-wood
building materials. Use of the chain saw for operations different than intended
could result in a hazardous situation.
Kickback
Kickback may occur when the nose or tip of the guide bar touches an object, or
when the wood closes in and pinches the saw chain in the cut.
Tip contact in some cases may cause a sudden reverse reaction, kicking the guide
bar up and back towards the operator.
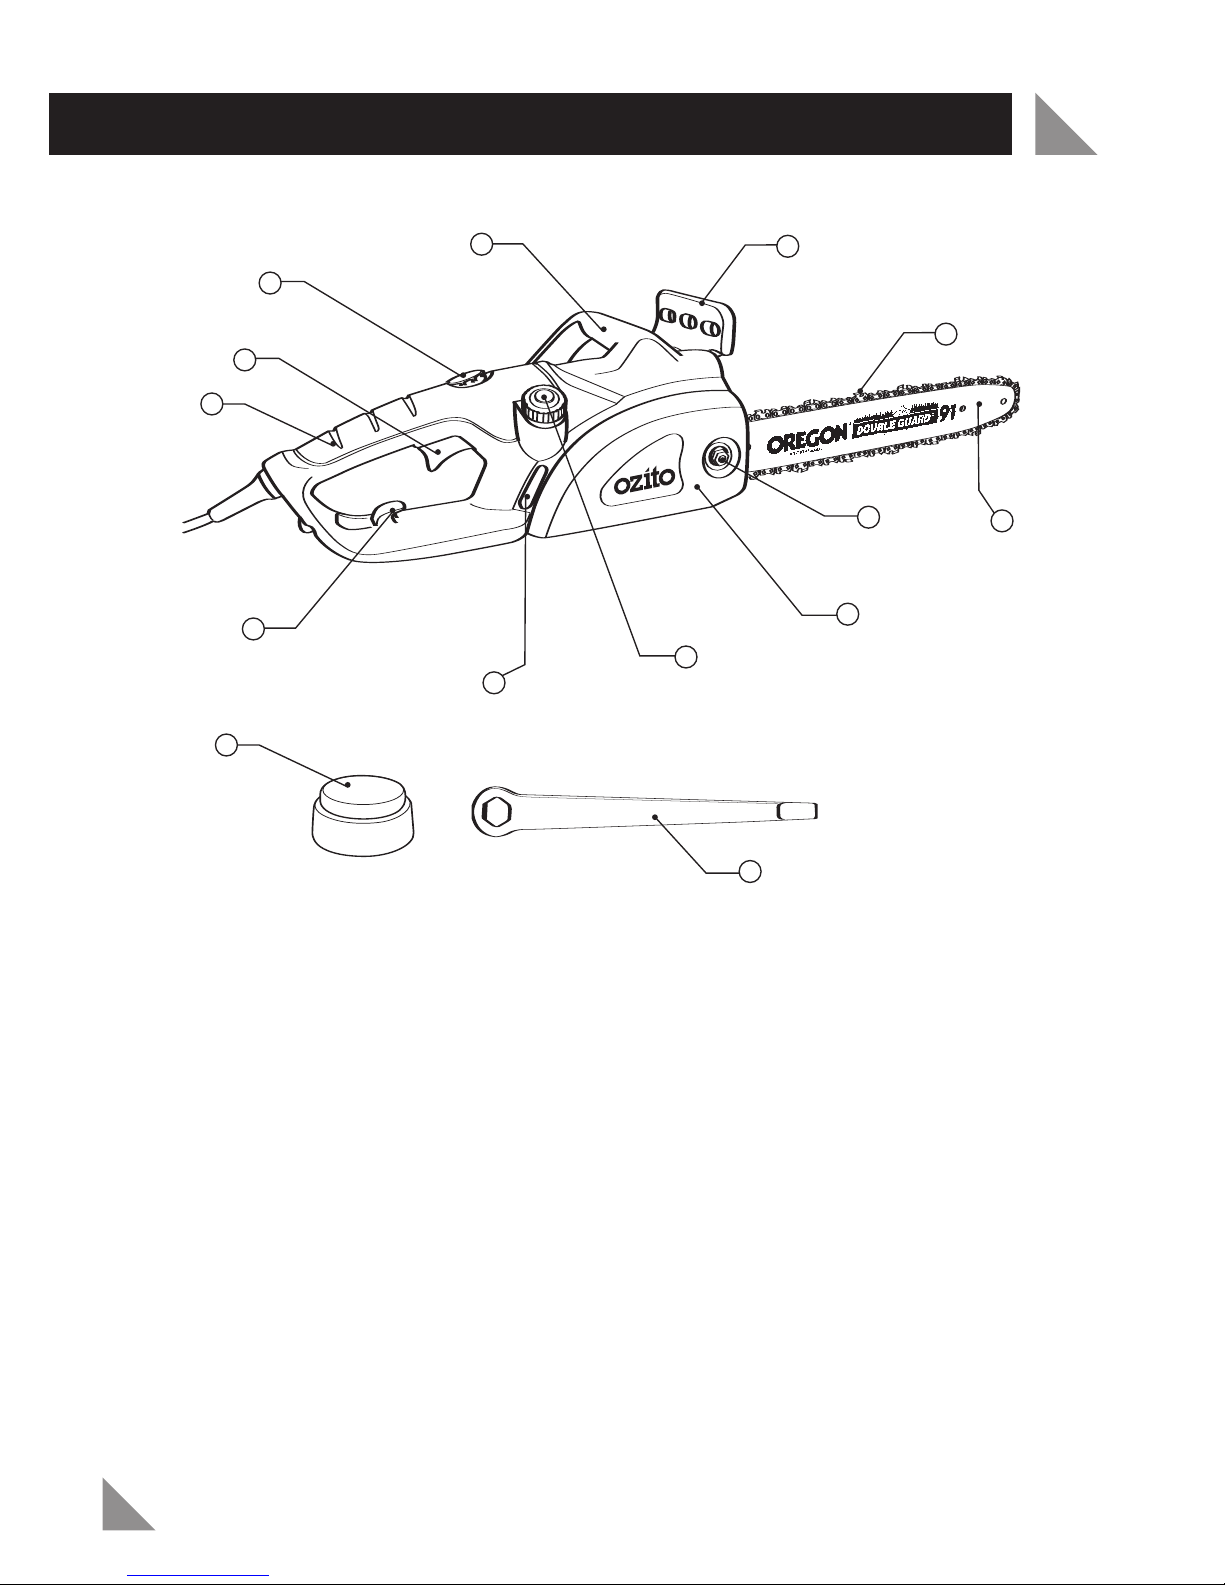
8
Pinching the saw chain along the top of the guide bar may push the guide bar rapidly
back towards the operator.
Either of these reactions may cause you to lose control of the saw which could result in
serious personal injury. Do not rely exclusively upon the safety devices built into your
saw. As a chain saw user, you should take several steps to keep your cutting jobs free
from accident or injury.
Kickback is the result of tool misuse and/or incorrect operating procedures or
conditions and can be avoided by taking proper precautions as given below:
• Maintain a firm grip, with thumbs and fingers encircling the chain saw handles, with
both hands on the saw and position your body and arm to allow you to resist
kickback forces. Kickback forces can be controlled by the operator, if proper
precautions are taken. Do not let go of the chain saw.
• Do not overreach and do not cut above shoulder height. This helps prevent
unintended tip contact and enables better control of the chain saw in unexpected
situations.
• Only use replacement bars and chains specified by the manufacturer. Incorrect
replacement bars and chains may cause chain breakage and/or kickback.
• Follow the manufacturer’s sharpening and maintenance instructions for the saw
chain. Decreasing the depth gauge height can lead to increased kickback.
Push Back
Push back will occur if an attempt is made to saw with the top of the guide bar, if the
chain touches against a rigid object and jams in the cut.
Pull Forward
If the bucking spikes are not set against the timber, the chain at the bottom of the
guide bar will pull the saw forward; this can jam the chain in the timber.
To avoid this always have the bucking spikes set against the timber when performing
a cut.
ADDITIONAL SAFETY INSTRUCTIONS FOR CHAINSAWS (cont.)

9
OPERATION
BEFORE ASSEMBLING OR DISASSEMBLING THE CHAIN (6) BE SURE TO
DISCONNECT THE CHAINSAW FROM THE POWER SUPPLY.
ALWAYS WEAR GLOVES WHEN HANDLING THE CHAIN (6), THE CHAIN (6)
IS VERY SHARP AND CAN CUT YOU WHEN IT IS NOT MOVING.
Fitting the Guide Bar and Chain
Always wear protective gloves when working on your
chainsaw. It is important to put the chain (6) on the
correct way with the cutters facing in the direction of
rotation (Fig. 1 & 6).
Remove the bar securing nut cover (13) using the flat
end of the spanner/chain tension adjustor (14) (Fig. 2).
Using the spanner (14), remove the bar securing nut
(8) (Fig. 3) followed by the side panel (9). Fit the chain
(6) over the guide bar (7) making sure that the cutters
are facing in the direction of rotation.
Place the guide bar (7) and chain (6) onto the
chainsaw, ensuring the chain (6) is around the sprocket
wheel (B) (Fig. 4).
Fig. 1
Fig. 4
Cutters Depth gauge
Drive links
Fig. 2
Fig. 3

OPERATION (cont.)
Adjust the chain tensioning screw (C) using the flat end of
the spanner/chain tension adjustor (14) until the bolt (A)
fits into the hole in the guide bar (7) (Fig. 5).
Fit the side panel (9) back onto the chainsaw, then
replace the bar securing nut (8). Fasten the bar securing
nut (8) finger tight only. Do not use the spanner/chain
tension adjustor (14) at this stage.
Adjust the tension on the chain (6) with the chain tension
screw (C). The tension is correct when the chain (6) can
be pulled 3mm away from the guide bar (7) when using
your finger and thumb (Fig. 6).
Tighten the bar securing nut (8) using the spanner/chain tension adjustor (14) by
turning in a clockwise direction.
Do not over-tighten as this will reduce the life of the chain (6) and guide bar (7).
Replace the bar securing nut cover (8).
Caution: If the chain (6) is installed on backwards (chain cutters are facing in the
opposite direction of rotation) the chainsaw will vibrate excessively and not cut
wood, you may also damage the chainsaw (This will not be covered under warranty).
Warning: It is normal for a new chain to stretch during the first 30 minutes of
use, after approximately 2-3 minutes you should check the tension and adjust if
necessary as described above. You should check the tension of the chain (6)
frequently; during use the chain (6) heats up and stretches, if it stretches without
being re-tensioned it may jump off the guide bar (7) and be of danger to the
operator.
10
Fig. 5
Fig. 6

OPERATION (cont.)
11
Chain Oiling
The guide bar (7) and chain (6) require lubrication
to reduce friction, the automatic oiler provides
lubrication to the chain (6) and guide bar (7) while
the chainsaw is operating.
Always fill the oil tank prior to using the chainsaw
(Fig. 7), if oil is not used you will quickly damage
the guide bar (7) and chain (6)(such damage is not
covered under warranty). To fill the oil tank,
unscrew the chain oiling filler cap (10), make sure
no dirt gets into the oil tank. Fill the oil tank until
full and replace the cap. Never use the chainsaw
when the oil level is below the minimum mark on the oil level window (11). Always
fill the oil tank before the oil level gets to the minimum mark on the oil level
window (11).
Checking the Chain Lubrication
To check the lubricating system, switch on the chainsaw and hold it with the guide
bar (7) and chain (6) above some light coloured paper (newspaper). A steadily
increasing stain caused by oil spray shows the lubricating system is working.
When necessary, replace the oil with chain bar oil from your local Bunnings
Warehouse Power Gardening Department.
Cord Retainer
When attaching an extension cord to the chainsaw, hook the end of the extension
cord into the cord retainer (12) located below the rear handle (1). Using the cord
retainer (12) prevents accidental disconnection of the chainsaw and extension
cord’s plug and socket.
Always be sure to route the power and extension cord away from the work area to
prevent it from coming into contact with the chainsaw when in operation.
Switching On and Off
When switching the chainsaw on, the hand guard/chain brake (5) must be in the
disengaged position (pull it towards you). To switch the chainsaw on, grasp the
front handle (4) with your left hand. With the thumb of your right hand, push the
lock-off switch (3) forward. Whilst holding the lock-off switch (3) in the forward
position, squeeze the on/off switch (2) and release the lock-off switch (3).
To switch the chainsaw off, release the on/off switch (2), the chain (6) will stop
rotating immediately but the chainsaw's motor will continue to make a noise whilst
the chainsaw is running down, this is normal and has no ill effect on the function or
life of the chainsaw.
Running in the Chain
Prior to operation, a new chain should be run in for 2-3 minutes and then its
tension should be checked and adjusted as detailed in the Fitting the Bar Guide
and Chain section.
Fig. 7

Re-tensioning the Chain
When working with the chainsaw, the chain (6) expands as a result of the heat generated.
With the chain (6) expanding, the tension slackens and the chain (6) can slip off the
guide bar (7).
If the chain (6) is tensioned in this condition, it is very important to release the tension
once cutting is completed, otherwise the chain (6) may contract so much on cooling, it
will be excessively tight.
Chain Brake
The chainsaw is fitted with a hand guard/chain brake
(5) which brings the chain (6) to a stop within a tenth
of a second. The hand guard/chain brake (5) is
actuated either manually or while operating as a result
of kickback, the hand guard/chain brake (5)(Fig. 8) is
pushed forward by the back of your hand engaging
the chain brake. To use the chainsaw again, you must
disengage the chain brake, to do this you should pull
the hand guard/chain brake (5) back towards you.
Note: When the chain brake has been actuated DO NOT RUN THE MOTOR OF
THE CHAINSAW. Set the hand guard/chain brake (5) back to its original position, by
pulling the hand guard/chain brake (5) towards the front handle (4).
Note: If the motor is running and the chain (6) is not turning, turn off the chainsaw and
check the chain brake is not engaged, if it is, disengage the chain brake and try again.
Each time you are about to use the the chainsaw, check it is in perfect working
condition. It is particularly important to ensure the guide bar (7) is properly fitted, the
chain (6) is correctly tensioned and the chain brake is functioning correctly.
CAUTION! When working with the chainsaw, care should be taken to keep the
power and extension cord away from the chain (6).
Cutting Logs, Branches, etc.
CAUTION! Position the power and extension cord so that it will not get caught
on tree branches and foliage during cutting.
Guide the chainsaw so no part of your body extends beyond the line of the guide bar (7).
Press the bucking spikes against the timber ensuring the chain (6) is NOT making
contact with the material being cut, only then start cutting by holding the chainsaw by
the front handle (4) and raising the rear handle (1). If you cannot cut the timber in a single
stroke, apply light pressure to the front handle (4) and continue sawing, draw the
chainsaw back a little then apply the bucking spikes a little lower and finish the cut by
raising the rear handle (1).
Withdraw the chainsaw from the cut while the chain (6) is still running.
12
OPERATION (cont.)
Fig. 8

13
When cutting timber resting on the ground, never allow the chainsaw chain (6) to
cut into the soil, this will dull the chain (6) immediately. The chainsaw chain (6) is
not covered under warranty.
When cutting trunks resting on a slope the operator should always stand uphill of
the trunk.
Note: When using a chainsaw for the first time, it is recommended to practice
cutting logs and branches on a saw horse or cradle.
Trimming Trees
When trimming trees always cut from above to allow the branch to drop away
downwards, it may however be useful to partially cut into the branch from
below first.
When cutting off a branch, if possible the chainsaw should be supported against
the body of the tree.
Never attempt to cut off branches with the nose (tip) of the guide bar (7).
Particular care should be taken when sawing through a branch that is under
tension and could possibly spring back up and hit you.
To Fell a Tree
Before commencing to cut down a tree you must be clear where you want it to fall
and be sure there is nothing in the way, such as power lines or buildings that can
be damaged when the tree falls. No person or animal must be within 21/2tree
lengths of the base of the tree to be felled.
You should clear two escape routes, each opening out at an angle of 45° in the
direction opposite to that in which you plan the tree should fall (Fig. 9). These
escape routes must be free and clear of obstruction.
* This chainsaw is not designed to fell large trees.
Fig. 9
USING THE CHAINSAW

USING THE CHAINSAW (cont.)
14
Guide Bar
The guide bar (7) should be checked and cleaned of saw chips and dust after each use,
clean the groove in the guide bar (7) and add oil to the oil holes at the drive sprocket
end of the guide bar (7).
Burring of the guide bar rails is normal wear
and tear and can be removed with a flat file.
If the top rail of the guide bar (7) is uneven,
use a flat file to restore them to the same
height (Fig. 10).
The bottom edge of the guide bar (7) is
exposed to heavy wear so it should be turned over when replacing the chain (6).
Ensure that you follow the instructions in the "Fitting the Guide Bar and Chain" section
on page 9 to refit the guide bar (7) and chain (6) to the Chainsaw.
Worn Groove Correct Groove
File Rail Edges
And Sides
Square
Fig. 10

MAINTENANCE
15
Chain Sharpening
The chain (6) on the CSE-355 chainsaw can be sharpened using a 5/32" size file.
A sharp chain generates wood chips during the cut, a dull chain generates
sawdust powder and produces a slow cut.
Chain sharpening requires special tools. Chain sharpening tools can be purchased
at your local Bunnings Warehouse. Alternatively you can take the chain to a
professional chain sharpener.
Further Maintenance
After each use, blow air through the chainsaw housing to ensure it is free from all
wood chips and saw dust that may build up.
If the enclosure of the chainsaw requires cleaning do not use solvents but a moist
soft cloth only. Never let any liquid get inside the chainsaw; never immerse any
part of the chainsaw into a liquid.
When the carbon brushes wear out the chainsaw will spark and/or stop. The
brushes are a wearing component of the chainsaw and should be replaced prior to
the carbon wearing out fully. Brushes will wear out after many uses but before they
do, contact Ozito customer service for quick replacement.
Always replace both brushes at the same time.
• Keep the ventilation vents of the chainsaw clean at all times, if possible,
prevent foreign matter from entering the vents. Build up of dust particles may
cause the chainsaw to overheat and fail.
Note: Ozito Industries will not be responsible for any damage or injuries caused
by the repair of the tool by an unauthorised person or by mishandling of the tool.
Limited spare parts are available subject to availability. Please contact your local
Bunnings Special Orders Desk to order the required spare parts.
Most common spare parts listed below
Spare Part Part No.
Bar Securing Nut Cover SPCSE355-10
Chain SPCSE355-17
Chain Plate SPCSE355-18
Brush Cover (Pair) SPCSE355-3315
Carbon Brush (Pair) SPCSE355-3316
SPARE PARTS

DESCRIPTION OF SYMBOLS
16
Warning Wear eye protection
Wear hearing protection
Wear a dust mask
Read operator’s manual
Read instructions
Wear safety glasses
Beware of kickback
Beware of debris being
Regulator compliance mark
VVolts Hz Hertz
~Alternating current WWatts
/min Revolutions or
reciprocation per minute
Double insulated
n
o No load speed
Warning
ø
Diameter
Do not expose to rain
Wear muffs
Always hold the saw with
both hands
Disconnect and discontinue use should the power cord be damaged

Power tools that are no longer usable should not be
disposed of with household waste but in an environmentally
friendly way. Please recycle where facilities exist. Check with
your local council authority for recycling advice.
Recycling packaging reduces the need for landfill and raw
materials. Reuse of recycled material decreases pollution in
the environment. Please recycle packaging where facilities
exist. Check with your local council authority for recycling
advice.
AUSTRALIA (Head Office)
1 - 23 Letcon Drive, Bangholme, Victoria, Australia 3175
Telephone: 1800 069 486
Facsimile: +61 3 9238 5588
Website: www.ozito.com.au
17
CARING FOR THE ENVIRONMENT
OZITO INDUSTRIES PTY LTD

WARRANTY
THIS WARRANTY FORM AND CONFIRMED BUNNINGS REGISTER RECEIPT SHOULD
BE RETAINED BY THE CUSTOMER AT ALL TIMES
The warranty is only made available by returning the product to your nearest
Bunnings Warehouse with a confirmed Bunnings register receipt.
PURCHASED FROM:________________________________________________
DATE PURCHASED: ________________________________________________
2 YEAR REPLACEMENT WARRANTY
Your Ozito tool is guaranteed for a period of 24 months from the ORIGINAL date of
purchase under the following conditions: Professional, trade or high frequency use
will VOID this warranty.
WARNING
The following actions will result in the warranty being void.
•If the tool shows signs of damage or defects caused by or resulting from abuse
accidents or alterations.
•If the tool has been disassembled or tampered with in any way (other than
specified in this manual).
Note: Warranty excludes consumable parts such as chain-bars, chains, sprockets,
and chain files.
YOUR WARRANTY FORM SHOULD BE RETAINED
BY YOU AT ALL TIMES.
SHOULD YOU HAVE ANY QUESTIONS PRIOR TO
RETURNING YOUR PRODUCT FOR WARRANTY OR
REPAIR PLEASE TELEPHONE OUR CUSTOMER
SERVICE HELPLINE:
Australia 1800 069 486
New Zealand 0508 069 486
TO ENSURE A SPEEDY RESPONSE PLEASE HAVE THE MODEL NUMBER
AND DATE OF PURCHASE AVAILABLE. AN OZITO CUSTOMER SERVICE
REPRESENTATIVE WILL TAKE YOUR CALL AND ANSWER ANY QUESTIONS
YOU MAY HAVE RELATING TO THE WARRANTY POLICY OR PROCEDURE.
Table of contents
Other Ozito Chainsaw manuals

Ozito
Ozito PCS-406A User manual

Ozito
Ozito PXCCSS-0182U User manual

Ozito
Ozito OZPCS305A User manual

Ozito
Ozito PXCCSS-018U User manual

Ozito
Ozito PCS-254 User manual

Ozito
Ozito PXCCSS-018 User manual

Ozito
Ozito OZPCS305A User manual

Ozito
Ozito PCS-305A User manual

Ozito
Ozito ECS-1935 User manual

Ozito
Ozito ECS-406A User manual

Ozito
Ozito ECS-2040U Operation instructions

Ozito
Ozito PXCCSS-018 User manual

Ozito
Ozito ECS-1835 User manual

Ozito
Ozito CSL-036 User manual

Ozito
Ozito Power X Change PXCCSS-0182 User manual

Ozito
Ozito PCS-406 User manual

Ozito
Ozito 25.4cc-305mm Bar User manual

Ozito
Ozito OCS-018 User manual

Ozito
Ozito PXCCSK-418 User manual

Ozito
Ozito ECS-355 User manual