Ozito OZPCS305A User manual


Engine displacement: 25.4cc
Engine: Air-cooled, single-cylinder, 2-stroke
No load motor idling speed: 3,500/min (max. recommended)
Max. no load motor speed: 11,000/min
Fuel type: Unleaded fuel with 2-stroke oil
Fuel mixing ratio: 35:1
(1 Litre = 28.5ml oil added to 971.5ml unleaded petrol)
(5 Litres = 143ml oil added to 4.857L unleaded petrol)
Fuel tank capacity: 200ml
Chain bar oil tank capacity: 140ml
Spark plug type: LD L8RTF, NGK BM6A, Champion CJ8
Spark plug gap: 0.7mm
Oil feed system: Automatic
Sprocket wheel: 6-teeth x 9.53mm (3/8”) pitch
Guide bar type: Sprocket nose
Chain bar length: 305mm (12”)
Chain pitch: 9.53mm (3/8”)
Chain gauge: 1.3mm (0.050”)
Chain file: 3.96mm (5/32”)
Sound pressure level: 110 dB(A)
Tool weight: 3.7kg (including guide bar & chain)
Features: Safety chain brake
Auto chain stop
Anti vibration handles
2
SPECIFICATIONS - MODEL NO. OZPCS305A

3
SPECIFICATIONS (cont.)
1. Choke control
2. Rear handle
3. Throttle safety lock
4. Throttle trigger
5. Top handle
6. Front guard (chain brake)
7. Filter cover knob
8. Filter cover
9. Recoil starter
10. Side operating handle
11. On/off switch
12. Exhaust
13. Chain
14. Guide bar
15. Double ended wrench
16. Screwdriver
17. Chain drive cover nut
18. Chain tensioning screw
19. Chain drive cover
20. Drive sprocket wheel
21. Fuel tank cap
22. Priming bulb
23. Chain tensioner pin
24. Chain bar oil tank cap
25. Bucking spikes
26. Spacer (for shipping
purposes only, please
dispose of)
27. Chain file
28. Guide bar cover
14
3
12
7
4
17
1
15
2
56
8
9
10
11
13
16
18
19
22
21
24
26
20
23
25
27
28

TABLE OF CONTENTS
4
SPECIFICATIONS………………………………………………..
TABLE OF CONTENTS………………………………………….
INTRODUCTION………………………………………………..
SAFETY INSTRUCTIONS……………………………………….
GENERAL SAFETY………………………………………………
ADDITIONAL SAFETY RULES FOR PETROL CHAINSAWS
………..
KICKBACK SAFETY PRECAUTIONS………………………….
ASSEMBLY ………………………………………………………
INSTALLING THE GUIDE BAR AND CHAIN…………………
ADJUSTING THE CHAIN TENSION………………………….
FILLING UP WITH FUEL AND OIL……………………………
STARTING THE CHAINSAW…………………………………..
STOPPING THE CHAINSAW…………………………………..
CHECKING THE CHAIN BAR OIL SUPPLY…………………..
ADJUSTING THE CARBURETTOR……………………………
CHAIN BRAKE…………………………………………………..
BUCKING SPIKES……………………………………………….
OPERATION……………………………………………………..
REPLACING THE SPARK PLUG……………………….………
HELPFUL HINTS…………………………………………………
FELLING A TREE………………………………………………..
LIMBING…………………………………………………………
BUCKING…………………………………………………………
PRUNING…………………………………………………………
MAINTENANCE…………………………………………………
CHAIN SHARPENING………………………………………….
DESCRIPTION OF SYMBOLS………………………………….
CARING FOR THE ENVIRONMENT………………………….
WARRANTY………………………………………………………
Page 2
Page 4
Page 5
Page 5
Page 6
Page 8
Page 9
Page 10
Page 10
Page 12
Page 13
Page 15
Page 16
Page 16
Page 16
Page 17
Page 17
Page 18
Page 18
Page 18
Page 19
Page 19
Page 19
Page 20
Page 20
Page 21
Page 22
Page 23
Page 23

5
INTRODUCTION
Congratulations on purchasing an Ozito Petrol Chainsaw.
We aim to provide quality tools at an affordable price. We
hope you will enjoy using this tool for many years.
Your Ozito Petrol Chainsaw OZPCS305A has been
designed for cutting small logs, branches and sawn
timber. It can also be used for felling small trees and
trimming tree branches. It is intended for DIY use only.
RISK OF EXPLOSION OR FIRE
What can happen:
• Spilled petrol and its vapours can become ignited from cigarette sparks,
electrical arcing, exhaust gases and hot engine components such as the muffler.
• Heat will expand fuel in the tank which could result in a fire.
• Operating the tool in an explosive environment could result in a fire.
• Muffler exhaust heat can damage painted surfaces, melt any materials sensitive
to heat (such as siding plastic, rubber or vinyl) and damage live plants. Keep
hot tool away from other objects.
• Improperly stored fuel could lead to accidental ignition. Fuel improperly
secured could get into the hands of children or other unqualified persons.
How to prevent it:
• Shut off engine and allow it to cool before adding fuel to the tank.
• Use care when filling the tank to avoid spilling fuel. Move tool away from
fuelling area before starting engine.
• Keep maximum fuel level 20mm below top of tank to allow for expansion.
• Operate and refuel in well ventilated areas free from obstructions.
• Store fuel in a approved container (AS/NZS 2906-1999) for petrol. Store in a
secure location away from the work area. Make sure the container is clearly
marked “fuel”.
RISK TO BREATHING
What can happen:
• Breathing exhaust fumes can cause serious injury or death.
How to prevent it:
•Operate tool in a well ventilated area. Avoid enclosed areas.
• Never operate unit in a location occupied by other people or animals.
SAFETY INSTRUCTIONS

!
!
6
GENERAL SAFETY
Warning! Read and understand all instructions. Failure to follow all
instructions listed below may result in fire and/or serious injury.
SAVE THESE INSTRUCTIONS
1) Work area
a) Keep work area clean and well lit. Cluttered and dark areas invite accidents.
b) Do not operate petrol tools in explosive atmospheres, such as in the
presence of flammable liquids, gases, or dust. Power tools create sparks
which may ignite the dust or fumes.
c) Keep children and bystanders away while operating a petrol tool.
Distractions can cause you to lose control.
2) Personal safety
a) Stay alert, watch what you are doing and use common sense when
operating a petrol tool. Do not use a power tool while you are tired or under
the influence of drugs, alcohol, or medication. A moment of inattention while
operating power tools may result in serious personal injury.
b) Use safety equipment. Always wear eye protection. Safety equipment such
as a dust mask, non-skid safety shoes, hard hat, or hearing protection used for
appropriate conditions will reduce personal injuries.
c) Remove any adjusting key or wrench before turning the tool on. A wrench
or a key that is left attached to a rotating part of the petrol tool may result in
personal injury.
d) Do not overreach. Keep proper footing and balance at all times. This
enables better control of the petrol tool in unexpected situations.
e) Dress properly. Do not wear loose clothing or jewellery. Keep your hair,
clothing and gloves away from moving parts. Loose clothes, jewellery or long
hair can be caught in moving parts.
f) If devices are provided for the connection of dust extraction and collection
facilities ensure that these are connected and properly used. Use of these
devices can reduce dust-related hazards.
3) Petrol tool use and care
a) Do not force the petrol tool. Use the correct petrol tool for your
application. The correct petrol tool will do the job better and safer at the rate
for which it was designed.
b) Do not use the petrol tool if the switch does not turn it on and off. Any
petrol tool that cannot be controlled with the switch is dangerous and must
be repaired.
c) Turn tool off completely before making any adjustments, changing
accessories, or storing petrol tools. Such preventive safety measures reduce
the risk of starting the petrol tool accidentally.

d) Store idle petrol tools out of the reach of children and do not allow persons
unfamiliar with the petrol tool or these instructions to operate the petrol tool.
Petrol tools are dangerous in the hands of untrained users.
e) Maintain petrol tools. Check for misalignment or binding of moving parts,
breakage of parts and any other condition that may affect the petrol tool’s
operation. If damaged, have the petrol tool repaired before use. Many accidents
are caused by poorly maintained petrol tools.
f) Keep utting tools sharp and clean. Properly maintained cutting tools with sharp
cutting edges are less likely to bind and are easier to control.
g) Use the petrol tool, accessories and tool bits etc., In accordance with these
instructions and in the manner intended for the particular type of petrol tool,
taking into account the working conditions and the work to be performed.
Use of the petrol tool for operations different from intended could result in a
hazardous situation.
h) This appliance is not intended for use by persons (including children) with
reduced physical, sensory or mental capabilities, or lack of experience and
knowledge, unless they have been given supervision or instruction concerning use
of the appliance by a person responsible for their safety.
i) Children should be supervised to ensure that they do not play with
the appliance.
4) Service
a) Have your petrol tool serviced by a qualified repair personnel using only
identical replacement parts. This will ensure that the safety of the petrol tool
is maintained.
7
GENERAL SAFETY (cont.)

8
ADDITIONAL SAFETY INSTRUCTIONS FOR CHAINSAWS
Note: For safety reasons the chainsaw is shipped with the chain brake fully
engaged. This brake must be released before the saw becomes operational.
Never cut into the ground.
Never cut into wire fences.
Never cut into samplings.
Never cut into prepared wood.
Use the chainsaw to cut only wood.
It is advisable to provide a support for the chainsaw when cutting branches. Do not
cut using the bar point and beware of branches under tension.
Children under 18 must not use chainsaws.
Keep people away from the chainsaw when in use.
Check the following conditions before beginning work:
• There should be no people in the felling area.
• Make sure there is a second person within calling distance.
•The working area should be free from obstacles.
Wear suitable clothes which do not hinder movement.
Use specific protection during operations involving head, hands, feet, eyes and ears.
It is recommended the use of a helmet with a visor during felling, branch cutting
and chopping operations.
Wear gloves with an external protection when using the chainsaw.
Use ear protection to prevent hearing injuries.
Wear safety boots when using the chainsaw.
During transport the brake must be applied to avoid accidental start-up.
Do not use the chainsaw in rainy or windy conditions or in poor light.
Find a suitable position before beginning work.
When working on slopes, the saw operator must stand beside or above the wood
to cut, i.e. felled trees.
Use the chainsaw holding it firmly with both hands.
Make a wedge-shaped cut before felling the tree, then the felling cut leaving a
hinge for the felling direction.
Beware of any falling branches after felling operations.
Beware of wood splinters when cutting chopped wood.
Ensure your chainsaw is suitable for the job.
Never work above shoulder level or reach out to cut a branch: ensure you have
stable footing at all times.
Do not operate in a hazardous location. Such areas include where there is a risk of
explosion of petrol fumes, leaking gas or explosive dust.
Do not operate in a confined area. Exhaust gases, smoke or fumes could reach
dangerous concentrations.

9
Protect your tool. This chainsaw is NOT WEATHERPROOF and should not be exposed
to direct sunlight, high ambient temperatures, damp, wet or high humidity conditions
for prolonged periods of time.
Take care not to spill fuel. When refuelling the chainsaw ensure that the motor has
been switched off. Prevent the spilling of fuel as this may also ignite with the hot
motor. Never refuel whilst the engine running.
Be careful where you store the chainsaw. Store the tool in a dry area away from
flammable liquids.
Keep your distance. The chainsaw emits exhaust fumes. Ensure bystanders keep a
safe distance.
Operating instructions and instructions for common cutting tasks, including the use of
personal protection equipment are covered in this manual. This product has a need for
adequate training which is covered in this manual.
Do not operate this machine while tired, ill or under the influence of alcohol or other drugs.
Ensure that you mix 35 parts unleaded fuel to 1 part 2-stroke oil. If not, the engine will
overheat and cause damage to your chainsaw.
Never fill fuel tank indoors. Never fill fuel tank when engine is running or hot. Do not
smoke when filling fuel tank.
Kickback may occur when the tip of the guide bar touches an object, or when the
wood closes in and pinches the saw chain.
If the bar tip or point contacts, it can produce a rapid reverse reaction, kicking the
guide bar up and back towards the operator. This is known as rotational kickback.
Pinching the saw chain along the top of the guide bar may push the guide bar rapidly
back towards the operator. This is known as pinch kickback.
Either of these reactions can cause loss of control of the saw, resulting in serious
personal injury.
Do not rely exclusively on the safety devices built into your saw. Take the following
steps to help avoid accident or injury:
Reduce the element of surprise by understanding what causes kickback.
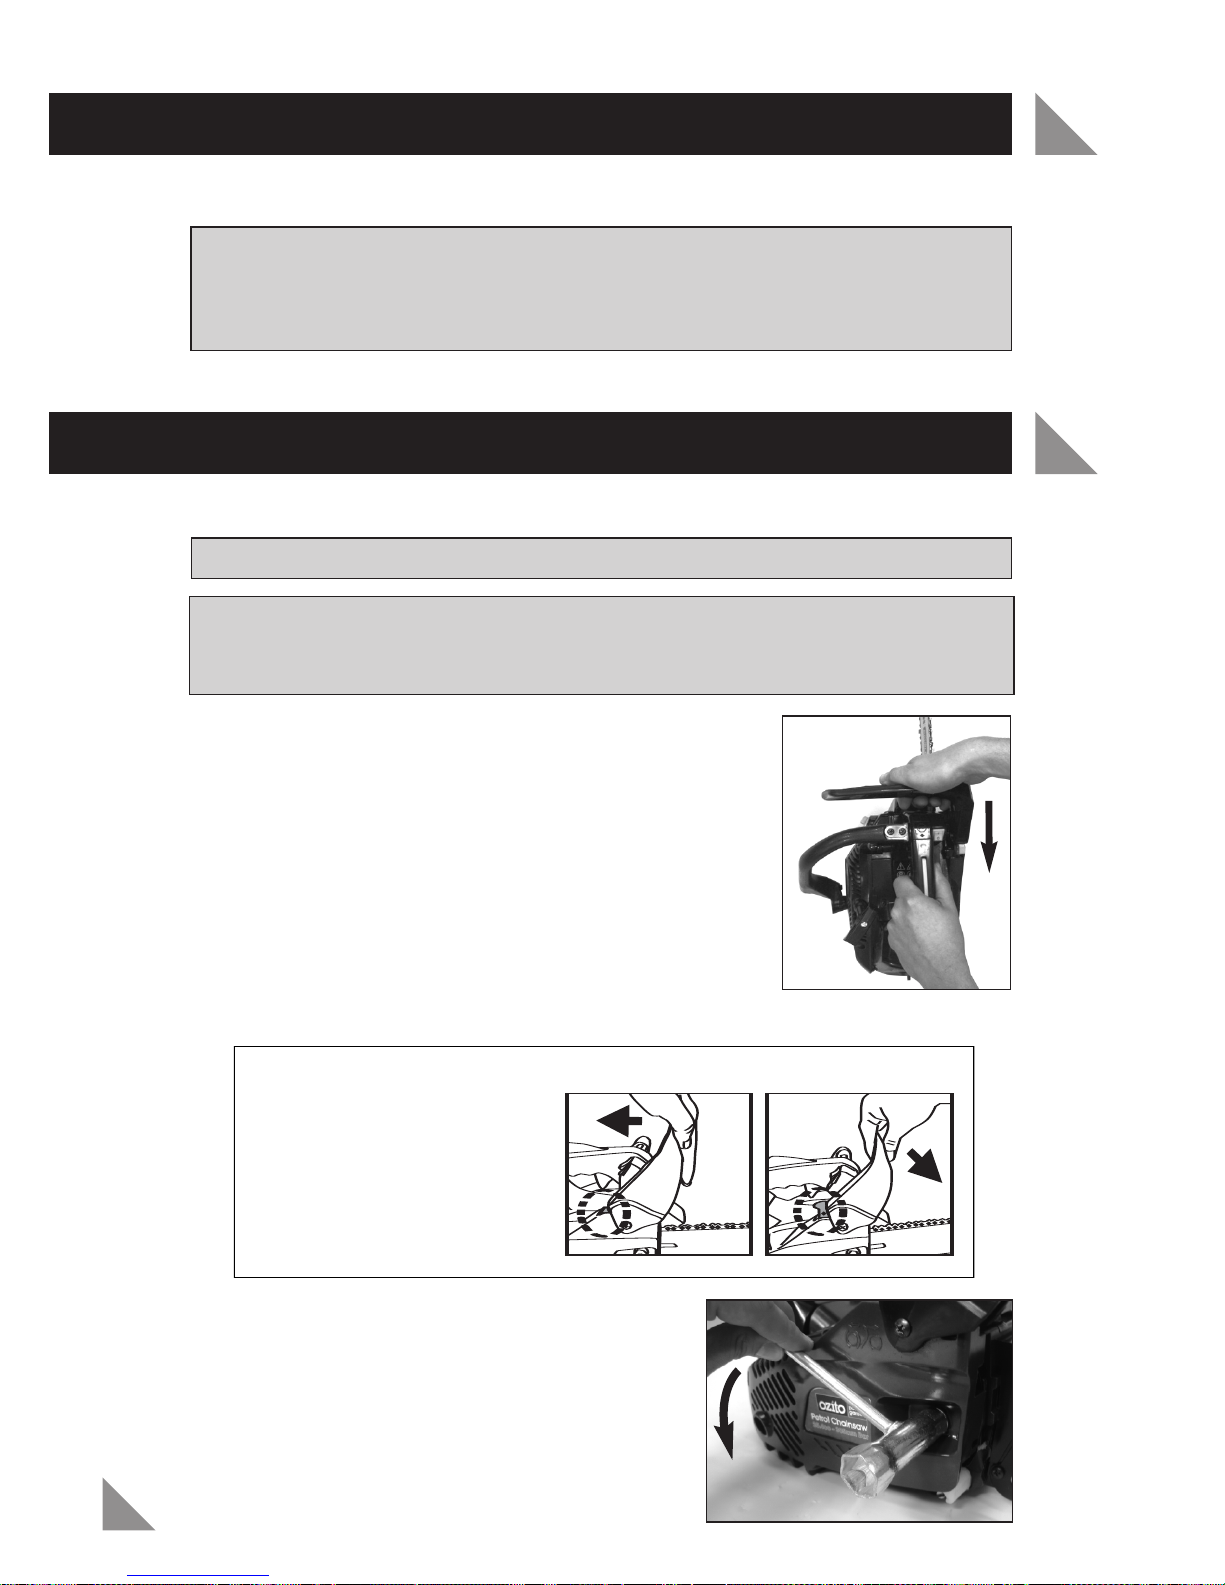
Keep a firm grip on the chainsaw using both hands, the right hand on the rear handle
and the left hand on the front handle when the motor is running. A firm grip will help
maintain control. Do not let go whilst the motor is running.
Make sure that the area of operation is free of obstructions. Do not let the point of the
guide bar contact a log, branch or any other object.
Use high speeds when cutting.
Do not overreach or cut above shoulder height.
Carefully follow the sharpening and maintenance instructions given in this manual.
Use only replacement bars and chains specified by the manufacturer.
KICKBACK SAFETY PRECAUTIONS
ADDITIONAL SAFETY INSTRUCTIONS FOR CHAINSAWS (cont.)

10
KICKBACK SAFETY PRECAUTIONS (cont.)
DANGER! BEWARE OF KICKBACK!
Warning! Kickback can lead to dangerous loss of control of the chainsaw and
result in serious or fatal injury to the operator or to anyone standing close by.
Always be alert. Rotational kickback and pinch kickback are major chainsaw
operational dangers and the leading cause of most accidents.
Installing the guide bar and chain
Warning! The chain has sharp edges. For your safety, please use work gloves.
Important! The front guard (chain brake) must be disengaged when installing
the guide bar and chain. Failure to do so will prevent the chain drive cover (19)
being assembled back to the chainsaw.
For operator safety, the chain brake disengaging action
has been designed to be a firm deliberate action.
1. To disengage the chain brake, first hold the rear
handle with the left hand. Now hold the underside of
the front guard (6) with your right hand. Ensure your
right hand is positioned on the right (as depicted).
Now firmly pull the front guard (6) backwards toward
the rear of the chainsaw until the notch (circled in the
below label) recesses into the chainsaw housing (label
also found on the chainsaw, on the inner side of the
front guard).
2. Loosen the chain drive cover nut (17) using
the double ended wrench (15) but do not yet
remove the nut.
ASSEMBLY
IMPORTANT!
Pull guard backwards
FIRMLY
to disengage
brake. The chain will not
run unless the chain
brake is disengaged.
BRAKE DISENGAGED BRAKE ENGAGED
Hold right
side of
guard

ASSEMBLY (cont.)
3. Fully loosen the chain tensioning screw (18) as far as you can anti-clockwise (refer
below left picture).
4. Now remove the chain drive cover nut (17) and remove the chain drive cover (19),
refer below right picture).
5. Once the chain drive cover (19) has been
removed, the transport-protecting spacer (26)
must be removed and disposed of so that the
chain bar can be positively located.
6. Place the guide bar (14) in position over the threaded stud and the two screw
heads which are on either side of the stud. The guide bar should remain upright
when you let it go, be careful not to knock it off the screw heads.
7. Place the chain (13) around the drive sprocket wheel (20) with the chain teeth
direction matching the link icons shown on the guide bar (refer above right picture).
If not in the right direction, the chain will not cut. Fit the chain around the guide
bar and ensure the chain is fitted above the chain guide and NOT below.
Remove
Spacer
* Direction of chain teeth should
match the tooth icons on the bar.
Chain Guide Stud
11

ASSEMBLY (cont.)
12
8. Fit the chain drive cover (19) back to the
saw body. There are two lugs on the left
side (rear end of saw) which will first need
to be located properly to enable the cover
to be fitted.
Also the chain tensioning pin (23) will need
to be lined up to the lower hole in the
guide bar (14) to enable the cover to
be fitted.
Sometimes the chain tensioner screw (18)
may need to be slightly adjusted in order to
line up the tensioning pin (23) with the
lower hole in the guide bar (14).
Note: If the chain brake (6) was not disengaged
as per step 1, you will not be able to fit the
drive cover to the saw. If you didn’t previously,
release the chain brake as per step 1.
9. Fasten the chain drive cover nut (17) finger
tight only. Do not use wrench just yet.
10. Rotate the chain tensioner screw (18)
clockwise until the links of the chain just
touch the bottom edge of the chain.
Adjusting the chain tension
11. Ensure the chain drive cover nut (17) is only finger tight (if the nut was
previously tight it will need to be loosened off a little).
Caution: If you try to rotate the chain tension screw (18) whilst the nut is tight, it
will result in the chain not loosening and possible damage to the chain tensioner
screw (18) and the chain tensioning pin (23).
Chain Guide
Rotate Clockwise
To Tension Chain
Lugs Chain Tension Pin
Lower
Hole
Chain
Tension
Pin

12. To get the correct chain tension, firmly pull up on the chain at the middle of the top
of the exposed guide bar. When the chain is pulled up to its highest point, the
bottom tip of the links should only just stay in the track [middle of the guide bar (14)].
13. Rotate the chain tensioner screw (18) to get the
correct tension. Once the correct tension has
been achieved tighten the chain drive cover nut
(17) to lock the bar and tension in place.
14. Check the tension again after a few minutes of
cutting and several times in the first hour
because the chain will lengthen as it breaks in.
Adjust as you go.
A loose chain causes rapid wear to both the
chain and the guard bar and could derail causing a major safety hazard.
Note: Chains lengthen slightly as the link pins set into place. They set into place from
the load applied to the chain, this process continues through-out the life of all chains
as they gradually wear from use.
Filling up with fuel and oil
Warning! Petrol is very flammable. Avoid smoking or causing any sparks or flames
near fuel. Make sure that you stop the motor and allow it to cool before refuelling
the machine. Select outdoor bare ground for fuelling and move at least 3m away
from the fuelling point before starting the motor.
• Only use oil that is expressly labelled for use with air-cooled 2-stroke engines. DO
NOT use BIA or TCW (2-stroke water-cooling type) mixed oil. The recommended
mixing ratio is PETROL 35: OIL 1.
•Use unleaded petrol with a minimum Octane number of 89. If you use petrol with
an Octane number lower than 89, there is a danger that the engine might
overheat and the piston seize.
• Poor quality petrol or oil may damage sealing rings, fuel lines or the fuel tank. Do
not use wasted or regenerated oil, it can damage the oil pump.
Caution: To maximise the lifetime of the engine, avoid the following:
• Do not use raw petrol (without 2-stroke oil), it will severely damage the engine
very quickly. This damage will not be covered under warranty.
• Do not run the tank dry, as this will cause damage to the engine.
• Do not use oil meant for 4-stroke engines, it will cause spark plug fouling, exhaust
blocking and piston ring sticking.
ASSEMBLY (cont.)
13
5 – 6.3mm gap is the
ideal tension
Lift chain up at
middle point of
guide bar

14
ASSEMBLY (cont.)
• Do not use fuel mixtures that have been left standing for one month or more,
they can cause clogging of the carburettor.
Before storing the chainsaw for an extended period, empty the fuel tank, clean it
then run the motor to empty the carburettor.
Note: Do not discard an unwanted fuel container with household waste. It must
be taken to an authorised repository site.
Mixing fuel (35:1 mixing ratio)
1. Measure out the quantities of petrol and oil to be mixed.
2. Put some of the petrol into a clean, approved fuel container.
3. Pour in all of the oil and mix well.
4. Pour in the rest of the petrol and again mix well (at least one minute).
5. It is very important to mix the two ingredients properly to prevent unnecessary
engine wear.
6. Make sure that the container is clearly labelled that it is “35:1 2-stroke” mixture.
Fuelling the chainsaw
1. The engine must be stopped
and cool. Place the chainsaw on its side with the fuel tank cap facing upwards.
2. Make sure that the fuel mixture is well mixed.
3. Remove the fuel tank cap (21).
4. Fill the fuel tank to about 80% of its capacity.
5. Fasten the fuel cap (21) securely and wipe up any fuel spillage around the machine.
Note: 1 litre of 2-stroke fuel = 28.5ml of 2-stroke oil & 971.5ml of unleaded fuel.
5 litres of 2-stroke fuel = 143ml of 2-stroke oil & 4.857L of unleaded fuel.
Adding chain bar oil
Warning! Never start work unless the chain and bar are lubricated.
1. Place the chainsaw
on its side with the
chain bar oil tank cap
(24) facing up.
Untwist and remove
the chain bar oil tank
cap (24).
2. Fill the tank to 80%
capacity with chain oil.

3. Fasten the chain bar oil tank cap (24) and wipe up any oil spillage.
Starting the chainsaw
Warning! Do not start the motor whilst the saw hangs from one hand. This is very
dangerous as the chain may come in contact with your body.
1. Fill the fuel and oil tanks respectively and tighten
the caps securely.
2. Set the on/off switch (11) to On (the I position).
Make sure the brake is ON when starting for safety,
by pushing the front guard (6) forward.
3. When the machine is cold first pull out the choke
control (1) to the CHOKE position, (fully withdrawn).
Note: Once the choke control (1) has been pulled out,
it returns automatically when the throttle trigger (4)
is operated.
Important! Do not push the choke down
manually. It will automatically return to the RUN
position from either the START or CHOKE position
when the throttle safety lock (3) is depressed and
throttle trigger (4) squeezed.
4. Depress the priming bulb (22) 6 times or until the
bulb is full of fuel.
Note: This is not required if engine is warm or is being
restarted.
5. Hold the chainsaw securely on the ground and pull
vigorously on the recoil starter (9). Repeat (at least
15 times) until the engine starts or “kicks”
(attempts to start).
Note: If the engine has not started after 15 pulls of the
recoil starter depress the throttle safety lock (3) and
then squeeze the throttle trigger (4) and allow the
choke to drop to the RUN position. Pull the choke
control half-way up to the START position and pull
the recoil starter again to start the engine.
6. Allow the engine to warm up for approximately
30 seconds.
7. When the engine is warm first depress the throttle
safety lock (3) then pull fully on the throttle trigger
(4) for a short burst. The choke control (1) will fully
retract to the RUN position, the chainsaw is now
ready for use.
OPERATION
15

OPERATION (cont.)
16
8. When restarting the engine when it is still warm, set
the choke control (1) to the START position. Hold
the chainsaw securely on the ground and pull
vigorously on the recoil starter (9). Allow the engine
to run for a few moments with the throttle trigger
(4) pulled slightly.
9. When the engine is fully warm, pull on the throttle
trigger (4). The choke control (1) will fully retract to
the RUN position.
10. When ready to start cutting, release the brake, by
pulling the front guard (6) back firmly towards the rear of the saw.
Stopping the chainsaw
1. Release the throttle trigger (4).
2. Set the on/off switch (11) to Off (the O position).
Checking the chain bar oil supply
Run the engine at medium speed and check that
the chain splatters a thin line of oil which can be
seen on the ground when the bar is pointed
downwards. This is normal. It may take 15-30
seconds for this to happen if this is the first time
the chainsaw has been started. If there is no line
of chain oil, stop the motor immediately and
investigate the cause. The chain bar oil tank could
be empty or the oil supply to the chain blocked.
This may require removal of the bar and checking
that the upper oil hole in the bar is clear of any blockages.
Adjusting the carburettor
The carburettor is factory set and should not require adjustment.
Changes in operating conditions may require fine tuning of the carburettor. A
special tool is required for making these adjustments. Contact Ozito Customer
Service for advice and instructions.
Aus: 1800 069 486
NZ: 0508 069 486
RUN
START
CHOKE

Chain brake / Anti kickback guard
The chain brake operates automatically in the even of kick back. Kick back occurs if the
chain catches on the wood being cut. In the event of the chain catching, chainsaw will
push back suddenly, when this happens, your hand (which is on the side handle (10)
during operation) will naturally move forward automatically causing the guard to be
pushed forward, engaging the chain brake.
Engaging the chain brake
To manually engage the chain brake, place your left hand on
the rear handle, and place your right hand on the front
guard (6). Push the front guard towards chain and guide bar.
Disengaging the chain brake
For operator safety, the chain brake disengaging action has
been designed to be a firm deliberate action.
To disengage the chain brake, first hold the rear handle (2)
with your left hand. Hold the underside of the front guard (6)
with your right hand. Ensure your right hand is positioned as
depicted. Now firmly pull the guard backwards towards the
rear of the tool until it clicks into the disengaged position.
The engaged and disengaged chain brake positions are clearly shown on the label below
which is located on the inner side of the front guard (6). When the brake is properly
DISENGAGED, the notch shown in the circled area will recess into the chainsaw housing.
When ENGAGED the
notch will be protruding
from the housing.
The notch only recesses
and protrudes by the
fore-mentioned action of
the front guard (6). DO
NOT try to directly lift out
or push in the notch. This
will not work.
Bucking spikes
The chainsaw has bucking spikes (25) to assist with cutting
and reduce the chance of kickback, use them as follows.
Keep the bucking spikes (25) touching the wood you
are cutting. Due to the rotation of the chain, it will pull
the saw into the wood. When the bucking spikes (25)
are touching the timber, it will help prevent any sudden
jerking or kick-back.
OPERATION (cont.)
Hold right
side of
guard
Engage
Disengage
IMPORTANT!
Pull guard backwards
FIRMLY
to disengage
brake. The chain will not
run unless the chain
brake is disengaged.
BRAKE DISENGAGED BRAKE ENGAGED
17

OPERATION (cont.)
18
Operation
Warnings:
• Always follow the safety instructions given at the front of this manual. This
chainsaw must only be used for cutting wood. It must not be used for cutting
other types of material. Do not use the chainsaw as a lever for lifting, moving
or splitting objects.
• Do not attach the chainsaw to a fixed stand.
• Do not attach any devices to the chainsaw other than those specified by
the manufacturer.
Replacing the spark plug
When the chainsaw will not start when everything else has been checked, it is most
likely the spark plug that needs replacing. The spark plug is not covered under warrantly.
To replace the spark plug:
1. Unscrew and remove the filter cover knob (7).
2. Remove the filler cover (8).
3. Pull the spark plug lead off the spark plug end.
4. Loosen (anti-clockwise) the spark plug using
the larger socket side of the double ended
wrench (15) provided.
5. Remove the spark plug and replace with a
new one, as specified on page 2.
6. Secure the spark plug in position by
tightening (clockwise) the spark plug using
the double ended wrench (15) provided.
7. Fix the spark plug lead back to the end of
the spark plug ensuring it clicks into place.
8. Replace the filler cover (8) and secure in
place with the filler cover knob (7).
Helpful hints
• Do not force the saw into the cut. Apply only light pressure whilst running the
engine at full throttle.
• If the saw chain gets caught in the cut, do not try to remove it by twisting the
guide or pulling forcibly. Use a lever or wedge to open up the cut so that the
saw chain is freed.
While cutting, always:
•Run the chainsaw motor at full revs. This makes the job safer, as there is less
chance of pull-in or kick-back.
• Position your body to the left of the chainsaw so if it kicks back uncontrollably,
it goes over your right shoulder, never stand in the cutting line of the saw.
• Keep a firm grip with your left hand on the front handle, with your thumb
securely below the handle.
•The swivel of your wrist in a kick-back situation will activate the chain brake.
• Make sure the chain is tensioned correctly.

Felling a tree
Warning! Felling a tree should only be done by trained operators.
Decide the direction in which you wish the tree to
fall taking into account the direction of the wind, the
position of branches, lean of the tree, ease of
subsequent limbing and bucking and other factors
prevalent at the time.
1. Clear the area around the tree and make sure that
you have a good foothold and clear retreat path.
2. Ensure that others in the area are aware of the
felling and ensure people and animals are well clear.
3. Make a notch cut one-third of the way into the tree on the felling side.
4. Make the felling cut on the opposite side to the initial notch and slightly higher than
the notch. As the felling cut gets close to the notch cut, the tree will begin to fall.
5. Remove the saw from the cut, stop the engine with the on/off switch (11), put the
saw down and leave the area along the retreat path.
Limbing
Limbing is the process of removing the branches
from a fallen tree. Check the direction in which a
branch will bend before cutting it. Always cut on the
opposite side to the bending direction so that the
guide bar is not pinched in the cut.
For large limbs that cannot be removed in one cut,
make an initial cut from the bent side and finish by
sawing from the opposite direction. Do not remove limbs that are supporting the
fallen tree on the ground until the tree has been cut into lengths.
Warning! Always keep a balanced stance. Do not stand on the log. Be alert to the
fact that the log may roll over. When working on a slope, always stand on the
uphill side of the log.
Bucking
Bucking is cutting a log into lengths for easier handling.
To saw a log lying on the ground, first saw halfway,
then roll the log over and cut from the opposite side.
To saw the end of a log supported off the ground,
first saw up from the bottom one-third through the
log then finish by sawing down from the top. To saw
a log in the middle of two supports holding it off the
ground, first saw down from the top one-third
through the log then finish by sawing up from
the bottom.
Caution: Avoid cutting into the ground as this will very quickly dull the saw chain. 19
1
2 1
2
1
2
OPERATION (cont.)

OPERATION (cont.)
20
Pruning
Pruning is the removal of a limb or branch from a standing tree.
Warning! Do not use an unstable foothold or ladder.
Do not overreach. Do not saw above shoulder height.
Always use both hands to hold the saw. First cut up
from the bottom and finish down from the top.
Note: Before cleaning your chainsaw or carrying out any maintenance procedure,
make sure that the engine is off and is cool. Disconnect the spark plug to prevent
accidental starting.
Maintenance to be preformed after each use
1. Loosen the filter cover knob (7) and remove
the filter cover (8).
2. Remove the air filter (as shown to the right).
3. Split the air filter into its two halves and clean
the mesh. Dry particles can be removed by
tapping on a hard surface. More stubborn dirt
may require washing out the filter with petrol
or using an air compressor.
4. Re-assemble the two halves and replace the airfilter,
filter cover (8) and filler cover knob (7).
5. Take off the guide bar (14) and maintain it as follows,
remove any saw dust from the groove in the guide bar (14).
6. Make sure that the oil port is not clogged. Grease
the nose sprocket at the tip of the guide bar (14).
7. Check for fuel and oil leakage and loose fastenings,
especially those securing the handles and the
guide bar (14).
8. Clean any dust away from the cooling vents as
clogged vents can cause overheating.
1
2
MAINTENANCE
Other manuals for OZPCS305A
1
Table of contents
Other Ozito Chainsaw manuals

Ozito
Ozito OZPCS305A User manual

Ozito
Ozito PXCCSS-018U User manual

Ozito
Ozito ECS-2040U Operation instructions

Ozito
Ozito PXCCSS-0182U User manual

Ozito
Ozito ECS-1935 User manual

Ozito
Ozito CSL-036 User manual

Ozito
Ozito ECS-406A User manual

Ozito
Ozito CSE-355 User manual

Ozito
Ozito PXCCSS-018 User manual

Ozito
Ozito PCS-305A User manual

Ozito
Ozito PXCCSS-018 User manual

Ozito
Ozito PCS-406A User manual

Ozito
Ozito ECS-1835 User manual

Ozito
Ozito 25.4cc-305mm Bar User manual

Ozito
Ozito OCS-018 User manual

Ozito
Ozito PXCCSK-418 User manual

Ozito
Ozito PCS-254 User manual

Ozito
Ozito PCS-406 User manual

Ozito
Ozito Power X Change PXCCSS-0182 User manual

Ozito
Ozito ECS-355 User manual