ORIGINAL EU DECLARATION OF CONFORMITY
This declaration relates exclusively to the product described below in the state in which it was placed on the market, and excludes
components which are added and/or operations carried out subsequently by any third parties.
We, the Manufacturer: Ozone Industries Ireland Ltd. Block 2, Newtown Business and Enterprise Park,
Newtownmountkennedy, Co. Wicklow, A63 XV26, Ireland
Declare under our sole responsibility that the product described below:
The RainSafe™
Is in compliance with the following EU Directives:
Machine Directive 2006/42/EC
Low Voltage Directive 2014/35/EC
EMC Directive 2014/30/EC
RoHS Directive 2011/65/EU (as amended)
RE Directive 2014/53/EU
And complies with the provisions of the following standards:
EN 60335-1:2012 Household and similar electrical appliances –Safety-Part 1: General requirements
EN 60335-2-109 Household and similar electrical appliances - Safety - Part 2-109: Particular requirements for UV radiation water
treatment appliances
EN 55014-1 Electromagnetic compatibility - Requirement for household appliances, electric tools and similar apparatus – Part 1:
Emission
EN 55014-2 Electromagnetic compatibility – Requirement for household appliances, electric tools and similar apparatus – Part 2:
Immunity – Product family standard
EN 55022 Information technology equipment – radio disturbance characteristics
Michael Delaney of Ozone Industries Ireland Ltd, Block 2, Newtown Business and Enterprise Park, Newtownmountkennedy, Co. Wicklow,
Ireland is authorised to compile the technical les.
Completed by: Ozone Industries Ireland Ltd, t/a RainSafe Water, Block 2,
Newtown Business and Enterprise Park, Newtownmountkennedy, Co. Wicklow, A63 XV26, Ireland
Name of signatory: Michael Delaney
Head of Engineering
INTRODUCTION
Intended Use:
For the purposes of this manual and the present capabilities of the RainSafe, “potable water” is deemed to mean treated source water
(see below denition) used or intended to be used, for drinking, food preparation and bathing purposes which is free from microbiological
impurities (in amounts sufcient to cause disease or harmful physiological effects) in compliance with the microbiological claims as
certied by KIWA. In no way (either express or implied) shall potable water be deemed to mean treated source water that is free (either
to a greater or lesser extent) from chemical contaminants or other impurities. Ozone Industries Ireland Ltd take no responsibility for the
quality of water once it enters the distribution network (commercial and domestic).
General Description:
The RainSafe is designed for use within a building to treat suitable source water to potable water standard. The rst part of the treatment
involves the ltration of the water through a solid particle lter, followed by a 5 micron particle lter. Following this, the UV sanitises the
water which is then stored in the 230 litre RainSafe tank, ready for use. In order to maintain water quality, the ozone diffuser bubbles
ozone into the stored water in the tank. When the water is required, the outlet pump is activated and the water is passed through a nal
phase of ltration in order to remove the residual ozone prior to use.
Source Water
For the purpose of this manual, usage of the RainSafe and product claims relating to the machine source water may be understood as
rain, ground (other than well), surface water or treated municipal water which complies with the Inbound Water Parametric Requirements.
It does not include transitional waters (eg. estuarine, brackish or tidal waters) or coastal water or any other form of water other than
water dened as source water above.
Backup Water
Backup water may be understood as water that supplements the source water during periods of low water supply. Backup water for the
purposes of the RainSafe is municipal water only.
Ozone Industries Ireland Ltd make no warranty or representation as to the quality of or compliance of the municipal supply or any other
backup water supply with national or local regulatory requirements guidelines or standards for drinking water.
Backup water should be supplied to the RainSafe in accordance with the requirements of EN1717:2001(Backflow Prevention Device)
where appropriate and/or the equivalent standard for the prevailing local drinking water installation regulations and/or guidelines.
GUIDELINES FOR THE COLLECTION OF RAINWATER
Please refer to any relevant national or local guidelines or advice as regards the collection of rainwater. Ozone Industries Ireland Ltd does
not recommend or endorse any particular method/guidelines as regards the collection of rainwater.
It is strongly recommended and may be a legal requirement under relevant national laws to install a rst flush diverter or inlet lter as this
will be necessary to divert the contaminated rst flow of rainwater from roof surfaces. This is of particular importance in circumstances
where there may be elevated levels of chemical and/or microbiological contaminants in rainwater.
The company’s lter changing recommendations are based on using a rst flush diverter where rainwater is the source. Without one,
lters may need changing more frequently.
The RainSafe requires a suitable rainwater collection and storage system (rainwater harvesting system) to be available to supply
rainwater to the machine for treatment. A suitable rainwater harvesting specialist should provide the correct advice. At all times the
instructions and directions of the rainwater harvesting equipment supplier should be followed.
WATER QUALITY ISSUES: PRE AND POST TREATMENT OF SOURCE WATER
Pre-Treatment of the source water
Rainwater
If the source water comes from rainwater there may be considerable variability in the condition of the raw source water prior to being
treated by the RainSafe. For example, if there are elevated turbidity levels due to heavy rainfall after a period of drought, pre-ltration
of the source water would be necessary before treatment by the RainSafe. The use of bromine and/or iodine should be avoided in any
pre-treatment.
Municipal water
Municipal water will need to be chlorine free before entering the rainwater harvesting tank.
Sample testing
It is strongly recommended that a sample of the source water in all circumstances be collected and independently tested by an approved
laboratory before the RainSafe system is connected to such source in order to ensure compliance with the source water inbound
parametric requirements. The test should cover pH, total hardness, nitrates, nitrites, bromides and metals as a minimum.
Post-Treatment of the source water
If one is still concerned about the quality of water post-treatment by the RainSafe, it is recommended that a standard dip test or lab test
(carried out by an approved laboratory) covering pH, total hardness, nitrates, nitrites, bromide and metals to be taken. Additional ltration
may then be required depending on the test results.
There are local conditions that can affect the quality of the source water and it is the ultimate responsibility of the end user to inform
themselves of these conditions. The signicance of these conditions will determine whether or not it is necessary to install pre and/or
post treatment devices.
Warning: Biological Treatment*
The RainSafe is not intended for the treatment of water from an obvious or intentional source of contamination (such as
sewage or wastewater) to microbiologically safe drinking water.
All piping and distribution lines at the premises should be sanitized prior to consuming the water using proper sanitization
procedures (see your local health authority or equivalent for advice) in order to minimize the risk of contamination. The
RainSafe owner should independently verify the water outlet quality at the outlet by having it tested by an approved or
qualied water testing laboratory prior to consumption.
The RainSafe must be commissioned and maintained in accordance with this manual. Failure to properly maintain the
RainSafe will compromise performance, shorten the life of the RainSafe and may lead to delivery of contaminated water.
*NB: Consuming contaminated water could result in serious illness or possible death.
Warning: Operational
The RainSafe system must be installed in accordance with the national and/or local building and plumbing codes or
equivalent.
The RainSafe must be installed on a cold-water supply line only. Failure to do so may cause damage to the RainSafe leading
to personal injury and/or physical damage.
The RainSafe has been designed and tested to offer a reliable service, provided it is installed, commissioned, operated,
maintained and tested in strict accordance with the installation, operation and safety instructions contained in this manual.
Always wash hands thoroughly with soap and water before and after performing any servicing procedures on the RainSafe.
NB: Clean disposable gloves should be used when handling parts in the water path. Particular care must be taken not to
carry contamination from inlet to outlet side.
SAFETY WARNINGS
This indicates you must
read the manual before
operating the RainSafe.
Label located on front.
Warning: Read Manual
Warning electrical danger.
Label located on control
panel to indicate High
Voltage within.
Warning: Electrical Hazard
DANGER
High Voltage
Warning: Electrical Safety
The RainSafe must always be used with a grounded/ earthed power source. If you do not know whether the
outlet is grounded, check with a qualied electrician.
Do not plug in the RainSafe if water has been spilled on the exterior surface of the system.
The control panel contains 240V AC mains voltage.
There are no user serviceable parts inside. DO NOT OPEN THE CONTROL PANEL.
Warning: Electrical Safety
220-240 V AC electrical input, disconnect electrical supply before performing maintenance. Ensure that your
internal electrical network is grounded through an approved Ground Fault Circuit Interrupt (GFCI) receptacle
with RCD at 30 mA.
Warning: No Climbing
There is a risk of the RainSafe falling over so under no circumstances should anyone climb onto the machine.
Warning: UV Light
The RainSafe contains an active germicidal UV-C lamp. UV-C Radiation is dangerous for the eyes and skin
even in small doses. Read the maintenance instructions before opening the appliance. When the system is
active, this lamp must remain contained and sealed within the generator. The lamp should not be removed
or exposed without disconnecting the system from the electricity supply. Cotton gloves should be worn at all
times when removing and touching the UV lamp.
NOTE: The RainSafe must be disconnected from the electricity supply before replacing the UV-C Lamp. Do
not power UV lamp outside of the RainSafe generator. Never look at the lamp while it is operating.
Using the RainSafe with damaged generator housing may result in the escape of UV radiation.
If the generator housing is obviously damaged the RainSafe must NOT be operated.
Emergency Situation
Where there is a leak, flooding etc. switch off power at source and isolate water supply.
Warning: Chemical
The RainSafe should not be used for or relied upon for the reduction, treatment or removal of chemical
contaminants from the source water supply, or for the treatment of source water from an obvious, non-
obvious or intentional source of chemical contamination.
PARTICULAR COMPONENT PARTS
Danger: High Temperature
The Air Dryer operates at temperatures of up to 160°C. Do not touch metal surfaces during drying mode
or cool down period. Wait a sufcient time for the air dryer to cool down before handling. DO NOT TOUCH.
Danger: Electrical Safety
• Do not open or dismantle the ozone generator.
• There are no user serviceable parts inside the ozone generator unit. The Ozone Generator uses very high
voltages to generate ozone by corona discharge. Any contact with the corona discharge may lead to death
or serious injury.
• If the power cable is damaged, it must be replaced by the manufacturer or by their approved technical
installer so as to avoid any risk. Failures to replace the damaged power cable could result in an electrical
shock.
• Never pull on the power cable to detach the plug from the socket. Pulling on the cable could result in an
electrical shock.
The notes below are intended to highlight the dangers of exposure to UV radiation. To avoid this risk the UV
Lamp must only be operated when properly installed within the UV generator. Germicidal UV cannot pass
through clothing or other opaque or clear materials such as plastics or window glass.
NOTE: Exposure to UV light results in symptoms that develop slowly, the exposure cannot be felt at the time.
Symptoms:
Eyes: Mild exposure – irritation developing several hours later. Severe exposure – sore, red eyes, sensitive to
light, painful to keep eyes open.
Skin: Mild exposure – slight reddening, tenderness, mild sunburn symptoms. Severe exposure – skin peeling,
weeping area, severe sunburn symptoms.
First Aid:
Eyes: In mild cases, cover eyes and seek medical attention. Severe cases seek immediate medical attention.
Skin: In mild cases removal from exposure may be sufcient. If in doubt seek medical attention. In severe
cases, seek immediate medical attention.
DANGER
High Voltage
Home screen:
Line 1 displays the software version of the machine
and the time.
Line 2 shows the reading from the machines ORP
sensor, the level of water in the tank and the rate of
flow of incoming water (Will be 0LPM unless water
is being treated).
Line 3 shows the machine status, the temperature
of the water and the reading from the Ozone sensor.
Status Values Meaning
Inactive - Machine is preparing to be active
Active - Machine is monitoring water quality, no treatment taking place
Warmup - System is preparing to treat incoming water. UV lamp is warming up
Fill - Inlet pump and lamp are on, water treatment in progress
Cooldown - System has nished treating incoming water. Inlet pump is off and lamp is cooling down
Ozone On - Water is being ozonated
Drying - The dryer is operating; no water treatment may take place. Water is available
Cooling - The dryer is cooling; no water treatment may take place. Water is available
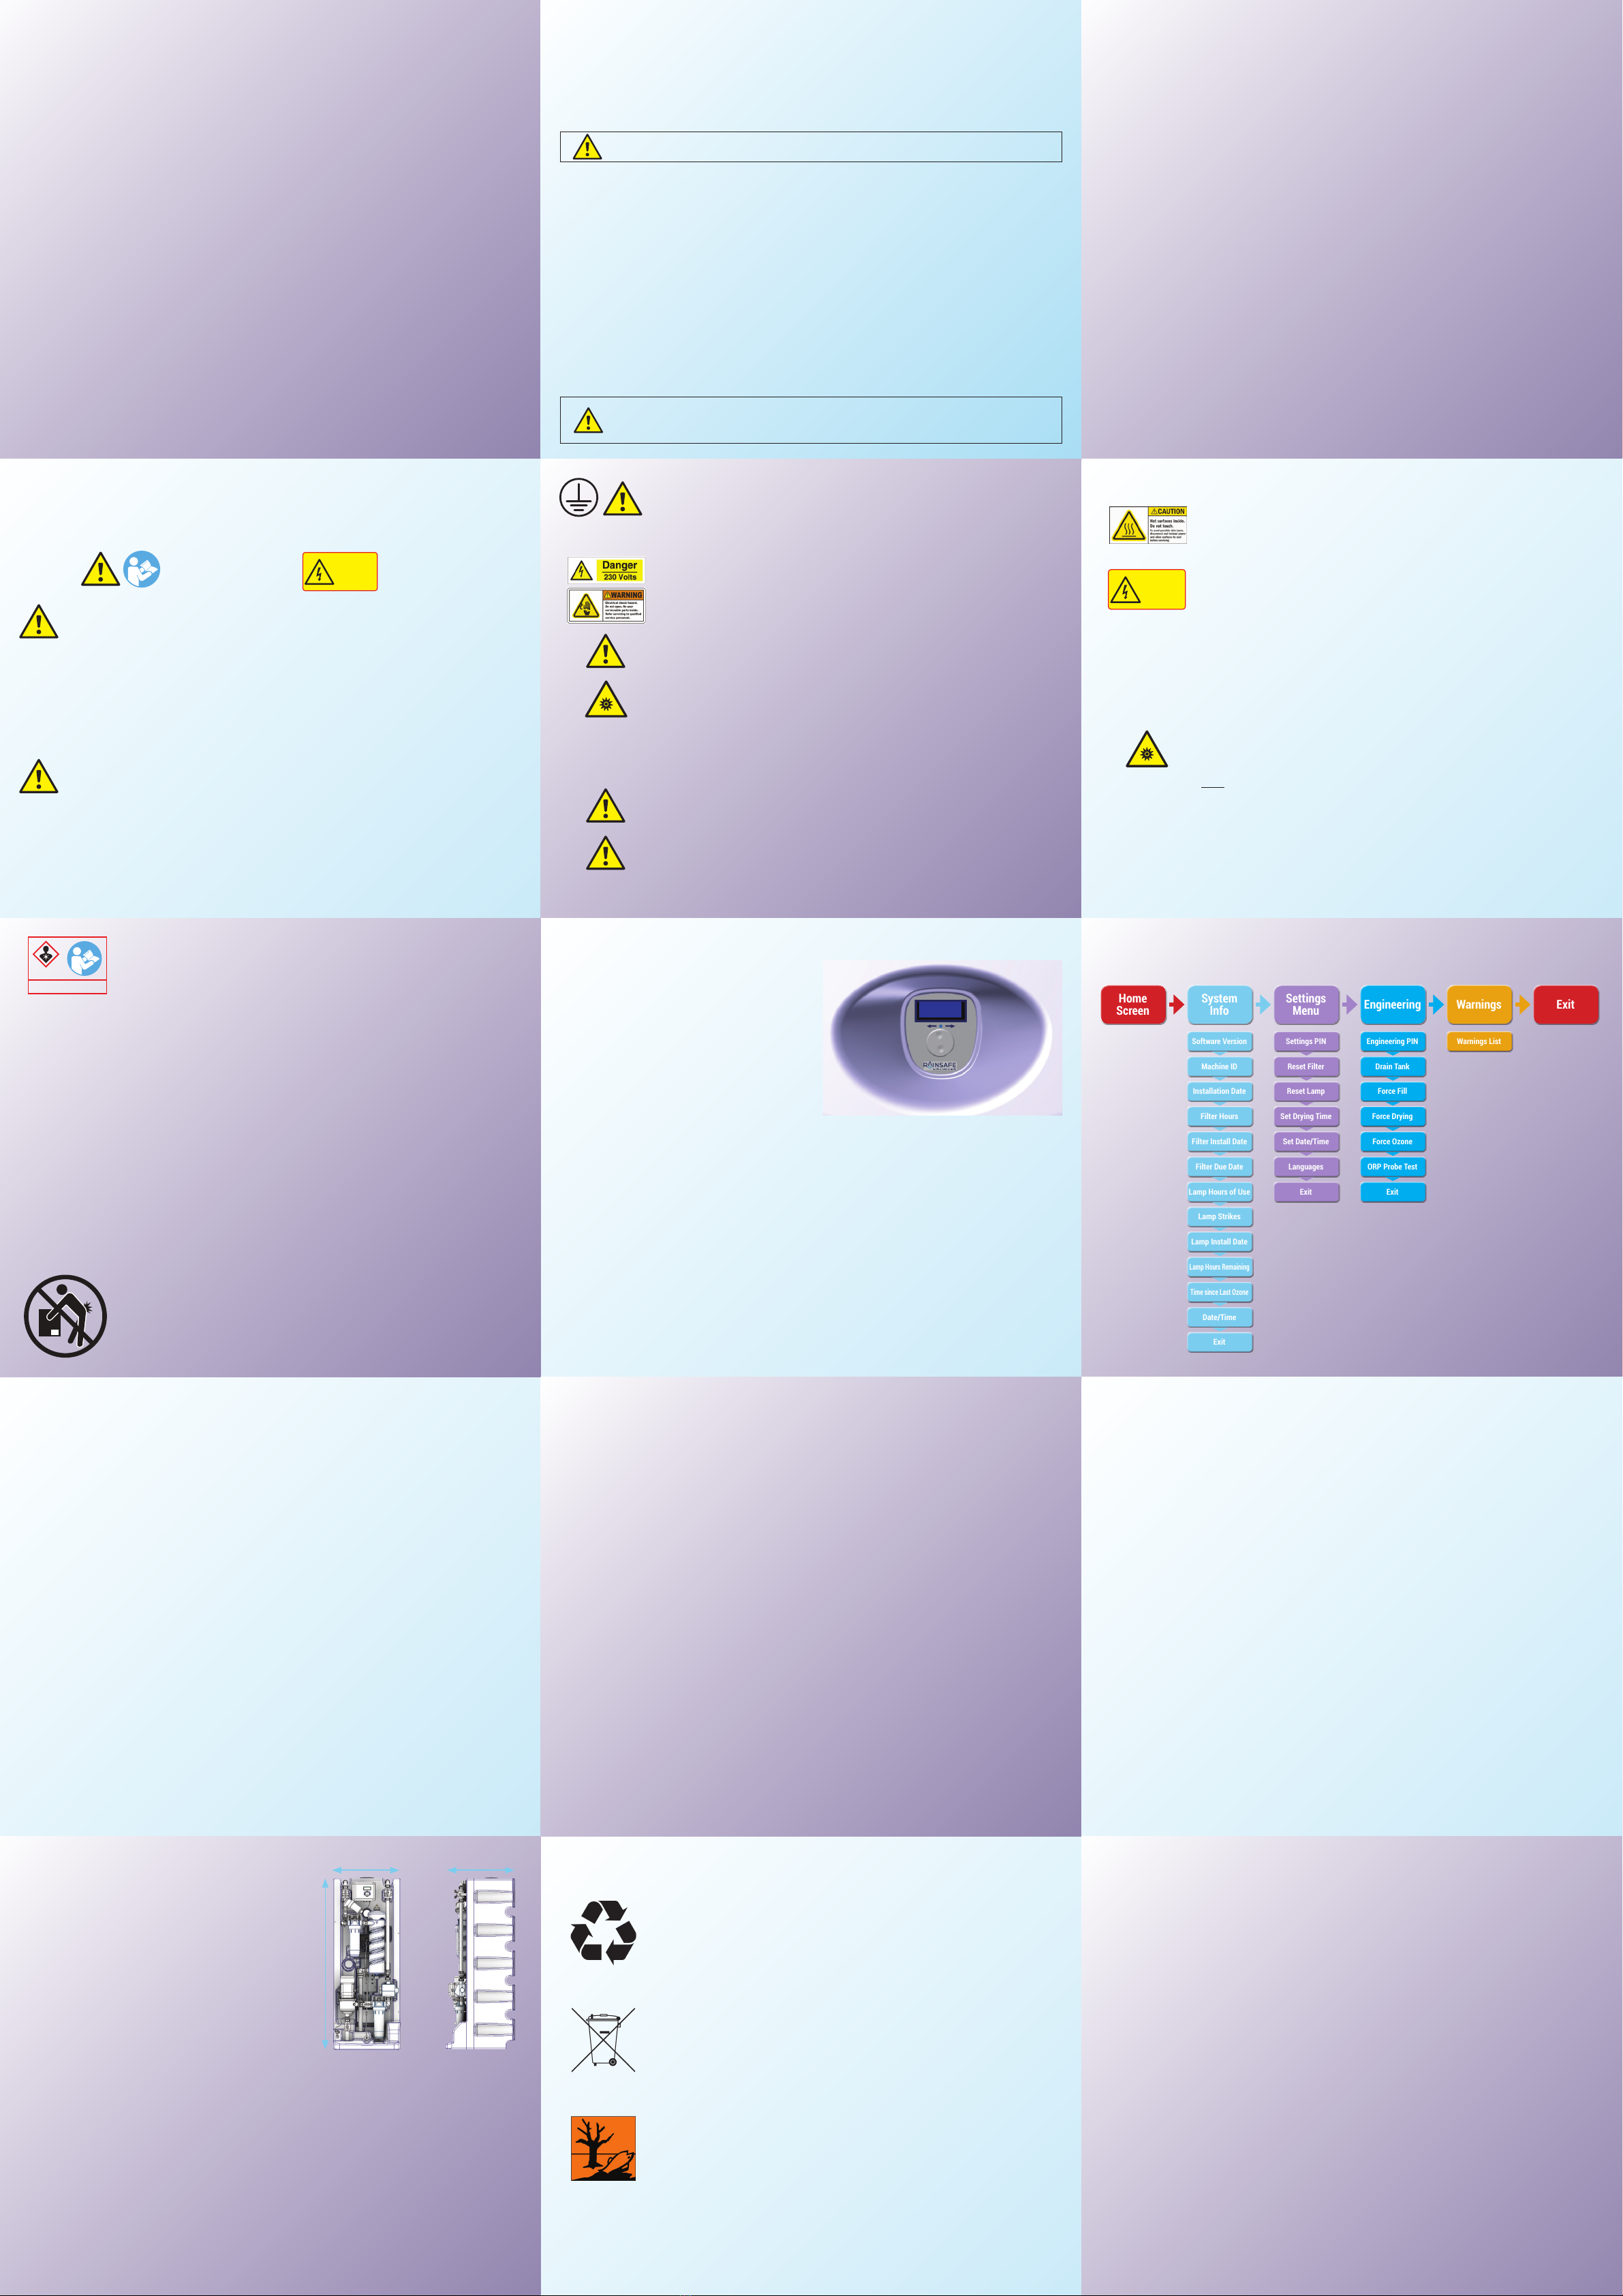
CONTROL PANEL SCREEN AND STATUS VALUES MEANING: MENU MAP: THIS IS THE STRUCTURE OF THE RAINSAFE
MENU ACCESSIBLE FROM THE CONTROL PANEL
Home
Screen System
Info Settings
Menu Engineering Warnings Exit
Settings PIN
Reset Filter
Reset Lamp
Set Drying Time
Set Date/Time
Languages
Exit
Engineering PIN
Drain Tank
Force Fill
Force Drying
Force Ozone
ORP Probe Test
Exit
Warnings ListSoftware Version
Machine ID
Installation Date
Filter Hours
Filter Install Date
Filter Due Date
Lamp Hours of Use
Lamp Strikes
Lamp Install Date
Lamp Hours Remaining
Time since Last Ozone
Date/Time
Exit
Error - Lamp Fail - The RainSafe lamp has failed. The system cannot treat any more water until a new lamp has been installed and the
Lamp timer has been reset. See “Changing the UV Lamp” for instructions on how to resolve this issue.
Error - No Flow - The RainSafe has detected that water is not flowing at the inlet. The treatment system will remain shut down until such
time as this error is resolved.
Error - High Flow - The RainSafe has detected water is flowing too quickly at the inlet to allow adequate UV treatment to take place. Water
inlet is disabled and water will be unavailable at the outlet until such time as this error is resolved. Contact your RainSafe service agent.
Error - Fill timeout - The RainSafe system has been constantly treating water for 30 minutes without registering as being full. As a
precaution to guard against leaks it has shut down. If you are satised that the system has been operating correctly then this error may
be cleared by selecting “clear error”.
Error - Unexpected Flow - The RainSafe has detected a flow of water while the UV system is not active. The system will shut down to
prevent delivery of water until such time as the problem has been resolved. Contact your RainSafe service agent.
Error - Ozone Fail - The RainSafe has not detected an improvement in water quality after the Ozone generator has been switched on for
30 minutes. Possible causes include: Poor source water quality; Air dryer exhausted; Ozone system failure; ORP probe disconnected;
ORP probe faulty. If the error persists after manually triggering a drying cycle and checking the ORP probe connection, contact your
RainSafe service agent.
Error - Level Detection - The RainSafe has detected a problem with its internal water level sensors. The system cannot treat any more
water until this issue is resolved. Please contact your local service agent.
Error - Filter expired - The RainSafe Filters have not been replaced within the recommended time frame. The system cannot treat any
more water until new lters have been installed and the lter timer has been reset. See “Changing the Filters” for instructions on how to
resolve this issue. If this error arises after lters have been changed this indicates that the timers were not reset. Follow the procedure
“New lter” under “Settings Menu” to resolve.
Error - Lamp Expired - The RainSafe Lamp has not been replaced within the recommended time frame. The system cannot treat any more
water until a new lamp has been installed and the Lamp timer has been reset. See “Changing the UV Lamp” for instructions on how to
resolve this issue. If this error arises after the lamp has been changed this indicates that the timer was not reset. Follow the procedure
“New/Reset Lamp” under “Settings Menu” to resolve.
Error - CD Power Fail - The system has detected that the Corona Discharge unit is not operating within its power specication. Water
treatment is not possible until this situation is resolved.
Error - Water Unavailable - This error indicates that the water level in the tank has fallen below 60L. This mechanism prevents air-locks
from affecting the outlet pump. The machine will continue to ll and store water. Water Outlet Pump remains disabled until the error is
cleared.
When properly installed, the ozone (O3) used in the RainSafe is contained within the
system and any excess is vented to the outside atmosphere by the overflow pipework
and reverts naturally to oxygen (O2). Always ensure the RainSafe is operated with the
lid closed and with the combined overflow/ vent pipe vented to outside.
Do not attempt to move the RainSafe when full. The RainSafe is NOT designed to
be moved or lifted by hand. The use of a trolley is the only recommended means of
moving or handling the RainSafe. Drain the RainSafe of water before attempting to
move it and always use appropriate lifting and handling equipment. Use an authorized
RainSafe technician to disconnect the system. The RainSafe weighs approximately
55kg empty, 300kg when full with water, and has a low centre of gravity.
In the event of an ozone gas escape and build up within the building, switch off the
RainSafe and ventilate the area.
NOTE: The RainSafe should always be placed in a well ventilated area. Prolonged
exposure to high concentrations of ozone gas can cause headaches and illness.
Ozone gas has a strong characteristic smell.
Warning: Exposure to ozone above 0.10ppm (parts per million) for eight hours per
day could be dangerous and should be avoided.
Symptoms: problems associated with ozone gas exposure include lung irritation and
infection, breathing pain, coughing, wheezing, headaches, minor eye, nose and throat
irritation, permanent lung damage.
First Aid: For mild exposure – leave affected area and breath some fresh air until
breathing has returned to normal. If breathing problems continue seek medical
attention for oxygen inhalation. For severe exposure – seek medical attention
immediately.
ERROR CODES TROUBLE SHOOTING
NO WATER AT TAP
Ensure all valves on RainSafe are open and the machine is turned ON.
Check the control panel display. Please refer to “RainSafe Error Codes” to determine solution to this
problem.
Check the outlet pump - press reset on the pump controller (refer to Genyo Pump Controller Manual).
If the tank has run dry, you may need to loosen the bleed screw on the outlet pump to vent air and resolve
an air locked pump.
If problem persists contact your RainSafe Service agent.
LOW WATER FLOW AT TAP
Ensure all valves on RainSafe are open.
Check that the outlet pump is running normally and is not air locked.
If water flow has gradually deteriorated, check that the outlet lter has not blinded.
NO POWER IN UNIT
Ensure RainSafe is turned ON. Ensure there is power to the supply socket. If the problem cannot be found
contact RainSafe service agent.
SCREEN DISPLAYS FILTER DUE
The lters installed in the RainSafe will soon require replacement. You may need to order new lters from
your distributor to see the date by which the lters must be replaced, check the value for “Filter due date”
in the “System Info” menu
SCREEN DISPLAYS FILTER DUE, SYSTEM DISABLE XX HRS
The lters installed in the RainSafe are about to expire. If new lters are not installed within the required
time then the system will shut down.
TROUBLE SHOOTING
SCREEN DISPLAYS LOW FLOW
The RainSafe has detected that there is a low volume of water flowing into the system. Follow these steps
to resolve this issue:
Check that inlet and outlet valves are fully open.
Check for any blockage of the source water supply.
Check that the inlet pump is operating correctly.
Check the inlet lter and replace if necessary
SCREEN DISPLAYS LAMP DUE
The UV Lamp installed in the RainSafe will soon require replacement. You may need to order a new lamp
from your distributor to get an indication of when the lamp must be replaced, check the value for “Lamp
hours remaining” in the “System Info” menu
SCREEN DISPLAYS LAMP DUE SYSTEM DISABLE XXHRS
The UV Lamp installed in the RainSafe is about to expire. You may need to order a new lamp from your
distributor if a new lamp is not installed within the required time then the system will shut down
SCREEN DISPLAYS HIGH FLOW
There is a problem with the inlet flow rate please contact your local RainSafe service agent to arrange a
repair.
WATER LEAKING FROM FILTER
Check O-ring held in lter housing is clean and properly seated. See “Changing the Filters”.
WATER LEAKS FROM ELSEWHERE IN THE SYSTEM
Turn off system and contact local service agent.
TECHNICAL SPECIFICATION OF RAINSAFE
Protection Level: IP 40.
Working ambient temp: Min. +5ºC to max. +35ºC.
Max outlet. flow: 50 L/min.
Max. Head: 46 meters.
Liquid temp range: from +5ºC to max. +25ºC.
Max. working pressure of the RainSafe outlet: 4.6 bar (460kPA).
Min. inlet flow: ≥5 L/min.
Min. inlet pressure: 2.0 bar;
Max. inlet pressure:6.0 bar.
Source water inlet connection: 1” BSP F. Potable outlet
connection: 1” BSP F.
Technical/ Electrical Data
220-240 V AC/Single Phase / 50Hz.
IP x 1
Relative Humidity: 75% (non-condensing).
Altitude: between 170m(550ft) below sea level and 4,887m
(15,000ft) above sea level.
RainSafe Dimensions:
CONDITIONS FOR USE
The RainSafe is designed to operate under the following conditions:
Operating Voltage: 220-240 V 50 Hz 13 A.
INDOOR USE ONLY and it must be protected from freezing.
Room temperature 5ºC to 35ºC (41ºF – 95ºF).
DO NOT place in direct sunlight, conservatory, sunroom etc.
For the treatment of cold water only (to a maximum of 25ºC).
Inbound Source Water Parametric Requirements:
(1) UVT (UV Transmittance) ≥ 80% ,
(2) Turbidity ≤ 1 NTU,
(3) TOC (total organic carbon) ≤ 4mg/l,
(4) TSS ≤ 1mg/l
(5) Chlorine free water,
(6) pH 6.5-8,
(7) Bromides < 5µg/l.
Elevation of the highest water withdrawal outlet
must be no higher than 15m above the elevation
of the RainSafe footing; otherwise the outlet
pump controller will need to be adjusted (see
Lowara Genyo Pump Controller Manual).
A: 583mm (Width)
B: 1500mm (Height)
C: 605mm (Depth)
Weight (Empty): 52Kg
Weight (Full) : 300Kg
(Approximately)
B C
A
ENVIRONMENT
DISPOSAL
An environmentally friendly method of disposal will ensure that valuable raw
materials can be removed and used again. When the RainSafe has reached the end
of its working life, unplug it from the mains and disconnect from plumbing system.
Most of the materials used in manufacturing the RainSafe can be recycled.
DISPOSAL OF RAINSAFE
Do not dispose of the RainSafe as standard waste. Any disposal of the RainSafe
must be carried out in accordance with the WEEE Directive (2012/19/EU) and the
applicable national and local regulations if discarded within the EU. Please bring to
your local collection point.
DISPOSAL OF LAMP
The RainSafe lamp should be disposed of at your local recycling centre. NB: DO NOT
dispose of lamp with domestic waste as it contains a small amount of mercury.
DISPOSAL OF FILTERS
Used lters can be disposed of with household waste.
COMPANY DETAILS
A current list of distributors and service organisations can be found at www.rainsafewater.com/distributors
or contact support@rainsafewater.com
Ozone Industries Ireland Ltd. t/a RainSafe Water
Block 2,
Newtown Business and Enterprise Park,
Newtownmountkennedy,
Co. Wicklow, A63 XV26, Ireland
DATA PROTECTION
Please see www.rainsafewater.com for details on the Company’s policies as regards Data Protection.
PATENTS GRANTED AND PENDING FOR THE RAINSAFE
The RainSafe machine is subject to patented (patents pending) technology on a global basis.
Please see www.rainsafewater.com for the most up to date patent list.
WARRANTY
Please see www.rainsafewater.com for details on the warranty relating the product and consumable parts.
YOU CAN DOWNLOAD THE MOST UP TO DATE RAINSAFE
MANUAL FILE AT WWW.RAINSAFEWATER.COM
NB: the water is not suitable for health care use (medical/surgical) or for use by Immunocompromised persons.
NOTE:
Where the backup water contains chlorine (municipal), a carbon lter
must be nstalled before the water is supplied to the RainSafe storage tank.
P/N: 400.021


