OzSpy CCJDV019 User manual

HD Spy Security Hidden Camera
with built in DVR
(CCJDV019)
This product is handheld micro device, recording audio and video information. Besides the
function of common cameras such as taking photos manually or recording video, it also has
many new features such as pre-record function triggered by motion detection or remote
control. The product supports the extension of large capaticy Micro SD cards, making it easy to
access and read data.

Content
Accessories 3
Parameters 3
Safety Instructions 4
Product Size 4
Structure 5
Installation 5
Charging 5
Setting the unit 6
Instructions for Use 7
Taking photo/video manually
Detection Function
Important
Remote Control
Connect to PC and access files
Reset
Operation Indication
Instructions for interface 10
Notes on maintenance 10
FAQ 11
Certificate 11

1. Accessories
Smart camera
Remote control
Adapter
User Manual
USB cable
Micro SD card
IR extension for remote control
AV Line
Bracket
Screws
Button pen
2. Parameters
Pixel
5,000,000 color CMOS
Video Format
AVI
Photo Format
JPEG 2592*1944 pixels
Camera Lens
Color pinhole
Focal distance
0.6m-infinity
TV system
NTSC/PAL
Memory extension supported
Up to 32 GB
Resolution
HD, DI, VGA (optional)
Detection sensitivity
Software setting Levels 1, 2, 3, 4, 5
Pre-record time
3 seconds before motion detected
Distance of remote control
8 meters
Power consumption
420mA for record, 270 mA for standby
Power supply
Input: 100-240V, Output: 5V, 800mA
Battery
Li-battery, 3.7 V, 720 mAH
Record time display
Available
View Angle
About 45”
Minimum illumination
10 Lux
Size of video file
12M per minute
Auto file-overwriting
Available
Battery working time
About 2 hours
Battery charging time
About 2 hours
Operation temperature
-10 C -50 C
Operation humidity
20% - 80 80%
Dimensions
101*32*28mm

3. Safety Instruction
Please read these instructions before using the product.
Since this product is controlled by a microcomputer chip, it is normal that system halt
may occur if users operate it incorrectly. In this case, restart the device or reset it.
Please refer to the following instructions for detailed handling methods.
This product is neither waterproof nor dust proof and therefore it cannot be used
outdoors or in adverse environment.
Please adopt original DC power supply to avoid causing device damage or electric shock
or fire.
Unauthorized dismantlement of the device or replacement of device parts is forbidden.
The manufacturer will not be responsible for any loss arising from such actions.
The built-in battery cannot be dismantled or discarded at will and it shall be handled by
appointed recycling stations.
Do not put the device body or battery into fire, oven or microwave oven, in order to
avoid explosion.
As a result of version changes, the user manual may be different from the real product.
Please take the real product as the standard.
4. Product Size

5. Structure
6. Installation
Insert a micro SD card (up to 32GB)
Install the bracket and use screws to fix it on anywhere you need.
Connect the local power plug to the mini USB port of the device to charge the built-in
battery. The recharging indicator is red, once it is fully charged, the indicator turns off.
Insert the IR extension and fix up the IR extension on the suitable place for easily remote
controlling.
After the product is placed, its angle can be adjusted about 70 degrees forwards or
backwards. Try to record and check the picture angle by reading the micro SD. You can
also use the AV cable instead of IR extension to view the real time picture on TV.
7. Charging
Please charge the device when it is used for the first time or no battery power.
The charge time is equal to or longer than two hours (after complete discharge)
Because low battery may result in inability to start up or system halt, it is suggested
charge the device after using. When the battery is low, the device will shut down
automatically.

This product features automatic save in the case of power outage. If needed for
continuous long time use, please insert power adaptor. To lengthen battery life, the
batteries shall be charged and discharged completely twice every 2 months.
The chargeable battery belongs to consumables and its capacity will decrease as the
duration of service.
8. Setting the Unit
Connect the device to the computer with a USB cable.
Open “My Computer” and you will find a mobile hard disk, double click the “DvXSet.exe”
then do the following:
A. Date: click “year-month-date” click the arrow up/down to adjust.
B. Time: click “hour: minute: second” after turning blue, click the up/down to adjust.
C. Date/Time/Format: “YY/MM/DD”, “DD/MM/YY”, or “MM/DD/YY”
D. MD Sensitive: choose the motion sensitivity (5 is the most sensitive, 3 is suggested)
E. Light Frequency (Hz): choose light frequency. Normally, it is 50Hz in Europe and
China, 60Hz in America and Japan.
F. Image Quality: High-HD, Standard D-1, Low-VGA (the default value is high)
G. Overwrite: “ON” means it overwrites when the memory card is full. “OFF” means no
overwrite (the default is ON)
H. Bell: “ON” means by pressing the button on the remote control, the device will
produce a sound. “OFF” means no sound.

9. Instructions for Use
Taking photo/video manually
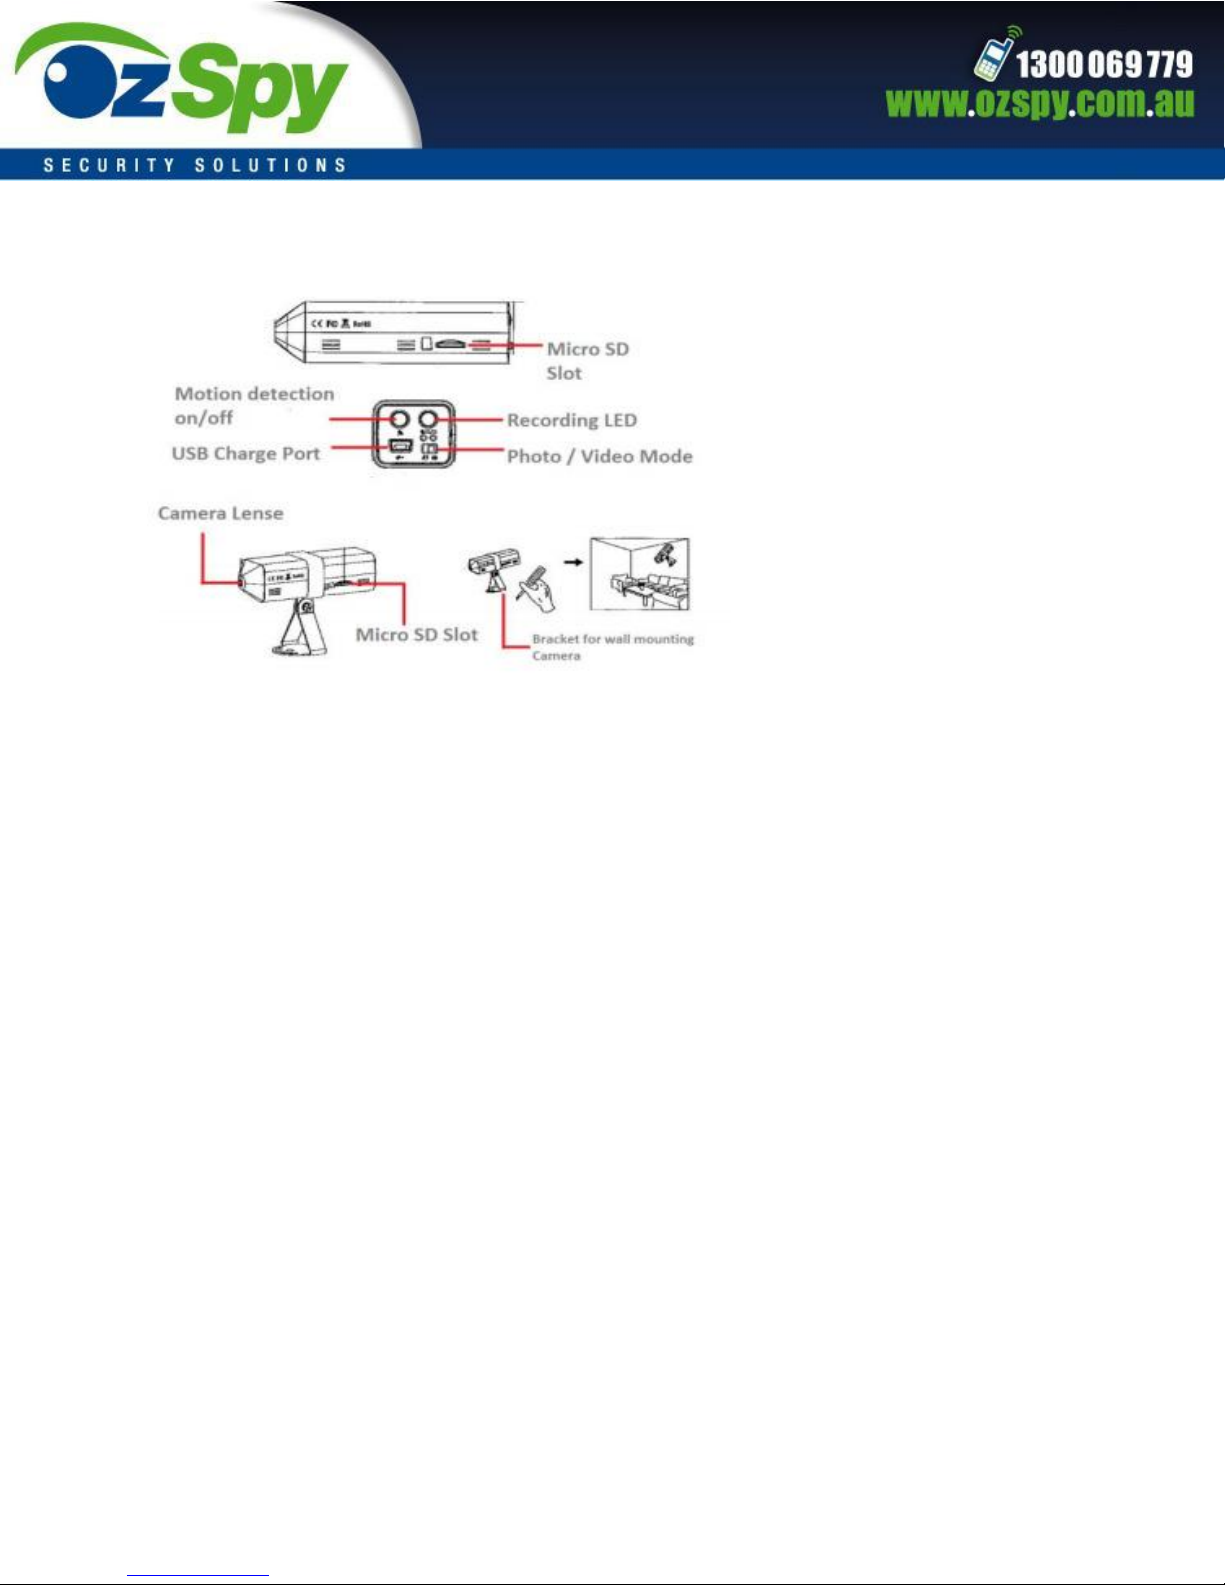
1. Press the Power/Photo/Video button for 5 seconds to start up the device. Change the mode
switch to Photo mode, then the blue/green light will illuminate.
2. Short press the Power/Photo/Video for one second to start taking photos manually. Every
time the key is pressed, the blue indicator light will flash.
3. Change the mode switch to Video mode, press the Power/Photo/Video for one second to
start recording video manually. The blue light will turn off indicating video recording has
started. Files will be saved every 15 minutes.
4. Press the Power/Photo/Video again to stop the recording, the blue light will lit up again.
Importance Notice:
Please note that the MIN 10 LUX is a must. Otherwise, motion detection could not be
exact.
If you want to power off the camera, press and hold the Power/Photo/Video for 3-5
seconds until blue light flashes and release it.
Detection Function - Press the motion detection button to enable this function.
Video Mode
When motion is detected, the blue light will turn off and device will start recording. If
there is any motion in 15 seconds, it will continuously record. It will save the video file
every 15 minutes and generate another recording file. If there is no motion in 15
seconds, it will save the file and will stop the recording.
Photo Mode
When motion is detected, the camera will take 3 photos and the blue indicator will flash
3 times. Press the motion detection button to disable the function and the blue status
light will illuminate again.

Important
In the video mode, the shortest recording time is 18 seconds. When the object captured
in the lens moves continuously, the device will keep recording and the longest time will
be 15 minutes.
When the detection function is enabled, video-recording and photo taking manually are
disabled
When keys are pressed, the device will give out “tick” sound
When the device records video and takes photos under the detection condition, press
the Power/Photo/Video button to stop and save the current recording but not to quit
the detection mode.
If the device is connected to the power supply, short press the Power/Photo/Video
button to turn the device on. If using batteries, hold down the button for 5 seconds to
power on the device. To switch off the device, hold down the button again.
Remote Control operation
Button A –manual recording
Button B - stop recording
Button C –enable motion detection mode
Button D –disable motion detection mode
1. When using the remote control, aim to the IR extension on the main unit. Press A, C
buttons, the unit will make two tick sounds. Press B, D buttons and the unit will make
one tick sound. The unit will enable appropriate functions.
2. When manual recording is enabled, the unit will continuously record until you stop it
or micro SD card is out of memory (recording will stop when “overwrite” is OFF). New
files will be generated when recording time exceeds 15 minutes.

Tips:
The remote control uses infrared, so the receiver module only receives the light wave
emitted by straight emission line. When the emission head or receiver module is
blocked or the light wave emitted by the emission head can’t be received, the remote
control will fail to function.
Low voltage of the batteries installed in the remote control will shorten the remote
control distance. Please replace the batteries in time.
When the remote control is out of service for a long time, remove the batteries to avoid
circuit damage.
Connecting to PC
Connect the device with the computer by USB cable.
In “My Computer”, find the removable disk and double click it to open it, to display the
files saved in the SD card. Such files can be copied, deleted, moved or the disk can be
formatted.
You can also choose to take out the micro SD card. Select a proper card reader to read
the data stored in the card.
After disconnecting the camera with the PC, the blue indicator will be on and the
camera will be in stand by status.
Reset
If the camera doesn’t work, use something thin and pointed and hold the reset button
for3 seconds to reset the device.
Light Indicator
Indicator
Status
Meaning
Recharging Indicator
Red
Charging
Recharging Indicator
Off
Battery is fully charged
Status Indicator
Green and then blue ON
Power on and Standby
Status Indicator
Blue and flash once
Taking photo
Status Indicator
Blue and then green
Recording video
Status Indicator
Flash quickly and then Off
Low power

10. Instructions for Interface
When the device is connected to the TV, the following will appear
means the device is under recording mode
means the device us under photo mode (optional)
means the device is recording
Present time and date
Recording time and date
Motion detection
Note: After connecting the device to TV, if the picture is black and white, we suggest you
change the system to be “NTSC” or PAL”. Then, it should be colored.
11. Notes on Maintenance
A. This device is equipped with infrared remote controller. The reception may be affected or
operation does not work in the following cases:
Objects hindering the receiver or remote controller
The remote controller deviating from the receiver too much (the horizontal and vertical
reception angle of the receiver approx. 90 degrees)
The distance between the remote control and receiver is too far (within 8 meters
recommended)
Low battery of the remote control
B. If the remote control is not in use for a long time, the batteries should be taken out to avoid
eroding circuits.
C. When the device is working or it is started up, the micro SD card cannot be take out to avoid
damaging the card, device or files.
D. Please check the machine regularly. If any abnormal performance is detected, please check
the power or press “RESET” to reset the machine.

E. To avoid false motion-triggering, please avoid putting the product straightly to strong light.
F. If the product is used to watch out of the window, the motion sensitivity may be decreased,
or there will be false triggering due to glisten of the glass.
G. In low-light condition, or the moving object being same color as the background, the
sensitivity may be decreased.
12. FAQ
The device cannot record
Please check if the micro SD card was inserted correctly.
The device would not start up
-You might have pressed the Power/Photo/Video too short, generally you should
press the power button for 5 seconds to power on the device.
-Check if the device has low battery or does not connect to the external power supply
via USB port.
-You may reset the camera to start up again.
Computer does not recognize the device
-Check if both ends of the USB cable are connected properly to the computer and the
device
-Check if the device is powered on
Video files cannot be played
Check if your player is updated. Otherwise, please go to the “Windows” website or
related websites to download.
13. Certificates
This product conforms to CE/FCC/RoHS.
Table of contents
Other OzSpy Security Camera manuals