Packard Bell Easy DVD Recorder User manual

User's Guide………………………………. 01
Guide de l'utilisateur…………………….. 43
Guía del usuario………………………….. 89
Gebruikershandleiding………………….. 133
Guida Utente……………………………… 175
Benutzerhandbuch……………………….. 217


1
ENGLISH
Table of Contents
I. Notices..................................................................................2
II. Precautions............................................................................3
Safety and operating precautions..........................................3
Disc care.............................................................................3
III. Specifications.........................................................................4
Easy DVD Recorder specifications.........................................4
Disc specifications................................................................5
Special features ...................................................................7
IV. Getting Familiar.....................................................................8
Remote Control....................................................................8
Features of your Easy DVD Recorder...................................10
V. Setting up............................................................................12
Connecting to TV ...............................................................12
Watching TV via the Easy DVD Recorder.............................13
Connecting to an amplifier .................................................14
Connecting Input AV signal using SCART IN........................16
Connecting Input AV or DV signal.......................................17
VI. Using your
Easy DVD Recorder
..............................................18
Playing Discs.....................................................................18
Controlling playback..........................................................20
Parental lock .....................................................................24
System menu .....................................................................25
TV channel setting..............................................................26
Recording .........................................................................28
Time settings......................................................................30
Editing DVD+R / DVD+RW discs........................................32
VII. Troubleshooting ...................................................................37
VIII. Standards and Certifications..................................................39

Easy DVD Recorder User's Guide
2
I. Notices
COPYRIGHT NOTICE
Packard Bell
Easy DVD Recorder
User’s Guide. Copyright© 2004 NEC Computers International
B.V. All Rights Reserved. No part of this manual may be reproduced or transmitted, in any form or
by any means, whether electronic, chemical, manual or otherwise, including but not limited to
photocopying, recording, or information storage and retrieval systems, for any purpose without
prior written permission of NEC Computers International B.V.
DISCLAIMER
NEC Computers International B.V. specifically disclaims all warranties, either express or
implied, including, but not limited to, implied warranties of merchantability and fitness for a
particular purpose with respect to this product and documentation.
Updates to software and hardware components are made regularly. Therefore some of the
instructions, specifications and pictures in this documentation may differ slightly from your
particular situation. All items described in the documentation supplied with the product are for
illustration purposes only and may not apply to your particular situation. No legal rights or
entitlements may be obtained from descriptions made in the documentation. NEC Computers
International B.V. reserves the right to revise or make changes or improvements to this product
or documentation at any time without obligation to notify any person of such revisions or
improvements.
In no event shall NEC Computers International B.V. be liable for any consequential or
incidental damages, including but not limited to loss of business profits or any other
commercial damages, arising out of the use of this product.
TRADEMARKS
Packard Bell is a registered trademark of NEC Computers International B.V. All other company
or product names are trademarks, registered trademarks or service marks of their respective
owners.
Manufactured under license from Dolby Laboratories. “Dolby”, "Pro Logic", and the double-D
symbol are trademarks of Dolby Laboratories. Manufactured under license from Digital Theater
Systems, Inc.
DTS and DTS Digital Surround are trademarks of Digital Theater Systems, Inc. protected by
U.S. and other world-wide patents issued and pending.

Easy DVD Recorder User's Guide
3
II. Precautions
Safety and operating precautions
Power requirement for this device is AC 220-240V, 50/60 Hz. Please ensure the power
supply to your home is in this range.
The temperature of the top cover and rear panel of the recorder may be high after playing
for a long period of time. This is normal.
When the recorder is not in use, please remove the disc and turn the power off.
Malfunctions may occur if the recorder has not been used for a long period of time. For
best results, turn it on occasionally.
Some kinds of discs may cause the unit to hang or freeze. Please restart the unit when
this occurs. Wait at least 10 seconds before restarting to extend the life of the recorder.
This DVD recorder is a device of high technology and high precision. The image quality
may be impaired when the laser head or the disc driving parts are dirty or damaged.
Do not use the
Easy DVD Recorder
where condensation may form easily, as this may
damage the disc and inner parts of the recorder.
Place the device in a location with adequate ventilation to prevent internal heat build up.
Use a soft and dry cloth for cleaning. For the stains that cannot be removed easily, apply
some diluted neutral detergent to a cloth, wring the cloth dry and wipe the stains away,
then use a dry cloth to clean. Do not use any solvents such as thinner or benzene; as this
may damage the
Easy DVD Recorder
.
Disc care
Periodically clean the disc to remove any dust or fingerprints. Use a soft, scratch-free
cloth or a commercial disc cleaner.
To keep the disc free of fingerprints, hold the disc with your fingers on the outer edge or
with a finger in the inner circle and a finger on the outer edge.
Always return the disc to its protective case or sleeve when you have finished using it.
Keep the disc tray closed whenever you are not using the drive.

Easy DVD Recorder User's Guide
4
III. Specifications
Easy DVD Recorder
specifications
This device adopts LSI's new generation encode-decode integrative single chip solution,
which enables to encode the TV RF signal, AV input signal from external equipments or
digital signal from iEEE1394 equipment in MPEG-2 format, and record on DVD+RW or
DVD+R discs. It also adopts LSI' unique DominoFX image processing technology,
providing excellent image quality.
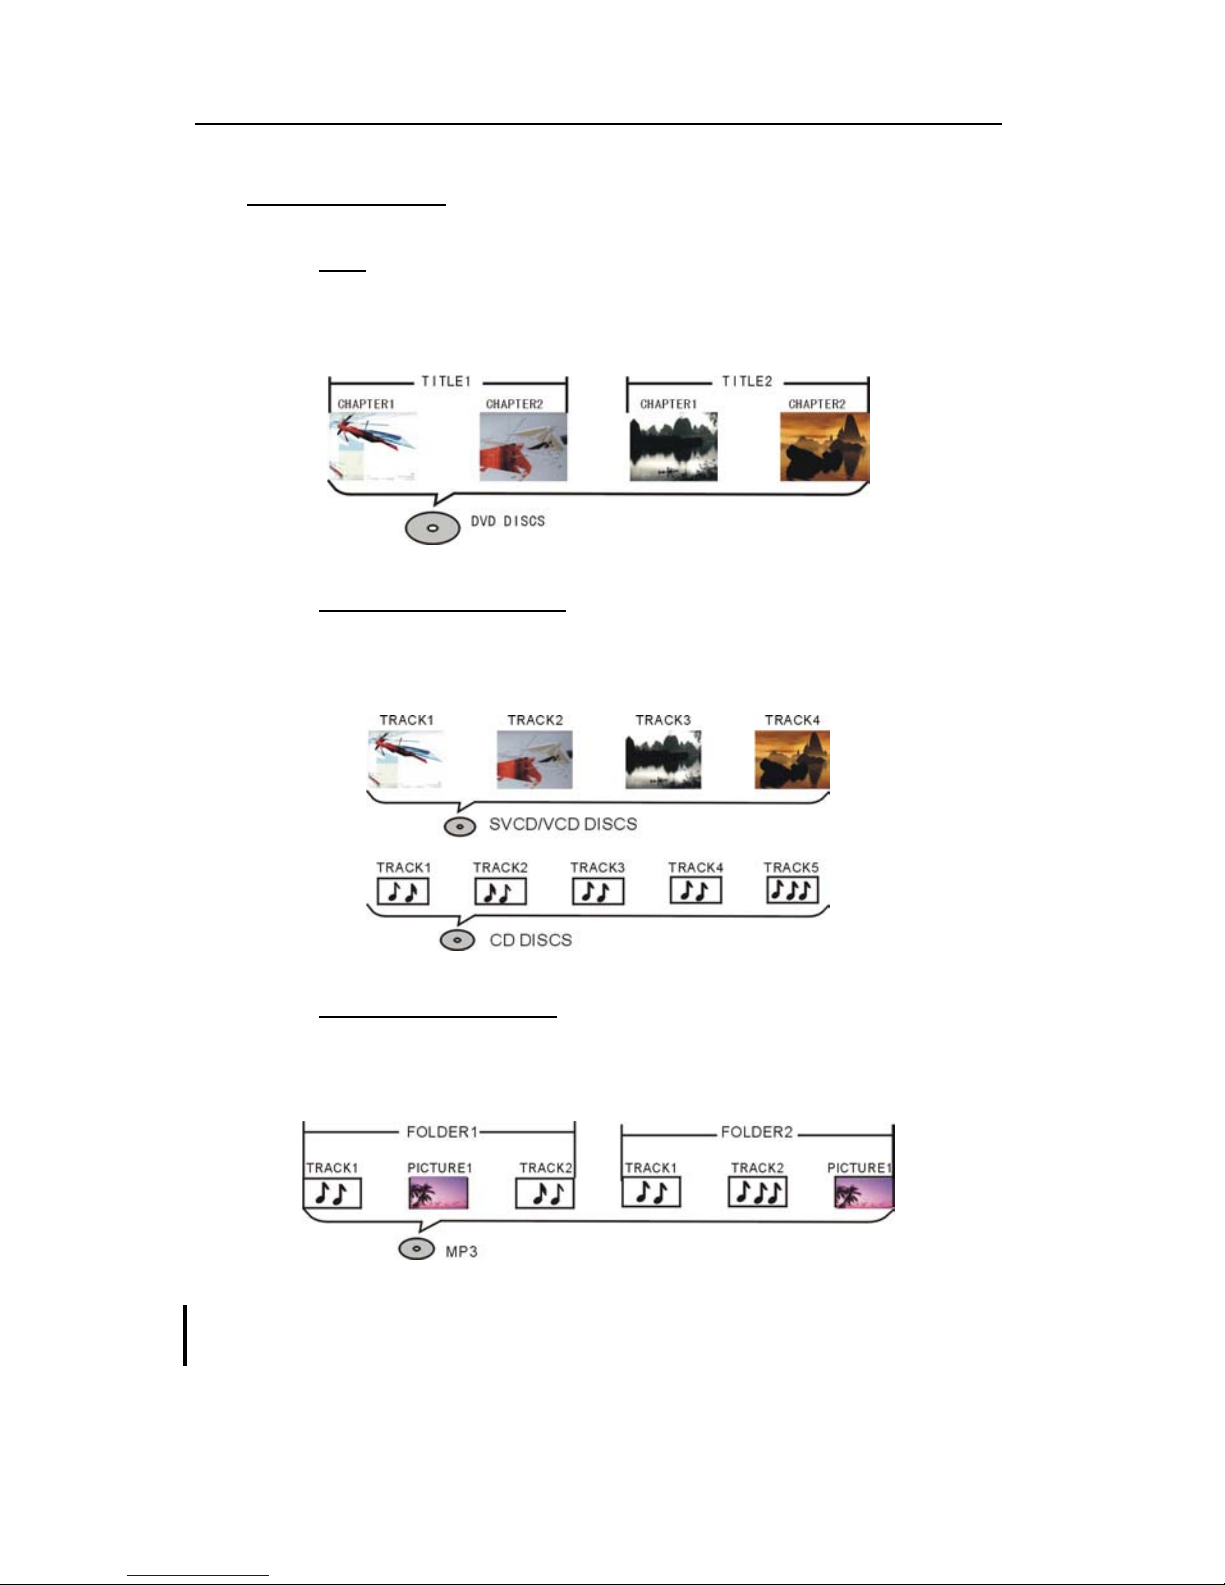
Compatible with all functions of ordinary DVD players.
Compatible with DVD, Super VCD, VCD, CD, CD-R discs, MP3 and Picture CD.
Discs recorded with the
Easy DVD Recorder
are compatible with other DVD players.
Programs recorded on DVD+RW discs are editable (to change a title, change title index
picture, divide a single title into smaller parts, and hide titles).
OTR mode, for quick capture and record.
Supports 8 audio languages, 32 subtitle languages, and 9 viewing angles, as well as other
full functional DVD playback features.
Parental Lock Level control system.
Screensaver program for screen protection.
Coaxial digital audio out jack.
Standard video out (CVBS), S-video out, SCART IN/OUT, and component video out (Y,
Cb/Pb, Cr/Pr) jacks. 16:9 and 4:3 TV screen aspect ratio support.
Can receive and record TV signal, as well as monitor its output.
Automatic time recording of AV signal or TV signal from external signal sources.
iEEE1394 DV in jack for video camera to record digital signal.
Up to 20 time-recording events, with three options: "Once", "Daily" and "Weekly".
Intelligent software update.
Power supply 220-240V AC 50/60 Hz
Power consumption 28W
Power consumption (stand by) < 4W
Size (mm) 430 x 53 x 320 (L xH x D)
Weight approximately 4.0kg
Environment temperature 15~35°C
Humidity 25~75%

Easy DVD Recorder User's Guide
5
Disc specifications
DVD+RW (rewritable DVD discs)
DVD+RW is an erasable format based on CD-RW technology.
DVD+RW discs can be rewritten more than 1,000 times.
DVD+R (write-once DVD discs)
DVD+R discs can only be written once. All the capacity of the disc does not
need to be filled in one single recording. You can add new contents later.
PLAYABLE AND WRITABLE
Should you wish to play a DVD+R created with your
Easy DVD Recorder
on another
player, please make sure it has been finalized. Likewise, you must use the "make
compatible" option if you want to play a DVD+RW disc on another player. You can
access these functions from the DVD+R and DVD+RW Edit menus by pressing the
DISK-OP button on your remote control.
CAUTION: Finalizing a disc consists in closing the recording session and to prevent
further recordings.
DVD-R (write-once DVD)
Only the DVD-R discs recorded in video mode that have been finalized
can be played by the
Easy DVD Recorder
.
DVD-RW (rewritable DVD)
Only the DVD-RW discs recorded in video mode that have been made
compatible can be played by the
Easy DVD Recorder
.
Audio CD-R (write-once CD) / MP3 Compressed Music
Audio CD-RW (rewritable CD) / MP3 Compressed Music
DVD Video (Digital Versatile Disc)
Audio CD (digital audio disc)
Super Audio CD (only plays the CD layer of a hybrid SACD )
VCD (Video CD - format 1.0, 1.1 and 2.0)
PLAYABLE-ONLY DISCS
Super VCD

Easy DVD Recorder User's Guide
6
Discs composition
DVD
A DVD disc is divided into sections (titles, chapters) so that you can find specific content more
easily.
SVCD/VCD/AUDIO CD
SVCD/VCD/AUDIO CDs are divided into a number of tracks, which may contain index points
to divide the track into several parts.
MP3 /JPEG/MP4(DivX)
MP3 (".mp3", for music), JPEG (".jpg", for pictures), and DivX (".avi", for videos) are
compressed file formats.
It may be longer for the Easy DVD Recorder to display the content of some discs because of the
large file size or number of songs/pictures they contain.

Easy DVD Recorder User's Guide
7
Special features
The digital input connector, known as 'firewire' or 'IEEE1394', is used to
transmit digital broadband signals. The audio and video signals are
transmitted via the same cable.
MP3 files are highly compressed music files, which compress standard CD
audio files to ~1/10 of their original size. As a result, up to 10 hours of music
can be stored on a single CD.
Ordinary the video is recorded at the current position of the disc. This is like
the tape recorder, the user can start recording at the middle of the tape. For
DVD+R discs, new video segment is always appended to the existing video
segments. The
Easy DVD Recorder
can play both pre-recorded DVDs and
CDs. DVDs recorded using this DVD recorder can be played on most current
and future DVD players.
Dolby Digital is a standard developed by Dolby Laboratories for transmitting
from 1 to 5 full-range channels as well as a low frequency (.1) channel for a
total of 5.1 discrete channels. The loudspeakers are arranged as follows: front
left, front right, middle, rear left and rear right. Dolby Digital is currently the
most common system and is often used in cinemas.
This product contains copy protection technology, which is protected by US
Patent and other intellectual property rights. Use of this copy protection
technology from Macrovision Corporation requires the approval of
Macrovision. It is intended exclusively for home use and other limited pay-
per-
v
iew applications, unless Macrovision approves some other use in writing.
Modifications to the equipment, removal of components and reverse
engineering are prohibited.
DivX is a codec (short for compression/decompression) - a piece of software
that compresses video from virtually any source down to a size that is
transportable over the Internet without reducing the original video's visual
quality. Currently the highest DivX version supported by the
Easy DVD
Recorder
is Div
X
5.2. To rent or purchase videos using DivX® technology,
please make sure you register.

Easy DVD Recorder User's Guide
8
IV. Getting Familiar
Remote Control
First remove the battery cover of the remote control and insert two AAA batteries (supplied).
For battery replacement and disposal, please refer to the Standards and Certifications chapter.

Easy DVD Recorder User's Guide
9
RECORD Record TV or AV signal from external source. While recording, every pressing
on this button will add 30 minutes recording time.
Edit Access the title editing menu.
TIMER Set/change the schedule of time recording.
POWER Switch on/off.
0---9 Number buttons.
title Access the title menu.
s-title Change subtitle language.
disk-op Manage DVD+R/RW discs.
clear Select current item, or clear the time recording event.
zoom Zoom in/out current picture.
OK Confirm current selection or input.
MENU Access disc menu.
SETUP Access system setup menu.
pscan Switch the scanning mode of video output (Progressive/Interlace).
audio Change audio language.
angle Change camera angle.
repeat Set repeat functions.
goto Go to desired title/chapter/time and play it.
SOURCE Select external signal source.
Eject Open/close the disc tray.
display Show and adjust the playback status.
random Switch the playback sequence between Normal and Random mode.
STOP/RETURN Press once to stop playback/recording, press again to return to root menu(only
for VCD discs).
MUTE Press once to turn off the sound, press it again or press the "V+/V-" button to
resume the sound.
Slow Slow forward (1/2, 1/4, 1/8).
V-/V+ Adjust the audio output volume, or move the cursor leftward/rightward.
PLAY/PAUSE Start playback, or stop playing/recording temporarily.
P+/P- Select TV channel, or move the cursor upward/downward.
Previous/next title or chapter.
Fast reverse/forward (2X, 4X, 16X, 32X).

Easy DVD Recorder User's Guide
10
Features of your
Easy DVD Recorder
Front Panel
POWER Power on/off.
EJECT Open/close the disc tray.
REC Record current TV program, AV or DV signals from external signal
sources.
PLAY/PAUSE Press to start playback or suspend playback.
STOP Stop playing/recording.
SOURCE Switch input signal source.
Front connections
To access these connectors, open the flap-door on the right side of the Easy DVD Recorder.
S-VIDEO S-Video input jack, use to connect to a SVHS/Hi8 video camera or
SVHS/Hi8 VCR.
VIDEO Video input jack, use to connect to a SVHS/Hi8 video camera or
SVHS/Hi8 VCR.
The signal from S-VIDEO input jack has higher priority than the signal from VIDEO input jack.
L-AUDIO-R Audio input jacks, use to connect to video camera or VCR.
DV i-LINK/DV input jack ( iEEE1394), use to connect digital video camera
or other digital equipments.

Easy DVD Recorder User's Guide
11
Rear Panel
AC IN ~ AC IN power cord connector to 220-240V, 50/60Hz mains supply.
ANTENNA in Use to connect to antenna/cable TV.
ANTENNA out Use to output TV signal to TV set.
Audio output L/R Analog audio output (left and right).
Coaxial output Use to output digital audio recorded on discs by connecting to the
coaxial digital audio input on an AV amplifier or receiver with digital
audio input capability.
CVBS Use to connect to TV set with video (CVBS) input jack.
Optical output Use to output digital audio recorded on discs by connecting to the
optical digital audio input jack on an AV amplifier or receiver with
digital audio input capability.
SCART IN Use to connect to digital AV equipments with SCART OUTPUT
capability. (E.g. DVD player with SCART output jack).
SCART OUT Use to connect to TV set or other equipments with SCART in jack.
S-Video Use to connect to TV set with S-VIDEO input jack.
Y Cb/Pb Cr/Pr Use to connect to TV set with Y Cb/Pb Cr/Pr input jacks. The output
mode can be set as progressive or interlace

Easy DVD Recorder User's Guide
12
V. Setting up
Connecting to TV
Your
Easy DVD Recorder
supports video connections through composite video, S-Video,
component video, and SCART. Connect the audio/video cables depending on the
specifications of your TV.
If the TV has COMPONENT VIDEO IN jacks (Y, Cb/Pb, Cr/Pr), connect them to the
corresponding jacks on the
Easy DVD Recorder
(recommended).
If the TV has an S-VIDEO IN jack, connect it to the S-VIDEO jack on the
Easy DVD
Recorder.
If the TV has SCART IN jack, connect it to the SCART OUT jack on the
Easy DVD
Recorder.
Connect the LEFT and RIGHT audio out jacks on the
Easy DVD Recorder
to the audio
input jacks that belong to the same jacks group as the video input jack on the TV set (if
applicable).

Easy DVD Recorder User's Guide
13
Watching TV via the
Easy DVD Recorder
Press SOURCE on the remote control to switch to TV mode and start to auto scan channels.
The TV signal output jack is only a loop-through of the inputted signal.
1.
Easy DVD Recorder
2. Audio
3. Video
4. Signal input
5. Antenna (or cable TV)
6. Signal output (can be used to output TV signal to another TV set's RF signal input
jack).

Easy DVD Recorder User's Guide
14
Connecting to an amplifier
Dolby Pro Logic Decoder
You can enjoy the Dolby Surround audio effect by connecting the recorder to an amplifier-and-
speakers system with Dolby Pro Logic decoder.
1. To AUDIO OUT (LEFT/RIGHT) jacks
2. To AUDIO IN jacks
3. FRONT LEFT
4. CENTER
5. FRONT RIGHT
6. SURROUND RIGHT
7. SURROUND LEFT

Easy DVD Recorder User's Guide
15
Dolby Digital or DTS Decoder
You can enjoy reproduced 5.1-channel Dolby Digital audio or Digital Theatre Systems audio
effect by connecting the recorder to an amplifier-and-speakers system with Dolby Digital
decoder or DTS decoder via a coaxial cable.
1. AMPLIFIER with DOLBY DIGITAL or DTS decoder
2. FRONT LEFT
3. CENTER
4. SUBWOOFER
5. FRONT RIGHT
6. SURROUND RIGHT
7. SURROUND LEFT

Easy DVD Recorder User's Guide
16
Connecting Input AV signal using SCART IN
The SCART IN connector included on your
Easy DVD Recorder
allows you to connect a video
device, such as a DVD player or a VCR. However, when this device is in use, or simply turned
on, you must turn it off before watching TV channels (using the
Easy DVD Recorder
tuner).
To display or record video inputted via the SCART IN connector (e.g, the AV signal from a
DVD player or a VCR with SCART OUT connector), press SOURCE on the remote control and
select SCART mode.
If the SCART IN device you want to connect is a CANAL+ analog decoder, you must configure
the
Easy DVD Recorder
accordingly. Press SETUP on your remote control to access the
General Setup screen and select ON for the “CANAL+ Analog Decoder” option. In this way,
when you select a CANAL+ scrambled signal, the CANAL+ decoder will automatically start
and the
Easy DVD Recorder
will automatically send unscrambled signal to the TV. If you
change to any other channel, the CANAL+ decoder will automatically shut down.
Even when the DVD recorder is in STAND-BY status, the AV signal from the external AV signal
source can be normally played on the TV set via the SCART IN and SCART OUT connectors on
the DVD recorder.
1. External AV signal source (e.g. DVD player, VCR, CANAL+ decoder, etc.)
2.
Easy DVD Recorder

Easy DVD Recorder User's Guide
17
Connecting Input AV or DV signal
Via the front panel
Flip down the door as indicated by the
OPEN label.
Select the correct AV signal input by pressing the SOURCE button on your remote control. If
the signal source is connected via the S-VIDEO jack, press SOURCE to select FRONT S-VIDEO
INPUT. If the signal source is connected via the DV jack, press SOURCE to select DV INPUT.
1. Use S-Video jack or composite video jack
2. Audio input jack
3. iEEE 1394 jack
4. External AV Signal

Easy DVD Recorder User's Guide
18
Via the rear panel
1. Signal output
2. Audio cable
3. Video cable
VI. Using your Easy DVD Recorder
Playing Discs
DVD
1. Make sure all connections are correct, then plug the power cord into a wall outlet.
2. Press the POWER button on the front panel or remote control to power on your
Easy DVD
Recorder
.
3. Insert a DVD disc when LOAD displays.
4. Use the arrow keys to select the desired title.
5. Press OK or PLAY/PAUSE. The selected title will start playing.
6. Press DISPLAY during playback to display playback information.
Other manuals for Easy DVD Recorder
1
Table of contents
Languages:
Other Packard Bell DVD Recorder manuals