Pakedge Device & Software RSB-KIT User manual

RSB-KIT
Preconfigured Audio/Video Bridging System
Installation Manual – Version 2.0

FCC Declaration of Conformity
Pakedge Device & Software, 1163 Triton Dr., Foster City, CA, 94404, declares under sole responsibility that
the RB-KIT complies with 47 CFR Parts 2 and 15 of the FCC Rules as a Class B digital device. This device
complies with Part 15 of FCC Rules. Operation of the device is subject to the following two conditions: (1)
This device may not cause harmful interference, and (2) this device must accept any interference that may
cause undesired operation.
WARNING: TO PREVENT FIRE OR SHOCK HAZARD, DO NOT EXPOSE THIS PRODUCT TO
RAIN OR MOISTURE. THE UNIT MUST NOT BE EXPOSED TO DRIPPING OR SPLASHING
WATER. CAUTION: DO NOT OPEN THE UNIT. DO NOT PERFORM ANY SERVICING OTHER
THAN THAT CONTAINED IN THE INSTALLATION AND TROUBLESHOOTING INSTRUCTIONS.
REFER ALL SERVICING TO QUALIFIED SERVICE PERSONNEL. CAUTION: THIS DEVICE
MUST BE INSTALLED AND USED IN STRICT ACCORDANCE WITH THE MANUFACTURER’S
INSTRUCTIONS AS DESCRIBED IN THE USER DOCUMENTATION THAT COMES WITH
THE PRODUCT. WARNING: POSTPONE INSTALLATION UNTIL THERE IS NO RISK OF
THUNDERSTORM OR LIGHTNING ACTIVITY IN THE AREA.
1
RSB-KIT INSTALLATION MANUAL

RSB-KIT INSTALLATION MANUAL
SAFETY PRECAUTIONS:
When using this device, always follow basic safety precautions, to reduce the risk of fire, electric shock, and
injury to persons, including the following:
• Read all of the instructions (listed here and/or in the user manual) before you operate this equipment.
• Comply with all warning and caution statements in the instructions.
• Retain the instructions for future reference.
• Observe all warning and caution symbols that are afxed to this equipment.
• Comply with all instructions that accompany this equipment.
• Upon completion of any service or repairs to this product, ask the service technician to perform safety checks to
determine that the product is in safe operating condition.
• Installation of this product must be in accordance with national wiring codes and conform to local regulations.
•Avoid using this product during an electrical storm. There may be a risk of electric shock from lightning. For
added protection for this product during a lightning storm, or when it is left unattended and unused for long
periods of time, unplug the power supply, and disconnect the CAT5e..This will prevent damage to the product
due to lightning and power surges.
• Give particular attention to all safety precautions.
• Operate this product only from the type of power source indicated on the product’s marking label. If you are not
sure what type of power is supplied to your home, consult your dealer or local power company.
• It is recommended that the customer install an AC surge protector in the AC outlet to which this device is
connected. This is to avoid damage to the equipment from lightning strikes and other electrical surges.
• Wipe the unit with a clean, dry cloth. Never use cleaning uid or similar chemicals. Do not spray cleaners
directly on the unit or use forced air to remove dust.
• Keep the device away from excessive heat and humidity and keep the device free from vibration and dust.
• Do not directly cover the device, or block the airow to the device with insulation or any other objects.
2

RSB-KIT INSTALLATION MANUAL
**** Warning ****
1) No Factory Reset - The RSB-KIT was designed to be a very robust and exceptionally reliable product. Because
of this, you will find the RT-50V does not have a hardware or software reset button. The product can only be reset
by Pakedge either remotely, if the router is connected to a working internet connection with remote access or at
Pakedge’s facility. We highly recommend using the product only as described in Pakedge’s “Installation User
Manual” and “Advanced Setup User Manual”.
2) Preset IP Address Values - the RSB-KIT was designed to simplify a complex Audio-Video Bridging Network
installation and is precongured for an “out - of - the - box” VLAN installation. Therefore, the IP address values of
all VLAN’s are predened as described in the Installation User Manual. If different IP address values are absolutely
required, please be aware that changing them may affect other precongured features. Contact Pakedge support
for more information.
If you have further questions, email suppor[email protected] or call 1-650-385-8703 for support.
3

RSB-KIT INSTALLATION MANUAL
Table of Contents
1 INTRODUCTION ............................................................................................................................... 6
1.1 Package Content ................................................................................................................6
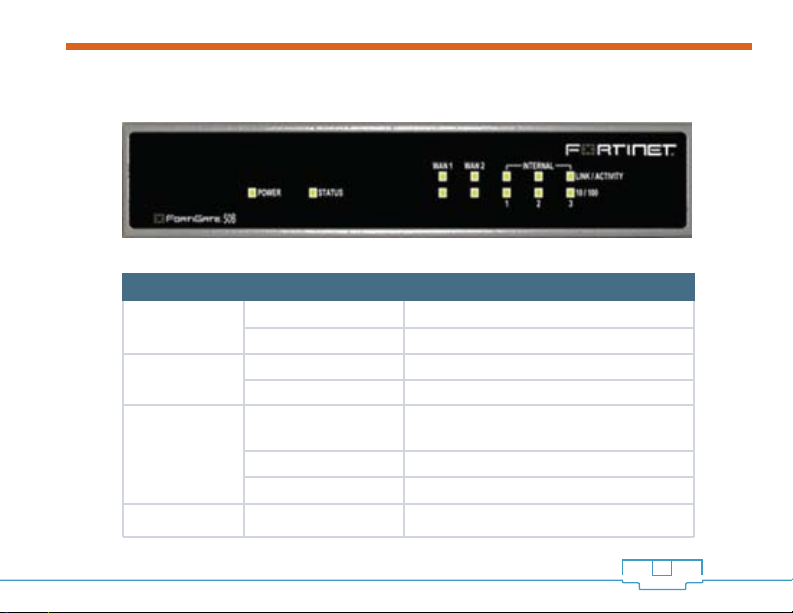
1.2 Getting to Know the RT-50V ................................................................................................. 7
Description for front LED’s: ................................................................................................... 7
Description for Ports: .......................................................................................................... 8
1.3 Getting to Know the SW8-GBV ...........................................................................................10
Description for front LED’s: ...................................................................................................10
Description for Ports: ..........................................................................................................11
2 NETWORK CONFIGURATION/SETUP OVERVIEW ...............................................................................14
2.1 Summary of Settings & IP Address Configuration ..................................................................14
2.2 Summary of Setup ...........................................................................................................14
2.2.1 Planning Your Network ....................................................................................................15
2.2.2 Basic Setup ...................................................................................................................18
2.2.3 Advanced Features Setup ...............................................................................................19
3 HARDWARE INSTALLATION ............................................................................................................. .21
3.1 Installing the Router and Switch ........................................................................................ 21
3.1.1 Securing RV-50V in RMB-FG Rack Mount Bracket .............................................................. 21
3.1.2 Connecting Cables to Switch Router ................................................................................. 23
4 BROADBAND SOFTWARE CONFIGURATION .................................................................................... 25
4.1 DHCP Configuration ........................................................................................................ 25
4.2 Static IP .......................................................................................................................... 26
4.3 PPPoE Configuration .........................................................................................................33
5 SUBSCRIPTION SERVICES .................................................................................................................36
6 CHANGING DEFAULT PASSWORDS ................................................................................................. 38
APPENDIX A – TROUBLESHOOTING FAQ’S .......................................................................................... 40
APPENDIX B – SPECIFICATIONS ........................................................................................................... 42
APPENDIX C – TECHNICAL SUPPORT ................................................................................................... 45
APPENDIX D – LIMITED WARRANTY ..................................................................................................... 46
4

RSB-KIT INSTALLATION MANUAL
1. INTRODUCTION
The popularity and affordability of IP networking has driven Audio Video and controls networks to share
the same physical wire with computer networks. However, unlike computer data that can tolerate a certain
degree of unpredictable latency, video streaming, audio streaming, and control systems cannot. These
sophisticated networks require the same robustness as an enterprise network to ensure the packets that carry
audio and video arrive in time and IP-based controls do not lose critical command packets.
The Pakedge Audio-Video Bridging (AVB) line of products is designed to solve these issues with minimum
configuration. The Pakedge solution pre-configures the Security Appliance (Router) and switch, dividing the
network into 5 separate subnets (VLANS) to manage traffic, broadcast, and priority for all devices based
on color coded ports. The simplicity of Pakedge’s solution allows custom installers to focus on quick, quality
installations without enterprise configuration worries.
The Pakedge Router including in the kit is configured for 6 VLANs, even though the switch is only configured
to handle 5. VLAN 6 is only used for a Guest Network because it is setup by policy to only have internet
access- no other devices on the internal network will be accessible. If the 6th (Guest) VLAN is desired, connect
a VLAN capable wireless access point directly to the router configured to the 6th VLAN. If you want to use the
6th VLAN through a wired port, consider instead the RSB-K24C.
Note: If this is your first time installing this product, please read this manual in its
entirety. Even though this product was design to get you up and running quickly, you
can perform unlimited customizations to meet every installation.
The very Basic (Section 2.2.2) setup would be- configure the router for the type of internet service such as
Dynamic, Static and PPPoE and plug the appropriate cables into the different VLAN/Priorities depending on
device.
5

RSB-KIT INSTALLATION MANUAL
A more Advance (Section 2.2.3) setup would be to do everything in the prior paragraph and then adding
load balancing for two internet connections and a setting up SSL VPN tunnel.
This Quick Start Guide only covers the Basic Setup, there a separate Advanced Features User Manual
(for latest Advanced Manual, please visit http://www.pakedge.com/userguides.php ) which covers the
advanced features offered by Pakedge. Any configuration outside of the Basic and Advanced is NOT
supported by Pakedge. Support, if needed, can be obtained from Fortinet.
1.1 PACKAGE CONTENT
Open the package carefully, and make sure that none of the items listed below are missing.
• RT-50V - Audio-Video Bridging Router
• SW8-GBV - Audio-Video Bridging Switch
• RMB-FG - Rackmount Bracket
• Power supply AC/DC (for RT-50V)
• Two Power Cables (US, EUR, UK, AUS/NZ, IT or IN/SA)
• Console Serial Cable (used for advanced features)
• Gray CAT5E Cable (Switch port 1 to Router Ports 1, 2 or 3)
• Red CAT5E Cable (WAN 1 Port to Internet Connection)
• Installation Manual - (Basic Only, Advanced Features Manual is Downloadable
on www.pakedge.com/userguides.php )
• Hardware Accessories
6

RSB-KIT INSTALLATION MANUAL
1.2 GETTING TO KNOW THE RT-50V
The front panel consists of LED indicators.
Description for front LED’s:
The router is powered on.
The router is turned off.
On during start-up or reboot.
Normal Operation.
The correct cable is in use and the
connected equipment has power.
Network activity at this interface.
No link established.
The interface is connected at 100 Mbps.
Green
Off
Green
Off
Green
Flashing Green
Off
Green
Power
Status
Link / Activity
10/100
OPERATIONSTATUSLED
7

RSB-KIT INSTALLATION MANUAL
1.2 GETTING TO KNOW THE RT-50V
The rear panel of the switch is laid out as follows:
Description for Ports:
Internal
WAN1 and
WAN 2
CONSOLE
USB
RJ-45
RJ-45
RJ-45
USB
10/100 Base-T
10/100 Base-T
9600 bps
Ethernet
Ethernet
RS-232-C
USB
3-port switch connection to up to three
devices or the internet network.
Redundant connections to the Internet.
Optional connection to the
management computet. Provides access
to the command line interface (CLI).
Optional connection for FortiUSB key
for firmware backup and installation.
PROTOCOL DESCRIPTIONTYPE SPEEDCONNECTOR
8

RSB-KIT INSTALLATION MANUAL
1.2 GETTING TO KNOW THE RT-50V
Restore to Factory Defaults
Due to the nature of an enterprise gateway/security appliance, a standard reset to factory default button
does not exist. Since the RT-50V is precongured, chances are a factory reset will not be required. However,
if for some reason this reset is needed, please contact Pakedge support for assistance.
Power Plug
To be compatible with electric service standards around the world, the switch is designed with a power
supply in the range from 100 to 240VAC, 50/60Hz. Please make sure that your outlet standard is within
this range. To power the switch, plug the female end of the power cord firmly into the receptacle of the
switch and the other end into a power outlet. After the power cord is plugged in, the power LED should be a
solid green to indicate normal power status.
9

RSB-KIT INSTALLATION MANUAL
1.3 Getting to Know the SW8-GBV
10
The front panel consists of LED indicators.
LEDs for each port:
The switch provides one “1000M” LED and one “10/100M” LED for each port.
1000M LED: Shows the current transmitting/receiving speed of the port.
10/100M LED: Shows link status and the activities on the port.

RSB-KIT INSTALLATION MANUAL
The port is connected at 1000 Mbps.
A valid link is established, and there is data transmitting/receiving.
No valid link on this port or the port is connected at 10/100 Mbps.
A valid link is established and there is no data transmitting/receiving.
A valid link is established and there is data transmitting/receiving.
No valid link on this port or the port is connected at 1000 Mbps.
The switch is powered on.
The switch is turned off.
Green
Blinking Green
Off
Steady Green
Blinking Green
Off
Steady Green
Off
10/100M
Power
OPERATION
OPERATION
STATUS
STATUS
LED
LED
Note: The mini GBIC slot shares the same LED indicator with port 8.
LED for the device:
The SW8-GBP’s power (PWR) LED reads as follows:
11

RSB-KIT INSTALLATION MANUAL
Full Duplex
Half Duplex
Full Duplex
Half Duplex
Full Duplex
Full Duplex
10Mbps
100Mbps
1000Mbps
1000Mbps
10/100/1000Mbps (copper)
1000Mbps (Fiber)
(mini GBIC required)
OPERATIONSTATUSLED
12
Port Operation:
The auto-negotiation feature allows the ports to run at one of the following operation modes:
The rear panel of the switch is laid out as follows:

RSB-KIT INSTALLATION MANUAL
1 Gray High
2 Green High
3 Yellow Medium
4 Yellow Medium
5 Orange Normal
6 Orange Normal
7 Red Low
8 Red Low
PORT PRIORITYCOLORPORT
13
Port Priority
The auto-negotiation feature allows the ports to run at one of the following operation modes:
Power Plug
To be compatible with electric service standards around the world, the switch is designed with a power
supply in the range from 100 to 240VAC, 50/60Hz. Please make sure that your outlet standard is within
this range. To power the switch, plug the female end of the power cord firmly into the receptacle of the
switch and the other end into a power outlet. After the power cord is plugged in, the power LED should be a
solid green to indicate normal power status.
Note: For the last port, when both the fiber and Cat5e interfaces are connected, the system uses the fiber
cable and disables the Cat5e port automatically.

RSB-KIT INSTALLATION MANUAL
2 Network Configuration/Setup Overview
2.1 Summary of Settings & IP Address Configuration
14
Pakedge Factory Default Settings for RSB-KIT
192.168.1.99
192.168.2.1
192.168.3.1
192.168.4.1
192.168.5.1
Dynamic IP Service
Dynamic IP Service
192.168.1.110 to 192.168.1.210
192.168.2.110 to 192.168.2.210
192.168.3.110 to 192.168.3.210
192.168.4.110 to 192.168.4.210
192.168.5.110 to 192.168.5.210
Internal Interface (VLAN1)
VLAN2
VLAN3
VLAN4
VLAN5
WAN1 Interface
WAN2 Interface
DHCP Server on Internal Interface (VLAN1)
DHCP VLAN2
DHCP VLAN3
DHCP VLAN4
DHCP VLAN5
DHCP VLAN6 – 192.168.6.110 to 192.168.6.210
Network
DHCP
Guest Network

RSB-KIT INSTALLATION MANUAL
The Pakedge RT-50V Router is precongured to support up to 3 SW8-GBV Switches. The network is divided
into 4 virtual local area networks (VLANs) with priority ranging from higher to lower from VLAN 2 to 5 (see
diagram below). Most installations will only require plugging in the cables into the right ports and setting up
the type of internet connection (ie. Static, dynamic, etc) for an easy plug and play installation. Given Audio-
Video IP based devices tend to send a lot of broadcasts, the VLANs are intended to keep the broadcasts
within a VLAN subnet.
For example, broadcasts in VLAN 2 will not be seen by devices in VLAN 3, 4 and 5. However, this does
NOT mean a device in one VLAN will not be able to communicate with a device on another VLAN.. In
summary, all devices can see each other when addressing their IP address, even if they are on a different
VLAN. However, broadcasts are limited to the VLAN the device is on.
15
2.2 Summary of Setup
2.2.1 Planning Your Network
For Basic Setup -
Username - user
Password - user
For Advanced Setup -
Username - pakedge
Password - pakedgef
The Pakedge Router included in the kit is configured for 6 VLANs, even though the switch is only configured to
handle 5. VLAN 6 is only used for a Guest Network because it is setup by policy to only have internet access-
no other devices on the internal network will be accessible. If the 6th (Guest) VLAN is desired, connect a
VLAN capable wireless access point directly to the router configured to the 6th VLAN.
Pakedge has a full line of 802.1q or VLAN capable wireless access point.
Please contact Pakedge for exact model numbers.

RSB-KIT INSTALLATION MANUAL 16
Suggested Network Configuration
Preconfigured VLAN Networking Equipment

RSB-KIT INSTALLATION MANUAL 17
The SW8-GBV VLAN switch is fully pre-congured so no additional conguration is needed when plugged in
properly. The SW8-GBV Switch has also been pre-congured with Quality of Service (QOS) packet priority
based on the ports of the Switch. QOS packet priority allows you to connect different devices to different
ports on the switch based on their need to access the internet. There are 4 levels of priority. The highest level
of priority marked as HIGH and GREEN in color is assigned to Port 2 on the Switch; the next lower level of
priority marked as MEDIUM and YELLOW in color is assigned to Ports 3 and 4 together. Ports 5 and 6 are
marked as NORMAL and ORANGE in color is assigned the next lower level of priority and Ports 7 and 8 are
marked as LOW and RED in color and assigned the lowest level of priority.
For optimal performance, connect the devices with the most need for uninterrupted internet access to Port 2 on
the Switch. These devices would include VOIP phones such as Vonage. Connect devices with a lesser need
for uninterrupted internet access to Ports 3 and 4 on the Switch. These devices would include video streaming
or surveillance systems. Connect devices with even lesser need for uninterrupted internet access to Ports 5 and
6. Finally, connect the devices with the least need for uninterrupted internet access to Ports 7 and 8. These
devices would include personal computers.
You can cascade switches off of the SW8-GBV for more ports are needed. The same QOS packet priority
will be in effect for all ports of the cascaded switch depending on what port it is plugged into on the SW8-
GBV. Also, up to 3 SW8-GBV Switches can be plugged into the RT-50V Router (must be plugged into the
802.1Q Trunk ports of the Router) to expand the number of available ports. A gray CAT5E cable is provided
with every SW8-GBV switch to connect to one of the 3 802.1Q trunk ports on the RT-50V Router.

RSB-KIT INSTALLATION MANUAL 18
The basic setup is a network broken into 4 virtual local area networks (VLANs) with priority ranging from
higher to lower from VLAN 2 to 5. Most installations will only require plugging in the cables into the right
ports and setting up the type of internet connection (ie. Static, Dynamic, etc) for an easy plug and play
configuration.
As mentioned before, with the default Pakedge configuration, all devices can see each other when
addressing their IP address, even if on a different VLAN. However, broadcasts are limited to the VLAN the
device is on.
To complete the basic setup- Follow the instructions in:
1. Section 3 to complete the hardware installation
2. Then Section 4 to configure the broadband internet connection.
3. At this point, you are up and running, however if you desire to activate the optional Security Subscription,
go to Section 5.
2.2.2 Basic Setup

RSB-KIT INSTALLATION MANUAL
2.2.3 Advanced Features Setup
After completing the basic setup, advanced features can be added if desired. This will required a different
login from the basic installation. The current advanced features that are discussed in this manual are:
• Disable DHCP on a VLAN - this feature is useful if the devices on a particular VLAN all have Static
IP addresses and no dynamic IPs are needed. Sometimes, a VLAN may already have a DHCP server
on the subnet, so they would need to disable the one from the router.
• Port Forwarding - is sometimes known as port mapping. This feature allows forwarding a network
port from the internet to a port on the internal network behind the router. This is needed if the user
wishes to publish a web server or mail server inside the internal network or VLAN.
• VPN - this service allows a user to remotely connect to the internal network behind the router from the
internet. Pakedge currently supports 2 types of VPN connections PPTP and SSL.
1. PPTP - PPTP technology extends the Point to Point Protocol (PPP) standard for traditional dial-up
networking. PPTP operates at Layer 2 of the OSI model. As a network protocol, PPTP is best
suited for the remote access applications of VPNs, but it also supports LAN internetworking.
PPTP client software is included with all current Windows and Linux operating systems and is
also included with Mac OS X (10.2) and above.
2. SSL - SSL runs on Secure Socket Layers technology and is accessible via https over web
browsers. It permits a user to establish safe and secure remote access sessions from virtually
any internet browsers to access home controls, share files, etc. SSL VPN advantage over IPsec
VPN is that a client software does not need to be installed.
19
Table of contents