Palram CANOPIA R217-S Operation instructions

HOW TO
ASSEMBLE
601452_21.07_MV-1.1
A member of
Palram Industries Ltd.www.canopia.com
Please read these instructions carefully before starting assembly.
Keep these instructions in a safe place for future reference.
IMPORTANT!
Length: 2.7 meter | EU Plug included
Remote battery CR2032 not included
The product is displayed on a Patio Cover but is suitable for a variety
of Palram - Canopia products
LED LIGHT STRIP WITH
REMOTE DIMMER CONTROLLER
LED Light Strip Remote Dimmer Controller

AFTER SALES SERVICE
1
PARTS REQUEST
In the case of missing or damaged parts, do not return
product to store.
Go to the link below or scan the QR code for help, it will direct
you to a form that will help us assist you as soon as possible.
SCAN ME
Contact us on our website:
bit.ly/3js7yZi
2
ASSEMBLY ASSISTANCE
If you need any technical assistance in assembling your
product, go to the link below or scan the QR code for help.
It will direct you to a form that will help us assist you as soon
as possible.
SCAN ME
Contact us on our website:
bit.ly/3kqqFEc

82642
CUSTOMER SUPPORT
SCAN ME
WE ARE HERE TO HELP
For general questions: bit.ly/3kY07dP
USA CANADA UNITED KINGDOM •IRELAND
877-627-8476 905-5646007 01302-380775
GERMANY FRANCE •BELGIUM ISRAEL
0180-522-8778 +33-169-791-094 04-848-6816
customer.serviceDE@palram.com customer.serviceFR@palram.com info.il@palram.co.il
ITALY • NETHERLANDS • PORTUGAL • SPAIN AUSTRIA •LUXEMBURG •LIECHTENSTEIN AUSTRALIA
+33-169-791-094 +49-180-522-8778 03-9219-4444
customer.serviceFR@palram.com customer[email protected]om salesvic@palram.com
NORWAY • SWEDEN • ARGENTINA • GREECE • GREENLAND • ICELAND • ESTONIA • JAPAN • LATVIA • LITHUANIA
MAURITIUS • MEXICO • ROMANIA • RUSSIA • TURKEY • UZBEKISTAN • UKRAINE • SWAZILAND • KOREA
+972-4-848-6816
customer.ser[email protected]

CUSTOMER SUPPORT
CYPRUS SWITZERLAND
0224-971-13 062-287-33-77
www.alpacodomica.com info@ritter.ch
DENMARK SOUTH AFRICA CROATIA •SLOVENIA
07-575 42 70 011-397-7771 0599-37-057
CZECH REPUBLIC FINLAND POLAND
0493-523-523 Neuvonta: 09-6866720
Tuki / Varaosat: 050-3715350
Infolinia: 801-011-929
22-349-93-36
AUSTRALIA - GREENHOUSES HUNGARY •SLOVAKIA NEW ZEALAND
03-9544-6-999 +420-493-523-523 0800 800 880
SCAN ME
WE ARE HERE TO HELP
For general questions: bit.ly/3kY07dP

EN
SAFETY ADVICE
1. If using a stepladder or power tools please make sure that you follow the manufacturer’s
safety advice.
BEFORE ASSEMBLY
•• Please read these instructions carefully before you start to assemble this product.
•• Please carry out the steps in the order set out in these instructions.
•• Keep these instructions in a safe place for future reference.
DURING ASSEMBLY
•• The light xture is waterproof in accordance with IP67 standard.
•• The transformer is waterproof in accordance with IP67 standard.
•• The controller is waterproof in accordance with IP68 standard.
•• LED Type: 3500K.
•• Light output: 700 Lumen.
•• The mounting of the LED Light Strip is performed onto the screws channels in the aluminum
proles.
When encountering the information icon, please refer to the relevant assembly
step for additional comments and assistance.
LED LIGHT STRIP WITH REMOTE DIMMER CONTROLLER - INFORMATION
TOOLS & EQUIPMENT
Silicone Philips Head Screwdriver
IMPORTANT ASSEMBLY STEPS
Step 2: Optional step in a situation where there is an excess of LED
strip: When cutting the LED strip, cut according to the round
images, and seal the LED strip with silicone.

FR LED LIGHT STRIP WITH REMOTE DIMMER CONTROLLER - INFORMATION
MESURE DE SÉCURITÉ
1. Si vous vous servez d’un escabeau ou d’outils électriques, alors veuillez vous
assurer que vous suivez les conseils de sécurité du fabricant.
AVANT L’ASSEMBLAGE
•• Veuillez lire attentivement ces instructions avant de commencer l’assemblage
de ce produit.
•• Veuillez effectuer les étapes dans l’ordre indiqué dans ces instructions.
•• Conservez ces instructions en lieu sûr pour consultation ultérieure.
DURANT L’ASSEMBLAGE
•• L’appareil d’éclairage est étanche à l’eau selon la norme IP67.
•• Le transformateur est étanche conformément à la norme IP67.
•• Le manette est étanche conformément à la norme IP68.
•• Type de LED: 3500K.
•• Rendement lumineux: 700 Lumen.
•• Le montage du Bande lumineuse LED est effectué sur les canaux des vis dans les prolés
en aluminium.
Lorsque vous rencontrez l’icône Informations, veuillez vous référer à l’étape
d’assemblage pertinente an d’obtenir davantage de commentaires et d’aide.
OUTILS ET ÉQUIPEMENT
Silicone Tournevis cruciforme
PRINCIPALES ÉTAPES D’ASSEMBLAGE
Étape 2: Étape facultative dans une situation où il y a un excès de
bande LED : Lors de la découpe de la bande LED, coupez en
fonction des images rondes et scellez la bande LED avec du
silicone.

DE LED LIGHT STRIP WITH REMOTE DIMMER CONTROLLER - INFORMATIONEN
SICHERHEITSHINWEIS
1. Wenn Sie eine Trittleiter benutzen, gehen Sie sicher, dass Sie den Sicherheitshinweisen des
Herstellers folgen.
VOR DEM ANBRINGEN
•• Um den Pavillon vollständig zu bedecken, müssen Sie eine weitere Garnitur kaufen.
•• Bitte lesen Sie die Instruktionen bevor Sie mit der Anbringung beginnen.
•• Bewahren Sie die Anleitung an einem sicheren Platz auf, um sie in der Zukunft nutzen zu
können.
WÄHREND DES ANBRINGENS
•• Die Leuchte ist wasserdicht gemäß dem IP67 Standard.
•• Der Transformator ist wasserdicht gemäß dem IP67 Standard.
•• Die Steuereinheit ist wasserdicht gemäß dem IP68 Standard.
•• LED-Typ: 3500K.
•• Lichtleistung: 700 Lumen.
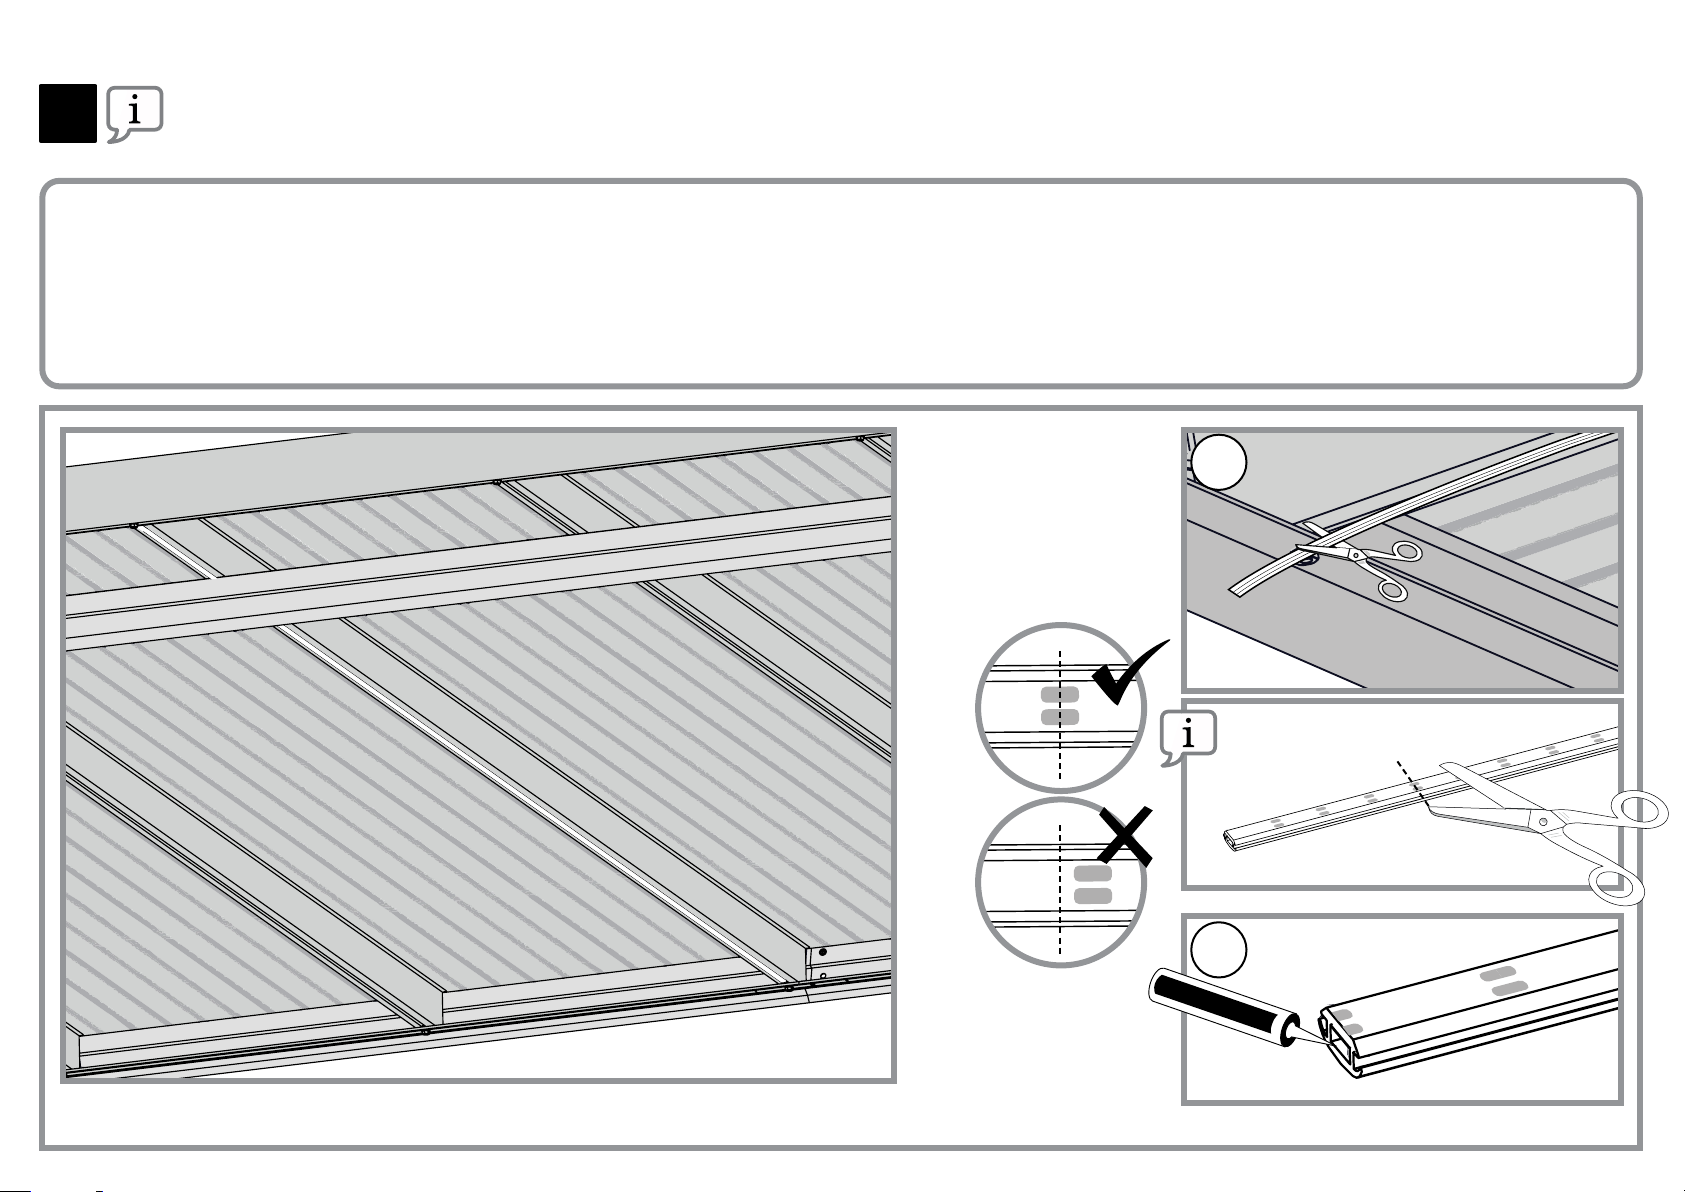
•• Die Montage des LED Lichtleiste erfolgt auf den Schraubenkanälen in den Aluminiumprolen.
Wenn Sie auf das Informationssymbol treffen, lesen Sie bitte den betreffenden
Montageschritt für weitere Anmerkungen und Unterstützung nach.
HERRAMIENTAS Y EQUIPOS
Silikon Kreuzschlitzschraubendreher
WICHTIGE MONTAGESCHRITTE
Schritt 2: Optionaler Schritt in einer Situation, wo der LED-Streifen
zu lang ist: Wenn Sie den LED-Streifen zuschneiden,
schneiden Sie bitte entsprechend den runden Bildern und
versiegeln Sie den LED-Streifen mit Silikon.

Contents
Item ItemQty. Qty.
1
1
1
2
1
9462 9464
9463
9465
8346
on/o
increase brightness
decrease brightness

1
19462
a

2
a
b

3
19463
a

4
19465
a

5
28346
a

USER’S MANUAL
•• RF Remote Operation
•• Smooth Change Effect
•• Compact Design
•• Full Protection
•• Waterproof Option
•• Multi Remote Option
•• Easy Remote Pairing
FUNCTIONS
1. Turn on/off
Press this key to switch on or off the controller.
Press and hold this key will force to switch off the controller.
The controller will memorize the on/off status and restore the on/off status and brightness
level on each power on moment.
2. Increase Brightness
Press this key to increase the output LED brightness.
Press and hold this key will continuously increase the brightness.
3. Decrease Brightness
Press this key to decrease the output LED brightness.
Press and hold this key will continuously decrease the brightness.
When controller is off, hold press this key will turn on the controller and jump to minimum
brightness.
4. Remote Controller Indicator
This indicator will blink when remote controller works.
SINGLE COLOR
REMOTE DIMMER CONTROLLER
R217-S
INTRODUCTION
Thank you for purchasing our product. R217 series LED Dimmer is designed to drive constant
voltage LED products in voltage range of DCSV-24V.
It contains a main control unit and a RF wireless remote controller. User can turn on/off or
adjust LED brightness conveniently via the remote controller.
INSTALLING
5. Power Supply
The controller unit can work from DC SV to 24V. The red power cable should be connected to
power positive and black to negative. Please make sure the power supply voltage is same as
the LED load and the power is capable for the load wattage.
6. LED Output
The controller unit supports constant voltage driving LED products. The red cable should be
connected to LED positive and black cable to negative.
The red cable is internal connected to power supply positive in controller unit.
The controller unit has output overload protection function, please check whether the output
is short circuit or over loaded if the controller stop working.
EN REMOTE DIMMER CONTROLLER - INFORMATION

EN
ADVANCED FEATURES
11. Waterproof
R217 model is standard version which can be used in dry environment. R217-S is a IP68
waterproof version, which can be used in wet environment or under water within depth
of 30 meters.
Note: The remote receiving sensitivity will decrease when controller insta lled in wet
place or under water, please setup the controller when the main unit is dry.
12. Protection
R217 series led dimmer has full protection function for output short circuit, overload,
and overheat.
The indicator will ash red at overload or short circuit protection and ash yellow at over heat.
The controller will automatically recover from protection when working status is good.
Please ensure the LED load is in rated range, not shorted and the controller unit is in a good
heat dissipation environment to avoid protection.
SPECIFICATION
Model R217-S
Brightness Grade 7 levels
PWM Grade 256 256 levels
Min. Brightness Shortcut Yes
On/off status memorize Yes
Overload protection Yes
Overheat protection Yes
Working Voltage OC 5·24V
Remote frequency 433.92MHz
Remote control distance >15m at open area
Rated Output Current 15A
IP Grade IP-68
OPERATION
7. Status Indicator
This is a full color status indicator. It displays all working status of the controller.
It indicates different events as following:
Blue: normal working.
Short single white ash: new command received.
Long single yellow ash: reach brightness limit.
Red ash: overload protected.
Yellow ash: overheat protected.
8. Using Remote
Please pull out the battery insulating tape before using.
The remote controller use CR2032 cell battery, it can last for 2 years for regular usage.
For proper receiving remote signal, please do not install the controller in closed metal parts.
9. Pairing New Remote
The remote and main unit is 1 to 1 paired as default.
Further more, one main unit can be paired to 5 remote controllers and every remote can
be paired to any main unit.
Please do following steps to pair a new remote:
1. Plug off the power of main unit and plug in aga in after more than 5 seconds.
2. Press remote ‘on/off’ and ‘decreasing brightness’ key together in 5 seconds after main unit
powered on.
After this operation, the controller’s indicator will ash white for 3 times to display the
new remote is accepted. The latest paired 5 remote controllers can be recognized.
10. Optional Wall Switch Remote
The controller can also work with the optional wall switch type remote controller RM07.
This remote controller has the same function and usage as the default hand hold remote
controller. It can be slicked on the wall for xed place operation.
REMOTE DIMMER CONTROLLER - INFORMATION

MANUEL DE L’UTILISATEUR
•• Opération à distance RF
•• Effet de changement en douceur
•• Conception compacte
•• Protection totale
•• Option étanche
•• Option Multi Remote
•• Appariement à distance facile
FONCTIONS
1. Allumer/éteindre
Appuyez sur cette touche pour allumer ou éteindre le contrôleur.
Si vous maintenez cette touche enfoncée, vous serez obligé d’éteindre le contrôleur.
Le contrôleur mémorise l’état de marche/arrêt et restaure l’état de marche/arrêt et le
niveau de luminosité à chaque mise sous tension.
2. Augmenter la luminosité
Appuyez sur cette touche pour augmenter la luminosité de la LED de sortie.
Maintenez cette touche enfoncée pour augmenter continuellement la luminosité.
3. Diminuer la luminosité
Appuyez sur cette touche pour diminuer la luminosité de la LED de sortie.
Maintenez cette touche enfoncée pour diminuer continuellement la luminosité.
Lorsque le contrôleur est éteint, maintenez cette touche enfoncée pour allumer
le contrôleur et passer à la luminosité minimale.
4. Indicateur de la télécommande
Ce voyant clignote lorsque la télécommande fonctionne.
INTRODUCTION
Nous vous remercions d’avoir acheté notre produit. Le variateur de LED de la série R217 est conçu
pour piloter des produits LED à tension constante dans une gamme de tension de DCSV-24V.
Il contient une unité de commande principale et une télécommande sans l RF.
L’utilisateur peut allumer/éteindre ou régler la luminosité des LED de manière pratique.
INSTALLATION
5. Alimentation électrique
L’unité de contrôle peut fonctionner de DC SV à 24V. Le câble d’alimentation rouge doit être
connecté au positif et le noir au négatif. Veuillez vous assurer que la tension d’alimentation
est identique à la charge de la LED et que l’alimentation est adaptée à la puissance de la
chargee.
6. Sortie de la LED
L’unité de commande prend en charge les produits LED à tension constante. Le câble rouge
doit être connecté au positif de la LED et le câble noir au négatif. Le câble rouge est connecté
en interne au positif de l’alimentation électrique de l’unité de commande.
L’unité de contrôle a une fonction de protection contre les surcharges de sortie, veuillez vérier
si la sortie est en court-circuit ou en surcharge si le contrôleur cesse de fonctionner.
COULEUR UNIQUE
CONTRÔLEUR DE GRADATEUR À DISTANCE
R217-S
FR CONTRÔLEUR DE GRADATEUR À DISTANCE - INFORMATION

FR
CARACTÉRISTIQUES AVANCÉES
11. Étanchéité
Le modèle R217 est une version standard qui peut être utilisée en milieu sec. Le modèle R217-S
est une version étanche IP68, qui peut être utilisée en milieu humide ou sous l’eau à une
profondeur de 30 mètres.
Note : La sensibilité de la réception à distance diminue lorsque le contrôleur est installé dans un
endroit humide ou sous l’eau, veuillez congurer le contrôleur lorsque l’unité principale est sèche.
12. Protection
Le variateur à LED de la série R217 a une fonction de protection complète en cas de
court-circuit de sortie , la surcharge et la surchauffe.
L’indicateur clignote en rouge en cas de protection contre les surcharges ou les courts-
circuits et en jaune en cas de surchauffe.
Le contrôleur se remet automatiquement de la protection lorsque l’état de fonctionnement est bon.
Veuillez vous assurer que la charge de la LED est dans la plage nominale, qu’elle n’est pas
court-circuitée et que l’unité de contrôle est dans un bon environnement de dissipation de la chaleur
pour éviter la protection.
SPÉCIFICATIONS
Modèle R217-S
Degré de luminosité 7 niveaux
PWM Grade 256 256 niveaux
Min. Raccourci de la luminosité Oui
Mémoriser le statut A
LLUMER/ETEINDRE Oui
Protection contre les surcharges Oui
Protection contre la surchauffe Oui
Tension de fonctionnement OC 5·24V
Fréquence à distance 433.92MHz
Distance de contrôle à distance >15 millions d’euros en espace ouvert
Courant de sortie nominal 15A
Grade IP IP-68
FONCTIONNEMENT
7. Indicateur de statut
Il s’agit d’un indicateur d’état de la couleur de l’eau. Il afche tous les états de fonctionnement
du contrôleur.
Il indique différents événements comme suit :
Bleu : fonctionnement normal.
Court ash blanc unique : nouvelle commande reçue.
Long clignotement jaune unique : atteint la limite de luminosité.
Clignotement rouge : protégé contre les surcharges.
Clignotement jaune : protégé contre la surchauffe.
8. Utilisation de la télécommande
Veuillez retirer le ruban isolant de la batterie avant de l’utiliser.
La télécommande utilise une pile de type CR2032, elle peut durer 2 ans pour une utilisation
régulière.
Pour une bonne réception du signal de la télécommande, veuillez ne pas installer la
télécommande dans des pièces métalliques fermées.
9. Appariement d’une nouvelle télécommande
Par défaut, l’unité principale et l’unité distante sont jumelées 1 à 1.
De plus, une unité principale peut être couplée à 5 télécommandes et chaque télécommande
peut être couplée à n’importe quelle unité principale.
Veuillez suivre les étapes suivantes pour appairer une nouvelle télécommande :
1. Débranchez l’unité principale et branchez-la après plus de 5 secondes.
2. Appuyez simultanément sur les touches “marche/arrêt” et “diminution de la luminosité”
de la télécommande dans les 5 secondes qui suivent la mise sous tension de l’unité principale.
Après cette opération, l’indicateur du contrôleur clignote en blanc pendant 3 fois pour afcher
la nouvelle télécommande est acceptée. Les 5 dernières télécommandes jumelées peuvent être
reconnues.
10. Télécommande murale en option
Le contrôleur peut également fonctionner avec la télécommande optionnelle RM07
de type interrupteur mural.
Cette télécommande a la même fonction et le même usage que la télécommande manuelle
par défaut.
Elle peut être glissée sur le mur pour un fonctionnement à poste xe.
CONTRÔLEUR DE GRADATEUR À DISTANCE - INFORMATION

BENUTZERHANDBUCH
•• Benutzerhandbuch
•• Fernbedienung
•• Gleichmäßiger Übergangseffekt
•• Kompaktes Design
•• Kompletter Schutz
•• Wasserdichte Option
•• Multi Fernbedienungs-Option
•• Einfache fernsteuerbare Kopplung
FUNKTIONEN
1. Ein-/Ausschalten
Drücken Sie diese Taste, um die Fernbedienung ein-, oder auszuschalten. Halten Sie diese
Taste gedrückt, um die Fernbedienung auszuschalten. Die Fernbedienung speichert den
Ein-/Aus-Status und stellt den Ein-/Aus-Status und die Helligkeit bei jedem Einschalten wieder her.
2. Helligkeit erhöhen
Drücken Sie diese Taste, um die Helligkeit der LEDs zu erhöhen. Halten Sie diese Taste
gedrückt, um die Helligkeit kontinuierlich zu erhöhen.
3. Helligkeit verringern
Drücken Sie diese Taste, um die Helligkeit der LEDs zu verringern.
Halten Sie diese Taste gedrückt, um die Helligkeit kontinuierlich zu verringern.
Wenn die Fernbedienung ausgeschaltet ist, halten Sie diese Taste gedrückt, um die
Steuerungseinheit einzuschalten und zur minimalen Helligkeit zu starten.
4. Fernbedienungsanzeige
Diese Anzeige blinkt, wenn die Fernbedienung funktioniert.
EINFARBIGER
REMOTE DIMMER CONTROLLER
R217-S
EINLEITUNG
Vielen Dank, dass Sie sich für unser Produkt entschieden haben.
Der LED-Dimmer der Serie R217 dient zur Ansteuerung von LED-Produkten mit konstanter
Spannung im Spannungsbereich DCSV-24V. Es enthält eine Hauptsteuereinheit und eine
drahtlose RF-Fernbedienung.
Der Benutzer kann die LED-Helligkeit bequem über die Fernbedienung ein- und ausschalten
oder einstellen.
INSTALLATION
5. Stromversorgung
Die Steuereinheit kann von DC 5V bis 24 V arbeiten. Das rote Stromkabel sollte an die positive
und die schwarze an die negative Stromversorgung angeschlossen werden. Stellen Sie sicher,
dass die Versorgungsspannung mit dem der LED übereinstimmt und die Leistung für die
Stromversorgung geeignet ist.
6. LED-Ausgang
Die Steuereinheit unterstützt LED-Produkte, die mit Gleichspannung betrieben werden.
Das rote Kabel ist an die positive und die schwarze an die negative Stromversorgung
anzuschließen. Das rote Kabel ist intern mit dem positiven Netzteil in der Steuereinheit
verbunden.Die Steuereinheit verfügt über eine Ausgangs-Überlastungsschutzfunktion.
Überprüfen Sie, ob der Ausgang kurzgeschlossen, oder überlastet ist, wenn die Steuereinheit
nicht mehr funktioniert.
DE REMOTE DIMMER CONTROLLER - INFORMATIONEN

DE
ERWEITERTE FUNKTIONEN
11. Wasserfestigkeit
Modell R217 ist eine Standardversion, die in trockener Umgebung verwendet werden kann.
R217-S ist eine wasserdichte IP68-Version, die in feuchter Umgebung, oder unter Wasser in
einer Tiefe von 30 Metern eingesetzt werden kann.
Hinweis: Die Empndlichkeit des Empfangs nimmt ab, wenn die Fernbedienung an einem
feuchten Ort, oder unter Wasser installiert wird. Installieren Sie die Fernbedienung bitte nur,
wenn das Hauptgerät trocken ist.
11. Schutz
Der LED-Dimmer der Serie R217 verfügt über eine vollständige Schutzfunktion für Kurzschluss,
Überlastung und Überhitzung. Die Anzeige blinkt bei Überlast, oder Kurzschluss rot und bei
Überhitzung gelb.
Die Steuereinheit wird sich automatisch vom Schutz zurückstellen, wenn der Arbeitsstatus
in Ordnung ist.Stellen Sie sicher, dass sich die LED-Stromaufnahme im Nennbereich bendet,
nicht kurzgeschlossen ist und sich die Steuereinheit in einer guten Wärmeableitungsumgebung
bendet, um einen Schutz zu vermeiden.
SPEZIFIKATION
Modell R217-S
Helligkeitsgrad 7 Stufen
PWM Grade 256 256 Stufen
Min. Helligkeits-Kurzbefehl Ja
Ein/Aus-Status speichern Ja
Überlastungsschutz Ja
Überhitzungsschutz Ja
Betriebsspannung OC 5·24V
Fernbedienungs-Frequenz 433.92MHz
Abstand zwischen
Fernbedienung und Gerät >15 m auf Freiäche
Nenn-Ausgangsstromatärke 15A
IP Grade IP-68
BETRIEB
7. Statusanzeige
Dies ist die vollständige Farbstatusanzeige.
Es zeigt den gesamten Arbeitsstatus der Steuerung an.
Es zeigt verschiedene Ereignisse wie folgt an:
Blau: normaler Betrieb.
Kurzes, weißer blinkern: neuer Befehl empfangen.
Langes gelbes Leuchten: Helligkeitsgrenze erreicht.
Rotes Blinken: Überlastungssicherung.
Gelbes Blinken: Überhitzungsschutz.
8. Verwenden der Fernbedienung
Bitte ziehen Sie vor der Verwendung das Batterie-Isolierband heraus. Die Fernbedienung
verwendet eine CR2032 Knopfbatterie, die bei noramler Verwendung 2 Jahre lang funktioniert.
Installieren Sie die Steuereinheit nicht in geschlossenen Metallteilen, um ein einwandfreies
Empfangssignal zu erhalten.
9. Neue Fernbedienung koppeln
Die Fernbedienung und die Steuereinheit sind standardmäßig 1 zu 1 gekoppelt.
Darüber hinaus kann eine Haupteinheit mit 5 Fernbedienungen gekoppelt werden,
und jede Fernbedienung kann mit jeder Haupteinheit gekoppelt werden.
Führen Sie die folgenden Schritte aus, um eine neue Fernbedienung zu koppeln:
1. Schalten Sie das Hauptgerät aus und schließen Sie es nach mehr als 5 Sekunden wieder an.
2. Drücken Sie nach dem Einschalten des Hauptgeräts innerhalb von 5 Sekunden gleichzeitig
die Tasten „Ein/Aus“ und die Taste für das „Verringern der Helligkeit“.
Nach diesem Vorgang blinkt die Kontrollleuchte der Steuereinheit dreimal weiß, um
anzuzeigen, dass die neue Fernbedienung gekoppelt ist. Die neue 5 gepaarte Fernbedienungen
werden ab jetzt auch erkannt.
10. Optionale Wandschalter-Fernbedienung
Die Steuerung kann auch mit der optionalen Wandschalter-Fernbedienung RM07 verwendet
werden.
Diese Fernbedienung hat die gleiche Funktion und Verwendung wie die Standard-
Handfernbedienung.
Es kann an die Wand angebracht werden, um den Betrieb an einem festen Ort zu ermöglichen.
REMOTE DIMMER CONTROLLER - INFORMATIONEN
This manual suits for next models
2
Table of contents
Languages:
Other Palram Lighting Equipment manuals
Popular Lighting Equipment manuals by other brands

ProLights
ProLights LEDFLOWERKIT4 user manual

ETC
ETC HIGH END SYSTEMS SolaPix 37 user manual

GM Lighting
GM Lighting LEDTask LTR-P-WP installation guide

ADJ
ADJ ProfilePanel RGB User instructions

Feniex
Feniex QUAD Q-6120 instruction manual

Whelen Engineering Company
Whelen Engineering Company L22 LED Beacon installation guide