Pambry Listen Ear User manual

Listen Ear™
Personal Noise
Dose Meter
User Manual

SOFTWARE REVISION
The User Manual supplied with the Listen Ear™ reects the rmware
installed at the time of manufacture. Updating the rmware may add or
change product features.
SAFETY INFORMATION
For safe practice only operate in accordance with the instructions in this
manual.
WARNING
To avoid personal injury, follow the guidelines below:
• Do not remove cover.
• Use the Listen Ear™ only as specied in this manual.
• Do not use around explosive gas or vapour.
• It is your responsibility to contribute to a clean and
healthy environment by using the appropriate local
return and collection systems.
• The symbol shown on the left indicates that
separate collection systems must be used for any
discarded equipment or batteries marked with the
WEEE Symbol.
PAMBRY DISCLAIMER
Pambry Electronics reserve the right to change specications or update
this user manual at any time without prior notice.
!
2

CONTENTS
1.0 INTRODUCTION 4
2.0 FEATURES 4
3.0 DESCRIPTION 5
3.1 Charging Before Use 6
3.2 Connecting to a PC 6
3.3 Switch ON 6
3.4 Switch OFF 6
4.0 PAGES 7
5.0 MENU 8
5.1 Pages 8
5.2 Settings 8
5.3 Info 12
6.0 CALIBRATION 12
6.1 Calibration procedure 12
7.0 ATTACHING YOUR Listen Ear™ 13
7.1 Mounting Listen Ear™ with external microphone 13
8.0 SPECIAL FEATURES 14
8.1 Anti-Knock & Vibration System 14
8.2 Motion Detection System 14
8.3 Auto Power OFF 14
9.0 MEASUREMENTS 14
9.1 Use as a Sound Level Meter 14
9.2 Use as a Noise Dosimeter 15
10.0 FIRMWARE UPDATE 16
11.0 THEORY BEHIND THE Listen Ear™ 16
11.1 Reference Information - NIHL 16
11.2 Ear Protection 18
11.3 A, C & Z Filter Weighting 18
11.4 F & S Time Weightings 19
12.0 REPORT AND HISTORY FILES 20
13.0 SPECIFICATION 22
APPENDIX A - EC DECLARATION OF CONFORMITY 24
3

1.0 INTRODUCTION
Welcome to your new purchase of your Listen Ear™ Noise Dose Meter
and thank you for choosing Pambry Electronics Ltd, a dedicated UK
manufacturer of audio products sold worldwide.
This professionally made and calibrated instrument is by far the best
value for money device of its type in the world. It will assist you to
monitor your hearing health and Noise Induced Hearing Loss (NIHL).
As one of the smallest and lightest units made, its ease of use belies the
hidden complexity inside. The theory behind NIHL shall be provided in
this manual.
2.0 FEATURES
• Compact and light design to clip on during the working day
• View current noise level and total exposure of the day on LCD display
• Knock and Vibration Cancelling Technology - patent applied
(1611153.6)
• Revolutionary design to simulate the effect of wearing ear defenders
• Use Mobile Phone to control and view data
• Battery life up to 160 hours / 4 working weeks
• Charged using USB
• Comply to the ‘Control of Noise at Work Regulations 2005 (UK)’
• Complies to international standards: IEC 61672-1, IEC 61252
• Produce a daily report and statistics of the work environment by
downloading data
• Default 8-hour day, adjustable in menu
• Tamper proof facility
• Bright LED for dose alarm warning
• Contains A, C and Z-weighting lters to mimic the frequencies heard
by the human ear
• Built in or External Microphone
• Calibrated during manufacture
• Data logging - Sound / temperature / humidity / movement
• No USB Drivers required to download data
• Class 2 sound level meter
• Includes movement and orientation monitor
• Records Temperature and Relative Humidity
4

Built-in microphone
‘Info’ LED
Scroll/power button
LCD display
Enter/record button
3.0 DESCRIPTION
Status Bar Icons
Battery level Indicator
Report enabled
Wearing Ear Defender
External Microphone Connected
Noise dose record duration - HH:MM:SS
Acoustic Overload recorded.
Recorded dose may not be accurate
Supplied with your Listen Ear™ Optional Accessories
• Quick Start Guide • Sound Calibration Unit (SCU)
• User Manual • External Microphone
• Micro USB 2.0 Cable 1.5m • Wall bracket
5
OL
00:00:00

3.1 Charging Before Use
Before use ensure the unit is fully charged by connecting it into a suitable
charger or computer USB port.
Charging is indicated by an “Info” LED and/or display icon. Red light
indicates “charging in progress”, Green light means that battery is “fully
charged”. Charging may take up to 5hours, depending on where the
device is connected. Battery life between charges is up to 160hours
(4 working weeks), depending on the activated options.
The ‘Info LED’ blinks RED once every 3 seconds when the battery level
is below 10%.
3.2 Connecting to a PC
The method of accessing the stored les in your Listen Ear™ is
by using your computer’s le explorer application, where the
stored les can be downloaded and manipulated as required.
Connect your Listen Ear™ device to your PC using the USB Cable
supplied. Microsoft® Windows® shall install the drivers automatically.
Windows® explorer will be activated granting you access to stored les
located on your device.
3.3 Switch ON
On initial power up or if the battery has been discharged you will
be prompted to the time/date menu.
To switch ON your Listen Ear™ press the “Scroll/Power” button. The
Pambry ‘splash’ screen will appear followed by the recently used ‘page’.
There are a number of different ‘pages’ each one represents a specic
measurement or function. Each ‘page’ is obtained by pressing the “Scroll/
Power” button. Each press scrolls to the next ‘page’ then returns where
you started. The unit wakes on power up in the rst ‘page’ DOSE and
the default set of measurement ‘pages’ are Dose and Level.
There are a further 5 screen pages which can be accessed via the
MENU screen (see CLOCK settings below) and scrolling to PAGES.
3.4 Switch OFF
Depressing the “Scroll/Power” button for 1 second will turn the unit OFF.
Note that if a Noise Dose recording is in progress this will stop
and reset.
Unit cannot be switched off in MENU OPTIONS Page as
SCROLL MODE is activated.
6

If needed, Listen Ear™ can be manually ”rebooted” by holding
the “Scroll/Power” button for 8 seconds. Current recording will
be aborted and settings will be set to factory defaults. Report and
History les will not be affected.
4.0 PAGES
There are 5 ‘pages’ so called because each represents a specic
measurement or function.
Each “Scroll/Power” button press turns to the next ‘page’ and eventually
back to the rst one. Section 5.1 describes way of enabling/disabling
required ‘pages’.
Dose
• Current Noise Dose percentage
• Projected Noise Dose percentage
(at the end of the 8h shift)
• Graphic representation of the Current
Noise Dose (0-100%)
Level
• Current Sound Pressure Level
• Maximum Sound Pressure Level
(current session)
History
• Last 90 minutes of Sound Pressure Level
• Current Sound Pressure Level
7

Details (current session)
• LAS - Sound Pressure Level
• LEQ - equivalent continuous noise level
• LEX8h - noise exposure level averaged over 8h
• Maximum Sound Pressure Level
• Minimum Sound Pressure Level
Temperature
• Current temperature
• Current humidity
• Minimum temperature and humidity
(current session)
• Maximum temperature and humidity
(current session)
5.0 MENU
To enter or exit from Menu press and release
both buttons simultaneously.
Button functions depend on the current Menu
location and are displayed at the bottom of the
screen.
5.1 Menu / Pages
The ‘Pages’ menu allows to enable/disable required
pages. At least one page must be enabled.
Only parameters from enabled pages are recorded
in the report and history les (if enabled).
5.2 Menu / Settings
Your Listen Ear™ has a number of adjustable
settings which can be modied, enabled &
disabled if desired.
8

Menu / Settings / Ear defender
Under the EU/UK Control of Noise at Work Regulations 2005, noise
levels above 85dBA require the use of hearing protection. If you wish
to use your Listen Ear™ whilst wearing hearing protection then this is
possible by inputting the SNR (see page 18) attenuation gure from the
specication of your hearing defender or ear plug into the SETUP page
screen. The Listen Ear™ will take note of the new setting and give display
readings as if measuring at your ear inside the Hearing Defender earmuff
and not outside in the external environment.
The ‘Ear defender’ menu displays 3 lines of
information regarding the current settings.
Line 1 - Enable or disable Ear Defender
correction
Line 2 - Current Ear defender model from
the pre-set list.
Line 3 - Current SNR value
A range of preprogrammed Ear Defenders with
SNR ratings can be selected by entering the ‘Line
2’. If you are wearing an ear defender contained
in the list, scroll to the ear defender being used
and press OK. The SNR value will be used for
the Noise Dose and Sound Level calculation.
Alternatively, if wearing an Ear defender not
displayed in the list, Scroll to the SNR, press OK
and enter SNR value for the Ear defender worn.
See section 11.2 for information regarding ear protection.
9

Menu / Settings / Bluetooth
Enable / disable Bluetooth functionality.
For more details please refer to Listen Ear™ APP user guide.
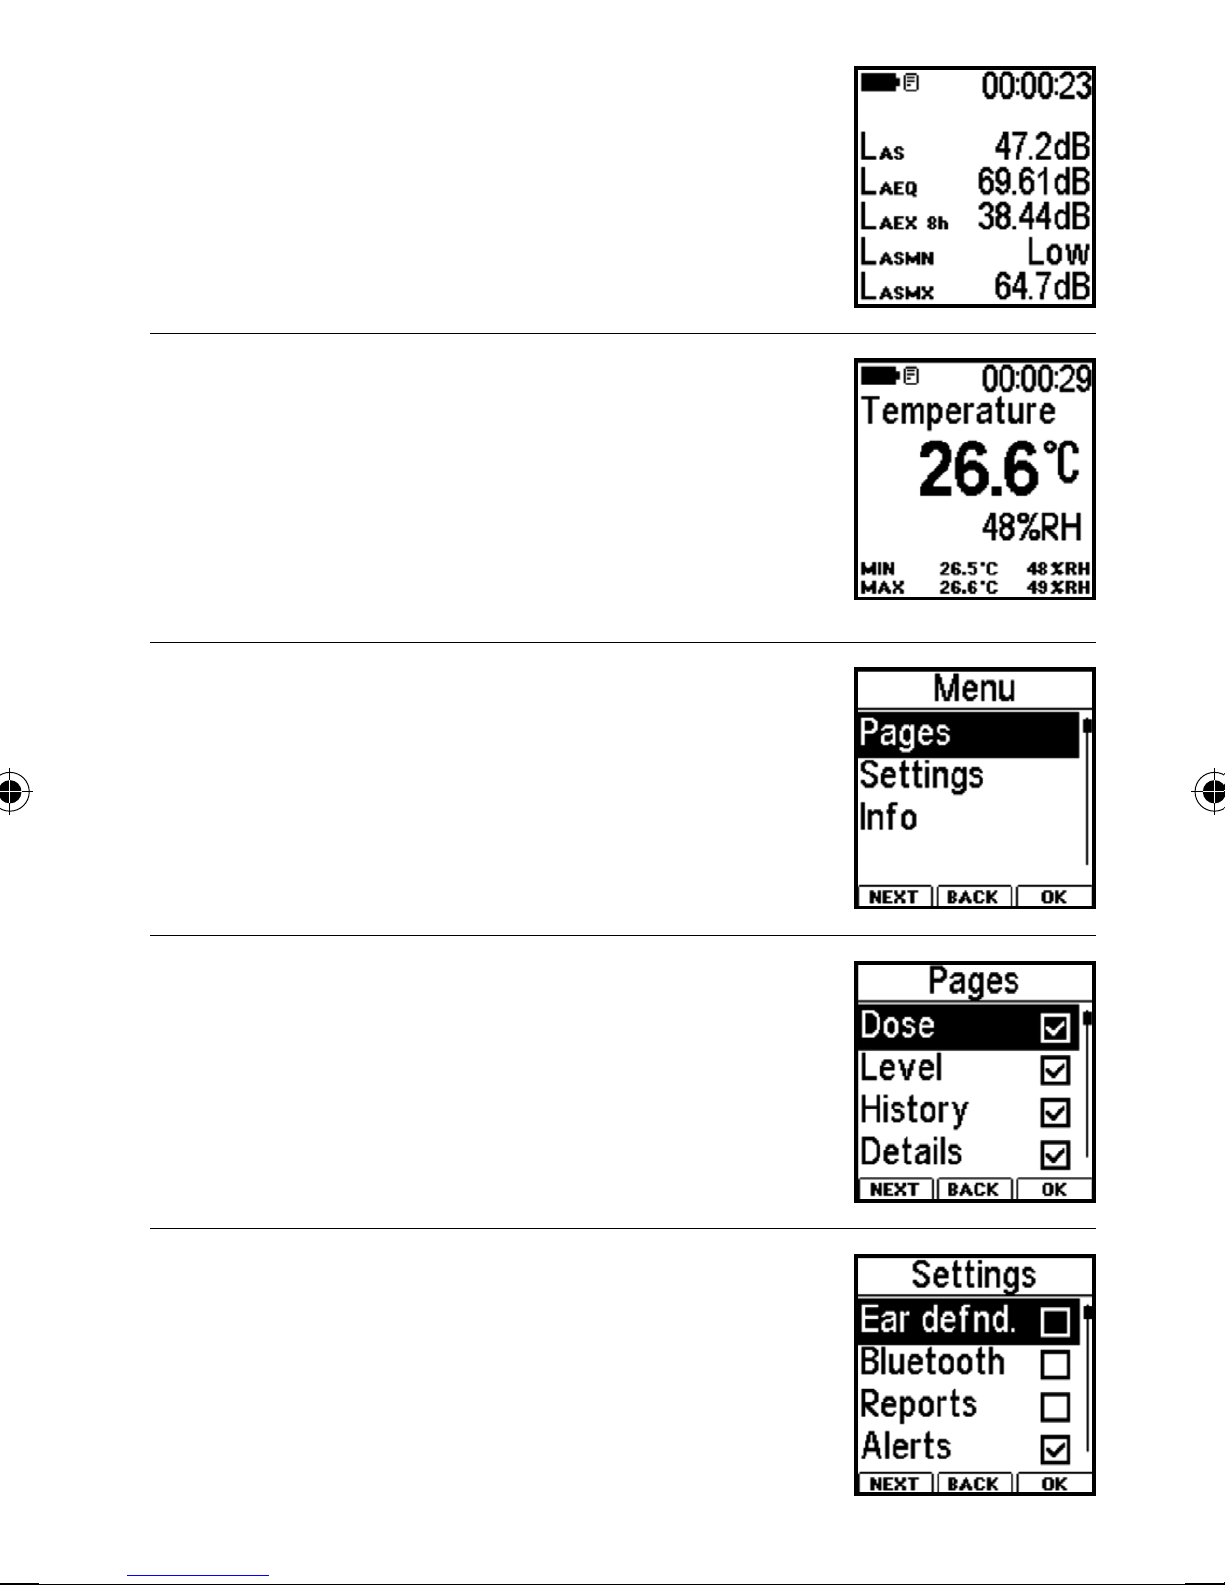
Menu / Settings / Reports
In addition to the ‘easy to understand’ Noise
Dose presented as a single number, Listen Ear™
can produce and save Daily Report Files.
First menu line enables / disables report and
history saving.
The method for accessing the stored les in
your Listen Ear™ is by using your computer’s le
explorer application, where the stored les can
be downloaded and manipulated as required.
Two types of les are stored (depending on settings):
• Report les, named rep_0001.txt (in folder /REPORTS), containing
recording session details. These can be opened by any text editor, i.e.
Notepad in Windows based PC’s
• Time history les, named hst_0001.csv (in folder /HISTORY), containing
periodically saved levels measured. Data is stored in the csv (comma
separated values) format and can be opened by any text editor, i.e.
Notepad or Microsoft Excel in Windows based PC’s and used to post
process recorded data, i.e. to plot a Time History graph.
The Time history sets how often data is recorded in the history le.
Longer data recording periods decrease the history le size,
allowing to store more les.
The Memory Manager
allows you to check available
storage space, content and
format memory if necessary.
CAUTION - memory
formatting will delete all
your existing report and
history les!
10

Menu / Settings / Alerts
This page refers to the settings for the Info LED
warning indicator.
If enabled, the ‘Info LED’ will indicate two
different alerts:
• Amber or Red for Noise Dose
• Blue for Sound Level Noise peak
The ‘Info LED’ will start blinking Amber or Red when the Noise Dose
will exceed set levels. If an alert has been triggered, press any button to
stop the LED from blinking.
Should you be in very high noise environments the ‘Info LED’ will ash
blue to indicate a peak level exceeded.
Menu / Settings / Meter
It is not recommended to alter the Meter Settings if you
are unfamiliar with the use and understanding of noise
measurements.
See chapter 11.0 Theory behind the Listen Ear™
Choose between Fast & Slow Time weighting.
Choose between A, C & Z Frequency Weightings
Choose Criterion Level from 75 - 90dB
Criterion Time is set to 8 hours in accordance
with Noise at Work Regulations
Choose recording Auto Stop time from 8 hours
to 16 hours or OFF
Menu / Settings / Time-Date
Set current Time and Date.
Press NEXT to select item to be adjusted,
press +/OK to adjust selected item.
Select SAVE and press +/OK to save new
settings. Otherwise select Cancel or EXIT
from menu.
11

Menu / Settings / Defaults
To restore back to default factory settings,
SCROLL down to Defaults and press ENTER.
Conrm in the next step.
Report and history les will not be affected.
5.3 Menu / Info
Information about your Listen Ear™ can be
found in the Info Page.
• Listen Ear Model & Serial Number
• Firmware Version
• Battery Remaining (%)
• Memory Storage Remaining (%)
Info Page is a READ ONLY Page.
To exit the Info Page press both buttons simultaneously.
6.0 CALIBRATION
In accordance with Noise at Work Regulations - Each time a
device is used it should be calibrated using an acoustic calibrator.
This will ensure the instrument is measuring correctly and that
you are complying with the requirements of any standards.
The Calibration menu can be accessed via the Menu/Settings/Meter.
Press and hold both buttons at the same time for 3 seconds to access
the calibration menu.
6.1 Calibration procedure
Int. refers to the built-in microphone
Ext. refers to the optional external microphone
that can be used via the micro USB port.
Pressing NEXT (both buttons) will step through the
calibration menu from Int. to Ext. Microphones
and returning back to the Meter page.
12

Ensure Listen Ear™ is situated on a stable at surface throughout the
calibration process.
Place Sound Calibration Unit (SCU) provided over the internal or
external microphone.
1. Switch ON SCU. A continuous SPL of 94dB @ 1KHz shall be applied
to the Internal/External microphone.
2. Ls should read 94dBA +/- 0.2dBA. If required adjust SPL Value using
+/- buttons.
3. To store the new calibration value, press and hold both buttons
simultaneously until conrmation is shown.
4. Remove and switch OFF SCU.
5. The Listen Ear™ is now calibrated.
7.0 ATTACHING YOUR Listen Ear™
Mount the Listen Ear™ as close to your ear as possible.
Attach the Listen Ear™ to your clothing using the integrated clip.
7.1 Mounting Listen Ear™ with external microphone attached
Your Listen Ear device can be supplied with an external microphone
which provides added exibility for positioning.
Plug the External microphone provided into the Micro USB Socket.
The microphone LED shall Illuminate momentarily.
The Icon shall appear on the status bar indicating that the External
microphone has been correctly paired and activated ready for use.
Relevant calibration data has been applied automatically.
The Internal microphone will be disabled while the External
microphone is connected.
The Anti-Knock & Vibration System is not active when External
microphone is connected
Only microphones supplied by Pambry Electronics will be
recognised (paired) by the Listen Ear™
Attach Ext. microphone to your shoulder or helmet as close to the ear
as possible using the mounting clip provided.
13

8.0 SPECIAL FEATURES
8.1 Anti-Knock & Vibration System
A major problem encountered with personal noise dosimeters is
distinguishing between true audio impulse noise and extraneous
mechanical ‘tapping’ on the personal noise dosimeter casing. The
introduction of a Patented Anti-Knock & Vibration System to the Listen
Ear™ provides an additional level of accuracy to the nal result. The
Listen Ear™ can detect and eliminate the mechanical tapping noise,
therefore the noise exposure measured and recorded is an actual
representation of that environment. Number of detected ‘knocks’ is
recorded and stored in the report le. The Anti-Knock & Vibration
System is not active when the External microphone is connected.
8.2 Motion Detection System
This feature monitors the Listen Ear™ motion status. It will detect if the
unit is not worn during the recording session. The ‘non motion’ event will
be detected if the unit is stationary for at least 10 seconds. Number of
events and summary of ‘no motion’ time is recorded in the report le.
8.3 Auto Power OFF
To save the battery life, the Listen Ear™ will switch itself OFF after 1
hour if no motion is detected and no record is taking place.
9.0 MEASUREMENTS
Your Listen Ear™ is a sound level meter with the capacity to record
and calculate the complex requirements for safe levels of noise dose.
The traditional working day of 8 hours is used and set as a default in
your Listen Ear™. This can be altered as can the various audio
thresholds but it is NOT recommended you do or need to until
you are entirely familiar with the subject of NIHL.
9.1 Use as a Sound Level Meter
Scroll your Listen Ear™ to the page labelled
‘Level’. This function provides you with a live
sound level (the large digits in the screen centre)
and the reading will change with the level of
sounds heard in your environment.
These can be modied under the settings menu.
14

The smaller digits and icons at the top and bottom of the screen relate
to the unit’s use as a Noise Dosimeter.
9.2 Use as a Noise Dosimeter
Scroll your Listen Ear™ to the screen labelled ‘Dose’. The percentage
value gives you the amount of Noise Dosage you have used up over
your working 8hr day. The Projected Noise Dose represent calculated
dose at the end of the 8h shift, assuming that the noise level will stay at
the current level.
Start Measurement
Press and hold the Record button. The ‘Info’
LED shall illuminate GREEN momentarily and
“Record started” message shall also appear
momentarily. The real-time counter is now
activated which indicates that your Noise
Dosimeter is calculating and recording data.
Stop Measurement
Press and hold the Record button. The ‘Info’ LED
shall illuminate RED momentarily.
At the end of the 8 hour work shift if you are
working safely, the dose value will display less
than 100%.
Should you exceed the Alert dose threshold levels
(see page 11) the icon will be displayed.
It is advised that you should remove yourself to a quiet environment to
allow your hearing to recover if the dose recorded is greater than 100%.
You may also consider using the Ear Defenders.
Menu and Settings cannot be accessed while recording is in progress.
15

10.0 FIRMWARE UPDATE
Firmware is the software that is inside the Listen Ear™. Occasionally,
Pambry Electronics may release new versions of the rmware that add
enhanced functions or x software bugs.
To update the rmware, you need a USB connection from your computer
to your Listen Ear™. You must also have a copy of the rmware le,
obtained from Pambry Electronics website or Customer Service.
1. Turn on and connect your Listen Ear™ to your PC.
2. Copy the Firmware update le to your Listen Ear™ memory.
3. Disconnect Listen Ear™ from your PC.
4. Press and hold Power button until ‘Info LED’ starts blinking blue.
Release buttons.
5. Your Listen Ear™ will start in the ‘Bootloader’ mode and will ask you
to conrm rmware update. Press ‘Yes’, the ‘Info LED’ will start blinking
green, and nally your Listen Ear™ will restart with new Firmware.
Firmware update process may take up to 1 minute. Do not press
any buttons whilst update is in progress.
11.0 THEORY BEHIND THE Listen Ear™
11.1 Reference Information - NIHL
Noise-induced hearing loss (NIHL) is hearing impairment or loss
resulting from exposure to loud sound. As a consequence, you may have
a loss of perception of a narrow range of frequencies, impaired cognitive
perception of sound, or other impairment, including sensitivity to sound
or even ringing in the ears.
Hearing may deteriorate gradually from chronic and repeated noise
exposure, such as loud music or background noise, OR suddenly, from a
short high intensity impulse noise such as a gunshot or air horn.
In both types of noise, the loud sound over stimulates delicate hearing
cells, leading to the permanent injury or death of these cells. Once lost,
your hearing cannot be restored. When exposure to hazards such as
noise occur at work and is associated with hearing loss, it is referred to
as occupational hearing loss.
Listen Ear™ has the capability of monitoring both types of noise. There
are various standards to which noise measurements adhere to, but the
main ones are the US and EU/UK references.
16

The more stringent of these standards is the EU/UK and this is the
default setting for your Listen Ear™. Units for the US market can be
ordered with the US standard as the default settings, although all Listen
Ear™ units can be modied via the Settings pages.
It is important to realise that once you have been subjected to a signicant
amount of excessive noise and your hearing loss is conrmed, it is too late!
So, what will your Listen Ear™ do. The device is primarily designed
to measure the noise levels in your environment. Wherever you are,
if you are wearing it, the LEVEL display screen will indicate the actual
noise level in dB in real time. The DOSE display screen takes these
level measurements and integrates them over an 8-hour time slot
to give you a percentage noise dose gure. As you work or play in a
noisy environment, the dose meter will register and record the amount
of noise and present it as a percentage of the safe allowable level.
Once you reach 100% you should remove yourself from the noisy
environment and recover for 24 hours. This is what Listen Ear™ does - it
tells you when you have received enough noise on a daily (8hr) basis and
will help to save your hearing.
Below is a table of typical noise levels for your information.
dB Levels
Possible physical damage 160 Pistol shot
150 Fireworks display, Rock concert peak
Acoustic trauma 140 Shotgun blast
Painful 130 Jet engine (50m distance), motor racing
120 Rock concert, thunder
Extremely loud 110 Car horn, snow blower, pneumatic hammer
100 Blow dryer, helicopter cabin, chainsaw
90 Motorcycle, lawnmower,
Ear protection required 85
Factory Noise Action Level. Very loud 80 Factory, noisy restaurant, vacuum cleaner
Loud 70 Car cabin, alarm clock, city trafc
60 Conversation, dishwasher
Moderate 50
Faint 40 Refrigerator
Quiet 30 Whisper
20 Ticking watch
17

11.2 Ear Protection
Ear defenders or ear muffs are PPE (personal protective equipment)
designed to protect the wearer from extreme noises. The head-band and
outer covering is usually made from a hard thermoplastic or metal. The
protection usually comes from acoustic foam - this absorbs sound waves
by increasing air resistance, thus reducing the amplitude of the waves.
What is SNR?
SNR is a Single Number Rating system. The SNR value can be used
to compare the level of noise attenuation offered by different hearing
protectors. To determine acoustic pressure on your ears, you subtract
the SNR value from the average noise level measured. For example:
The noise level measures an average of 99dB. You are wearing ear
protection with an SNR of 19. Thus, the acoustic pressure on your
ears is on average 99 - 19 = 80dB.
The higher the SNR, the higher the level of noise attenuation
provided by the hearing protection.
11.3 A, C & Z Filter Weighting
Our Human hearing has a specic performance over a certain frequency.
Weighting Filters represent our hearing performance at specic sound
levels with respect to frequency.
• A - Filter: emulating the human hearing @ lower levels
• C - Filter: emulating the human hearing @ higher levels
• Z - No weighting, i.e what the system is actually producing.
Figure 1 opposite illustrates frequency response curves for A, C & Z
Filter Weighting.
18

Figure 1 - Frequency Weighting Curves
11.4 Fast & Slow Time Weighting
Time weightings are used to represent the behaviour of sound pressure
levels.
When sound level meters were rst developed, analogue meters were
used. The needle would move corresponding to the sound pressure
level. The needle size would vary depending on manufacture leading to
ambiguous results.
Standards were introduced to ensure sound level meters from different
manufacturers would display the same readings.
These are known as time weightings
F - Fast Weighting time constant = 125mS - decay 34,7 dB/sec. it is
only a glimpse of the very last Sound pressure that has happened during
our recording.
S - Slow Weighting time constant = 1 sec - decay 4,3 dB/sec
This smoother level history can give you a better indication of the noise
level in an environment which is constantly changing.
Keep in mind that Leq is the most relevant long-term
measurement that would correspond to our human perception.
19

12.0 REPORT AND HISTORY FILES
The report and history les are stored in the memory only ‘report’
function is enabled in Menu/Setting/Reports (see page 11). Both le names
are numbered i.e. rep_0004.txt and hst_0004.csv for the report
number 4. Files are stored in folder /Reports and /History respectively.
12.1 Report le example
Daily Noise Dose Report #0004 ________________________________
Dose recorded 141.55%
Record duration 06:21:23
Record started 09:34:56 14/07/17
Record completed 15:56:19 14/07/17
Details ______________________________________________________
Lex8h 86.51dB
Las min --- 15:04:06 14/07/17
Las max 117.9dB 13:51:07 14/07/17
Lpk max 129dB
E 1.432577Pa2h
Peak events 105
Overloads 0
Criterion level 85dB
Model PED 0828
Serial number 00005
Calibration time Internal Mic. 10:08:00 03/07/17
Report le rep_0004.txt
Time history le hst_0004.csv
Environment data _____________________________________________
Temperature min 19.6’C 09:34:56 14/07/17
Temperature max 28.0’C 12:01:42 14/07/17
Humidity min 32.0%RH 13:07:22 14/07/17
Humidity max 54.3%RH 09:35:22 14/07/17
No motion events (>10s) 141 Duration 00:43:10
Knock events 83
End of Report ________________________________________________
20
Other manuals for Listen Ear
1
Table of contents
Other Pambry Measuring Instrument manuals
Popular Measuring Instrument manuals by other brands

ANDERSON-NEGELE
ANDERSON-NEGELE IZMSA operating manual

Ditel
Ditel BETA-D instruction manual

Endress+Hauser
Endress+Hauser StamoSens CNM 750 operating instructions

Trimax Meters
Trimax Meters SM-2500 user manual

Raycus
Raycus RFL-C Series user guide

Hanna Instruments
Hanna Instruments Checker HI721 instruction manual