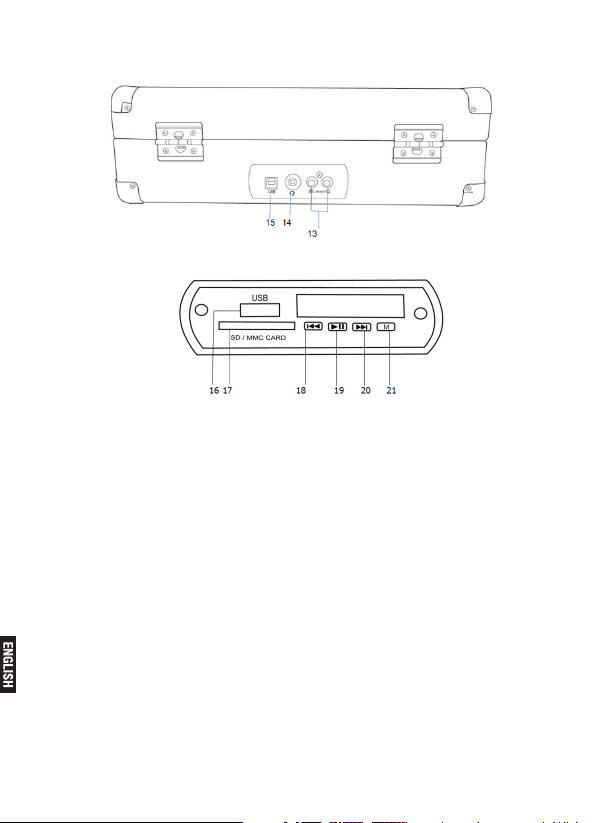
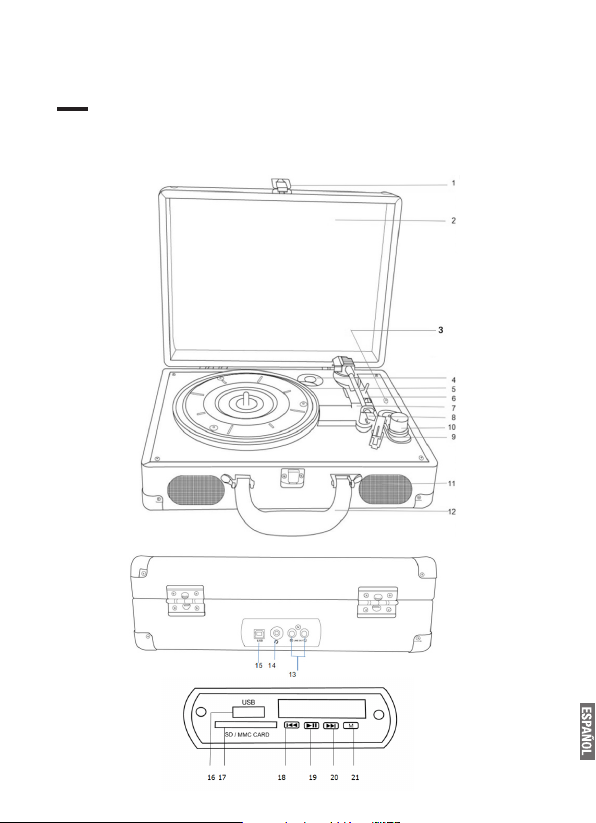
Panacom LP-8804 User manual


Pg. 3
LP-8804 - USER MANUAL
ENGLISH
Thanks for purchasing Panacom Suitcase Turntable .Please read
this manual carefully before using this Turntable.
Description:

Pg. 4
1. Lock catch.
2. Plastic dust cover.
3. Adapter - Use this when playing 45rpm records with cut out centres.
4. Tonearm lift lever.
5. Turntable.
6. Auto stop control.
7. Speed selection - Three speed for choice: 33.3, 45, 78 rpm.
8. Lock ON and OFF/BT.
9. Needle.
10. Power switch.
11. Built-in stereo speaker.
12. Handle.
13. RCA output.
14. Socket for headphone to play iphone/ipod.
15. USB 5V DC power in socket.
16. USB slot.
17. SD slot.

Pg. 5
18. Skip Up button.
19. Play or pause button.
20. Skip down button.
21. Mode: to select FM radio/USB/SD or LP songs.
Initial Set-Up
Mains Connection
Ensure that the mains voltage of your home corresponds to the
operating voltage of the unit. Your unit is ready to be connected to a
mains voltage of 100-240V/50-60Hz.
Amplifier Connection (If Required)
Whilst you can listen to your new turntable using the built in
speakers you may also wish to connect it to your existing Hi Fi
system. To do that, connect the audio plugs to the AUX input on
your mixer or amplier using an RCA cable (not supplied)
• Red plug into R/H channel input.
• White plug into L/H channel input.
Playing a record
- Place the record of your choice on the turntable. If required, do not
forget to place the adaptor on the record spindle.
- Choose the desired playing speed using the speed selection
switch between 33.3, 45 and 78rpm.
- Turn on the Rotary Power Switch. Note: it also controls the volume.
- Release the tone arm lock.
- Raise the arm with your hand lightly.
- Place the stylus vertically over the rst track of the record, the
turntable will start turning automatically.
- Slowly put down the stylus on to the record to star playing.
- When a record comes to an end, the turntable will stop
automatically as long as the auto-stop switch is in the ON position.

Pg. 6
If the switch is in the off position then it will keep revolving until the
tone arm is returned to the tone arm rest.
- Lift up the tone arm and put it on the rest position when you have
nishes playing.
- Replace the protective cap on the stylus and close the tone arm lock.
- Turn off power at mains.
Listen to USB SD tracks
- Turn the volume knob in a clockwise direction to turn the
equipment on.
- Use the function selector to select USB mode.
- Insert the USB/SD card to correct slot.
- Wait for 6-10s, once the machine read the Total tracks ,will auto-
play the tracks.
- Press M button to convert USB/SD Tracks.(default for U-disc play)
- Press Play. re-pressed, pause.
- Press Next, play nexttrack.
- Press Play previous track.
- Keep Pressing Next for 3s, can enlarge the volume of source-disc.
- Keep pressing Prev for 3s, can reduce the volume.

Pg. 7
BT Connection Output function
- To connect BT Connection speakers via BT.
- Turn on the BT Connection speakers when the turntable is on,
and then turn BT Connection speakers to BT mode, then it will
connect directly.
- If cannot connect quickly, press the NO.3 BT connection reset
button once.
Selection of built-in speakers or output BT Connection speakers
- Turn the button of NO.6, can choose built-in speakers or BT speakers.
- When turn to off/turn up, it will play the built-in speakers.
- When turn to on/turn down, it will play the output BT
Connection speakers.
1) Push the arm lock to release the tone-arm.
2) Take off cap of the cartridge to expose the needle out.
3) Separate the cartridge from the socket lightly.
4) Take off the audio-line from the cartridges completely.
MAINTENANCE
Replacing the stylus
5-8) To t a new one just in opposite deals. Insert the audio-line
accordingly, and install the cartridge to the socket ligthly.

Pg. 8
NOTES:
We advise you to clean your records with an anti-static cloth to
preserve its quality.
For the same reason your stylus should be replaced periodically
(approximately every 250 hours)
Dust the stylus from time to time using a very soft brush soaked
in alcohol.
WHEN CARRYING YOUR RECORD PLAYER DO NOT FORGET TO:
• Replace the protective cap on the stylus.
• Put the rest clip into the pick-up arm.
Please exercise extreme care whilst performing this operation so
as to avoid the tone arm and audio line wires from any damage.
Features:
1. 33.3, 45 and 78 RPM turntable player
2. Built-in Speaker (2x1W RMS).
3. USB/SD playing.
4. 3.5mm earphone jack.
5. RCA Line out.
6. Rechargeable lithium battery.
7. BT connection Output.

Pg. 9
LP-8804 - MANUAL DE USUARIO
ESPAÑOL
Gracias por comprar la Bandeja giradiscos de Panacom. Lea este
manual cuidadosamente antes de usarla.

Pg. 10
DESCRIPCIÓN
1. Traba.
2. Cubierta antipolvo
3. Adaptador: utilícelo cuando reproduzca registros de 45rpm con
centros cortados.
4. Palanca de elevación del brazo.
5. Placa giratoria.
6. Control de parada automática.
7. Selección de velocidad: 33.3, 45, 78 rpm.
8. Botón de reajuste de Conexión BT.
9. Aguja.
10. Interruptor de encendido.
11. Altavoz estéreo incorporado.
12. Manija.
13. Salida RCA.
14. Entrada para auriculares.
15. Alimentación de 5V DC USB.
16. Entrada USB.
17. Entrada SD.
18. Botón Anterior.
19. Botón Reproducir o pausar.
20. Boton Siguiente.
21. Modo: para seleccionar canciones de USB / SD o LP.
INSTALACIÓN
Suministro de energía principal
Compruebe que el voltaje del suministro eléctrico local corresponda
con las especicaciones de la unidad. El giradiscos está preparado
para soportar un voltaje de 230V/50Hz.
Conexión a un amplificador (en caso de que sea necesario)
Si bien es posible reproducir la música y escucharla a través
de los parlantes incorporados, en caso de que quiera utilizar un
amplicador, puede conectarse a su sistema HI FI a través de un
cable RCA (no incluido).
• Conectar el cable rojo a la entrada de canal R/H.
• Conectar el cable blanco a la entrada de canal L/H.

Pg. 11
Para Reproducir un Disco
- Coloque un disco a elección sobre el tocadiscos. En caso de que
sea necesario, coloque un adaptador en el eje de disco.
- Elija una velocidad de reproducción de las tres opciones de
velocidad disponibles: 33.3, 45 o 78rpm.
- Encienda el motor de rotación. Nota: el motor también controla
el volumen.
- Libere el seguro del brazo del tocadiscos y elévelo suavemente.
- Coloque la aguja verticalmente sobre la primera pista del disco y
el tocadiscos comenzará la reproducción automáticamente.
- Cuando se complete la reproducción de todo el disco, el
tocadiscos se detendrá automáticamente siempre y cuando esa
función se encuentre habilitada. En caso de que esa función no se
encuentre habilitada, el disco continuará dando vueltas hasta que
el brazo del tocadiscos se vuelva a colocar en la posición original.
- Una vez que termine la reproducción, coloque el brazo del
tocadiscos en la posición original.
- Coloque la tapa protectora sobre la aguja y guarde el brazo del
tocadisos con el seguro.
- Para nalizar, apague el tocadiscos.
Reproducción de pistas USB/SD
- Para encender el equipo, gire la rueda de volumen en dirección a
las agujas del reloj.
- Presione el botón M (modo) para seleccionar el modo USB/tarjeta SD.
- Inserte el USB/tarjeta SD en la entrada correspondiente.
- Espere a que la bandeja lea la tarjeta de memoria correctamente.
- Esta operación durará unos segundos. Una vez que la
información haya sido leída correctamente, comenzará la
reproducción de las pistas automáticamente.
- Presione el botón Play para comenzar la reproducción. Presione
nuevamente para pausar.

Pg. 12
- Presione el botón Next para reproducir la pista siguiente.
- Presione Next sostenidamente para aumentar el volumen.
- Presione el botón Prev para reproducir la pista anterior.
- Presione el botón Prev sostenidamente para disminuir el volumen.
Función de salida como Conexión BT
Para conectar altavoces Conexión BT a través de BT.
- Encienda los altavoces cuando el tocadiscos esté encendido, y
luego conectelos a modo Conexión BT.
- Si no puede conectar rápidamente, presione el botón de reajuste
de Conexión BT (botón N°17).
Selección de altavoces incorporados o altavoces de conexión BT
- Con el botón N°6 puedes elegir altavoces incorporados o
altavoces para conexión BT.
- Cuando se gira para apagar, se reproducirá los altavoces incorporados.
- Cuando gira para encender, reproducirá los altavoces en
conexión BT.

Pg. 13
Asegúrese de realizar estas operaciones con sumo cuidado
para evitar cualquier daño.
NOTAS
Se recomienda limpiar los discos suavemente con un paño para
cuidar la calidad de los mismos.
Por la misma razón, el stylus (aguja) debe ser recambiada
periódicamente (cada un aproximado de 250 horas) y limpiado
utilizando un cepillo extra suave sumergido en alcohol.
Mantenimiento
Para reponer el STYLUS siga las instrucciones de las
imágenes.
1) Quite el seguro del brazo.
2) Quite la tapa del cartucho y libere la aguja.
3) Separe suavemente el cartucho del encaje.
4) Separe por completo al cartucho de la línea de sonido.
5-8) Para reponerlo por uno nuevo, inserte la línea de sonido de esta
manera e instale suavemente el cartucho en su posición original.

Pg. 14
Cuando transporte su tocadiscos, no se olvide de:
• Colocar la tapa protectora sobre el stylus
• Asegurar al brazo del tocadiscos a su posición.
Catacterísticas:
1.Bandeja giradiscos de 33, 45 y 78 RPM.
2. Altavoz incorporado (2x1W RMS).
3. Lector USB / SD.
4. Entrada de auriculares de 3,5mm.
5. Salida RCA.
6. Batería recargable de litio.
7. Salida de conexión inalámbrica BT.

Pg. 15

Pg. 16


Table of contents
Languages:
Other Panacom Turntable manuals
Popular Turntable manuals by other brands

Massive
Massive H7MCP owner's manual

birddog
birddog PLAY quick start guide

Audio Technica
Audio Technica AT-LP5 Installation and operation manual

Audio Technica
Audio Technica AT-LP2X user manual

JVC
JVC QL-Y5SF Service manual

Pro-Ject Audio Systems
Pro-Ject Audio Systems 1 Xpression Carbon Classic Instructions for use