Panasonic SJ-MR100 User manual

PORTABLEMDRECORDER
00
4020840-db
SJ-MR100
DIGITALRECORDING
DISPLAY
ENTER
CAPS LOCK
EDIT
MARKMODE
POWEROFFCHARA
VOL/CURSOR
MODE EQ/RECSENS
DELETE
RECPAUSE
SPACE
sr
:9
HOLD
OPEN
(
PLUGIN POWER
)
MIC
OPT/LINEIN
Ë
Portable MD Recorder
Grabador portátil de
minidisc
Portabel MD-spelare med
inspelningsfunktion
Tragbarer MD-Recorder
Registratore di MD portatile
Enregistreur de minidiscs
portable
Draagbare md-recorder
Transportabel MD-optager
SJ-MR100
Operating Instructions
Instrucciones de funcionamiento
Bruksanvisning
Bedienungsanleitung
Istruzioni per l’uso
Mode d’emploi
Gebruiksaanwijzing
Brugsvejledning
∫ENGLISH
See pages 2–77.
∫ESPAÑOL
Consulte las páginas 3–73 y
78–81.
∫SVENSKA
Se sidorna 3–73 och 82–85.
∫DEUTSCH
Siehe Seite 88–158 und
160–163.
∫ITALIANO
Vedere alle pagine 89–159 e
164–167.
∫FRANÇAIS
Voir pages 89–159 et 168–171.
∫NEDERLANDS
Zie blz. 174–244 en 246–249.
∫DANSK
Se side 175–245 og 250–253.
RQT5119-B
Note
The “EB” indication shown on the packing
case indicates United Kingdom.
Before connecting, operating or adjusting
this product, please read these instructions
completely. Please keep this manual for fu-
ture reference.
EGEB

MARKMODE
PORTABLEMDRECORDER
00
4020840-db
SJ-MR100
DIGITALRECORDING
DISPLAY
CAPSLOCK
EDIT
POWEROFFCHARAVOL/CURSOR
MODEEQ/RECSENS
DELETE
RECPAUSE
SPACE
sr
9
ENTER
:
MARKMODE
PORTABLEMDRECORDER
00
4020840-db
SJ-MR100
DIGITAL RECORDING
DISPLAY
CAPSLOCK
EDIT
POWEROFFCHARAVOL/CURSOR
MODEEQ/RECSENS
DELETE
REC PAUSE
SPACE
sr
9
ENTER
:
2
OPEN
1
2
RQT5119
ENGLISH
Table of contents
Location of controls . . . . . . . . . . . 04
Power source. . . . . . . . . . . . . . . . . 08
The HOLD function . . . . . . . . . . . . 12
Before recording . . . . . . . . . . . . . . 14
Recording. . . . . . . . . . . . . . . . . . . . 18
Other recording functions . . . . . . 28
Playback (Basic play) . . . . . . . . . . 32
Other playback functions . . . . . . . 36
Other useful functions . . . . . . . . . 46
Editing MDs . . . . . . . . . . . . . . . . . . 48
Titling MDs. . . . . . . . . . . . . . . . . . . 58
Using the unit with optional
accessories . . . . . . . . . . . . . . . . 68
Some useful information
about MDs. . . . . . . . . . . . . . . . . . 70
Troubleshooting guide . . . . . . . . . 74
Displays . . . . . . . . . . . . . . . . . . . . . 75
Cautions. . . . . . . . . . . . . . . . . . . . . 76
Maintenance. . . . . . . . . . . . . . . . . . 76
Specifications . . . . . . . . . . . . . . . . 77
Supplied Accessories
Check the packing carton for these
accessories.
Stereo earphones.............................1pc.
(RFEV319P-SA)
Wired remote control........................1pc.
(RFEV023P-SM)
External battery case........................1pc.
(RFA1320-S)
Nickel-metal hydride rechargeable
battery...........................................1pc.
(RFKFBP140HSY)
Remove from case before use.
AC adaptor .......................................1pc.
For Continental Europe (RFEA002E-S)
For UK (RFEA003B-S)
Carrying case ...................................1pc.
(RFC0056-K)
Line cable.........................................1pc.
(RJL2P007X08)
(Use numbers indicated when asking for
replacement parts.)
A spacer has been inserted to
protect the mechanism.
Remove it before using the
unit.
Un espaciador ha sido inser-
tado para proteger el meca-
nismo. Retire este espaciador
antes de usar el aparato.
En distans har satts in för att
skydda mekanismen.
Avlägsna denna distans
innan du använder enheten.

3
RQT5119 ENGLISHESPAÑOLSVENSKA
ESPAÑOL
Índice
Ubicación de los controles. . . . . . 5
Alimentación . . . . . . . . . . . . . . . . . 9
La Función HOLD . . . . . . . . . . . . . 13
Antes de grabar. . . . . . . . . . . . . . . 15
Grabación. . . . . . . . . . . . . . . . . . . . 19
Otras funciones de grabación . . . 29
Reproducción
(Reproducción básica) . . . . . . . 33
Otras funciones de
reproducción . . . . . . . . . . . . . . . 37
Otras funciones útiles. . . . . . . . . . 47
Editando MDs. . . . . . . . . . . . . . . . . 49
Titulando MDs . . . . . . . . . . . . . . . . 59
Usando el aparato con los
accesorios opcionales . . . . . . . 69
Información útil acerca
de los MDs . . . . . . . . . . . . . . . . . 71
Guía para la localización de
las fallas . . . . . . . . . . . . . . . . . . . 78
Exhibiciones . . . . . . . . . . . . . . . . . 79
Precauciones. . . . . . . . . . . . . . . . . 80
Mantenimiento. . . . . . . . . . . . . . . . 80
Especificaciones . . . . . . . . . . . . . . 81
Accesorios Suministrados
Compruehe el embalaje para ver si
han sido suministrados los acceso-
rios siguientes.
Auriculares estéreo . . . . . . . . . . . . . . . 1
Control remoto con cable. . . . . . . . . . . 1
Estuche externo de la batería . . . . . . . 1
Batería recargable de hidruro de
níquel metálico . . . . . . . . . . . . . . . . . 1
Retírela de su estuche entes del uso.
Adaptador de CA . . . . . . . . . . . . . . . . . 1
Estuche de transporte . . . . . . . . . . . . . 1
Cable de conexión . . . . . . . . . . . . . . . . 1
SVENSKA
Innehålls-
förteckning
Kontrollernas placering . . . . . . . . 5
Strömkälla . . . . . . . . . . . . . . . . . . . 9
HÅLL-funktionen . . . . . . . . . . . . . . 13
Före inspelning . . . . . . . . . . . . . . . 15
Inspelning. . . . . . . . . . . . . . . . . . . . 19
Andra inspelningsfunktioner . . . . 29
Avspelning (Grundläggande). . . . 33
Andra avspelningsfunktioner. . . . 37
Andra praktiska funktioner. . . . . . 47
Redigering av MD-skivor . . . . . . . 49
Att benämna MD-skivor . . . . . . . . 59
Att använda enheten med extra
tillbehör. . . . . . . . . . . . . . . . . . . . 69
Diverse praktisk information om
MD-skivor . . . . . . . . . . . . . . . . . . 71
Felsökningsschema . . . . . . . . . . . 82
Meddelanden på displayen. . . . . . 83
Försiktighetsåtgärder . . . . . . . . . . 84
Underhåll . . . . . . . . . . . . . . . . . . . . 84
Tekniska data. . . . . . . . . . . . . . . . . 85
Medföljande tillbehör
Kontrollera att följande tillbehör finns
med i förpackningen.
Stereohörlurar . . . . . . . . . . . . . . . . . . . 1
Fjärrkontroll med kabel. . . . . . . . . . . . . 1
Externt batterifack . . . . . . . . . . . . . . . . 1
Laddningsbart batteri av
nickel-metallhydridtyp. . . . . . . . . . . . 1
Ta ut det laddningsbara batteriet ur
dess ask före användning
Växelströmsdapter . . . . . . . . . . . . . . . . 1
Bärväska . . . . . . . . . . . . . . . . . . . . . . . 1
Anslutningskabel . . . . . . . . . . . . . . . . . 1

4
RQT5119
ENGLISH
Location of
controls
Main unit A
AStop/power off/edit cancel button
(∫, POWER OFF)
BPlay/record/pause/power on/
character type button
(1/ ;, CHARA)
CDisplay
DVolume/cursor buttons
(Ms, rL, VOL/CURSOR)
EDisplay, capital/lower case but-
ton (DISPLAY, CAPS LOCK)
FChanging edit mode, changing
track mark mode, completing edit
button (EDIT, MARK MODE)
GJog dial (:, 9, ENTER ∆)
HTone/recording sensitivity/space
button (EQ/REC SENS, SPACE)
IOpen switch (OPEN ➞)
JPlay and record mode/character
delete button (MODE, DELETE)
KHold switch (⁄HOLD)
LRecording pause/power on
switch (REC PAUSE ➞)
MHeadphone jack (Ë)
NOptical digital in/line in jack
(OPT/LINE IN)
OMicrophone jack
[(PLUG IN POWER) MIC]
PRechargeable battery compart-
ment cover (2OPEN)
QConnection terminal for battery
case
RDC in jack (DC IN 1.8 V K)
Stereo earphones B
APlug
BSlider
Slide up to prevent tangling the cord
when the earphones are not in use.
A
B
PORTABLEMDRECORDER
00
40 20 840-db
SJ-MR100
DIGITALRECORDING
DISPLAY
ENTER
CAPSLOCK
EDIT
MARKMODE
POWEROFFCHARA
VOL/CURSOR
MODEEQ/RECSENS
DELETE
RECPAUSE
SPACE
sr
:9
HOLD
OPEN
(
PLUGIN POWER
)
MIC
OPT/LINEIN
Ë
C
B
A
PORTABLEMDRECORDER
00
4020
84
0-db
SJ-MR100
DIGITAL RECORDING
DISPLAY
ENTER
CAPSLOCK
EDIT
MARKMODE
POWEROFFCHARAVOL/CURSOR
MODEEQ/RECSENS
DELETE
RECPAUSESPACE
sr
KL
OPEN
HOLD
OPEN
DC IN 1.8V
K
R
L
ED
GHIJKLMN
O
F
R
Q
P
B
A

5
RQT5119 ENGLISHESPAÑOLSVENSKA
ESPAÑOL
Ubicación de
los controles
Aparato principal A
ABotón de parada/apagar/ cance-
lar edición (∫, POWER OFF)
BBotón de reproducción/graba-
ción/pausa/encendido/tipo de ca-
racter (1/ ;, CHARA)
CExhibición
DBotones de volumen/puntero
(Ms, rL, VOL/CURSOR)
EBotón de exhibición, mayús-
culas/minúsculas
(DISPLAY, CAPS LOCK)
FBotón de cambiar modo de edi-
ción, cambiar el modo de marca
do de pistas, completación de
edición (EDIT, MARK MODE)
GDial jog (:, 9, ENTER ∆)
HBotón de tono/sensibilidad de
grabación/espacio
(EQ/REC SENS, SPACE)
IInterruptor de abrir (OPEN ➞)
JBotón de modo de reproducción
y grabación/borrar caracter
(MODE, DELETE)
KInterruptor de retención
(⁄HOLD)
LInterruptor de pausa de graba-
ción/encendido (REC PAUSE ➞)
MToma de auriculares (Ë)
NEntrada óptico digital/toma en-
trada de línea (OPT/LINE IN)
OToma de micrófono
[(PLUG IN POWER) MIC]
PCubierta del compartimiento de
la batería recargable (2OPEN)
QTerminal de conexión para el es-
tuche de la batería
RToma de entrada de CC
(DC IN 1.8 V K)
Auriculares estéreo B
AEnchufe
BCorredera
Deslícela hacia arriba para prevenir que
la cuerda se enrede cuando los auricu-
lares no estén siendo usados.
SVENSKA
Kontrollernas
placering
Huvudenhet A
AKnapp för stopp/avslag/rediger-
ingshävning (∫, POWER OFF)
BKnapp för avspelning/inspelning/
paus/påslag/textinmatning
(1/ ;, CHARA)
CDisplay
DKnappar för volym/pekare
(Ms, rL,VOL/CURSOR)
EKnapp för display, versaler/
gemena (DISPLAY, CAPS LOCK)
FKnapp för redigeringsfunktion,
spårmarkeringsfunktion
(EDIT, MARK MODE)
GJogratt (:, 9, ENTER ∆)
HKnapp för ton/inspelningskän-
slighet/mellanrum
(EQ/REC SENS, SPACE)
IReglage för öppning av spelaren
(OPEN ➞)
JKnapp för avspelnings- och in-
spelningsfunktioner/textradering
(MODE, DELETE)
KHållknapp (⁄HOLD)
LKnapp för inspelningspaus/på-
slag (REC PAUSE ➞)
MHörlursanslutning (Ë)
NOptisk digitalingång/linjeingång
(OPT/LINE IN)
OMikrofonanslutning
[(PLUG IN POWER) MIC]
PLucka för det laddningsbara bat-
teriets fack (2OPEN)
QBatterifackets kontakt
RIngång för likström
(DC IN 1.8 VK)
Stereohörlurar B
APlugg
BGlidspänne
För den uppåt för att undvika att sladden
trasslar när hörlurarna inte används.

ENGLISH
Location of controls
Wired remote control A
AEarphone jack
BDisplay
CPlay/record/stop button
DFunction selector/hold switch
(MAIN, SUB, HOLD)
The operation depends on the position of
this switch. Ensure the switch is in the
correct position before using the remote
control. These symbols are used to indi-
cate the position of this switch in the in-
structions.
EVolume control/tone control/
track mark button
(VOL r, EQ, T.MARK)
FVolume /play mode/recording
pause button
(VOL s, PLAY MODE, REC
PAUSE)
GSkip/search(forward)/light/dis-
play button
(9, $LIGHT %DISP)
HSkip/search (backward) button
(:)
An operation tone sounds when buttons on
the remote control are pressed. This tone is
represented in these instructions by “ ”.
Display information B
ASynchronized recording display
BRecording display
CMonaural play/record display
DBattery indication
EPlay mode
FRemaining recording time
GText
HSound quality
IDisc mark
JLevel meter
6
RQT5119
A
B
1
TRAIN REC
REMAIN
RANDOM
SYNC MONOREC
S-XBS
-
VOL
) LIGHT
*DISP
PLAY MODE
REC PAUSE EQ
T.MARK
E
E
HG
F
E
CB
A
D
G
F
ECB
A
H
I
J
MAIN SUB HOLD
MAIN SUB HOLD
MAIN SUB HOLD
MAIN
SUB
HOLD
D
x

7
RQT5119 ENGLISHESPAÑOLSVENSKA
ESPAÑOL
Ubicación de los
controles
Control remoto con cable A
AToma de auriculares
BExhibición
CBotón de reproducción/graba-
ción/parada
DInterruptor selector de función/
retención (MAIN, SUB, HOLD)
La operación depende de la posición de
este interruptor. Asegúrese que el inter-
ruptor esté en la posición correcta antes
de usar el control remoto. Estos símbo-
los son usados para indicar la posición
de este interruptor en las instrucciones.
EBotón de control de volumen/
control de tono/marca de pistas
(VOL r, EQ, T.MARK)
FBotón de volumen/modo de re-
producción/pausa de grabación
(VOL s, PLAY MODE, REC
PAUSE)
GBotón de salto/búsqueda (hacia
adelante)/luz/exhibición
(9, $LIGHT %DISP)
HBotón de salto/búsqueda
(hacia atrás) (:)
Suena un tono de funcionamiento al oprimir
los botones del control remoto. En estas in-
strucciones, se representa este tono me-
diante “ ”.
Información de la exhibición
B
AExhibición de grabación sincro-
nizada
BExhibición de grabación
CExhibición de reproducción
monoaural/grabación
DIndicación de la batería
EModo de reproducción
FTiempo de grabación remanente
GTexto
HCalidad de sonido
IMarca de disco
JMedidor de nivel
SVENSKA
Kontrollernas placering
Fjärrkontroll med kabel A
AHörlursuttag
BDisplay
CKnapp för avspelning/inspelning/
stopp
DOmkopplare för funktionsväljare/
håll (MAIN, SUB, HOLD)
Fjärrkontrollens handhavande beror på
hur denna omkopplare är inställd. Se till
att omkopplaren är korrekt inställd innan
du använder fjärrkontrollen. Dessa sym-
boler används för att indikera omkopp-
larens inställning i dessa instruktioner.
EKnapp för volymkontroll/tonkon-
troll/spårmarkering
(VOL r, EQ, T.MARK)
FKnapp för volym/avspelnings-
funktion/inspelningspaus
(VOL s, PLAY MODE, REC
PAUSE)
GKnapp för hopp/sökning (framåt)/
ljus/display
(9, $LIGHT %DISP)
HKnapp för hopp/sökning (bakåt)
(:)
En funktionston ljuder när knapparna på
fjärrkontrollen trycks ned.
Denna ton indikeras i dessa instruktioner
med ett “ ”.
Displayinformation B
AVisning av synkroniserad inspel-
ning
BVisning av inspelning
CVisning av avspelning/inspelning
i mono
DBatteriindikator
EAvspelningsfunktion
FÅterstående inspelningstid
GText
HLjudkvalitet
ISkivmarkering
JNivåmätare
x
x

8
RQT5119
ENGLISH
Power source
The rechargeable battery
(included)
1Put the battery into the unit.
The unit cannot recharge batteries other than
the one supplied or recommended replace-
ments.
2Connect the AC adaptor.
aDC IN jack (DC IN 1.8 V K)
bBack panel of the unit
cAC adaptor(included)
dHousehold mains socket
Recharging begins.
“CHARGE” appears on the display while
recharging. A
eScrolls
“CHARGE” disappears when the battery is
fully charged. It takes approximately 3 hours
to recharge the supplied battery.
3Disconnect the AC adaptor from
the [DC IN 1.8 V K] terminal
and the household mains socket.
Note.
≥The unit can only be recharged while it is
off.
≥The AC adaptor and battery may become
warm during recharging but this is normal.
∫Recharging time and dura-
tion.
(When using the included rechargeable bat-
tery.)
Charging: Approx. 3 hours
Playback: Approx. 8.5 hours
Recording: Approx. 4.5 hours
≥Duration may be reduced under some con-
ditions.
≥If the unit is to be used for long periods,
such as during recording, use the AC adap-
tor to power it.
∫Rechargeable number of
times
About 300.
The battery has reached the end of its useful
life if play time dramatically reduces after
recharging.
∫Replacement
Nickel-metal hydride rechargeable battery
(RFKFBP140HSY).
Please inquire at a Panasonic dealer for a re-
placement.
A
DE
L
OPEN
OPEN
A
C
E
R
MO
DE
L
OPEN
OPEN
B
1
2
DC IN 1.8V
K
a
e
d
c
b
Note
For UK, the shape of the charger is
different.

9
RQT5119 ENGLISHESPAÑOLSVENSKA
ESPAÑOL
Alimentación
La batería recargable
(incluida)
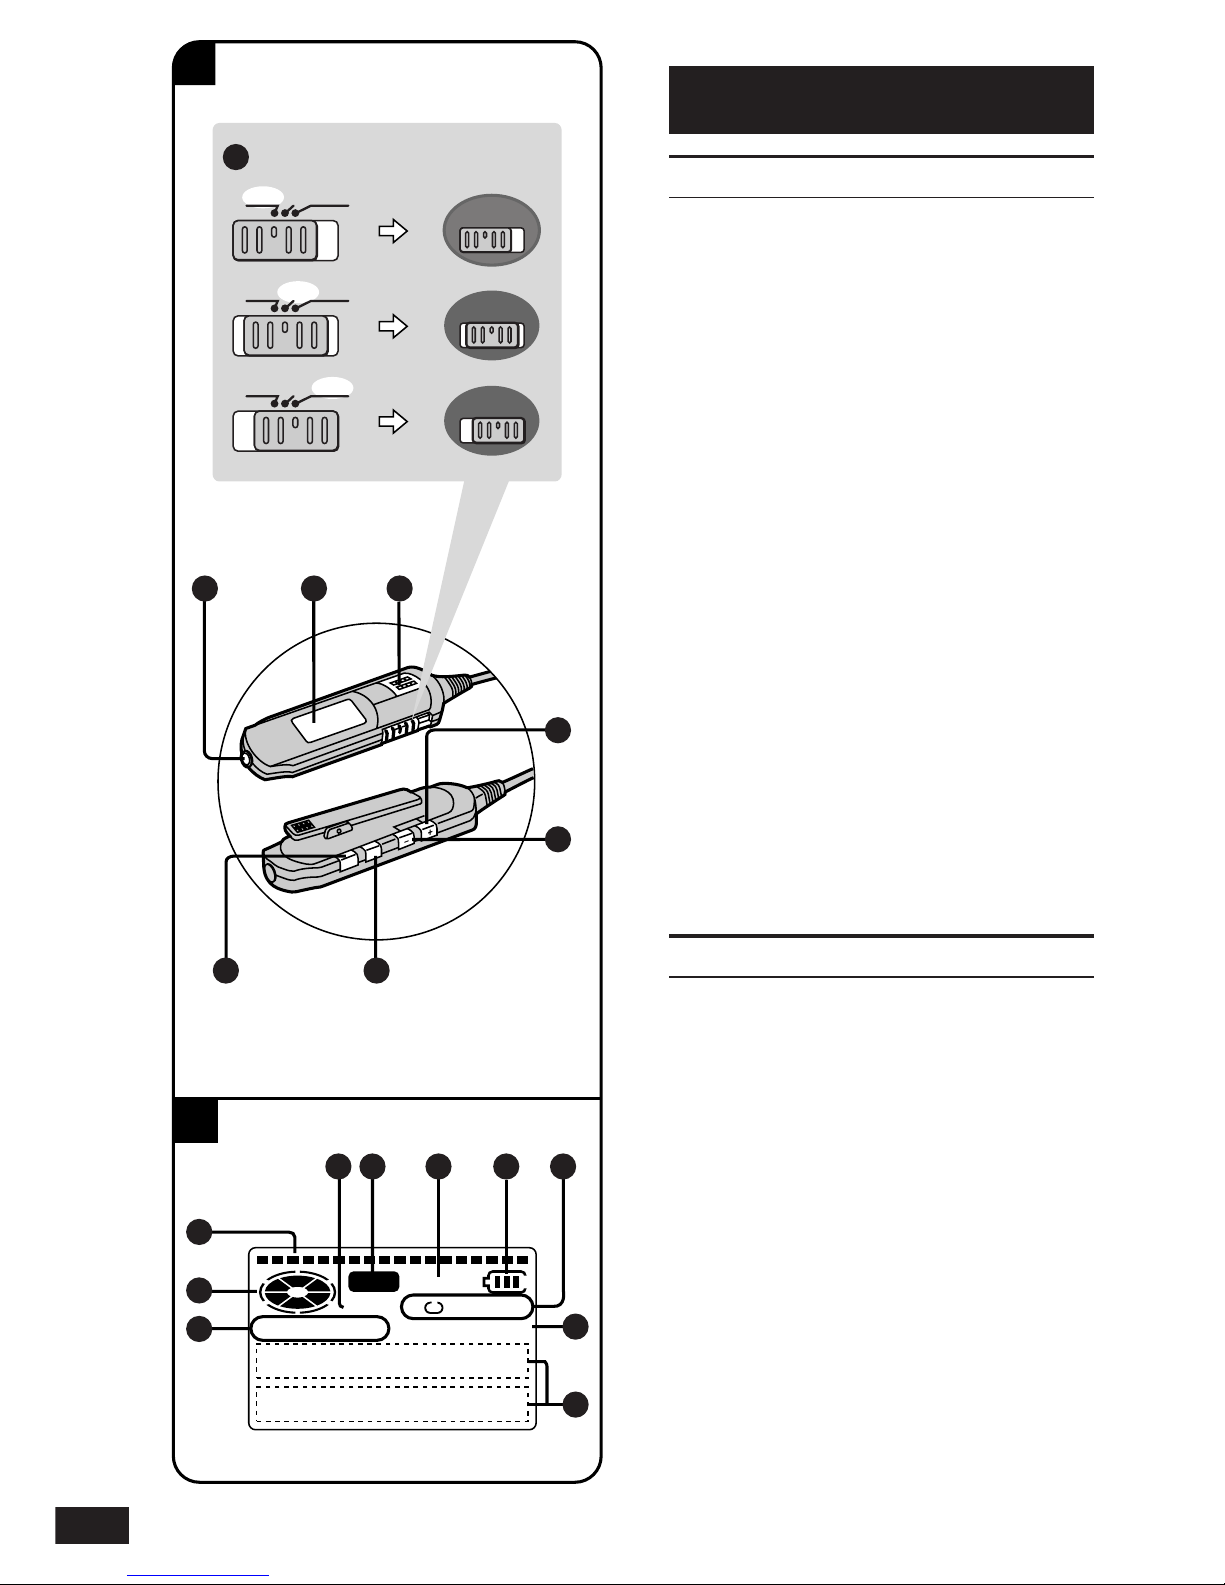
1Ponga la batería en el aparato.
El aparato no puede recargar baterías que no sean
la suministrada o las recomendadas como reeem-
plazo.
2Conecte el adaptador de CA.
aToma de entrada de CC (DC IN 1.8 V K)
bPanel posterior del aparato
cAdaptador de CA (incluido)
dToma de corriente de CA
La recarga comienza.
“CHARGE” aparece en la exhibición mientras que
se recarga. A
eSe desplaza
“CHARGE” desaparece cuando la batería está com-
pletamente cargada. La batería suministrada toma
unas 3 horas para recargarse.
3Desconecte el adaptador de CA
del terminal [DC IN 1.8 V K]
y de la toma de corriente de CA.
Nota.
≥El aparato sólo puede recargado cuando está apa-
gado.
≥El adaptador de CA y la batería puede que se
calienten durante la recarga pero ésto es normal.
∫Tiempo de recarga y du-
ración.
(Cuando se usa la batería recargable incluida.)
Carga: Aprox. 3 horas
Reproducción: Aprox. 8,5 horas
Grabación: Aprox. 4,5 horas
≥La duración puede reducirse bajo algunas condi-
ciones.
≥Si el aparato va a ser usado por largos periodos,
tales como durante una grabación, use el adapta-
dor de CA para alimentarlo.
∫Número de veces que se
puede recargar
Unas 300.
La batería ha llegado al límite de su vida útil si el
tiempo de reproducción se reduce dramáticamente
despues de la recarga.
∫Reemplazo
Batería recargable de hidruro de níquel metálico
(RFKFBP140HSY).
Póngase en contacto con un distribuidor Panasonic
para un reemplazo.
SVENSKA
Strömkälla
Det laddningsbara batteriet
(medföljer)
1Sätt i batteriet i enheten.
Enheten kan inte ladda andra batterier än det
medföljande eller rekommenderade ersätt-
ningsbatterier.
2Anslut växelströmsadaptern.
aIngång för likström (DC IN 1.8 V K)
bEnhetens bakpanel
cVäxelströmsadapter (medföljer)
dUtgång för växelström
Laddning påbörjas.
“CHARGE” visas på displayen under ladd-
ningen. A
eRullar
“CHARGE” försvinner när batteriet är helt
laddat. Det tar ungefär 3 timmar att ladda det
medföljande batteriet.
3Koppla loss växelströmsadap-
tern från kontakten märkt [DC IN
1.8 V K] och från utgången
för växelström.
Notera.
≥Denna enhet kan endast laddas när den är
avslagen.
≥Växelströmsadaptern och batteriet kan bli
varma under uppladdningen, men detta är
normalt.
∫Laddningstid- och laddning-
ens hållbarhet.
(När det medföljande laddningsbara batteriet
används.)
Uppladdning: Circa 3 timmar
Avspelning: Circa 8,5 timmar
Inspelning: Circa 4,5 timmar
≥Laddningens hållbarhet kan minska under
vissa omständigheter.
≥Om enheten ska användas under en längre
period, t ex vid inspelning, bör växelströms-
adaptern användas för enhetens drift.
∫Antalet gånger enheten kan
laddas om
Ca 300.
Batteriet har nått slutet av sitt användbara liv
då avspelningstiden dramatiskt reduceras
efter omladdning.
∫Utbytesbatteri
Laddningsbart batteri av nickel-metallhydrid-
typ (RFKFBP140HSY).
Tag kontakt med en Panasonic-återförsäl-
jare för att införskaffa utbytesbatterier.

10
RQT5119
ENGLISH
Power source
Dry cell battery
(not included)
Use one LR6 alkaline battery. Use long-life
Panasonic alkaline batteries.
1Put the battery into the battery
case.
aExternal battery case (included)
bOne LR6,AA,UM-3 battery (not included)
2Attach the case to the unit.
cBottom of the unit
Note.
Insert the rechargeable battery when record-
ing on dry cell batteries.
The battery indicator A
The illustration shows how the indicator on
the remote control display appears as battery
power runs down.
dFull
eEmpty
When the indicator starts flashing
The battery is almost flat and should be re-
placed or recharged.
For longer use
≥You will be able to playback for 20 hours
and record for 9.5 hours if the two types of
batteries are used together.
≥We recommend using long-life Panasonic
alkaline batteries.
Using the AC adaptor
(included)
Connect the AC adaptor.
Refer to the step 2 of “The rechargeable bat-
tery” (See page 8.) for connection instruc-
tions.
Note.
≥The unit is in the standby condition when
the AC adaptor is connected. The primary
circuit is always “live” as long as the AC
adaptor is connected to an electrical outlet.
≥Use only the supplied AC adaptor. Use of
other adaptors can damage the unit. If the
unit is not to be used for a long time discon-
nect the AC adaptor from the household
mains socket and turn the unit off to save
power.
A
1
A
B
de
2
a
b
c

11
RQT5119 ENGLISHESPAÑOLSVENSKA
ESPAÑOL
Alimentación
Pila seca (no incluida)
Use una pila alcalina LR6. Use pilas alcali-
nas Panasonic de larga duración.
1Ponga la pila en el estuche de
pilas.
aEstuche externo de pilas (incluido)
bUna pila LR6, AA, UM-3 (no incluida)
2Adose el estuche al aparato.
cParte inferior del aparato
Nota.
Inserte la batería recargable cuando grabe
con pilas secas.
El indicador de batería A
La ilustración muestra cómo el indicador en
la exhibición del control remoto aparece a
medida que la potencia de la batería dismin-
uye.
dCargada totalmente
eVacía
Cuando el indicador comienza a
destellar
La batería está casí vacía y deberá ser
reemplazada o recargada.
Para un uso más largo
≥Use los dos tipos de baterías juntas para
reproducir durante 20 horas y grabar du-
rante 9,5 horas.
≥Recomendamos usar pilas alcalinas
Panasonic de larga duración.
Usando el adaptador de CA
(incluido)
Conecte el adaptador de CA.
Refiérase al paso 2 de “La batería recar-
gable” (Consulte la página 9.) para instruc-
ciones de la conexión.
Nota.
≥El aparato está en la condición de espera
cuando el adaptador de CA es conectado.
El circuito primario estará siempre con cor-
riente cuando el adaptador de CA esté
conectado a un tomacorriente.
≥Use sólo el adaptador de CA suministrado.
El uso de otros adaptadores puede dañar
el aparato. Si el aparato no va a ser usado
por largo tiempo desconecte el adaptador
de CA de la toma de corriente de CA y
apague la unidad para ahorrar energía.
SVENSKA
Strömkälla
Torrelementbatteri
(medföljer ej)
Använd ett LR6 alkalinbatteri. Använd
Panasonics alkalinbatterier för längsta drifts-
tid.
1Sätt i batteriet i batterifacket.
aExternt batterifack (medföljer)
bEtt LR6, AA, UM-3-batteri (medföljer ej)
2Sätt fast facket i enheten.
cApparatens undersida
Notera.
Sätt i det laddningsbara batteriet när inspel-
ning sker med torrelementbatterierna.
Batteriindikatorn A
Indikatorn på fjärrkontrollens display ändras
när batteriets kraft minskar.
dFullt
eTomt
När indikatorn börjar blinka
Batteriet är nästan helt tomt och bör bytas ut
eller laddas om.
För längre användning
≥Använd de två olika batterityperna tillsam-
mans för avspelning i upp till 20 timmar och
inspelning i upp till 9,5 timmar.
≥Vi rekommenderar Panasonics alkalinbat-
terier för längsta driftstid.
Att använda
växelströmsadaptern
(medföljer)
Anslut växelströmsadaptern.
Se steg 2 i “Det laddningsbara batteriet” (Se
sidan 9.) för instruktioner om anslutning.
Notera.
≥Apparaten är i standbyläge då nätdelen är
inkopplad. Primärkretsen är alltid försedd
med ström då nätdelen är inkopplad i ett
vägguttag.
≥Använd endast den medföljande växel-
strömsadaptern. Användande av annan a-
dapter kan skada enheten. Om enheten
inte används under en längre tid, bör växel-
strömsadaptern kopplas loss från utgången
för växelström och enheten bör slås av för
att spara ström.

12
RQT5119
ENGLISH
The HOLD
function
This function stops the player and remote
control from responding when a button is
pressed.
aHold mode
bRelease
∫Guards against the following
≥The unit is powered on accidentally when
not in use, causing the batteries to run
down.
≥A button is accidentally pressed during play
or recording, interrupting the operation.
Note.
There is a HOLD switch on both the player
and remote control, each of which works in-
dependent of the other.
∫The “HOLD” display
This is displayed for about 2 seconds on the
main unit’s and the remote control’s display
panels when the following occurs.
≥The main unit is on hold and a button is
pressed. (If off, display appears only if
[1/;, CHARA] or [REC PAUSE ➞] is op-
erated.)
≥The remote control’s switch is moved to
hold. The display also lights for about 5 se-
conds at this time.
MAIN SUB HOLD
MAIN SUB HOLD
MAIN SUB HOLD
HOLD
HOLD
PORTABLEMDRECORDER
00
4020840-db
SJ-MR100
DIGITAL RECORDING
DISPLAY
ENTER
CAPS LOCK
EDIT
MARKMODE
POWER OFF CHARA
VOL/CURSOR
MODEEQ/REC SENS
DELETE
REC PAUSE
SPACE
sr
:9
HOLD
OPEN
(
PLUG IN POWER
)
MIC
OPT/LINEIN
Ë
ab
ab

13
RQT5119 ENGLISHESPAÑOLSVENSKA
ESPAÑOL
La Función HOLD
Esta función evita que el lector y el control
remoto respondan cuando un botón es
oprimido.
aModo de retención
bSoltar
∫Protege contra lo siguiente
≥El aparato es alimentado accidentalmente
cuando no está siendo usado, haciendo
que las baterías se desgasten.
≥Un botón es oprimido accidentalmente du-
rante la reproducción, interrumpiéndola.
Nota.
Hay un interruptor HOLD en ambos el lector
y el control remoto; cada uno de ellos fun-
ciona independientemente del otro.
∫La exhibición “HOLD”
∫(retención)
Esta es exhibida durante unos 2 segundos
en los paneles de exhibición del aparato
principal y del control remoto cuando lo sigu-
iente ocurre.
≥El aparato principal está en retención y un
botón es oprimido. (Si está apagado, la
exhibición aparece sólo si [1/ ;, CHARA]
o [REC PAUSE ➞] es operado.)
≥El interruptor del control remoto es movido
a retención. La exhibición también se ilu-
mina durante unos 5 segundos en esta
ocasión.
SVENSKA
HÅLL-funktionen
Denna funktion förhindrar att spelaren och
fjärrkontrollen reagerar när en knapp trycks
ned.
aHållfunktion
bFrigörande
∫Skyddar mot följande
≥Att enheten oavsiktligt slås på när den inte
används, så att batterierna töms.
≥Att en knapp oavsiktligt trycks in, så att spe-
larens funktion avbryts.
Notera.
Det finns omkopplare för hållfunktionen på
både spelaren och fjärrkontrollen, vilka ver-
kar oberoende av varandra.
∫HÅLL-displayen
Denna visas under ca 2 sekunder på båda
displayerna när följande inträffar.
≥Huvudenheten är satt i hållfunktion och en
knapp trycks in. (Om enheten är avslagen,
visas displayen enbart om [1/ ;, CHARA]
eller [REC PAUSE ➞] trycks in.)
≥Fjärrkontrollens kontrollomkopplare ställs
till HOLD. Displayen tänds också under ca
5 sekunder när detta inträffar.

14
RQT5119
ENGLISH
Before recording
The two methods of
recording
Digital
This method records the digital signals from
CDs. Compared to analogue recording, this
method makes it possible to make record-
ings of higher quality. Purchase an optical
fiber cable (RP-CA2120 or RP-CA2220, sold
separately) to record digitally.
Analogue
Use this method to make analogue record-
ings of digital material, CDs and MDs, and to
record analogue sources such as the radio.
Use the included line cord to make analogue
recordings.
The recording modes
Normal
This method allows you to start and stop
recording manually.
Synchronized
This method starts and stops recording at the
same time as the source being record.
Available with both digital and analogue
recording.
One track synchronized
The first track on a CD is recorded and then
the unit goes to recording standby.
Recording starts again automatically when
the first track on another CD is played.
Available only when recording CDs digitally.
Note.
This function only works with tracks num-
bered “1”.
Monaural
This mode allows you to record approximate-
ly double the amount of material normally
possible. (For example, it is possible to
record about 148 minutes worth of material
onto a 74 minute MD.) Available only when
analogue recording.

15
RQT5119 ENGLISHESPAÑOLSVENSKA
ESPAÑOL
Antes de grabar
Los dos métodos de
grabación
Digital
Este método graba las señales digitales de
CDs. Comparadas con la grabación ana-
lógica, estas grabaciones son de más alta
calidad. Adquiera un cable de fibra óptica
(RP-CA2120 o RP-CA2220, vendidos se-
paradamente) para grabar digitalmente.
Analógica
Use este método para hacer grabaciones
analógicas de material digital, CDs y MDs, y
para grabar fuentes analógicas tales como la
radio. Use el cordón de línea incluido para
hacer grabaciones analógicas.
Los modos de grabación
Normal (sin exhibición)
Este método le permite a Ud. comenzar y de-
tener la grabación manualmente.
Sincronizado
La grabación arranca y se detiene al mismo
tiempo que la fuente. Disponible para ambas
grabaciones, digital y analógica.
Sincronizada de una pista
La pista numerada “1” en un CD es grabada
y luego el aparato se pone en espera. Vuelve
a comenzar la grabación automáticamente
cuando se reproduce la primera pista de otro
CD. Disponible sólo cuando cuando se
graba CDs digitalmente.
Nota.
Esta función solamente trabaja con las pis-
tas numeradas “1”.
Monoaural
Este modo le permite a Ud. grabar aproxi-
madamente el doble de material normalmen-
te posible. (Por ejemplo, es posible grabar
unos 148 minutos de material en un MD de
74 minutos.) Disponible sólo cuando se gra-
ba analógicamente.
SVENSKA
Före inspelning
De två metoderna för
inspelning
Digital inspelning
Denna metod spelar in den digitala signalen
från CD-skivor. Jämfört med analog inspel-
ning, blir dessa inspelningar av en högre
kvalitet. Införskaffa en optikfiberkabel (RP-
CA2120 eller RP-CA2220, saluförs separat)
för att spela in digitalt.
Analog inspelning
Använd denna metod för att göra analoga in-
spelningar av digitalt material (dvs CD-skivor
och MD-skivor) och för att spela in från ana-
loga källor såsom radio. Använd den medföl-
jande linjekabeln för att spela in analogt.
Inspelningsfunktionerna
Normal inspelning (ingen display)
Denna metod ger möjlighet att starta och
stoppa inspelningen manuellt.
Synkroniserad inspelning
Inspelningen startas och stoppas samtidigt
med källan. Denna funktion finns tillgänglig
vid både digital och analog inspelning.
Enspårs synkroniserad inspelning
Spåret numrerat “1” på en CD-skiva spelas
in, varefter inspelningen övergår i väntläge.
Inspelningen startar igen automatiskt när det
första spåret på en annan CD-skiva spelas.
Denna funktion finns endast tillgänglig vid
digital inspelning av CD-skivor.
Notera.
Denna funktion fungerar endast med spår
som är numrerade “1”.
Mono
Denna funktion ger möjlighet att spela in
ungefär dubbla mängden material jämfört
med vad som normalt är möjligt. (T ex, så är
det möjligt att spela in ca 148 minuters mate-
rial på en 74-minuters MD-skiva.) Denna
funktion finns endast tillgänglig vid analog in-
spelning.

16
RQT5119
ENGLISH
Before recording
Track marks
∫Track marks and track num-
bers
Like CDs, it is possible to select and play a
track on an MD by selecting its track number.
There are marks at the beginning of each
track, called track marks, that make this pos-
sible. The period between each track mark is
called a track.
∫Putting track marks on an MD
∫(See page 28.)
Auto mark mode
The unit automatically decides where track
marks are to be put.
Manual mark mode
You can manually put the track marks where
you want them to go.
Time mark mode
(3 MIN, 5 MIN, 10 MIN)
Track marks are put at a preselected dis-
tance from each other.

17
RQT5119 ENGLISHESPAÑOLSVENSKA
ESPAÑOL
Antes de grabar
Marcas de pista
∫Marcas de pista y números de
pista
Como los CDs, es posible seleccionar y re-
producir una pista en un MD seleccionando
su número de pista. Hay marcas al comienzo
de cada pista llamadas marcas de pista, que
hacen ésto posible. El periodo entre cada
marca de pista es llamado una pista.
∫Poniendo marcas de pista en
un MD (Consulte la página 29.)
Modo de marca automático (AUTO)
El aparato inserta automáticamente las mar-
cas de pista.
Modo de marca manual (MANUAL)
Se puede poner marcas de pista donde uno
quiere que vayan.
Modo de marca de diempo
(3 MIN, 5 MIN, 10 MIN)
Marcas de pista son insertadas a una distan-
cia preseleccionada entre éllas.
SVENSKA
Före inspelning
Spårmarkeringar
∫Spårmarkeringar och spår-
nummer
Precis som med CD-skivor, är det möjligt att
välja ut och spela ett spår på en MD-skiva
genom att välja ut dess spårnummer. Det
finns markeringar i början av varje spår, så
kallade spårmarkeringar, som gör detta möj-
ligt. Utrymmet mellan varje spårmarkering
kallas ett spår.
∫Att placera spårmarkeringar
på en MD-skiva (Se sidan 29.)
Automarkeringsfunktion (AUTO)
Enheten sätter automatiskt in spårmark-
eringarna.
Manuell markeringsfunktion
(MANUAL)
Du kan manuellt placera spårmarkeringarna
där du vill ha dem.
Tidsmarkeringsfunktion
(3 MIN, 5 MIN, 10 MIN)
Spårmarkeringar sätts in vid valda intervall.

18
RQT5119
ENGLISH
Recording
1Digital recording A
Connect this unit to a unit that
has a digital output terminal.
aDigital output terminal
(portable()portable)
Purchase an optical fiber cable
(RP-CA2220, sold separately).
bDigital output terminal
(deck()portable)
Purchase an optical fiber cable
(RP-CA2120, sold separately).
Analogue recording B
Connect this unit to a unit that
has stereo LINE OUT terminals.
cLINE OUT terminal
Note.
Disconnect other cables from the [(PLUG
IN POWER) MIC] terminal.
Recording with a microphone C
Connect the microphone.
dStereo microphone (not included)
Purchase a stereo microphone
(RP-VC200, sold separately).
Note.
≥Disconnect other cables from the
[OPT/LINE IN] terminal.
≥Stereo recording is made if a stereo mi-
crophone is used.
2Release hold.
AMain unit
BRemote control
3Open the player and insert a
recordable MD.
1Slide [OPEN ➞] to the right.
2Open the lid.
3Insert disc with label facing upward.
Push the disc in the center until it
locks in place.
4Close the lid.
After an MD has been inserted the player
turns on, reads the information from it, then,
after a minute, the power goes off again.
MARKMODE
PORTABLE MD RECORDER
00
40 20840-db
SJ-MR100
DIGITALRECORDING
DISPLAY
CAPSLOCK
EDIT
POWEROFFCHARAVOL/CURSOR
MODEEQ/RECSENS
DELETE
RECPAUSE
SPACE
sr
9
ENTER
:
2
OPEN
MARKMODE
PORTABLE MD RECORDER
00
4020 840-db
SJ-MR100
DIGITALRECORDING
DISPLAY
CAPSLOCK
EDIT
POWEROFFCHARAVOL/CURSOR
MODEEQ/RECSENS
DELETE
RECPAUSE
SPACE
sr
9
ENTER
:
4
3
2AB
1
POWER
O
POW
ER
)
MIC
OPT/LINEIN
Ë
(R)(L)
POWER
O
POW
ER
)
MIC
OPT/LINEIN
Ë
POWER
O
POW
ER
)
MIC
OPT/LINEIN
Ë
R
L
STEREO
a
b
A
B
C
c
d
[OPT/LINE IN]
[OPT/LINE IN]
[(PLUG IN POWER)MIC]
HOLD
SUB HOLD
MAIN
1
3
3.5 mm stereo

19
RQT5119 ENGLISHESPAÑOLSVENSKA
ESPAÑOL
Grabación
1Grabación digital A
Conecte este aparato a un apara-
to que tenga un terminal de sali-
da digital.
aTerminal de salida digital
(portátil()portátil)
Adquiera un cable de fibra óptica
(RP-CA2220, vendidos separadamente).
bTerminal de salida digital
(unidad de cinta()portátil)
Adquiera un cable de fibra óptica
(RP-CA2120, vendidos separadamente).
Grabación analógica B
Conecte este aparato a un apara-
to que tenga terminales LINE
OUT estéreo.
cTerminal de salida de línea
(LINE OUT)
Nota.
Desconecte otros cables del terminal
[(PLUG IN POWER) MIC].
Grabando con un micrófono C
Conecte el micrófono.
dMicrófono estéreo (no incluida)
Adquiera un micrófono estéreo
(RP-VC200, vendido por separado).
Nota.
≥Desconecte otros cables del terminal
[OPT/LINE IN].
≥Una grabación estéreo es hecha si un
micrófono estéreo es usado.
2Suelte la retención.
AAparato principal
BControl remoto
3Abra el lector e inserte un MD
grabable.
1Deslice [OPEN ➞] hacia la derecha.
2Abra la tapa.
3Inserte el disco con la etiqueta miran-
do hacia arriba. Empuje el disco en
el centro hasta que entre en su
lugar.
4Cierre la tapa.
Después que un MD ha sido insertado el lec-
tor se enciende, lee la información en él, y
luego después de un minuto, se apaga otra
vez.
SVENSKA
Inspelning
1Digital inspelning A
Anslut denna enhet till en enhet
som har en digital utgång.
aDigital utgångsterminal
(portabel()portabel)
Införskaffa en optikfiberkabel
(RP-CA2220, saluförs separat).
bDigital utgångsterminal
(inspelningsdäck()portabel)
Införskaffa en optikfiberkabel
(RP-CA2120, saluförs separat).
Analog inspelning B
Anslut denna enhet till en enhet
som har stereoutgångar märkta
LINE OUT.
cLINE OUT terminal
Notera.
Koppla loss andra kablar från [(PLUG IN
POWER) MIC]-uttaget.
Inspelning med mikrofon C
Anslut mikrofonen.
dStereomikrofon (medföljer ej)
Införskaffa en stereomikrofon
(RP-VC200, säljs separat).
Notera.
≥Koppla loss andra kablar från kontakten
[OPT/LINE IN].
≥Stereoinspelning görs om en stereo-
mikrofon används.
2Släpp upp hållfunktionen.
AHuvudenhet
BFjärrkontroll
3Öppna spelaren och sätt i en in-
spelningsbar MD-skiva.
1För [OPEN ➞] till höger.
2Öppna luckan.
3Sätt i skivan med etiketten vänd
uppåt. Tryck in skivan i centrum
tills dess att den låses fast på
plats.
4Stäng luckan.
När en MD-skiva har placerats i spelaren,
slås spelaren på och skivans information
läses in i minnet. Sedan, efter en minut,
stängs den av igen.

20
RQT5119
ENGLISH
Recording
4Slide [REC PAUSE ➞] to the
right.
The unit enters the recording mode.
If you have inserted an MD with recordings
already on it, the unit prepares to record from
the first available space.
5Press [1/;, CHARA] (main unit)
or the main button (remote con-
trol) to start recording.
AMain unit
BRemote control
Beep
6Start playback on the source to
be recorded or point the micro-
phone at the source of the sound.
Note.
Recording level is automatically set.
Changes to volume will have no effect on
recording.
∫To select the recording mode
Press [MODE, DELETE] while in
recording standby mode. A
Each time the button is pressed the mode
changes and an indicator is shown in the fol-
lowing order.
Digital recording
Normal (No display)>SYNC>SYNC 1
^_____________}
Analogue recording
Normal (No display)>MONO>SYNC
^_____________}
Recording with a microphone
Normal (No display)>MONO
^_________}
SYNC: Synchronized recording
SYNC 1: One track synchronized recording
MONO: Monaural recording
If you have selected
≥Synchronized recording (SYNC) or One
track synchronized recording (SYNC 1)
Recording begins automatically when you
begin playback of the source.
≥Monaural recording (MONO)
Perform steps 5 to 6 to start recording.
Note.
If you set the recording mode to “SYNC”,
recording begins immediately if the source is
already playing.
A
4
DISPLAY
ENTER
CAPS LOCK
EDIT
MARK MODE
PO
WER OFF CHARA
VOL/CURSOR
MODE EQ/REC SENS
DELETE
REC PAUSE
SPACE
sr
HOLD
OPEN
:9
CHARA
REC PAUSE
REC PAUSE
5
CHARA
MODE
DELETE
AB
x
MODE
DELETE
x :
Other manuals for SJ-MR100
3
Table of contents
Other Panasonic Mini Disc Recorder manuals

Panasonic
Panasonic SJ-MR200 User manual

Panasonic
Panasonic SJ-MR250 User manual

Panasonic
Panasonic SJ-MR200 User manual

Panasonic
Panasonic SJ-MR100 User manual

Panasonic
Panasonic SJ-MR100 User manual

Panasonic
Panasonic TH-55AS670M Assembly instructions

Panasonic
Panasonic SJ-MR220 User manual

Panasonic
Panasonic SJ-MR220 User manual

Panasonic
Panasonic SJ-MR230DGH User manual