Panasonic YD-350GY4 User manual

Operating Instructions
Digital IGBT controlled
MIG/MAG Arc Welding Power Source
Model No. :
YD-350/500GY4
● Thank you for your purchase of Panasonic welding power source.
● Before operating this product, please read the instructions carefully and save this manual
for future use.First of all, please read “Safety precautions” or “Safety manual”.
● SPEC. No.:YD-350GY4HJE, YD-500GY4HJE.
Panasonic Welding Systems (Tangshan) Co., Ltd.
TSM50886

■ Features
● LED digital display and soft-touch buttons for easy and convenient operation
● The wire feeder equipped with encoder provides stable and high-precision wire feeding control.
● The welding parameters can be recorded & called.
● The enhanced mobility, robust structure and dust tightness
■ The applicable welding methods
● carbon steel CO2 welding,
● carbon steel MAG welding
● carbon steel flux core welding.
welding methods
welding wire material
welding method
shielding gas
wire
diameter
(mm)
extension length (mm)
Root
welding
semi-
automatic
automatic
welding
carbon steel
CO2 100%CO2
0.8 HND 10 ○
1.0 HND 15 ○
1.2 HND 15, 20 ○
1.4 HND 25 ×
1.6 HND 30 ×
MAG Ar+20%CO2
0.8 HND 10 ○
1.0 HND 15 ○
1.2 HND 15, 20 ○
1.4 HND 25 ×
1.6 HND 30 ×
carbon steel flux core
CO2 100%CO2
1.2 HND 20 ×
1.4 HND 25 ×
1.6 HND 30 ×
stainless steel flux
core CO2 100%CO2 1.2 HND × ×
Note: × stands for no data, ○ stands for standard configuration data, ● for the chargeable data.

Table of Contents
1 SAFETY ................................................................... 1
1.1 WARNING SYMBOLS FOR SAFE USAGE ......................... 1
1.2 SAFETY PRECAUTIONS .............................................. 2
2 RATED SPECIFICATIONS ........................................... 4
2.1 SPECIFICATIONS TABLE ............................................. 4
2.2 RATED DUTY CYCLE .................................................. 5
2.3 THERMAL PROTECTION ............................................ 5
2.4 DIMENSIONS ......................................................... 6
3 INSTALLATION AND POWER SUPPLY FACILITY ......... 7
3.1 INSTALLATION SITE .................................................. 7
3.2 INSTALLATION TRANSPORTATION ................................ 8
3.3 POWER SUPPLY EQUIPMENT ...................................... 9
4 CONFIGURATION .................................................. 10
4.1 EQUIPMENT NECESSARY FOR WELDING ...................... 10
4.2 CONNECTING CABLE .............................................. 11
5 NAMES AND FUNCTIONS ...................................... 12
5.1 THE POWER SWITCH .............................................. 12
5.2 THE OUTPUT TERMINAL AREA .................................. 12
5.3 REAR SIDE ........................................................... 13
5.4 FRONT PANEL ....................................................... 14
6 CONNECTION........................................................ 17
6.1 THE CONNECTION OF OUTPUT CABLE ........................ 17
6.2 THE CONNECTION OF THE GROUNDING WIRE .............. 18
6.3 THE CONNECTION OF INPUT CABLE ........................... 18
6.4 CONNECTING JIG(S) .............................................. 19
7 PREPARATION AND TERMINATION PROCESSINGS . 20
7.1 PREPARATION ...................................................... 20
7.2 TERMINATION PROCESSING (STEPS AFTER WELDING
OPERATION) .................................................................... 20
8 SETTINGS .............................................................. 21
8.1 FUNCTION SETTINGS .......................................... 21
8.2 THE WELDING MACHINE FACTORY DEFAULTS RESET....... 25
8.3 WELDING WIRE INCHING ........................................ 26
8.4 CHECKING SHIELD GAS ........................................... 26
9 OPERATION ........................................................... 27
9.1 WELDING CURRENT CALIBRATION ............................. 27
9.2 “NO CRATER” .................................................... 27
9.3 “CRATER” .......................................................... 28
9.4 “INI. &CRATER” ................................................. 29
9.5 “CRATER REPEAT” OPERATION .................................. 30
9.6 “ARC SPOT” ....................................................... 31
10 MAINTENANCE AND INSPECTION ...................... 32
10.1 DAILY CHECK......................................................... 32
10.2 PERIODIC CHECK.................................................... 33
10.3 PRECAUTIONS FOR WITHSTAND VOLTAGE TEST AND
INSULATION RESISTANCE MEASUREMENT ................................ 34
11 TROUBLESHOOTING .......................................... 36
11.1 ERROR INDICATION ................................................ 36
11.2 TROUBLESHOOTING TABLE ....................................... 38
12 PARTS LIST ......................................................... 39
12.1 PARTS LIST FOR YD-350GY4 ................................... 39
12.2 YD-350GY4 PARTS DIAGRAM ................................. 41
12.3 PARTS LIST FOR YD-500GY4 ................................... 43
12.4 YD-500GY4 PARTS DIAGRAM ................................. 45
13 CIRCUIT DIAGRAM ............................................ 47
13.1 CIRCUIT DIAGRAM FOR YD-350GY4HJE ................... 47
13.2 CIRCUIT DIAGRAM FOR YD-500GY4HJE ................... 48
14 APPENDIX ......................................................... 49
14.1 CO2 WELDING CONDITIONS TABLE: SOLID WIRE
(REFERENCE) .................................................................... 49
14.2 MAG WELDING CONDITIONS TABLE: SOLID WIRE
(REFERENCE) .................................................................... 51
14.3 ARC SPOT WELDING CONDITIONS TABLE (REFERENCE) ... 51

Safety
1
1 Safety
1.1 Warning symbols for safe usage
Each symbol describes things to be observed to prevent you and other personnel from hazardous conditions or
damage to property.
●The followings explains harzardous conditions or
damages that are classi-fied into the following three
levels.
●The following symbols indicates things to be
observed.
Things that MUST NOT be
performed.
A hazardous situations including death or serious
personal injury is imminent.
Things that MUST be performed.
The potential for a hazardous accident including death
or serious personal injury is high.
Things attention must be paid to.
The potential for hazardous accident including light
personal injury and/or the potential for property
damage are high.
◆Disclaimer:
Panasonic Welding Systems(Tangshan) Co., Ltd., (hereinafter called “PWST”) and its affiliates (including any
subcontractor, sales company or agent) shall not assume or undertake any responsibility or liability of the followings:
•Any problem arising out of, or directly or indirectly attributable to,the failure of user to carry out those normal
maintenance, normal adjustment and periodical check of this product.
•Any problem arising out of any force majeure, including but not limited to, act of god.
•Any malfunction or defect of this product that is directly or indirectly the result of any malfunction or defect of one
or more related parts or products that are not supplied by PWST. Or any problem arising out of, or directly or
indirectly attributable to, the combination of this product with any other product, equipment, devices or software
that is not supplied by PWST.
•Any problem arising out of, or directly or indirectly attributable to,user’s failure to strictly carry out or follow all of the
condition sand instructions contained in this instruction manual, or user’s misusage, mishandle, operational miss
or abnormal operation.
•Any problem arising out of this product or the use of it, the cause of which is other than the foregoing but is also
not attributable to PWST.
•Any claim of a third party that this product infringes the intellectual property rights of such third party that are
directly or indirectly caused by user’s use of this product and relate to the method of production.
●The description of this manual is based on the contents as of Jun, 2019.
●The contents of this manual are subject to change without further notice.
●English version is the original instructions.

Safety
2
1.2 Safety precautions
Welding power source
Observe the following instructions to
prevent the hazard.
(1)Never use the welding power source for other than
welding purpose. (e.g. Never attempt to use the
welding power source for pipe thawing.)
(2)It is very important to comply with all instructions,
safety warnings, cautions and notes mentioned.
Failure to do so can result in serious injury or even
death.
(3)Work of driving source at the input side, selecting
work site, handling, storage and piping of high
pressure gas, storage of welded products and also
disposal of waste should be performed according to
the operating instructions and national, state and
local codes and regulations.
(4)Prevent any unauthorized personnel to enter in and
around the welding work area.
(5)Pacemaker wearers should consult their doctor
before going near arc welding. Magnetic fields can
affect pacemakers.
(6)Only educated and/or skilled persons who well
understand this welding power source should
install, operate, maintain and repair the unit.
(7)Only educated and/or skilled persons who well
understand the operating instructions of the unit
and are capable of safe handling should perform
operation of the unit.
Against electric shock
Observe the following instructions to
prevent the hazard.
(1)Do not touch live parts.
(2)Grounding of the case of the welding power and
base metal or a jig electrically connected to the
base metal must be performed by educated and/or
skilled persons.
(3)Before installation or maintenance work, turn off
power at the power box, wait it for at least five
minutes to discharge capacitors. Significant voltage
may exist on capacitors after turning off power at
the power box so it is imperative to check to make
sure that no charged voltage present at capacitors
before touching any parts.
(4)Do not use undersized, worn, damaged or bare
wired cables.
(5)Connect cables firm and insulate connection parts.
(6)Keep all cases, panels and covers securely in
place.
(7)Do not handle the welding power source with torn
or wet gloves.
(8)Wear safety harness in case of working above floor
level.
(9)Turn off all equipment when not in use.
(10)Perform periodic checks without fail and repair or
replace any damaged parts before using the power
source.
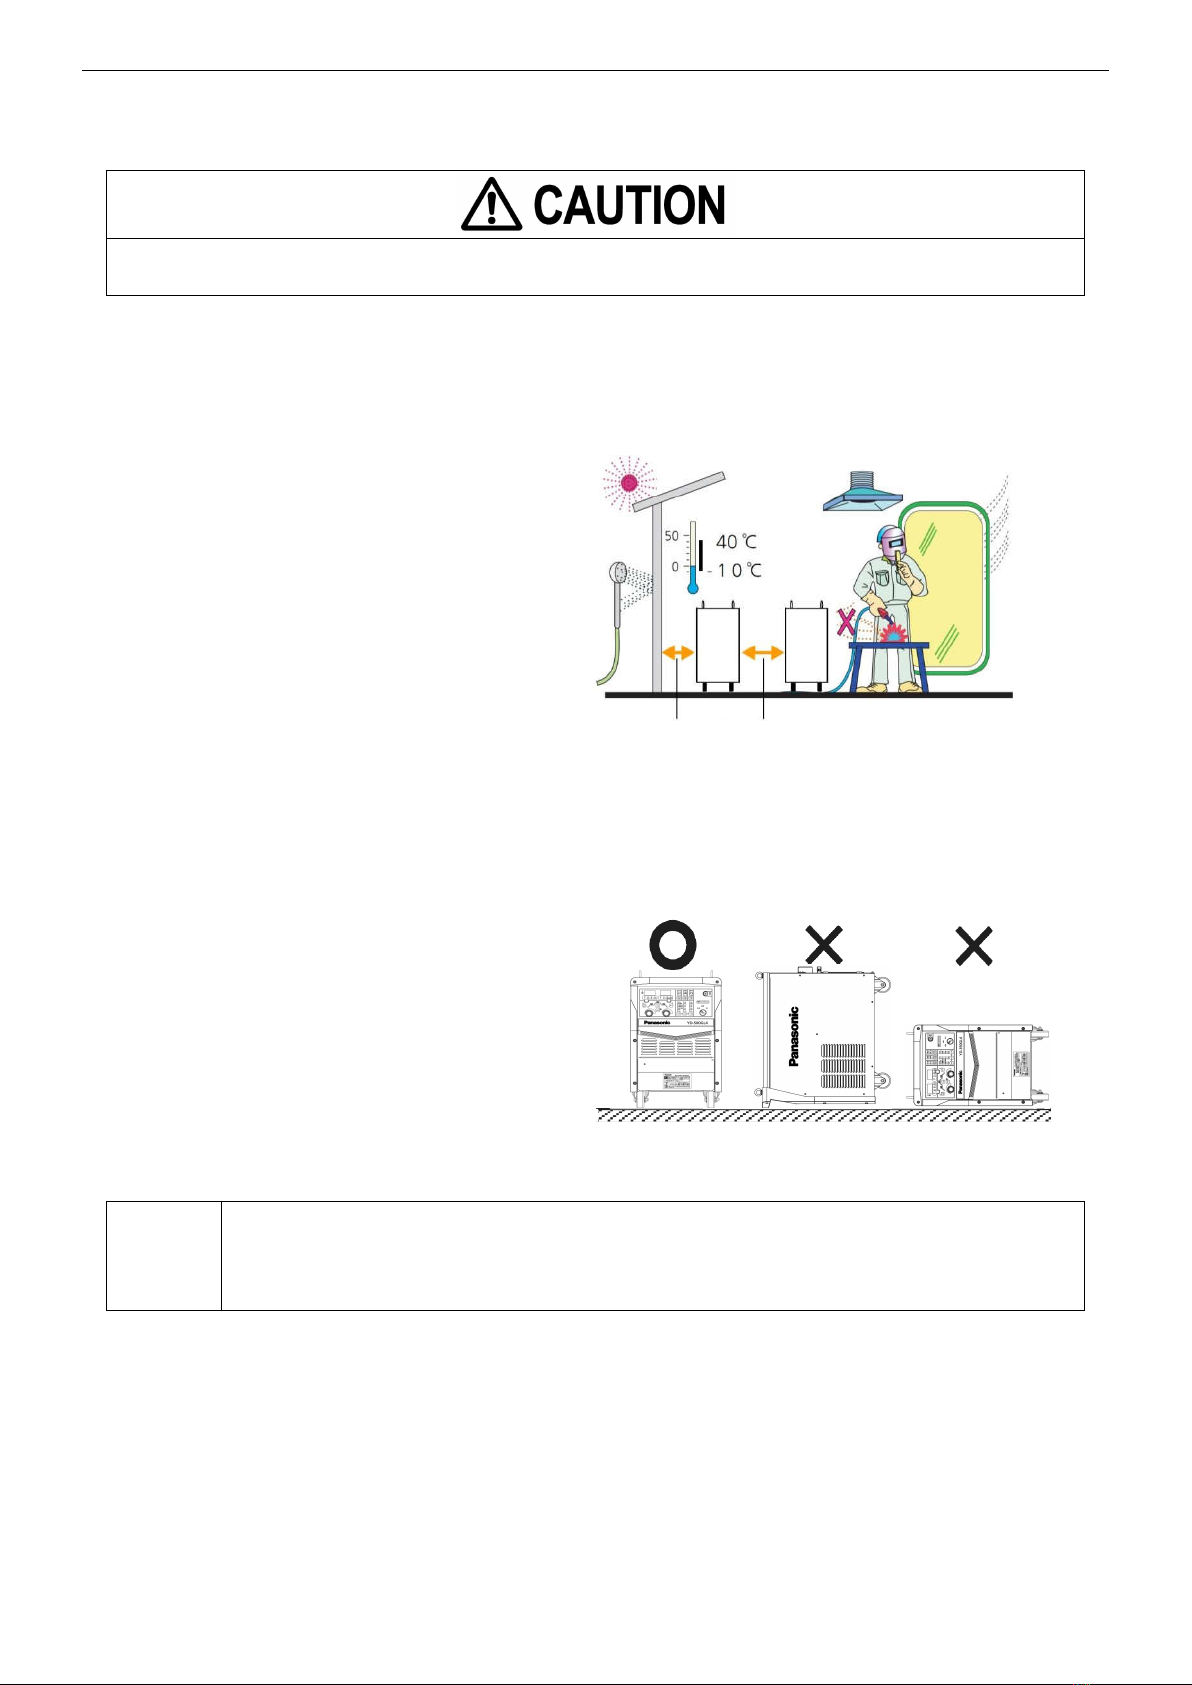
Ventilation and protective equipment
Oxygen deficit, fume and gas
generated during welding can be
hazardous.
(1)When conducting welding in the bottom of the tank,
boiler or hold as well as legally-defined sites, use a
local exhauster specified by the applicable laws and
regulations (occupational safety and health
regulation, rules on preventing suffocation or etc.)
or wear protective breathing gear.
(2)To prevent dust injury or poisoning by the fume
generated during welding, use a local exhauster
specified by the applicable law (occupational safety
and health regulation, rules on preventing injury by
inhaled dust or etc.), or wear protective breathing
gear.
(3)When conducting welding in a confined area, make
sure to provide sufficient ventilation or wear
protective breathing gear and have a trained
supervisor observe the workers.
(4)Do not conduct welding at a site where degreasing,
cleaning or spraying is performed. Conducting
welding near the area where any of these types of
work is performed can generate toxic gases.
(5)When welding a coated steel plate, provide
sufficient ventilation or wear protective breathing
gear. (Welding of coated steel plates generates
toxic fume and gas.)
Against fire, explosion or blowout
Observe the following cautions to
prevent fires explosion or
blowout.
(1)Remove any combustible materials at and near the
work site to prevent them from being exposed to
the spatter. If they cannot be relocated, cover them
with a fireproofing cover.
(2)Do not conduct welding near combustible gases.
(3)Do not bring the hot base metal near combustible
materials immediately after welding.
(4)When welding a ceiling, floor or wall, remove all
flammables including ones located in hidden
places.
(5)Properly connect cables and insulate connected
parts. Improper cable connections or touching of
cables to any electric current passage of the base
metal, such as steel beam, can cause fire.
(6)Connect the base metal cable at a section closest
to the welding part.
(7)Do not weld a sealed tank or a pipe that contains a
gas.
(8)Keep a fire extinguisher near the welding site for
an emergency.

Safety
3
Installing shielding (curtain etc.)
Arc flash, flying spatter, slugs, and
noise generated during welding can
damage your eyes, skin and
hearing.
(1)Install a protective curtain around the welding
manipulator site to prevent the arc flash from
entering the eyes of people in the surrounding area.
(2)When welding or monitoring welding, wear safety
glasses with sufficient light blocking structure or
use a protective mask designed for welding
operation.
(3)When welding or monitoring welding wear protective
clothing designed for welding operation, such as
leather gloves, leg cover and leather apron, and also
wear long-sleeve shirts.
(4)Be sure to wear noise-proof protective equipment if
the noise level is high.
(5)The larger the welding current is, or in case of AC
TIG or MIXTIG welding, the larger the AC frequency
is, the larger the arc sound becomes.
Gas cylinder and gas flow regulator
Overturn of gas cylinder and blowout
of gas flow regulator can cause
injury.
(1)The gas cylinder must be handled properly according
to the applicable law and in-house standards.
(2)Use the gas flow regulator that is supplied or recom-
mended by our company.
(3)Read the instruction manual of the gas regulator prior
to using it, and observe the cautions in the manual.
(4)Secure the gas cylinder to a dedicated gas cylinder
stand.
(5)Do not expose the gas cylinder to high temperature.
(6)When opening the valve of the gas cylinder, do not
bring your face close to the discharge outlet.
(7)When the gas cylinder is not used, be sure to install a
protective cap.
(8)Do not hang the welding torch on the gas cylinder, or
touch the gas cylinder with the electrode.
(9)Do not attempt to disassemble or repair the gas
regulator. Such works require special knowledge.
Rotating parts
Rotating parts can cause injury.
(1)Keep away from rotating parts such as cooling fans,
and feed roller of the wire feeder, or hand, finger(s),
hair or part of your clothes may be caught by the
parts resulting in injury.
(2)Keep all covers, panels and cases closed when
using the product.
(3)Maintenance work and repair should be perform only
by educated and/or skilled persons who thoroughly
understand welding machines. While
performing maintenance work or repair work, provide
fence or the like around the welding machine so that
unauthorized person can not come close carelessly.
Welding wire
Welding wire, especially wire tip part
can cause injury.
(1)Do not perform inching operation or pull the torch
switch with your eyes, face or body close to the end
of the welding torch - wire extends out from the
end of the welding torch and may stick into the
eye, face or body.
(2)In case of using a torch cable with the resin liner,
straighten the torch cable and reduce the preset
feed amount (current) to a half or less before
applying the wire inching.
(3)Performing wire inching while torch cable has been
bent extremely can cause the wire to pierce the
resin liner and cable. Make sure to replace any
damaged liner or cable with a new one, or
damaged liner/wire can cause gas leak or dielectric
degradation.
. Against insulation deterioration
Insulation deterioration can cause fire of
welding power source.
(1)Keep enough distance from welding power source
when performing welding or grinding work so as to
prevent spatters or iron particles from getting
into the power source.
(2)Perform check and maintenance work periodically
so as to prevent insulation deterioration due to
accumulated dust or dirt.
(3)When spatters or iron particles get into the welding
power source, turn off the power switches of the
welding power source and power distribution box,
and then blow out.
(4)Make sure to replace any damaged liner or cable
with a new one as use of damaged liner/cable may
cause gas leak or dielectric degradation.
(5)In order to avoid dust and dirt to be collected inside
of the power source, make sure not to leave the
panel and bolts (including eyebolts) open and
removed.

Rated Specifications
4
2 Rated Specifications
2.1 Specifications table
Item Unit Contents
YD-350GY4HJE YD-500GY4HJE
Control method - digital IGBT control
Rated input·
Number of phases - 3-phase AC 380 V(415 V)
Input power frequency Hz 50/60
Rated input capacity kVA/kW
17.6/13.5 29.9/23.9
Output characteristics - CV( constant voltage characteristics )
Rated output current A DC 350 DC 500
Rated output voltage V 31.5 39
Rated duty cycle % 60 100
Rated output no-load voltage V DC 80
Output current range (※Note)
A DC 40~430 DC 60~500
Output voltage range (※Note)
V 16~35.5 17~39
Welding method - individual / unitary
Enclosure protection class - IP23S
Insulation class - main transformer 155 ℃( inductor 200 ℃)
EMC classification - A Grade
Cooling method - forced air cooling
Applicable welding wire type - flux core / solid
Applicable welding wire
diameter
mm solid 0.8/1.0/1.2/1.4/1.6
mm flux core carbon steel 1.2/1.4/1.6
Welding wire material - carbon steel / carbon steel flux core
Memory - 100 channels can be called, welding parameters
recordable
Sequence - welding / welding — crater / initial — welding — crater /
spot welding
Shielding gas -
CO2 welding CO2: 100%
MAG welding Ar: 80%, CO2: 20%
MIG welding Ar: 98%, O2: 2%
Gas check time - 60s ( longest gas check time )
Pre-flow time - 0 s–5.0 s continuous adjustment (0.1 s increment)
After-flow time - 0 s–5.0 s continuous adjustment (0.1 s increment)
Spot welding time - 0.3 s–10.0 s continuous adjustment (0.1 s increment)
Overall dimensions mm 692×380×612 ( L×W×H ) 745×380×820(L×W×H)
Mass kg 68 110
※Note: welding power source output range is tested according to GB/T 15579.1-2013.

Rated Specifications
5
2.2 Rated duty cycle
■ YD-350GY4
●
The rated duty cycle is 60 %. This means that the machine can cut for a total of 6 minutes out of any 10 minutes at the
rated current, and then, during the remaining 4 minutes, the machine must be cooled down to prevent overheating.
●
Exceeding allowable duty cycle can cause the temperature rise higher than the maximum allowable temperature,
resulting in the performance degradation or damage.
●
The figure above shows the ideal value of cutting current and duty cycle. Please use the machine within the
corresponding duty cycle of cutting current.
■ YD-500GY4
2.3 Thermal protection
●
Cutting power source is equipped with a thermal switch at the radiator fin of IGBT to monitor the temperature.
●
When the abnormal temperature happens, the thermal switch takes action and cut off the output.
●
Please be sure not to use under the conditions listed here:
●
Over the rated output voltage.
●
The air inlet or outlet is blocked.
●
The ambient temperature is higher than 40°C.
●
The cooling fan stops.

Rated Specifications
6
L
W
2.4 Dimensions
■ YD-350GY4
■ YD-500GY4
Welding power source W H L
YD-350GY4 380 612 692
YD-500GY4 380 820 745
H
L
W
H

Installation and Power supply facility
7
3 Installation and Power supply facility
When installing or transporting the cutting machine, wear long sleeve shirts, leather gloves and
safety shoes to prevent injury.
3.1 Installation site
(1) Locate indoors only, where the floor is capable of supporting the weight of the product.
(2) Avoid exposure to the direct sun light or the rain or water spray.
<Note>
If exposed to the rain or water spray, or dew
condensation occurred, dry the product
before using it.
(3) Ambient temperature
(a) During cutting operation: -10 °C to 40 °C
(b) During transportation/storage: -20 °C to 55 °C
(4) Humidity relative to temperature
(a) Up to 50 % at 40 °C.
(b) Up to 90 % at 20 °C.
(5) Altitude above sea level: Up to 1 000 m.
(6) Inclination to installation surface: Max. 10 °
(7) Do not block cooling air intake of the cutting
power source
• From the wall: 200 mm or more.
(8) Avoid wind to the arc. (Provide windshields.)
(9) Free from abnormal amounts of dust, acid, corrosive gases or substances etc. other than those generated by
the cutting process.
Note:
●
In case the machine with wheels is placed on an
inclined surface, machine may slide by itself.
●
Please use stop device
●
Please do NOT turn over and lay the machine down
on the floor.
●
Up-side-down use can worsen cooling performance
of the machine and may cause the machine burnt or
overheated.
●
Please vertically place the machine on the horizontal
surface.
Please
●
When the product is installed on the floor where it is too low to operate, customers
are required to prepare a table to mount the product on.
●
Such table should be provided with flanges on the mounting surface to prevent the
product to slide off the table.
200 mm
or more
300 mm
or more

Installation and Power supply facility
8
3.2 Installation transportation
When hanging this product for transportation, hang it at two eyebolts.
●The hoisting operation
●
During
hoisting operation, please do NOT use the handles.
●
When
the
machine is moved downwards by hoist, please be
sure to use the eye bolts and hang the machine with two points.
●The machine is carried by hands
●
When
the
machine is carried manually, single person can NOT
carry it on. More than one person are required to do this job.
Note:
●
If the eye bolts are missing or damaged, please contact with
the distributor of the Company.
●
Please purchase the genuine parts which comply with strength
assessment.
●
The model number of the eye bolt is R825M8
●Pushing the machine by hands
●
There are wheels under the machine. The machine can be pushed by hands. During moving, please do not
make sharp turn to protect wheels and floor.
●
Please do NOT place the machine on the slope。 ( The Product has wheels, which cause the machine to
move on the inclined surface by itself. )
●Do not lift the product on your own.
As this product is heavy, it is dangerous to lift it on your own. Involve plural
number of persons with its lifting.
●Do not leave the product on a slope. (The product is provided with
casters.)
●When pushing this product for transportation, do not make a sharp turn,
or casters or floor may be damaged.
Storage, installation, transportation please do not pile up over two layers.

Installation and Power supply facility
9
3.3 Power supply equipment
Observe the following to prevent burnout, destruction of parts and unstable
arc.
welding power source YD-350GY4HJE YD-500GY4HJE
Input power source Three phase ,380V(415V) AC,
50 / 60 Hz (common)
Capacity Commercial power source 20 kVA or more 35 kVA or more
Engine generator Two times rated input or more
Input protection
(Power distribution box)
Fuse breaker 40 A 63 A
Molded case circuit breaker
(or leakage breaker) 50 A 80 A
Cross-section area
Of cable
Input power cable 6 mm2or more 10 mm2or more
Ground cable The same as input power cable or bigger
Output power cable 50 mm2 or more 70 mm2 or more
*1. The listed capacities of fuses and breakers (or leakage protectors) are only for reference.
*2. When the machine is working at the places where are moist or on the iron plate or stand, please be sure to
install leakage protector.
Note:
please follow the regulations listed below to avoid any damage of parts, unstable arc and overheat or damage of
the machine.
●
The
fluctuation
range of input: the allowable rated input voltage is 304V~ 456V.
●
When the generator is used, the rated input capacity should be two times of cutting power source or higher. The
generator should be equipped with compensating coils.
●
The wiring of input side: please equip each cutting power source with one fuse switch or non-fuse breaker (or
leakage breaker) of which capacity complies with the rated one of the cutting power source.
●
Please select the proper breaker (or leakage breaker) which is applicable to electric distribution, such as cutting,
electric motor or transformer.

Configuration
10
4 Configuration
4.1 Equipment necessary for welding
NO.
item remarks
NO. item remarks
①
Welding
power
source
YD-350GY4 YD-500GY4
⑥ Grounding
cable 6 mm2 or higher 10mm2 or higher
② wire feeder YW-
35DG1HLE
YW-
50DG1HLE
⑦ Distribution
box 3-phase AC 380 V(415V)
③ Torch YT-
35CS4HAE
YT-
50CS4HAE
⑧ power source
input cable 6 mm2 or higher 10 mm2 or higher
④ Gas
regulator YX-25CD1HAM
⑨ Grounding
cable 6 mm2 or higher 10 mm2 or higher
⑤
Base metal
welding
cable
50 mm2 or
higher
70 mm2 or
higher
⑩ shielding gas Same as the selected gas
Note:
the diagram below shows the connection with the welding power source. Please be sure to use the wire
feeder, welding gun, gas regulator of the Product as set equipment. Otherwise the welding performance may
be affected or the machine can be even damaged.
Before using the Product with other standard products, please read the operation manual
carefully.
Reminder

Configuration
11
Power cable Connecting
cable
4.2 Connecting cable
Caution against getting the cable wet.
Avoid the connecting cable to get wet.
If there is a chance of getting the cable exposed to rain or water splay,
make sure to protect the connection with waterproof cover.
Water seeping into the machine may degrade the insulation between
ter- minals, which may cause an error or damage this product or wire
feeder.
4.2.1 About connecting cable
●
The connecting cable (separately sold) is useful to expand the working space in welding operation. (See
the table on the right for model numbers.)
●
Apply the connecting cable between torch output terminal (+) of the product and the torch cable of the wire
feeder.
●
Depending on work conditions, it may be necessary to extend the base metal cable.
Note:
It is not possible to use the connecting cable as a junction cable.
4.2.2 Cautions about using connecting cable
●
Select a model properly and use connecting cable properly, or adverse impact on welding operation, such as
voltage drop, may result. Voltage drop may be resulted from the reactance caused by the conductor resistance
or cable routing manner. The longer the cable is or smaller the cross section is, the more likely an adverse
impact occurs.
●
To minimize such adverse impact, pay attention to the fol- lowing points.
(1) Relationship among extending length, cross section, allowable current and duty cycle.
(2) Arrange the base metal cable corresponding to the applied connecting cable.
(3) Do not extend the cable unnecessarily. (A shorter cable is preferable)
(4) Do not use leave the connecting cable slackened. Never coil the connecting cable when welding, or the
welding arc may become unstable.
(5) Connect the base metal voltage detection wire (-) to the base metal voltage detection terminal (-).
(6) Do not use the connecting cable as a junction cable.
Welding power source Cross section Length
YD-350GY4 50 mm2 L≤13.2 m
YD-500GY4 70 mm2 L≤18.2 m

Names and functions
12
5 Names and functions
5.1 The power switch
About power switch:
●
When the power switch i
s turned off automatically, do not turn it on
again. (Consult with sales distributor of Panasonic representatives.)
●
When activating a power generator, turn off the power switch.
The connection and disconnection operation of the power source
●
Turn the power source switch knob clockwise to connect power
source. About one 1 second later, LED display shows software
version information.
●
The software version is shown for about 4 seconds. Then AC
contactor is switched on and cooling fan starts to rotate.
5.2 The output terminal area
Regarding connection and disconnection of the cable, to avoid electric shock and
malfunction, please be sure to cut off the switch of distribution box and then start the
operation.
①③②
(-) base metal connection
Connect the base metal cable to the “(-) base metal terminal”
.
(+) welding gun cable connection
Connect the power cable drawn from the wire feeder to the (+) torch terminal
.
control cable socket (16 cored )
Please firmly connect the socket with the wire feeder
※
1 16 cored cable.

Names and functions
13
5.3 rear side
power source input terminal (It is attached with the protective cover )
●
After
connecting the power source input cables, please be sure to well install power source input protective cover.
external control wire inlet ( external terminal )
●
When
the
wire connection of external terminals, please guide the wires through rubber cover and fasten all wires.
grounding terminal (
M
8 bolt )● please use reliable grounding method.
cooling fan air passage inlet
●
The
fan
intakes cool air from this inlet.
●
Do
not
leave any obstacles near this inlet
●
The
operation
of the cooling fan.
●
When
the
power is turned on, the fan rotates. If the no-welding operation lasts more than seven minutes,
it automatically stops to
saveelectricity until the welding operation starts for the next time. ( After TS-ON
pressing the switch again, the fan continues to
rotate ).
The gas regulator is equipped with the socket and fuse
●
The
output of gas regulator socket is AC100V. Please do NOT use it on any other purpose.
●
fuse
capacity is 3A.
●
please
use
the gas regulator provided by the Company.
●
After
turning
on the power source switch, gas regulator socket outputs voltage immediately.

Names and functions
14
5.4 Front panel
Note: for robot welding, be sure to set the machine on “ crater OFF ” status.
NO.
name description
○
1 temperature
abnomal indicator
●
When abnormal rise in important components temperature occurs, temperature
abnomal alarm is sent, this lamp blinks and the welding operation stops. Welding
operation cannot be restarted unless this lamp is turned off. ( For troubleshooting:
Section 11.1).
○
2 current display
7-segment LED
●
When Mode selection key ○
12 is set to“ Weld ”
・On stand-by status,, it shows the current value set in ○
3
・During welding, it shows the current value of the actual output.
●
When Mode selection key ○
12 is set to“F. Adj” ( Section8.1)
・It shows fine adjusting setting items PXX(XX stands for 00->29), default display
CH-OFF( voltage display LED○
5 shows its specific set value ).
●
When Mode selection key ○
12 is set to “ Call ” ( Section 8.1)
・The default display CH-OFF. By turning the Jog-dial ○
7, select channel number,
LED shows “CH” channel. If welding parameters are available, the channel can be
selected, else the corresponding channel can NOT be selected. When the channel
stored with data is selected, the channel and parameters are displayed alternately
and welding can start.
●
When Mode selection key ○
12 is set to “ Record ” ( Section 8.1)
・By turning the Jog-dial ○
7, channel number can be selected. LED shows “CH”
setting current and voltage. Flashing means welding parameters are being stored.
・Press selection key ○
12 to return to “ Weld ” from “ Record ” and the corresponding
parameters are recorded in the channel being selected.
●
When a self-diagnosable error occurs, ( For troubleshooting: Section 11.1)
・ it shows Err( voltage display LED○
3 shows alarm signal number ).
○
3
setting
“ current ”
“ wire feeding
speed ”
“ plate thickness ”
“ spot welding
time ”
function 的
select
●
When “ current ” / “ wire feeding speed ” function is selected, the setting method of
the corrosponding selection number is decided by P11 of “F. Adj” function menu.
When P11 is 0, it is adjusted by wire feeder potentiometer; when P11 is 1, it can
be changed by Jog-dial ○
4. Note “ plate thickness ” can be displayed only instead
of being changed.
●
“ spot welding time ” function is adjusted by Jog-dial ○
4.
Note To change“ spot welding time ”, welding control ○
13 is to be selected as “ spot
welding ” function.

Names and functions
15
○
4 Jog-dial
●
When Mode selection key ○
12 is set to “ Weld ”, (refer to description in ○
3)・ when
key ○
3 selects different options, please adjust corrosponding set value according
different items.
・During welding, “ Welding ” current can be adjusted. However “ initial ” and
“ crater ” current can NOT be changed.
●
When Mode selection key ○
12 is set to “F. Adj”,( Section 8.1) ・ refer to
detailed description.
●
When Mode selection key ○
12 is set to “ Call ”,
・ It does not function.. ( When“ Call ” is selected, only Jog-dial ○
7, key ○
8, ○
10 , ○
12
work. )
●
When Mode selection key ○
12 is set to “ Record ”,
・It does not function.. (When “ Call ” is selected, only Jog-dial ○
7, key ○
8, ○
10 , ○
12
work. )
○
5 voltage display
7-segment LED
●
When Mode selection key ○
12 is set to “ Weld ”,
・On stand-by status, ○
6 data of the item being selected is shown.
・During welding, it shows the voltage value of the actual output.
●
When Mode selection key ○
12 is set to “F. Adj”, ( Section 8.1)
・It shows specific set values.
●
When Mode selection key ○
12 is set to “ Call ”,( Section 8.1)
・Use Jog-dial ○
7 to select channel number. LED shows corresponding channel
number. If the welding parameters are avilable in the channel, the channel can be
selected, else the corresponding channel can NOT be selected. When the channel
stored with data is selected, the channel and parameters are displayed alternately
and welding can start.
●
When Mode selection key ○
12 is set to “ Record ”, ( Section8.1)
・By turning the Jog-dial ○
7, channel number can be selected. LED shows “CH”
setting current and voltage. The flashing means welding parameters to be stored.
・Press selection key ○
12 to return to “ Weld ” from “ Record ” and the corresponding
parameters are recorded in the channel being selected.
●
When a self-diagnosable error occurs, ( For troubleshooting: Section 11.1)
・It shows alarm signal number.
○
6
setting
“ voltage ”
“ arc length ”
“ arc
characteristics ”
“ penetration
control ”
function select
●
When “voltage”/ “arc length ” function is selected, the setting method of the
corrosponding selection number is decided by P11 of “F. Adj” function menu.
When P11 is 0, it is adjusted by wire feeder potentiometer; when P11 is 1, it can
be changed by Jog-dial ○
7
●
When“ arc characteristics ” function is selected, the value can be changed by Jog-
dial ○
7
●
When“penetration control ” function is selected, the value can be changed by Jog-
dial ○
7
Note: To change“penetration control ”, welding method ○
14 is to be selected as
“Deepen ”.
○
7 Jog-dial
●
When Mode selection key ○
12 is set to“ Weld ”, (please refer to the description in
○
6)
・When key ○
6 selects different options, please adjust corrosponding set value
according different items.
・During welding, the contents in ○
8 can be adjusted. However, “ initial ” and
“ crater ” current change not be changed.
●
When Mode selection key ○
12 is set to “F. Adj”, ( Section 8.1)
・Refer to detailed description.
●
When Mode selection key ○
12 is set to “ Call ”,
・select Call channel number. (Only the channel number being recorded in ○
5 can
be shown. )
●
When Mode selection key ○
12 is set to “ Record ”,
・Record channel number is select.

Names and functions
16
○
8 manual wire
feeding button
●
The function is used to feed welding wire into the liner before welding by holding
this key.
・manual wire feeding speed is decided by the welding current.
○
9 switching button
●
To switch the setting among“ initial ”, “ Weld ”, “ crater ” current.
・For crater OFF, it can not be switched. Only the setting for “ Weld ” current can be
selected.
○
10 gas check button
●
It is to check shield gas and adjust flow rate.
・Normally, the indicator lamp is off. The lamp is on while checking gas.
・To perform the gas check, press this button and then release, then the gas valve of
the wire feeder is turned ON and then turned OFF in 20 seconds.
Press this button once again to terminate the gas check immediately.
○
11 lock button
●
During stand-by, long press button for 1 second to lock the panel. Then all buttons
on the panel expect ○
3○
6○
8○
9○
10 can NOT be operated but the wire feeder
potentiometer can be adjusted.
○
12 mode select
button
●
Weld: welding condition setting for ○
2~○
7, ○
9 and ○
13 ~○
17 , ○
8○
10 for wire feeding
check, gas check for welding, ○
11 for panel lock
・F. Adj: fine adjustment on F. Adj menu ( Section 8.1).
・Call: To call the welding condition being recorded ( Section 8.1).
・Record: To record the present welding conditions ( Section 8.1).
○
13 welding control
●
For welding control method selection, ( Chapter 8 )
・crater OFF: regular welding.
・crater ON: regular welding ~ crater welding.
・initial ON: initial welding ~regular welding ~ crater welding.
・spot welding: The welding lasts certain seconds according to the spot welding time
being set. The welding stops automatically when the spot welding time is up.
○
14 welding method
●
To select the welding method
・Standard: No pulse during welding.
・OP1: Reserve.
○
15 material
●
select the material to be welded
・OP1 and OP2 are reserved for special design.
○
16 wire diameter
●
select welding wire diameter to be used
・OP1 reserved for special design.
○
17 gas
●
welding method select. please prepare gas according to the requirement listed
below:
・CO2: CO2 gas 100%
・MAG: Ar gas 80%+CO2 gas 20%
・MIG: Ar gas 98%+O2 gas 2% or Ar gas 97.5%+CO2 gas 2.5%
・OP1, OP2, OP3 and OP4 are reserved for special design.
○
18 fuse (8A)
wire feeding motor
●
protection on the wire feeding motor
Note: be sure to turn off the power source switch before replacing the fuse.
○
19 power source
switch
●
switch the power source ON and OFF
Note:
1. The welding material, welding wire diameter and welding gas being set in (○
15 )~(○
17 )should be in line with the
actual operational conditions.
2.If there is no welding data in welding material, welding wire diameter and welding gas, it shows “--- ---”, as
shown in the picture below.
- - - - - -
2 5

Connection
17
6 Connection
Important
●
The installation shall be done by qualified installation personnel and should conform to
all national andlocal codes.
●
Type and capacity of protection devices, such as breaker and fuse, to be applied
should conform to all national and local codes.
●
Type and size of cables to be applied should conform to all national and local codes.
Touching current carrying parts may cause a fatal accident like an electric
shock, burn injury and so on. To prevent physical accidents like an electric
shock, burn injury and so on, make sure to observe the followings.
●
Make sure to turn off the switche
s of this product and the distribution box before starting
connections.
●
Do not perform any connection work with wet hands.
●
Make sure to insulate all bare current-carrying parts like joints and so on by tape, etc.
●
Do not apply undue force to the cables and wires.
●
Avoid contact with the welding arc part at wiring.
●
For safety reasons, provide base material with grounding work. Wiring and grounding
work should be done by qualified electricians.
Observe the followings to prevent a fire caused by overheat of cables.
●
Use cables with specified size or larger.
●
Fasten all cable connections securely.
6.1 The connection of output cable
Connecting cable from base metal
●
Connect
cable from the base metal to the base metal terminal (-).
●
After connection, insulate the cable connections with insulation tape.
●
Use a cable of 35 mm
2
or more for welding or a specified tough rubber sheath cable (excluding vyniletype)
●
Make sure to use one whose cross section and length conform to the applied connecting cable.
●
Make sure to attach the proper clamp terminal.
Connecting torch cable
●
Connect torch
cable from the wire feeder to the torch ter- minal (+) with the attached M10 bolt.
●
After connection, in
sulate the cable connections with insulation tape.
Connecting feeder cable
●
Put in the plug of the feeder cable from the wire feeder to the feeder connector.
This manual suits for next models
3
Table of contents
Other Panasonic Welding System manuals

Panasonic
Panasonic YC-500WX User manual

Panasonic
Panasonic YT-40MFW User manual

Panasonic
Panasonic YC-315TX User manual

Panasonic
Panasonic YC-300BP2YAF User manual

Panasonic
Panasonic YD-350FD2 User manual

Panasonic
Panasonic YC-400TX User manual

Panasonic
Panasonic YX-09KGC2 User manual

Panasonic
Panasonic YF-0201Z5HGF User manual

Panasonic
Panasonic YC-400TX4 User manual

Panasonic
Panasonic YD-400AT User manual