PanelClaw Polar Bear III HD User manual

panelclaw.com
PanelClaw®, Inc.
1600 Osgood Street, Ste. 20-23
North Andover, MA 01845
Tel +1 (978) 688.4900
www.panelclaw.com
Polar Bear® III HD
Mechanical Attachment Bracket
Installation Manual
Document Number 9910031 Rev F
Jan 2019

Polar Bear III HD Mechanical Attachment Bracket Installation Manual
9910031 Rev F
2
Revision History
Rev
ECO #
Date
Description of Changes
Approved By
A
C00385
29AUG14
Initial Released
CA
B
C00422
08SEP15
Add installation instruction for 5 Degree
Mechanical Attachment Bracket
CN
C
C00457
12SEP16
Add installation instruction for 10 Degree
South Tray Mechanical Attachment
JA
D
C00500
20JUN17
Update instruction regarding installation
support from manufacturer
JA
E
C00513
31JAN18
Update instruction regarding installation
of South Tray Mechanical Attachment
JA
F
C00546
03JAN19
Brand refresh
CN

Polar Bear III HD Mechanical Attachment Bracket Installation Manual
9910031 Rev F
3
Table of Contents
Revision History ............................................................................................................................................ 2
Table of Contents.......................................................................................................................................... 3
Introduction .................................................................................................................................................. 4
Safety Overview ............................................................................................................................................ 4
Parts and Hardware ...................................................................................................................................... 5
Required Tools .............................................................................................................................................. 5
5 Degree Mechanical Attachment location and Mechanical Attachment Bracket Installation ................... 6
Step 1: Position the Mechanical Attachment ........................................................................................... 6
Step 2: Install the Mechanical Attachment............................................................................................... 7
Step 3: Secure the Mechanical Attachment Bracket ................................................................................ 7
10 Degree Mechanical Attachment location and Mechanical Attachment Bracket Installation ...............10
Step 1: Position the Mechanical Attachment ......................................................................................... 10
Step 2: Install the Mechanical Attachment............................................................................................. 11
Step 3: Secure the Mechanical Attachment Bracket .............................................................................. 11
10 Degree South Support Mechanical Attachment location and Mechanical Attachment Installation ....13
Step 1: Position the Mechanical Attachment ......................................................................................... 13
Step 2: Install the Mechanical Attachment............................................................................................. 14
Step 3: Connect the Mechanical Attachment to the Ballast Tray........................................................... 14
Appendix A: Safety...................................................................................................................................... 16

Polar Bear III HD Mechanical Attachment Bracket Installation Manual
9910031 Rev F
4
Introduction
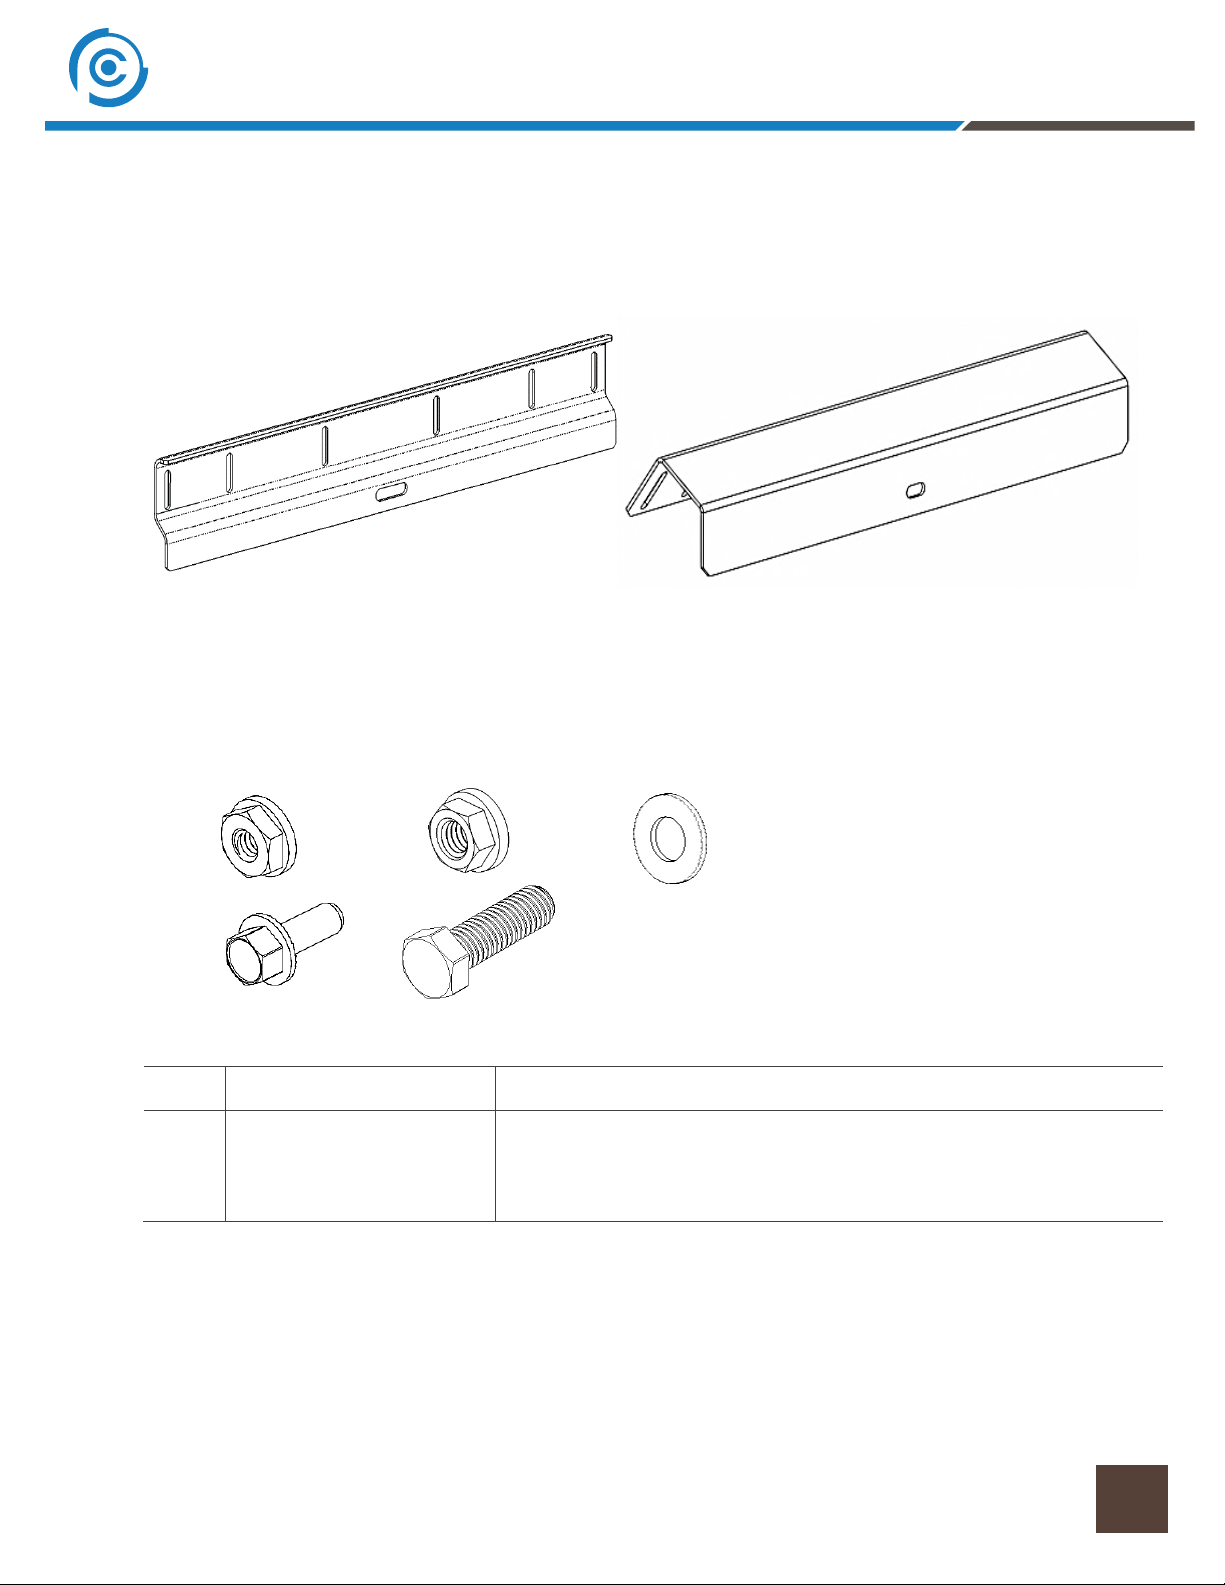
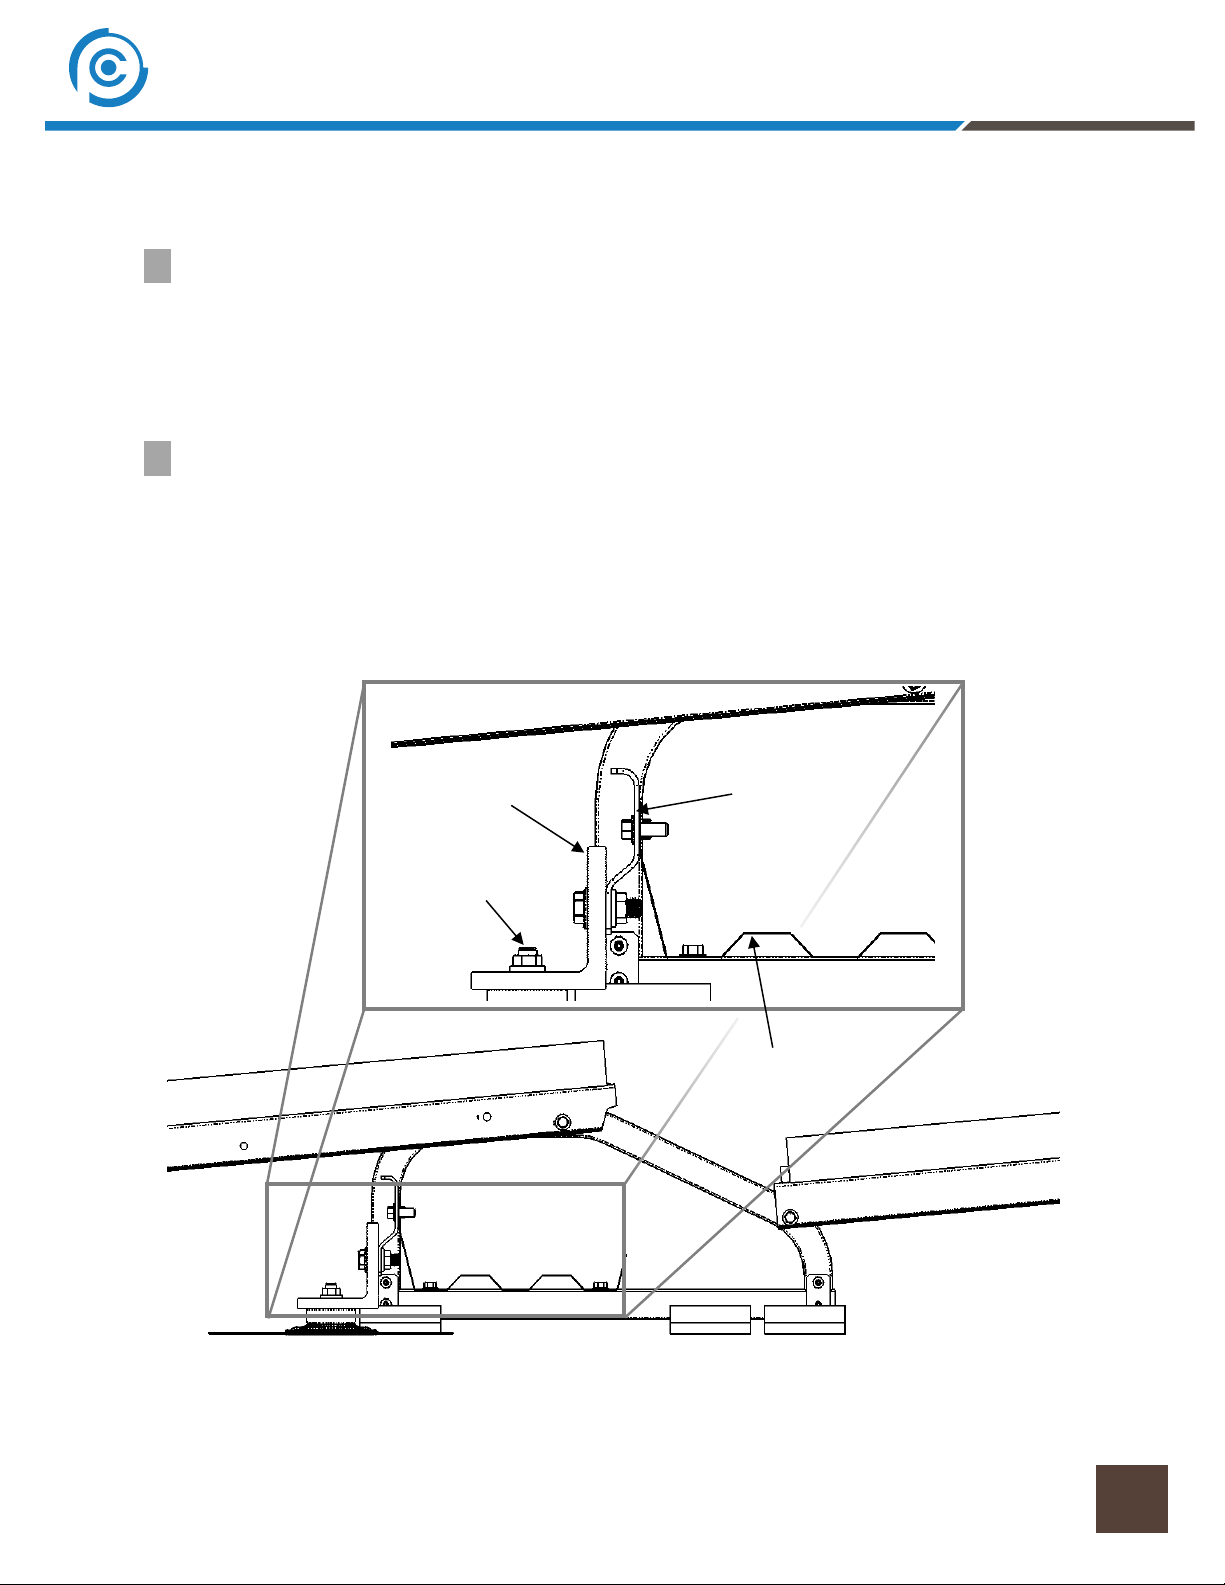
The PanelClaw Mechanical Attachment Bracket is an option for PanelClaw’s Polar Bear® III HD flat roof
photovoltaic mounting systems. The PanelClaw Mechanical Attachment Bracket is designed to enable
installers to seamlessly connect EcoFasten Solar®, OMG® Roofing Products and Anchor Products™
Mechanical Attachments to PanelClaw’s Polar Bear III HD system. This installation manual demonstrates
the proper connection of EcoFasten, OMG and Anchor products to Polar Bear III HD components.
THIS INSTALLATION MANUAL DOES NOT COVER SELECTION OF OR INSTALLATION OF ANY MATERIALS
USED TO SEAL A MECHANICAL ATTACHMENT TO THE ROOF. FOR THESE INSTRUCTIONS PLEASE SEE OEM
PROVIDER INSTALLATION MANUALS AND RELATED LITERATURE. A LIST OF OEM PROVIDERS IS SHOWN
BELOW.
THIS INSTALLATION MANUAL DOES NOT COVER SELECTION OF OR INSTALLATION OF FASTENERS
REQUIRED TO FASTEN A MECHANICAL ATTACHMENT TO THE ROOF STRUCTURE ITSELF. FOR THESE
INSTRUCTIONS, PLEASE SEE OEM PROVIDERS INSTALLATION MANUALS AND RELATED LITERATURE. A
LIST OF OEM PROVIDERS IS SHOWN BELOW.
ANY QUESTIONS RELATED TO MECHANICAL ATTACHMENT ROOF PATCHES, PATCH SELECTION, PATCH
COMPATIBILITY WITH ROOF MEMBRANE, PATCH COMPLIANCE WITH ROOF MEMBRANE
MANUFACTURER WARRANTIES, OR ANY QUESTIONS RELATED TO MECHANICAL ATTACHMENTS AND
ROOF WARRANTIES, MUST BE DIRECTED TO RESPECTIVE MECHANICAL ATTACHMENT OEM PROVIDER
SHOWN BELOW.
PANELCLAW IS NOT RESPONSIBLE FOR THIRD PARTY MECHANICAL ATTACHMENT PRODUCTS OR THEIR
RESPECTIVE INSTRUCTIONS, MANUALS, WARRANTIES, OR SUPPORT.
OEM MECHANICAL ATTACHMENT PROVIDERS:
•Anchor Products: www.anchorp.com
•OMG Roofing Products: www.omgroofing.com
•ECOFasten Solar: www.ecofastensolar.com
Safety Overview
Safety is an essential part of every photovoltaic (PV) installation and every construction site. It is
imperative to plan ahead for any safety concerns and hazards to promote safe work practices during
installation. This section does not claim to address or Support all safety concerns that may arise during
the installation of PanelClaw mounting systems or any other aspect of the work being performed. Before
beginning work, installers should refer to all local and federal safety, health, and regulatory
requirements to assure compliance. Refer to OSHA Part 1926 and its related Subparts for federal
construction related regulations and standards.
The section in Appendix A: Safety outlines some of the obvious / major hazards that could exist during
the installation of PanelClaw products, and are divided to bring a level of clarity to such hazards. Some
sections do not apply to all PanelClaw product lines and such exclusions are noted within each section.
PRIOR TO INSTALLATION, READ THE SAFETY PROVISIONS ATTACHED IN APPENDIX A AND REVIEW
THE INSTALLATION MANUAL IN ITS ENTIRETY.

Polar Bear III HD Mechanical Attachment Bracket Installation Manual
9910031 Rev F
5
Parts and Hardware
Major Components
Mechanical Attachment Bracket
Hardware Kits
Fastener Kit
Parts and Hardware
Mechanical Attachment Bracket
Universal bracket connecting the Mechanical Attachment to the Ballast Tray
Hardware
Serrated flange nuts 1/4-20 Stainless Steel 18-8
Hex head cap screw 1/4-20 x 0.75” Stainless Steel 18-8
Flange nuts 3/8-16 Stainless Steel 304
Hex head bolt 3/8-16 x 1.25” Stainless Steel 304
Flat Washer 3/8 Stainless Steel 304
Required Tools
•3/8” drive torque wrench (settings available up to 30 ft-lbs)
•3/8” deep socket (bolts) and wrench
•1/2” deep socket (bolts) and wrench
Mechanical Attachment Bracket
for 5° PanelClaw system
Mechanical Attachment Bracket
for 10° PanelClaw system

Polar Bear III HD Mechanical Attachment Bracket Installation Manual
9910031 Rev F
6
OMG/Anchor:
2 1/2”(± 1/2”)
63mm (±
13mm)
Measure from the
inside surface of
the Support
5 Degree Mechanical Attachment location and Mechanical
Attachment Bracket Installation
Step 1: Position the Mechanical Attachment
1. Consult the provided Racking Construction Set Drawing for the locations of the Mechanical
Attachments that need to be installed. Once the modules and Supports are installed you can
locate the Mechanical Attachments. Ballast Trays and modules may need to be removed if they
are already installed.
2. The Mechanical Attachments are installed underneath modules and connect to the side of the
Ballast Trays via the Mechanical Attachment Bracket.
3. Center the Mechanical Attachments on the Ballast Tray requiring the attachment (east to west).
NOTE: If no suitable slots are available at the center of the Ballast Tray, the Mechanical
Attachment can be located at the next available slots closest to the center of the gap between
adjacent modules.
4. See below for Mechanical Attachment locations from the Support edge (Figure 1, 2).
NOTE: OMG and Anchor Products are interchangeable for the instructions below.
Figure 1 OMG/Anchor Products: Distance from Support surface to center of Mechanical Attachment
Measure from
the inside surface
of the Support
EcoFasten:
6’’ Standoff:
2 1/2” (± 1/2”)
63mm (±13mm)
Standard Mount(shown):
1 29/32” (± 1/2”)
47mm (±13mm)
Figure 2 EcoFasten Product: Distance from Support surface to center of Mechanical Attachment

Polar Bear III HD Mechanical Attachment Bracket Installation Manual
9910031 Rev F
7
5 Degree Mechanical Attachment location and Mechanical
Attachment Bracket Installation
Step 2: Install the Mechanical Attachment
1. Install the Mechanical Attachment once it has been placed appropriately. Consult the
manufacturer’s installation instructions and specifications regarding the proper installation and
flashing of the Mechanical Attachment.
Step 3: Secure the Mechanical Attachment Bracket
1. Once the Mechanical Attachment is installed you can complete the rest of the Mechanical
Attachment assembly. Attach the L-Brackets/Standoffs to the threaded stud on the Mechanical
Attachment. Finger-tighten for now. (Figure 3, 4)
2. With the Mechanical Attachment shown as in the figures below, attach the Mechanical
Attachment Bracket to the L-Bracket. Finger-tighten the hardware for now. (Figure 3, 4)
Figure 3 OMG/Anchor Products: Attach the L-Brackets to the threaded stud on the
Mechanical Attachment
Mechanical
Attachment
Bracket
Ballast Tray
L Bracket
Mechanical
Attachment
stud

Polar Bear III HD Mechanical Attachment Bracket Installation Manual
9910031 Rev F
8
Ballast Tray
Mechanical
Attachment
Bracket
L Bracket
6” Standoff
5 Degree Mechanical Attachment location and Mechanical
Attachment Bracket Installation
Figure 4 Ecofasten Product: Attach the standoff and L-Brackets to the threaded
stud on the Mechanical Attachment

Polar Bear III HD Mechanical Attachment Bracket Installation Manual
9910031 Rev F
9
5 Degree Mechanical Attachment location and Mechanical
Attachment Bracket Installation
3. Install the Ballast Tray and locate the Mechanical Attachment Bracket so that it aligns with the
inner slots of the Ballast Tray. Using the two ¼-20 x 0.75” serrated flange bolts and ¼-20
serrated flange nuts connect the Ballast Tray and Mechanical Attachment Bracket. Torque to 8
ft-lbs. (Figure 5)
4. Torque the remaining components:
L-Bracket to Mechanical Attachment to 30 ft-lbs;
L-Bracket to Mechanical Attachment Stud per Manufactures installation instructions. (Figure 5)
Figure 5 Secure the Mechanical Attachment Bracket with 2 nuts and bolts using slots
that align with Ballast Tray
Torque to
8 ft-lbs
See Mechanical
Attachment Installation
Manual
Torque to
30 ft-lbs
May shift
East/West to
Nearest Available
Slots

Polar Bear III HD Mechanical Attachment Bracket Installation Manual
9910031 Rev F
10
10 Degree Mechanical Attachment location and Mechanical
Attachment Bracket Installation
Step 1: Position the Mechanical Attachment
1. Consult the provided Racking Construction Set Drawing for the locations of the Mechanical
Attachments that need to be installed. Once the module and Supports are installed you can
locate the Mechanical Attachment. Ballast Trays will need to be removed if they are already
installed.
2. The Mechanical Attachments are installed north of modules and connect to the underside of the
Ballast Trays via the Mechanical Attachment Bracket.
3. Center the Mechanical Attachments between two adjacent modules (east to west).
4. See below for Mechanical Attachment locations from the module edge (Figure 6, 7).
NOTE: OMG and Anchor Products are interchangeable for the instructions below.
Figure 6 OMG/Anchor Product: Distance from Support surface to center of Mechanical Attachment
4 11/16” (±
1/2
”)
120mm (±13mm)
Measure from the
inside surface of
the Support
Measure from the
inside surface of
the Support
6” Standoff:
4 11/16” (±1/2”)
120mm (±13mm)
Standard Mount:
5 13/32” (±1/2”)
139mm (±13mm)
Figure 7 EcoFasten Product: Distance from Support surface to center of Mechanical Attachment

Polar Bear III HD Mechanical Attachment Bracket Installation Manual
9910031 Rev F
11
10 Degree Mechanical Attachment location and Mechanical
Attachment Bracket Installation
Step 2: Install the Mechanical Attachment
1. Install the Mechanical Attachment once it has been placed appropriately. Consult the
manufacturer’s installation instructions and specifications regarding the proper installation and
flashing of the Mechanical Attachment.
Step 3: Secure the Mechanical Attachment Bracket
1. Once the Mechanical Attachment is installed you can complete the rest of the Mechanical
Attachment assembly. Attach the L-Brackets/Standoffs to the threaded stud on the Mechanical
Attachment. Finger-tighten for now. (Figure 8, 9, 10)
2. With the opening facing down attach the Mechanical Attachment Bracket to the L-Bracket.
Finger-tighten the hardware for now.
3. Install the Ballast Tray and locate the Mechanical Attachment Bracket so that it aligns with the
inner slots of the Ballast Tray. Using the two ¼-20 x 0.75” serrated flange bolts and ¼-20
serrated flange nuts connect the Ballast Tray and Mechanical Attachment Bracket. Torque to 8
ft-lbs (Figure 8, 9, 10).
4. Torque the remaining components:
L-Bracket to Mechanical Attachment to 30 ft-lbs.
L-Bracket to Mechanical Attachment Stud per Manufactures installation instructions.
Figure 8 OMG Product: Secure the Mechanical Attachment Bracket
Mechanical Attachment
Bracket
Ballast
Tray
L Bracket
Mechanical
Attachment
Stud

Polar Bear III HD Mechanical Attachment Bracket Installation Manual
9910031 Rev F
12
10 Degree Mechanical Attachment location and Mechanical
Attachment Bracket Installation
Figure 9 EcoFasten Product with 6” standoff: Secure the Mechanical Attachment Bracket
Figure 10 EcoFasten Product: Secure the Mechanical Attachment Bracket
Mechanical
Attachment
Bracket
L Bracket
6”
Standoff
Ballast
Tray
Mechanical
Attachment Bracket
L Bracket
Ballast
Tray
Mechanical
Attachment
Stud

Polar Bear III HD Mechanical Attachment Bracket Installation Manual
9910031 Rev F
13
10 Degree South Support Mechanical Attachment location and
Mechanical Attachment Installation
Step 1: Position the Mechanical Attachment
1. Consult the provided Racking Construction Set Drawing for the locations of the Mechanical
Attachments that need to be installed. Once the module and Supports are installed you can
locate the Mechanical Attachment. Ballast Trays will need to be removed if they are already
installed.
2. The Mechanical Attachments are installed between two adjacent south supports and connect to
the center of the Ballast Trays.
3. Place the Mechanical Attachments matching the hole location in the Ballast Tray.
Notes: Drill a ½” hole in the middle of the Ballast Tray if needed.
Figure 11 Place the Mechanical Attachment underneath the center of the Ballast Tray
South Supports
Match the Mechanical
Attachment to the hole
in the Ballast Tray
Mechanical Attachments are installed
between two adjacent South Supports

Polar Bear III HD Mechanical Attachment Bracket Installation Manual
9910031 Rev F
14
10 Degree South Support Mechanical Attachment Location and
Mechanical Attachment Installation
Step 2: Install the Mechanical Attachment
1. Install the Mechanical Attachment once it has been placed appropriately. Consult the
manufacturer’s installation instructions and specifications regarding the proper installation and
flashing of the Mechanical Attachment.
Step 3: Connect the Mechanical Attachment to the Ballast Tray
1. Once the Mechanical Attachment is installed you can connect the Mechanical Attachment to the
Ballast Tray.
2. Place the Ballast Tray on the South Supports. Match the Ballast Tray hole to the Mechanical
Attachment stud. Connect the Ballast Tray to the South Supports with 4 bolts. (In some
instances the Ballast Tray must be forced down to be able to install the washer and nut)
NOTE: Extra washers are supplied with the Attachment Hardware Kit to act as a compression
stop below the tray. Washers or other suitable compression stop must be used to ensure that a
maximum distance of 1” below the bottom of tray and compression stop is achieved. In some
cases a coupling nut may be required in the event that the stud of the attachment is not of
sufficient length. This will prevent excessive Ballast Tray deformation and allow appropriate
application of torque.
Figure 12 Use optional washers to prevent excessive tray deformation as necessary
Nut
Washer
Ballast
Tray
Optional Washers are
required to ensure a
maximum 1” gap
Mechanical
Attachment
As-installed
view with
optional
washers
Exploded
view with
optional
washers

Polar Bear III HD Mechanical Attachment Bracket Installation Manual
9910031 Rev F
15
3. Connect the Mechanical Attachment to the Ballast Tray with a washer and a nut.
4. Torque the nut to 30 ft-lbs.
Figure 13 Connect the Mechanical Attachment to the Ballast Tray
Figure 14 Mechanical attachment installed with coupling nut
(bolt and coupling nut are not supplied by PanelClaw)
Torque to 30 ft-lbs
Nut
Washer
As-installed
view with
coupling nut
(not supplied
by PanelClaw)
Exploded
view with
coupling nut
Bolt
Washer
Ballast
Tray
Mechanical
Attachment
Coupling nut
Max length
2.5”

Polar Bear III HD Mechanical Attachment Bracket Installation Manual
9910031 Rev F
16
Appendix A: Safety
The subsections below outline some of the obvious / major hazards that could exist during the
installation of PanelClaw products, and are divided to bring a level of clarity to such hazards. Some
sections do not apply to all PanelClaw product lines and such exclusions are noted within each section.
Electrical Hazards: PanelClaw products are purely mechanical and do not contain any electrically live
parts. When a photovoltaic module is exposed to sunlight it is electrically live and cannot be turned off.
As soon as modules are installed using a PanelClaw system, an electrical shock hazard is present. All
personnel on site should coordinate to ensure that such electrical hazards are clearly communicated. It
is advised, at a minimum, that all personnel utilize caution and proper Personal Protective Equipment as
outlined in that section. Only electrically qualified personnel should perform PV module installation.
Refer to OSHA Part 1926 Subpart K –Electrical and NFPA 70E for additional information.
Fall Hazards: This section only applies to Polar Bear® products installed on locations six feet or higher
above grade. Proper fall protection should be in place at all work sites. There are many fall protection
solutions readily available to help reduce exposure to fall hazards. These may include personal fall arrest
systems, safety nets, guardrails, and flagged setbacks from all roof edges as outlined in OSHA Part 1926
Subpart M –Fall Protection.
Trip Hazards: All PanelClaw arrays have elevated components that are installed above grade or above a
roof surface. Such hazards should be identified and caution should be taken to avoid tripping over such
components. Refer to the Fall Hazards section specifically if working with the Polar Bear product line.
Make sure to pick up and not drag your feet when working on site, and always pay attention to your
path of movement to note any obstructions that could create a trip hazard.
Lifting Hazards: The PanelClaw installation process involves lifting of heavy items that could lead to
personal injury and damage to property. All personnel should be trained in the proper procedures for
manually lifting. Evaluate an object’s size and weight prior to lifting, and follow these general guidelines
for lifting:
1. Assess the lift and know the object weight.
2. Bend at the knees and get a good grip.
3. Keep back straight and lift straight up with legs without twisting. It is important to lift with the
legs and not the back.
4. If an object is too large or heavy, ask for help and do not attempt to lift by yourself.
In the case that mechanical assistance (e.g. crane, forklift, etc.) is required to complete the
lifting operations, all machine operators of such devices should be licensed and trained.
Material Handling: All PanelClaw parts and components are made of aluminum and steel alloys and
utilize stainless steel assembly hardware. These materials are considered non-toxic and require no
special handling procedures. Metal components may have sharp edges, so be sure to handle with care
and utilize proper personal protection equipment, especially gloves, during handling. Refer to OSHA Part
1926 Subpart H –Materials Handling, Storage, Use, and Disposal for additional information.
Personal Protective Equipment (PPE): All personnel should utilize and implement proper PPE per OSHA
requirements. Refer to OSHA requirements for proper use and implementation of PPE. The following

Polar Bear III HD Mechanical Attachment Bracket Installation Manual
9910031 Rev F
17
items are suggested as a minimum to avoid injury based on the installation procedure outlined in this
manual:
1. Appropriate work clothing
2. Electrically insulated hard hat
3. Protective eyewear
4. EH rated safety boots
5. Gloves
6. High-visibility safety vest
7. Hearing protection
If any PPE appears to be defective, stop the use of such equipment immediately, and ensure it is
replaced before work continues. Refer to OSHA Part 1926 Subpart E –Personal Protective and Life
Saving Equipment for additional information.
Hand and Power Tools: Access to all hand and power tools should be regulated and controlled at all
times on site to prevent improper use and related injuries. When not in use, all equipment should be
stored in a secured location. Only personnel who have been properly trained in the safe operation of
any potentially dangerous tool should be allowed access. All required tools to perform the installation of
PanelClaw racking are outlined in the installation procedure. All tools should be inspected daily and
before use by the operator. If any tool appears to be defective, stop the use of such equipment
immediately, and ensure it is replaced before work continues. Electrical power tools should follow
proper lock-out tag-out procedures per OSHA requirements. Refer to OSHA Part 1926 Subpart I –Tools –
Hand and Power for additional information.
Table of contents