Paratec Next User manual

Paratec GmbH
Next H / C
Issue II
04-2005
Owner‘s Manual
1
Weingartstr. 12
66798 Wallerfangen
Tel.: +49-(0)6837-7375
Fax : +49-(0)6837-74373
www.paratec.de
Dear Customer !
Thank you for choosing a NEXT harness/container system. This
rig has been designed, tested and built not only to EASA and FAA
minimum performance standards but mostly with our passion for
the utmost quality workmanship, system functionality and longivi-
ty. We strongly recommend, that you and your rigger thoroughly
inspect your new rig and carefully read this manual.
Should you find anything, that does not look right to you or your
rigger, please contact us immediately.
Again, thank you for choosing a Paratec Product. We are very con-
fident it will be dependably at your service, everytime you skydi-
ve.
Sincerely
Eva Schumann
Stefan Ertler
Managing Directors
Paratec GmbH

Paratec GmbH
Next H / C
Issue II
04-2005
Owner‘s Manual
2
Table of Contents
Letter from the President .......................................... 1
Table of contents ....................................................... 2
Operation limitatons................................................... 3
About this manual...................................................... 4
Read before assembling ............................................ 4
Inspection procedures............................................... 5
Inspection plan.......................................................... 6
Closing the reserve container..................................... 7
Closing the main container ........................................ 16
The pull out system.................................................... 28
The Next Student System........................................... 36
Cleaning and storage................................................. 47
Maintenance.............................................................. 48
Pack volume comparison chart.................................. 49
Parts and part numbers ............................................ 50

Paratec GmbH
Next H / C
Issue II
04-2005
Owner‘s Manual
3
Operation Limitations
The NEXT Family of Harness / Container System has been certi-
fied under ETSO C23d issued by the Luftfahrt Bundesamt LBA as a
member of the European Aviation and Safety Authority and under
the US FAA TSO C23d
CERTIFICATION NR.: LBA.O.40.014/06 ETSO
FAA design approval No : CB/vk/04/03:0056-03
THIS HARNESS IS LIMITED TO BE USED UP TO
A PACK OPENING SPEED Of 150 KTS
AT A MAXIMUM OPERATING WEIGHT OF 115 Kg

Paratec GmbH
Next H / C
Issue II
04-2005
Owner‘s Manual
4
About this Manual
This manual cannot substitute for the knowledge and training you get in a
proper riggers course. The scope of this manual is also not to enable you to
pack this reserve container without any basic skills.
It is the responsibility of every trained and licensed rigger to as-
semble, inspect and pack to the manufacturers instructions, recom-
mendations and to his best knowledge and ability before he seals
and signs any packjob.
It is also in the responsibility of every user, to stay within the limitations set
by the manufacturer regarding maintenance cycles, wing loadings and pack
opening speeds, to not endanger himself nor his fellow skydiver friends !!
This manual is a source of compact information, both for the owner and the
rigger.
Read Before Assembling
Inspect the entire parachute system, reserve, harness/container, main
parachute and all other components, before you begin to assemble, pack or
use this parachute system.
Your NEXT should be assembled by a properly certified Rigger (or equivalent
rated person in your country).
Before assembling, be sure that the parachutes are compatible with this rig.
To check for compatability, refer to the chart on page 48 in this manual.
Should the pack volume of your parachute not fall under the figures in this
chart, then contact us immediately for further assistance.
Assemble this harness / container also in accordance with the reserve
parachute manufacturer‘s manual and the AADs manufacuters manual.

Paratec GmbH
Next H / C
Issue II
04-2005
Owner‘s Manual
5
Inspection Procedures
Carry out inspection proceedures at assembly, before every repack and after
emergency use.
According to the manufacturer‘s regulation, every NEXT rig must be inspec-
ted by qualified personel, before it is used for the first time, before every re-
pack, no matter if it was used or not and after it was handled in an improper
way such as after water jumps etc. The periodic inspection and repack cycle
for this Harness Container Sytem is 12 months. Other countries may have
different regulations, so please check with your responsible organisation.
Read the instructions in this manual completely before you begin.
Points of Inspection Inspect for
Main lift web damaged edges, velcro damage, broken
stitches, ravelled stitches
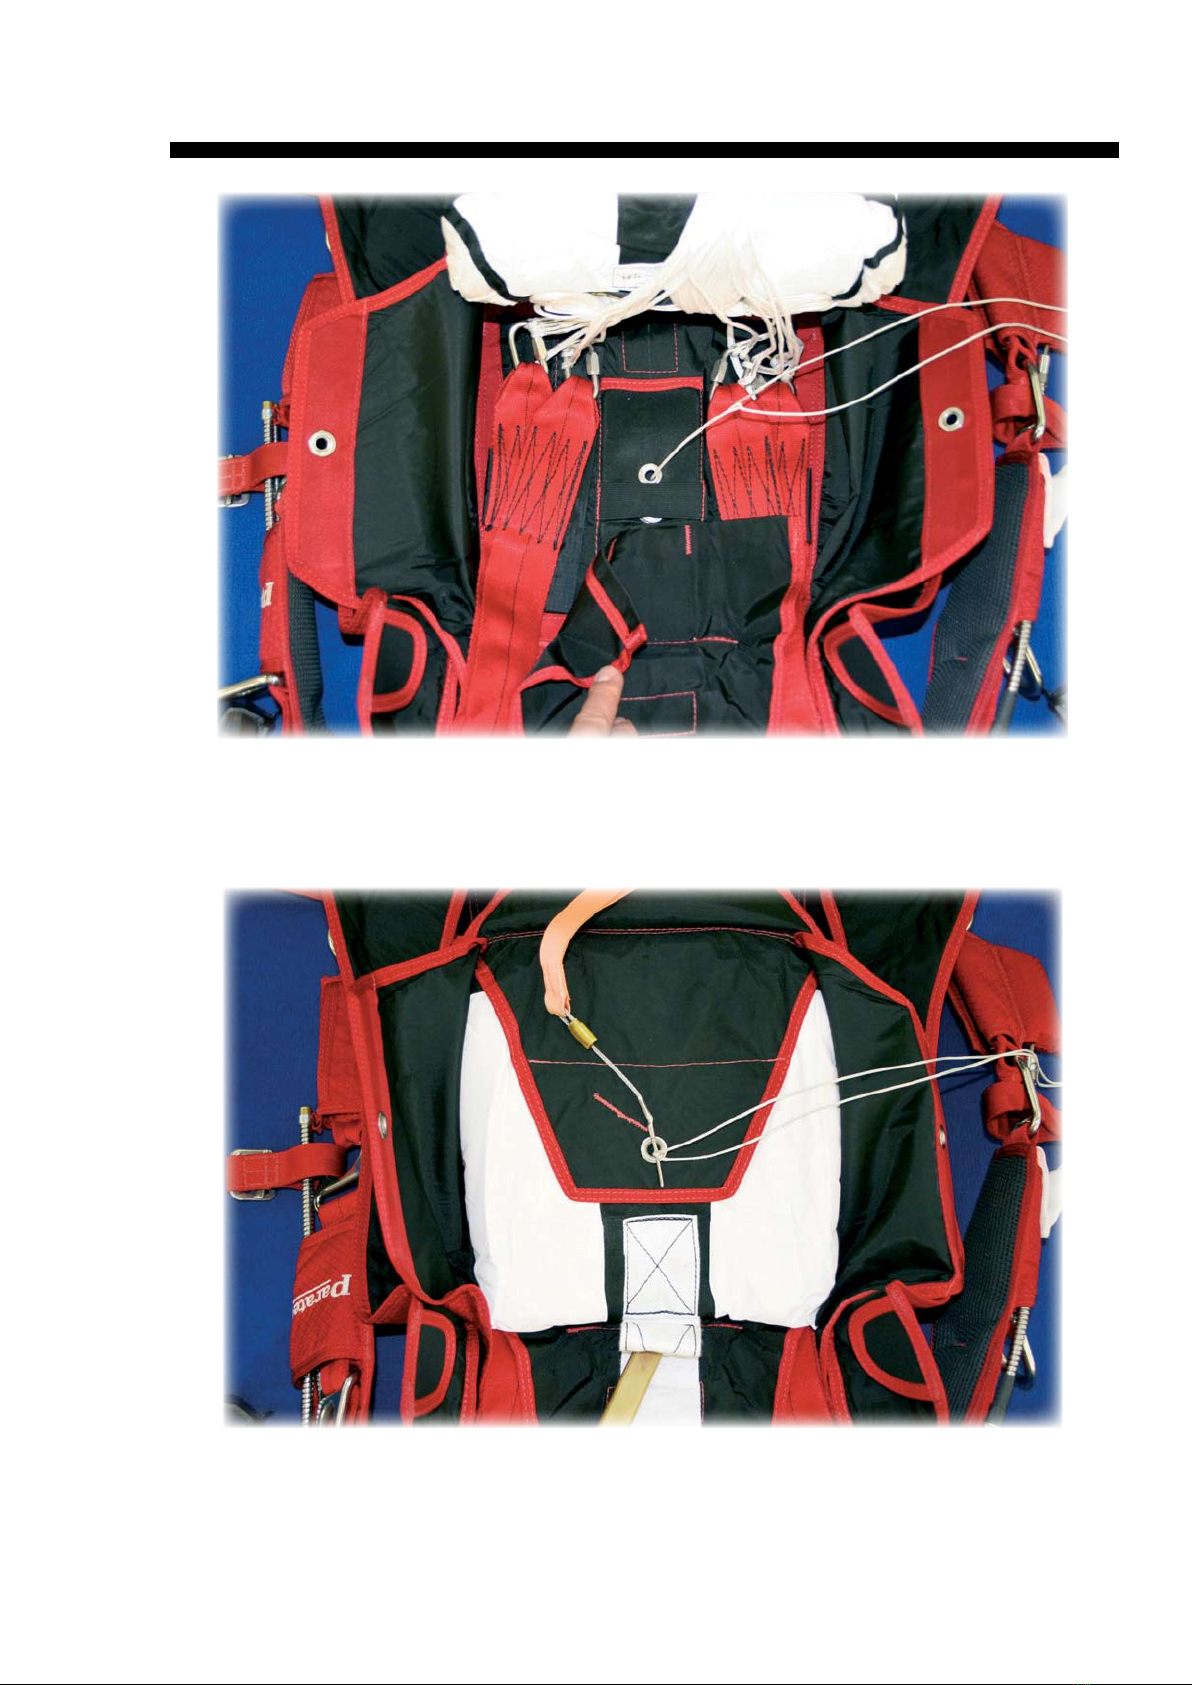
Reserve ripcord, ripcord pocket, cable
housing
tight fit in pocket, bent pin, enough
excess cable, worn out velcro, broken
stitches, loose tacking on MLW and / or
reserve flap
Chest and leg straps damaged edges, velcro damage, broken
stitches, ravelled stitches, worn out ela-
stic keepers
Cutaway pad, cables, cutaway housings velcro damage, nicks in cables, damaged
cables, dirty cables,
Container flaps broken plastic stiffeners
Grommets sharp edges, bad or improper setting,
AAD set up according to manufacturer‘s installation,
damaged cables
Main riser velcro damage, bent rings, damaged
closing loop,
hardened webbing on 3-ring, good togg-
le fit,
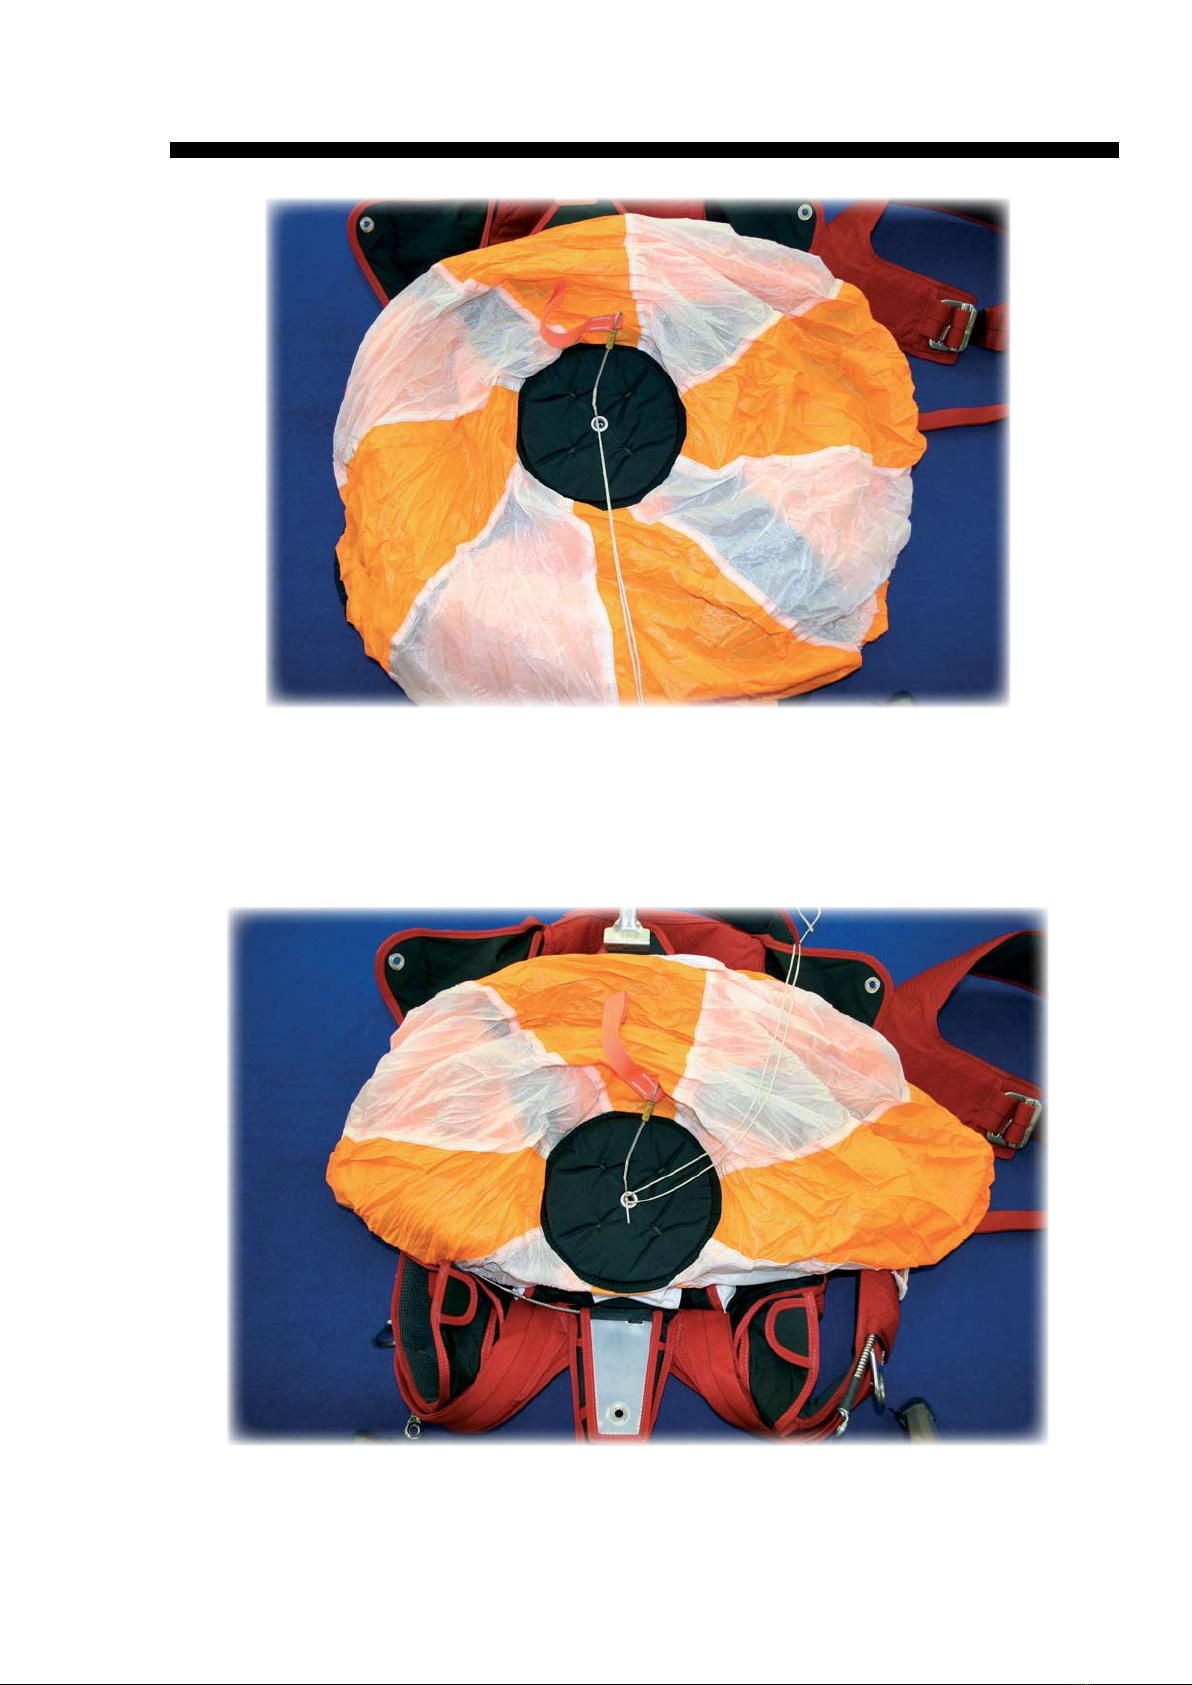
Free bag and pilot chute grommets for sharp edges, all seams
of bag, velcro in good condition, safety
stow, bridle seams, damages on pilot
chute fabric, spring force sufficient
Main deployment bag and pilot chute damaged grommets, old rubber bands,
retract system of P/C in good condition,
Pilot Chute fabric for porosity
Closing loops proper length, not frayed, general conti-
tion, proper type for AAD used
Entire hardware rust, sharp edges, cracks, correct instal-
lation

Paratec GmbH
Next H / C
Issue II
04-2005
Owner‘s Manual
6
Closing the Reserve Container
Please follow the packing instructions of your reserve manufacturer‘s
manual to this stage. This picture shows you the packing tools, re-
commended by us. Being a experienced rigger, you should not need
more. Note the clamp (yellow circle), which keeps the 1st reserve
flap from folding back, so you have easy access to the reserve tray,
making it much easier to place the reserve riser and the free bag
into the reserve container.
The reserve risers are still being tied together which makes the pro
packing of the reserve (recommended) easier and will assure sym-
metry throughout the pack job.
Important: Please make sure to remove this tie after you
have put the reserve risers into the pack tray. To asure
that this is not being forgotten, use a long and bright co-
lour tape as seen in the picture.

Paratec GmbH
Next H / C
Issue II
04-2005
Owner‘s Manual
7
Please make sure that the reserve risers are being placed UNDER the
covers of reserve flap # 2.
Close flap # 1 and stow the 3 point x stitch connection to the bridle
under the free bag.

Paratec GmbH
Next H / C
Issue II
04-2005
Owner‘s Manual
8
Stow the first section of bridle under flap # 1 using 2 complete s-
folds, pinching them under flap one, just before the grommet, yet pre-
paring the rest of the bridle to be folded up also in s-folds as shown
in the picture above.
Close flap # 2 and s-fold the rest of the bridle one sided. (Should give
you circa 6 folds)

Paratec GmbH
Next H / C
Issue II
04-2005
Owner‘s Manual
9
Count half of your folds and move them together to the other side,
creating a V of s-folds this way.
Place the bottom rim of the spring pilot chute on the base of the V, to
keep it in place. Using a gun cleaning rod or any similar device with a
eyelet on one end to pull the pull up cord through makes things quite
easy, assuring that your pack job doesn‘t shift.

Paratec GmbH
Next H / C
Issue II
04-2005
Owner‘s Manual
10
After you have compressed the spring and secured it with your tem-
porary pin, pull all the pilot chute fabric out of the sping completely.
Make sure that no fabric is pinched between the springs or under the
lower rim of the spring
Begin to dress the pilot chute fabric by rolling in the bottom section
towards the compressed spring. The top plate offers sufficient room
for your roll.

Paratec GmbH
Next H / C
Issue II
04-2005
Owner‘s Manual
11
Start folding back the sides of the fabric, also rolling it inward towards
the top plate. This method comlements the wedge shape of the reser-
ve container and will enhance the volume distribution of the complete
pack job. Done correctly, you should end up with a long rectangle,
sticking out into the main container section.
Close the left side flap first

Paratec GmbH
Next H / C
Issue II
04-2005
Owner‘s Manual
12
Continue by closing the right side flap
Close flap # 5

Paratec GmbH
Next H / C
Issue II
04-2005
Owner‘s Manual
13
The long rectangle of pilot chute fabric is now being rolled forward, to
rest under the 2 side flaps. If the container is tight, you might want
to use a packing paddle. In this case, please be carefull not to dama-
ge it by pushing too hard.
Close flap # 6 as shown above, remove the pull up cord.

Paratec GmbH
Next H / C
Issue II
04-2005
Owner‘s Manual
14
Seal, and document your pack job. Close the pin cover flap by using
the tabs.
The Next is now ready to be assembled with a main parachute.

Paratec GmbH
Next H / C
Issue II
04-2005
Owner‘s Manual
15
Closing the main container
As shown above, this way your Next is well prepared to be fitted with
a main canopy.
Your Next offers a neat little feature to secure the main container flap
together with your pull up cord. Just secure it, by sticking it into the
reserve pin cover flap pocket, as shown in the picture above.

Paratec GmbH
Next H / C
Issue II
04-2005
Owner‘s Manual
16
The above two pictures show from different perspectives, how the
main deployment bag is set into the main tray vertically to begin with.
Make sure that the main risers are stowed alongside the reserve con-
tainer, showing no excess length and the bag filling out the corners.

Paratec GmbH
Next H / C
Issue II
04-2005
Owner‘s Manual
17
Turn the main bag forward towards the reserve container, making
sure that it comes to rest in a position where is resembles the given
Length /Width /Height as the main tray resembles.
Note, that the bridle already points to the top right corner.
Close flap # 1. Make sure you pull enough closing loop length out of
the gommet, since you will need loop length as you continue, procee-
ding though the other flaps.

Paratec GmbH
Next H / C
Issue II
04-2005
Owner‘s Manual
18
Close flap # 2.
Very important : Close the right flap first. This asures the sym-
metry of the side flaps and the pin cover flap. Please note !!

Paratec GmbH
Next H / C
Issue II
04-2005
Owner‘s Manual
19
Close the left side flap and secure with the closing pin. Idealy, the pin
should be placed from bottom left to top right.
The closing loop length is very crucial with the Next container. Set at
the right length, it asures that the symmetry of the 2 side flaps is gi-
ven and the pin pressure is sufficient. The grommets should never be
on top of each other. Please look at the yellow line in the above pictu-
re for a perfect loop length and a symmetric side flap setting.

Paratec GmbH
Next H / C
Issue II
04-2005
Owner‘s Manual
20
Stow the excess bridle under the top and bottom of the right side
flap.
Other manuals for Next
1
Table of contents
Other Paratec Accessories manuals
Popular Accessories manuals by other brands

Stübbe
Stübbe PTM C2 Series Original operating manual

river systems
river systems ET 49 Use and maintenance manual

Waters Industries
Waters Industries SUNCATCHER SW-9374 manual

ESTEBAN
ESTEBAN ELESSENS Use Instructions Leaflet

Bugaboo
Bugaboo Breezy quick start guide

3Doodler
3Doodler Start troubleshooting guide