Parkside PWT 11 A1 User manual

WATER ANIMAL REPELLER WITH MOTION SENSOR /
WASSERSTRAHL-TIERABWEHR MIT
BEWEGUNGSSENSOR / JET D’EAU RÉPULSIF POUR
ANIMAUX AVEC DÉTECTEUR DE MOUVEMENTS
PWT 11 A1
IAN 360872_2007
JET D’EAU RÉPULSIF POUR
ANIMAUX AVEC DÉTECTEUR DE
MOUVEMENTS
Mode d’emploi
WATER ANIMAL REPELLER WITH
MOTION SENSOR
Operating instructions
WATERSTRAAL-DIERENAFWEER MET
BEWEGINGSSENSOR
Gebruiksaanwijzing
VODNÍ PAPRSEK S POHYBOVÝM
SENZOREM NA OCHRANU PROTI
ZVÍŘATŮM
Návod k obsluze
VANDSTRÅLE MED BEVÆGELSES-
SENSOR TIL AT SKRÆMME DYR VÆK
Betjeningsvejledning
VODNÝ LÚČ S POHYBOVÝM
SENZOROM NA OCHRANU PROTI
ZVIERATÁM
Návod na obsluhu
WASSERSTRAHL-TIERABWEHR MIT
BEWEGUNGSSENSOR
Bedienungsanleitung
ODSTRASZACZ ZWIERZĄT Z CZUJ-
NIKIEM RUCHU, WYKORZYSTUJĄCY
STRUMIEŃ WODY
Instrukcja obsługi
CHORRO DE AGUA PARA
ESPANTAR ANIMALES CON SENSOR
DE MOVIMIENTO
Instrucciones de uso
CV_360872_PWT11A1_LB8.indd 1-3 04.02.2021 14:55:07

GB/ IE Operating instructions Page 1
DE/AT/CH Bedienungsanleitung Seite 23
FR/BE Mode d’emploi Page 45
NL/BE Gebruiksaanwijzing Pagina 71
CZ Návod k obsluze Strana 93
PL Instrukcja obsługi Strona 113
SK Návod na obsluhu Strana 135
ES Instrucciones de uso Página 157
DK Betjeningsvejledning Side 179
Before reading, unfold the page containing the illustrations and familiarise yourself with all functions of the
device.
Klappen Sie vor dem Lesen die Seite mit den Abbildungen aus und machen Sie sich anschließend mit
allen Funktionen des Gerätes vertraut.
Avant de lire le mode d‘emploi, ouvrez la page contenant les illustrations et familiarisez-vous ensuite avec
toutes les fonctions de l‘appareil.
Vouw vóór het lezen de pagina met de afbeeldingen open en maak u vertrouwd met alle functies van het
apparaat.
Před čtením si otevřete stranu s obrázky a potom se seznamte se všemi funkcemi přístroje.
Przed przeczytaniem proszę rozłożyć stronę z ilustracjami, a następnie proszę zapoznać się z wszystkimi
funkcjami urządzenia.
Pred čítaním si odklopte stranu s obrázkami a potom sa oboznámte so všetkými funkciami prístroja.
Antes de empezar a leer abra la página que contiene las imágenes y, en seguida, familiarícese con todas
las funciones del dispositivo.
Før du læser, vend siden med billeder frem og bliv bekendt med alle apparatets funktioner.
CV_360872_PWT11A1_LB8.indd 1-3 04.02.2021 14:55:07

CV_360872_PWT11A1_LB8.indd 4-6 04.02.2021 14:55:07

PWT 11 A1 GB│IE │ 1 ■
Contents
Introduction ....................................2
Information concerning these operating instructions............. 2
Intended use ........................................... 2
Warnings ............................................. 2
Safety.........................................3
Basic safety instructions .................................. 3
Handling batteries ...................................... 4
Package contents ...............................5
Appliance description ............................6
Firstuse .......................................7
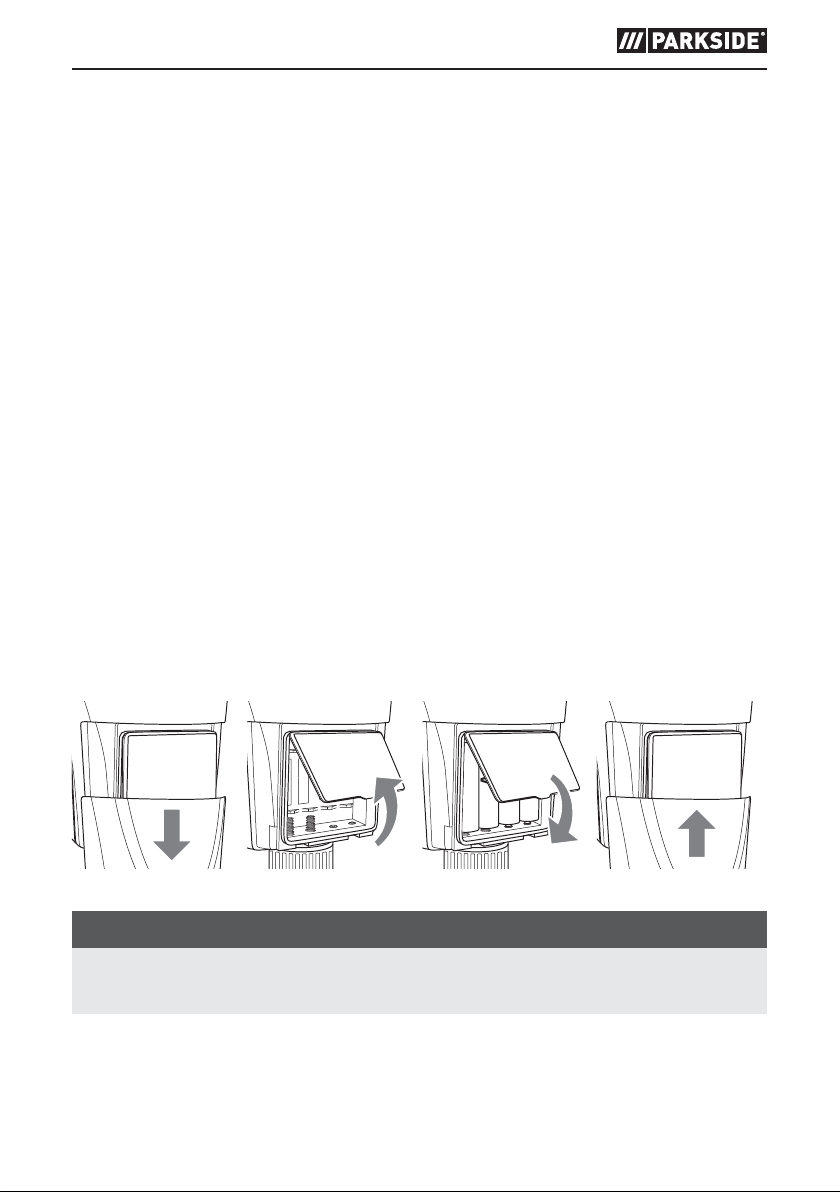
Inserting/replacing the batteries............................ 7
Assembling and connecting the appliance.................... 8
Requirements for the installation site ......................... 8
Operation ....................................10
Adjusting the water jet ..................................10
Switching the appliance on and off, adjusting the detection range 12
Activating the appliance.................................13
Dismantling ...................................13
Troubleshooting ...............................14
Cleaning......................................15
Cleaning the appliance .................................15
Cleaning the filter and sealing rings ........................15
Storage ......................................15
Disposal ......................................16
Disposal of the appliance................................16
Battery disposal .......................................16
Disposal of packaging ..................................17
Appendix.....................................17
Technical specifications..................................17
Information on the EU Declaration of Conformity..............18
Kompernass Handels GmbH warranty......................18
Service ..............................................21
Importer.............................................21
IB_360872_PWT11A1_LB8.indb 1 04.02.2021 15:16:18

PWT 11 A1
■ 2 │ GB│IE
Introduction
Information concerning these operating instructions
Congratulations on the purchase of your new appliance.
You have selected a high-quality product. The operating in-
structions are part of this product. They contain important information
about safety, usage and disposal. Before using the product, please
familiarise yourself with all operating and safety instructions. Use the
product only as described and for the specified range of applications.
Retain these operating instructions for future reference. Please also
pass these operating instructions on to any future owner.
Intended use
The appliance is exclusively used to gently repel animals in outdoor
areas. Commercial or industrial use is not permitted. No liability will
be assumed in cases of improper use. No liability will be assumed for
damage caused by misuse or improper handling, the use of force or
unauthorised modification. The risk is borne solely by the user.
Warnings
The following warnings are used in these operating instructions:
WARNING
A warning at this hazard level indicates a potentially
hazardous situation.
Failure to avoid this hazardous situation could result in injuries.
► Follow the instructions in this warning notice to prevent injuries.
IB_360872_PWT11A1_LB8.indb 2 04.02.2021 15:16:21

PWT 11 A1 GB│IE │ 3 ■
ATTENTION
A warning at this hazard level indicates a risk of prop-
erty damage.
Failure to avoid this situation could result in property damage.
► Follow the instructions in this warning notice to prevent property
damage.
NOTE
► A note provides additional information that makes handling the
appliance easier for you.
Safety
Basic safety instructions
■ Read all safety warnings and all instructions!
■ Check the appliance before every use to make sure it is in perfect
condition. Do not use the product if it is damaged in any way.
■ This appliance may be used by children aged 8 years and above
and by persons with limited physical, sensory or mental capabilities
or lack of experience and knowledge, provided that they are under
supervision or have been instructed on how to use the appliance
safely and are aware of the potential risks. Do not allow children to
use the appliance as a toy. Cleaning and user maintenance tasks
must not be carried out by children unless they are supervised.
■ Do not aim the water jet at electrical equipment!
■ Do not aim the water jet at people or animals!
■ Do not drink from the hose!
■ Open the appliance only when it is dry.
■ Before use, check the appliance and its supply lines for tightness.
■ Avoid direct sunlight.
■ Do not operate the appliance close to naked flames.
IB_360872_PWT11A1_LB8.indb 3 04.02.2021 15:16:22

PWT 11 A1
■ 4 │ GB│IE
■ The appliance is not frost-proof.
■ After using the appliance, always close the water outlet (tap).
■ Check the appliance and its supply lines at regular intervals for
leaks and fault-free operation.
■ Repairs to the appliance during the warranty period may only be
carried out by a customer service department authorised by the
manufacturer. Otherwise, no warranty claims will be considered
for any subsequent damages.
Handling batteries
WARNING
The appliance is powered by batteries. Mishandling
batteries can cause fires, explosions, leakages or other
hazards!
► Keep batteries out of the hands of children. Store batteries out of
the reach of children.
► If a battery has been swallowed, you must seek medical assistance
immediately.
► Batteries must never be short-circuited, taken apart, deformed or
thrown into a fire.
► Never try to charge non-rechargeable batteries.
► Chemicals from leaking or damaged batteries can cause skin irrita-
tions when touched. Use suitable protective gloves if this occurs.
If you get the liquid on your skin, rinse it off with plenty of water.
If the chemicals come into contact with your eyes, rinse them
thoroughly with plenty of water, and do not rub them. Consult a
physician immediately.
► Always use the stated battery type.
► Inserting the wrong type of battery can lead to a risk of explosion.
Dispose of used batteries as described in the instructions.
► Ensure that the batteries are inserted with the correct polarity.
This information is displayed in the battery compartment.
IB_360872_PWT11A1_LB8.indb 4 04.02.2021 15:16:23

PWT 11 A1 GB│IE │ 5 ■
WARNING
► If necessary, clean the battery and appliance contacts before
inserting the battery.
► Remove the batteries if you do not intend to use the appliance for
a long time.
► Always remove discharged batteries from the appliance immedi-
ately.
Package contents
(See fold-out page for illustrations)
▯ Main unit with motion detector
▯ Sprinkler unit
▯ Ground spike with hose connection
▯ Extension tube
▯ Connecting piece
▯ 4 × 1.5 V batteries AA/Mignon/LR6
▯ These operating instructions
NOTE
► Check the package for completeness and signs of visible damage.
► If the delivery is incomplete or damage has occurred as a result
of defective packaging or during transport, contact the customer
service hotline (see section Service).
IB_360872_PWT11A1_LB8.indb 5 04.02.2021 15:16:23

PWT 11 A1
■ 6 │ GB│IE
Appliance description
(See fold-out page for illustrations)
1Rotary control (DISTANCE)
2Locking lever
3Sprinkler unit
4Limiter clips
5Metal clip
6Connecting piece
7Sealing rings
8 Main unit
9Motion sensor with red LED
0Battery compartment cover
qProtective cover
wFilter
eConnecting piece
rSensor sensitivity controller
tExtension tube
zGarden hose connection
uGround spike
iWater stop
IB_360872_PWT11A1_LB8.indb 6 04.02.2021 15:16:23

PWT 11 A1 GB│IE │ 7 ■
First use
Inserting/replacing the batteries
The appliance is operated with four 1.5 V AA/Mignon/LR6 batteries
(included in delivery).
♦ If necessary, disconnect the appliance from the water connection
and switch it off.
♦ Slide the protective cover qdownwards and remove it (see Fig. 1).
♦ Lift the tab and remove the battery compartment cover 0(see Fig. 2).
♦ Remove the depleted batteries, if necessary.
♦ Insert four 1.5 V AA/Mignon/LR6 batteries into the battery com-
partment. Make sure that the polarity is correct, as indicated in the
battery compartment. The LED of the motion sensor 9lights up red
briefly. The appliance is now ready for use.
♦ Place the battery compartment cover 0back on the battery com-
partment. Make sure that the sealing ring is firmly seated (see Fig. 3).
♦ Slide the protective cover qover the battery compartment (see
Fig. 4).
+
−
AA
+
−
AA
+
−
AA
+
−
AA
Fig. 1 Fig. 2 Fig. 3 Fig. 4
NOTE
► When the batteries are low, the LED of the motion sensor 9flashes
red. The batteries should be changed as soon as possible.
IB_360872_PWT11A1_LB8.indb 7 04.02.2021 15:16:25

PWT 11 A1
■ 8 │ GB│IE
Assembling and connecting the appliance
♦ Screw the extension tube tclockwise onto the ground spike u.
♦ Screw the main unit 8clockwise onto the extension tube t.
♦ Screw the connecting piece 6clockwise onto the main unit 8.
♦ Screw the sprinkler unit 3clockwise onto the connecting piece 6.
♦ Use a quick coupler or adapter to connect a suitable garden hose
to the 13 mm ( ) garden hose connection z.
NOTE
► If you unscrew the water stop iyou will have the option to
connect another appliance to the 26.44 mm ( ) connection.
► Keep the water tap closed until all the settings have been
completed.
Requirements for the installation site
The installation location must meet the following requirements to
ensure safe and error-free operation of the appliance:
■ Ensure that no uninvolved persons are affected by the appliance.
■ Ensure that the safety and limiting devices are not rendered unusable.
■ The ambient temperature must be between +5°C and +30°C.
■ Use only clear fresh water.
■ The motion sensor 9reacts more effectively when animals to be
driven away walk past the appliance instead of walking directly
towards the unit.
■ The field of view of the motion sensor 9must not be obscured.
■ The surface of the motion sensor 9must be kept clean.
■ The appliance must be stable and secure; otherwise, the recoil of
the water jet may knock the appliance over.
IB_360872_PWT11A1_LB8.indb 8 04.02.2021 15:16:25

PWT 11 A1 GB│IE │ 9 ■
■ If the terrain is uneven, make sure that you set up the appliance so
that the motion sensor 9is no higher than approx. 80 cm above
the area to be monitored. Otherwise, the motion sensor 9cannot
detect animals to be repelled.
NOTE
► The horizontal detection angle of the motion sensor 9is approx.
150°.
► At a water pressure of 4 bar, the appliance can spray water up
to 11 metres.
► The sprinkler unit 3can rotate up to 360°.
► False triggering may occur if objects warmer than the ambient
temperature are moving in the field of view of the motion sensor 9.
False triggering can also be caused by pets, rapid temperature
changes or moving water, such as rain. On very hot days, the
motion sensor 9may not detect passing animals.
► The maximum detection range for animals that are to be driven off
is approx. 7 metres. Uninvolved third parties who are larger than
large animals can be detected beyond 7 metres.
♦ Once you have selected a suitable installation site, push the ground
spike udeep into the ground.
IB_360872_PWT11A1_LB8.indb 9 04.02.2021 15:16:25

PWT 11 A1
■ 10 │ GB│IE
Operation
NOTE
► Make sure the water tap is closed when you move into the detec-
tion area of the appliance.
Adjusting the water jet
You have two options when adjusting the water jet that comes out of
the sprinkler unit 3.
Adjusting the width:
♦ Press the locking lever 2down and turn the rotary control 1in
the MAX direction to increase the width of the water jet (see Fig. 5).
When you turn the rotary control 1completely in the MAX direc-
tion, the appliance can spray water up to a distance of 11 metres
when operating at 4 bar.
♦ Press the locking lever 2down and turn the rotary control 1
towards MIN to reduce the width of the water jet (see Fig. 5).
DISTANCE
MIN
MAX
Fig. 5
IB_360872_PWT11A1_LB8.indb 10 04.02.2021 15:16:27

PWT 11 A1 GB│IE │ 11 ■
Setting the dispersion angle:
The two limiter clips 4serve as a stop for the metal clip 5. The metal
clip 5changes its pivoting direction as soon as it strikes against one
of the two limiter clips 4.
♦ Increase the distance between the two limiter clips 4to increase
the dispersion of the water jet (see Fig. 6).
♦ Decrease the distance between the two limiter clips 4to decrease
the dispersion of the water jet (see Fig. 7).
♦ Fold the metal clip 5upwards so that the sprinkler unit 3rotates
360° (see Fig. 8).
Fig. 6 Fig. 7 Fig. 8
IB_360872_PWT11A1_LB8.indb 11 04.02.2021 15:16:31

PWT 11 A1
■ 12 │ GB│IE
Switching the appliance on and off, adjusting the detection
range
The sensor sensitivity controller ris located on the rear side of the
appliance. The sensor sensitivity controller rhas an adjustable range
of 0 to 9.
■ Level 0: The appliance is switched off.
■ Level 1–9: the higher the level, the more sensitive the motion sensor 9
becomes and the detection range is increased.
Small animals
Detection range 3 m Level 6–7
Detection range 4.5 m Level 8–9
Medium-sized animals
Detection range 3 m Level 4–5
Detection range 4.5 m Level 6–7
Detection range 6 m Level 8–9
Large animals
Detection range 4 m Level 1–3
Detection range 5 m Level 4–6
Detection range 7 m Level 7–9
NOTE
► Uninvolved third parties who are larger than large animals can be
detected beyond 7 metres.
♦ Turn the sensor sensitivity controller rclockwise to switch the appli-
ance on and increase the detection range.
♦ Turn the sensor sensitivity controller ranticlockwise to reduce the
detection range.
♦ Turn the sensor sensitivity controller ranticlockwise to level 0 to
switch the appliance off.
IB_360872_PWT11A1_LB8.indb 12 04.02.2021 15:16:31

PWT 11 A1 GB│IE │ 13 ■
Activating the appliance
NOTE
► Complete all settings before switching on the appliance.
♦ Turn the sensor sensitivity controller rclockwise to switch the appli-
ance on.
♦ Activate the appliance by placing one hand in front of the motion
sensor 9. The LED briefly lights up red and a click can be heard.
The appliance is activated and the water valve has opened up.
The appliance is now ready for use.
♦ Switch on the water tap.
NOTE
► Switch off the tap before you move into the detection field of the
appliance.
Dismantling
♦ Switch off the water tap.
♦ Turn the sensor sensitivity controller ranticlockwise to level 0 to
switch the appliance off.
♦ Disconnect the garden hose from the garden hose connection z.
♦ Unscrew the sprinkler unit 3in an anticlockwise direction from the
connecting piece 6.
♦ Unscrew the connecting piece 6in an anticlockwise direction from
the main unit 8.
♦ Unscrew the main unit 8in an anticlockwise direction from the
extension tube t.
♦ Unscrew the extension tube tin an anticlockwise direction from
the ground spike u.
IB_360872_PWT11A1_LB8.indb 13 04.02.2021 15:16:31

PWT 11 A1
■ 14 │ GB│IE
Troubleshooting
The following table will help you identify and rectify minor malfunc-
tions:
Error Possible cause Remedy
No water is
emitted from
the appliance.
No batteries inserted. Insert batteries.
Batteries are depleted. Replace the batteries.
Appliance is switched
off. Switch the appliance on.
The water tap is
switched off. Switch on the water tap.
The motion sensor 9
fails to detect animals.
Refer to the sections
Requirements for the
installation site and
Operation.
The water jet is
insufficient. The appliance is dirty. Refer to the section
Cleaning.
IB_360872_PWT11A1_LB8.indb 14 04.02.2021 15:16:31

PWT 11 A1 GB│IE │ 15 ■
Cleaning
Cleaning the appliance
CAUTION
♦ To avoid irreparable damage to the appliance, ensure that no
moisture can penetrate into the battery compartment during
cleaning.
♦ Do not use caustic, abrasive or solvent-based cleaning materials.
They can damage the surfaces of the appliance.
♦ Clean the surfaces of the appliance with a soft, dry cloth. For more
stubborn dirt, use a slightly damp cloth with some mild detergent.
Cleaning the filter and sealing rings
(see fold-out page)
♦ Unscrew the connecting piece efrom the main unit 8.
♦ Remove the filter wfrom the main unit 8.
♦ Remove the sealing ring 7from the connecting piece e.
♦ Unscrew the connecting piece 6from the main unit 8.
♦ Remove the sealing ring 7from the connecting piece 6.
♦ Clean the sealing rings 7and the filter w under running water.
♦ Reinstall the sealing rings 7and the filter w and unscrew the
connecting pieces 6/e.
Storage
♦ If you plan not to use the product for a long period, remove the
batteries and store it in a clean, dry, frost-free place out of direct
sunlight.
IB_360872_PWT11A1_LB8.indb 15 04.02.2021 15:16:31

PWT 11 A1
■ 16 │ GB│IE
Disposal
Disposal of the appliance
The adjacent symbol of a crossed-out wheelie bin means that
this appliance is subject to Directive 2012/19/EU. This
directive states that this appliance may not be disposed of in
the normal household waste at the end of its useful life, but
must be taken to specially set-up collection locations, re-
cycling depots or disposal companies.
The disposal is free of charge for the user. Protect
the environment and dispose of this appliance
properly.
Your local community or municipal authorities can provide
information on how to dispose of the worn-out product.
The product is recyclable, subject to extended producer
responsibility and is collected separately.
Battery disposal
Batteries should not be disposed of with normal household
waste. Consumers are legally obliged to dispose of used
batteries at a collection point in their town/district or at a
retail store. They may contain poisonous heavy metals and
must be disposed of in accordance with the rules for the
treatment of hazardous waste. The chemical symbols for
heavy metals are as follows:
Cd = cadmium, Hg = mercury, Pb = lead.
Dispose of batteries only when they are fully discharged.
IB_360872_PWT11A1_LB8.indb 16 04.02.2021 15:16:32

PWT 11 A1 GB│IE │ 17 ■
Disposal of packaging
The packaging materials have been selected for their environ-
mental friendliness and ease of disposal and are therefore
recyclable. Dispose of packaging materials that are no longer
needed in accordance with applicable local regulations.
Dispose of the packaging in an environmentally friendly
manner.
Observe the labels on the different packaging materials and
separate them as needed. The packaging material is labelled
with abbreviations (a) and numbers (b) with the following
meanings: 1–7: plastics, 20–22: paper and cardboard,
80–98: composites.
Appendix
Technical specifications
Power supply 4 × 1.5 V (DC) AA/Mignon/
LR6 batteries
Operating temperature +5 – +30°C
Storage temperature 0 – +50°C
Max. operating water pressure 4bar
Garden hose connection z13 mm ( )
Connection behind the
water stop i26.44 mm ( )
Water consumption upon
activation approx. 350 ml–500 ml
Range of water jet max. 11 m
Horizontal detection angle of
motion sensor approx. 150°
Dispersion of water jet 360°
Protection type IPX4 (splashproof)
IB_360872_PWT11A1_LB8.indb 17 04.02.2021 15:16:33
This manual suits for next models
1
Table of contents
Languages:
Popular Pet Care Product manuals by other brands

Prevue Hendryx
Prevue Hendryx PREVUE PET PRODUCTS 495 manual

neno
neno Pesca user manual

Master equipment
Master equipment PolyPro Lift Grooming Tub Assembly instructions

Majestic Pet
Majestic Pet Small Luxe Cat Tree Assembly instructions

Ferplast
Ferplast Ristodog operating manual

Valiant
Valiant furmates CLOSE TO ME user manual

Dogtra
Dogtra 1800NC Series owner's manual

Zen Habitats
Zen Habitats 2'x2'x4' PVC Panel Reptile Enclosure Assembly instructions

Zen Habitats
Zen Habitats Deluxe Stacking Spacer Assembly instructions

Innotek
Innotek BC-200 user manual

Suncast
Suncast DH251 Assembly instructions

Petsafe
Petsafe PIFOO-13672 operating guide