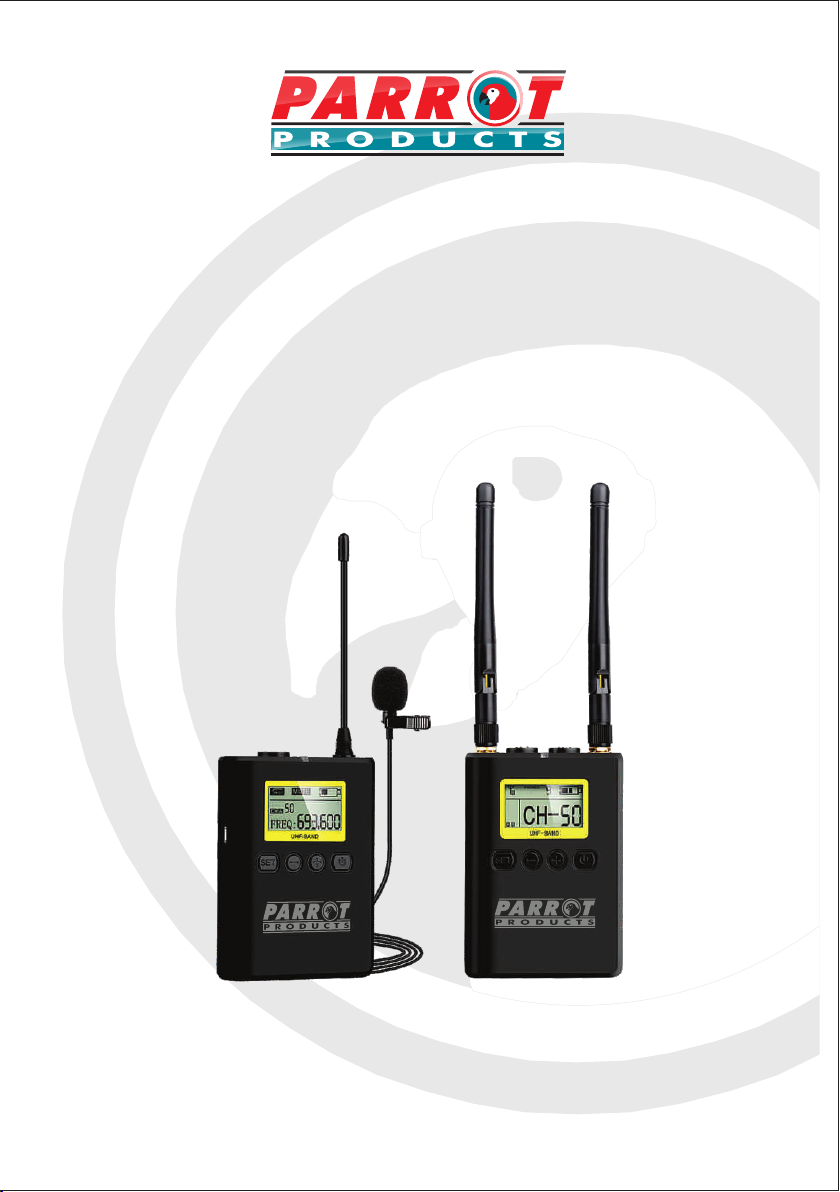
Parrot Products IS1002 User manual

Tel: (RSA) 010 140 4900 / Email: [email protected] / www.parrot.co.za
For further information, please visit / contact us on:
Wireless Lapel Microphone
(Dual Channel) - IS1002
User Manual

1. Microphone socket: Insert the microphone into the socket and lock it firmly
2. Status indicator: Indicates Red when the battery is low. Flashes when the microphone is muted
3. ¼ wavelength antenna
4. Information display
5. External DC-5V power input socket
6. Microphone noise reduction switch
7. Power switch: press and hold for 2 seconds to power on / off; press once to activate mute / unmute
8. Adjust Button: Adjust parameter along with the button
9. SET button: Select the function to be set
10. Battery compartment
Transmitter:
11. Recording output: Connect to the recording device by using an audio cable
12. Status indicator: Indicates green at normal function, indicates red when battery is low
13. Headphone output: connect headphones for real-time monitoring
14. High quality receiving antenna, can be folded 90 degrees
15. Information display
16. External DC-5V power input socket
17. Output mode selections: ST is dual-channel independent output; MIX is dual-channel mixed output
18. Power switch: Press 2 seconds to turn on or off
19. Adjust button: adjust parameter along with the SET button
20. SET button: Select the function to be set
21. Battery compartment
Dual Channel Receiver:
Operating Controls
1

Features
1. Professional recording quality
2. Designed for use with DSLR cameras, camcorders & audio recorders
3. Professional-level LOW-CUT & mixing function
4. Real-time foldback interface for monitoring recording effects
5. The volume of monitoring and recording output can be adjusted independently and has memory function
6. High-performance audio compression expander provides wider audio dynamic response
7. Dual-channel UHF wireless receiving technology, for simultaneous use of 2 transmitters
8. WNCR acoustic environment noise reduction technology, suppresses environmental noise and wind noise
9. Provides up to 100 wireless frequencies, multiple (50 signal) channels can be set up to work at the same time
10. Double-conversion DSP receiver processor for strong anti-mirror interference ability
11. Dual independent output and MIX output is available
12. Equipped with headphone output socket for real-time monitoring
13. DC-5V Power Socket - Charger Not Included
Specifications
Items Included:
• 1 x Transmitter
• 1 x Receiver
• 1 x Audio cable
• 1 x 3.5 mm to XLR conversion cable
• 1 x lapel microphone
• 1 x shoe-mount connector of receiver
• 2 x belt-pack clip
2
• Frequency range: 538 - 594MHZ
• Modulation method: F3E
• Audio frequency response: 40Hz - 18KHz
• Microphone type: Capacitive Omnidirectional
• Number of channels: 50
• Frequency controller: PLL Synthesizer
• Wireless transmission power: <10mW
• Signal to noise ratio: > 90dB
• Power supply: DC 3V (2 x AA batteries not included)
• Battery life: >10 hours
• Operating range: 100meters
• Operating temperature: 0°C to 55°C
• Storage temperature: -20°C to +55°C
• Receiver & Transmitter dimensions: 89*63*22mm
• Receiver unit weight: 80g
• Transmitter unit weight: 106g
-

Start using
1. Inserting the battery: Press the locking parts to take out
the battery compartment. Check the battery terminals
when inserting the batteries
2. Mount the shoe-mounted connector on the belt-pack clip
of the receiver (press the belt-pack clip inward for easy
installation)
3. Connect the microphone to the MIC socket of the
transmitter, make sure it is fully plugged in and securely
locked
4. Connect the OUT socket of the receiver with the
MIC IN socket of the video camera or AUX IN socket
of other device by using the audio connection cable
5. Turn on the transmitter and receiver
6. Set the transmitter and receiver to the same channel by using the function setting button
Channel adjustment method: Press the SET button, when “CH / A or CH / B” on the display flashes (CH - ** on
the display of the receiver flashes), adjust the channel by pressing. Press SET again to exit and save the setting,
or exit automatically after 5 seconds and save the setting. For example: channel A transmitter is set as CHA09,
channel B transmitter is set as CHB09, the receiver channel is set as CH-09
3

7. Turn on the “LOW CUT” function of the transmitter as needed to significantly improve ambient low frequency
and wind noise
9. Adjust the volume control of the receiver to achieve the appropriate sound effect. OUT recording output
and PHONES headphone output are independent volume adjustment. In the standby interface, the display only
shows the volume level of the PHONES; the adjustment method is as below:
OUT recording output volume adjustment: Press the SET button to adjust the volume with the button when the
OUT LEVEL character on the display flashes. Press the SET button again to exit and save the setting,
or automatically exit after 5 seconds and save the settings; usually the default volume is set at 0-4dB level
PHONES headphone output volume adjustment: Press the SET button to adjust the volume with the button when
the “PHONES” character on the display flashes. Press the SET button gain to exit and save the setting,
automatically exit after 5 seconds and save the settings
8. The receiver can either be dual independednt output (ST) or mixed output (MIX) - optional. Using independent
output, the audio track can be processed later on
4

Troubleshooting
No signal on the receiver /
noise
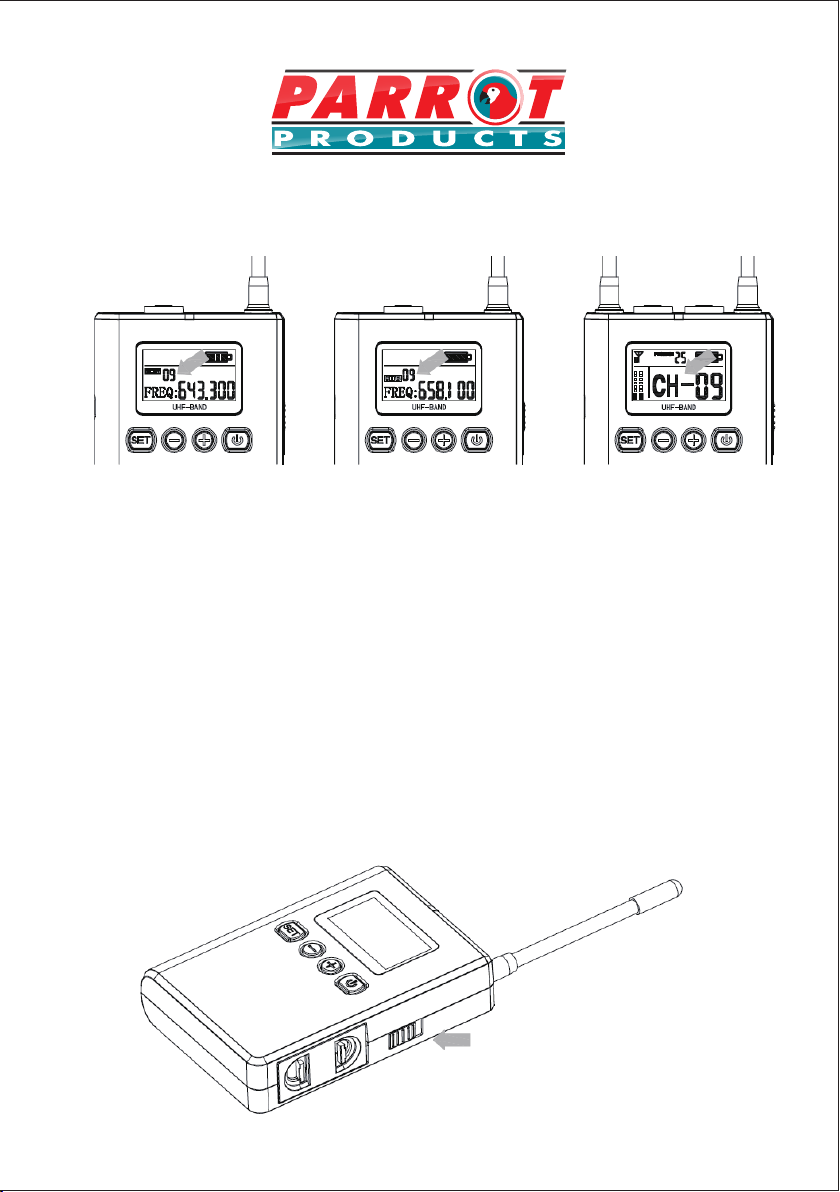
Check whether the transmitter channel is consistent with the receiver
If it gets interference, please change the transmitter and receiver to a different channel
The distance is beyond the operating range, please shorten the range; Outdoor effective
operating range is 100 meters, in case of shelter or indoor use, the distance will be
reduced accordingly
Audio signal is distorted
when speaking loudly
The lavalier microphone has a high-sensitive capsule, please adjust the distance
between the microphone and the sound source
Receiver output volume is too high, please the OUT line output at “0-4” dB level
The mic input level of the video camera is too high, please set the MIC volume of the
video camera at manual mode and set at level 1/3~1/2
No sound / low sound
Check if the transmitter is muted. When it is muted, the transmitter display shows
“MUTE” and press the power button to unmute
Check the volume settings , OUT line output should usually be set at “0-4” dB level
Check if the transmitter microphone plug receiver output plug are fully inserted into the
socket and locked
Short operating distance
The antenna of transmitter and receiver should not be covered by objects , in order to
facilitate signal transmission
The distance can be affected by the buildings that blocks the transmitter receiver
In crowded environment, the human body will attenuate the radio waves, please
make sure the transmitter and receiver are nit blocked.
If it gets interference, please change the transmit and receiver to a different channel
Please use AA alkaline batteries, as the use of R6P acid batteries will shorten the
operating time
Short battery life
As the microphone is subject to wind-borne noise, turn on the LOW CUT function of
the transmitter to improve it
Wind noise
Check whether the microphone windscreen is put on
5
Table of contents