Partilink VP-QV41H User manual

User Manual- VP-QV41H
Quadview Video Processor


Contents
1. Overview................................................................................................... 1
2. Features.................................................................................................... 1
3. Specifications ......................................................................................... 2
4. Hardware Descriptions......................................................................... 4
4.1 Product Appearance.......................................................... 4
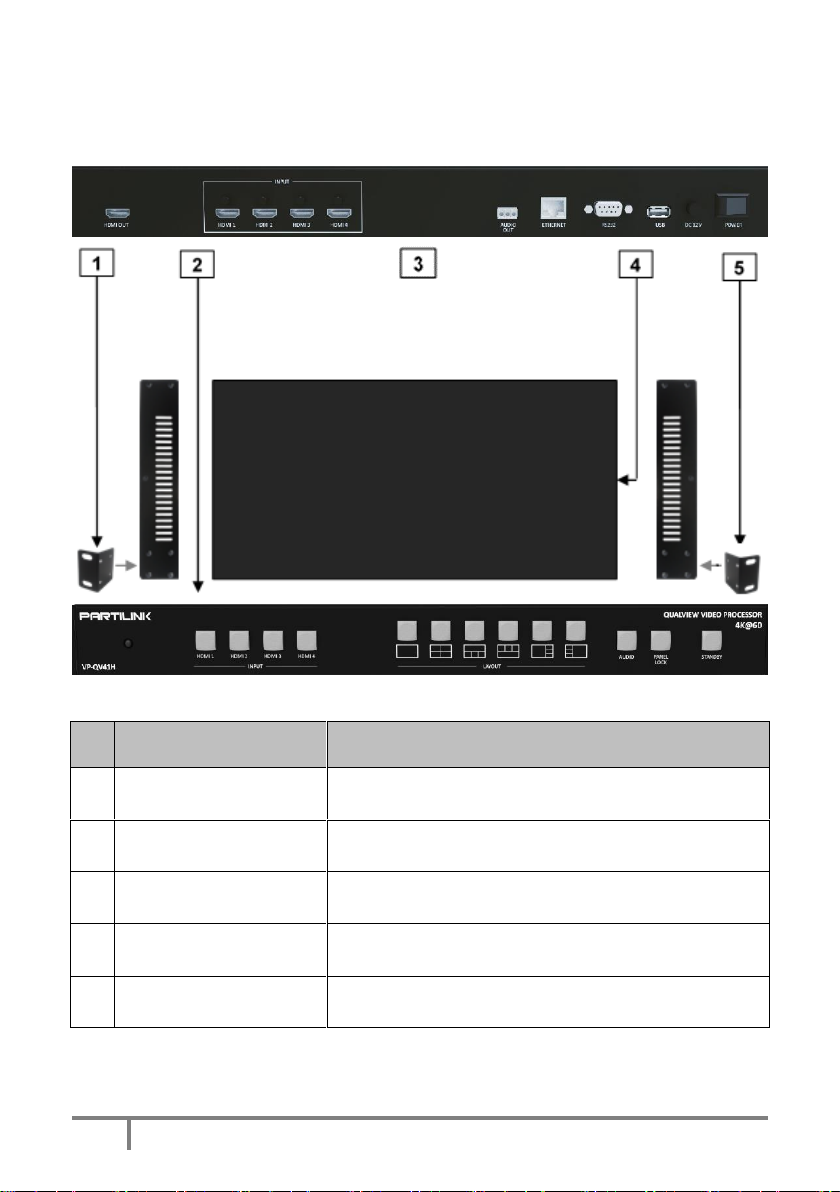
4.2 Front Panel......................................................................... 5
4.3 Rear Panel .......................................................................... 7
4.4 IR Remote Control.............................................................. 8
5. Installation ............................................................................................. 11
5.1 Wiring Diagram................................................................. 11
5.2 Rack Mount Installation................................................. ..12
6. Configurations...................................................................................... 13
6.1 Front Panel Buttons......................................................... 13
6.2 Front Panel Buttons......................................................... 13
6.3 Web UI............................................................................... 13
6.3.1 Directly Connect to PC via Ethernet Cable.................... 13
6.3.2 Ethernet Hub or Router....................................................... 14
6.3.3 System Setting Page in Web UI........................................ 15
6.3.4 Multi View Page in Web UI ................................................. 16
6.3.5 Load Default in Web UI ....................................................... 22
6.4 RS232/TELNET................................................................. 23
6.4.1 Serial Port Settings.............................................................. 23
6.4.2 Commands............................................................................. 23

1
1. Overview
The Quadview Video Processor is a simple, cost-effective video scaler
designed to enable a true 4K@60Hz UHD, HD, SD video display device,
virtually handling any input resolution up to 4K@60Hz. It provides 4 HDMI
inputs and 1 HDMI output.
2. Features
4K@60 display output which does full screen/PIP/POP/quadview
6 pre-defined screen layouts and extra 8 customized screen layouts
which can be modified easily anytime by user
Input resolution up to 4K@60Hz, 4:4:4 color sampling.
Output resolution up to 4K@60Hz, 4:4:4 color sampling
Upscaling up to 4K@60Hz, 4:4:4 color sampling
Deep Color and HDCP 1.4/ 2.2
Fast switching between input channels or screen layout modes
Rotation R90o/ L90oor flip output in full screen layout
Stereo audiooutput
Front panel button, IR remote control, RS232/TELNET
User friendly Web UI control
USB port firmware upgrade

2
3. Specifications
MODEL NO.
VP-QV41H
Product
Hardware
Information
System structure
Pure Hardware
Start up
< 12 sec
Operating
system
No CPU and operating system
Input /
Output
Input
4 x HDMI 2.0 with locking
Output
1 x HDMI 2.0 with locking
Audio output
Terminal Block 3 Pole, Stereo
Image
processing
Display mode
Full screen, Quad view, PIP, POP
Max Input
resolution
Up to 3840 x 2160@60Hz,
4:4:4 color sampling
Input resolutions
3840x2160 - 60Hz, 50Hz, 30Hz, 25Hz
1920x1080 - 60Hz, 50Hz, 30Hz, 25Hz
1280x720 - 60Hz, 50Hz, 30Hz, 25Hz
720x480 - 60Hz, 50Hz, 30Hz, 25Hz
480i, 576i - 24Hz to 60 Hz
Output Color
Format
4:4:4, 4:2:2, 4:2:0
Max Output
resolution
Up to 3840 x 2160@60Hz, 4:4:4 color
sampling
Output
resolutions
3840x2160 - 60Hz, 50Hz, 30Hz, 25Hz
1920x1080 - 60Hz, 50Hz, 30Hz, 25Hz
1280x720 - 60Hz, 50Hz, 30Hz, 25Hz
720x480 - 60Hz, 50Hz, 30Hz, 25Hz
Output Color
Format
4:4:4
Output Color
depth
8 bpc (24 bit/px)
Scaler
Scaling up to 4K@60Hz, 4:4:4 color
sampling and downscaling as well
Video Bandwidth
Up to 18 Gbps
HDMI
Compliance
HDMI 1.4 and HDMI 2.0
HDCP
Compliance
HDCP 1.4 and 2.2

3
Control
Methods
Front panel
buttons
4 x select HDMI 1,2,3,4 input and/or
audio, 6 x display layout, 1 x Audio
Selection, 1 x Panel lock, 1x Standby
IR
1 x IR remote control
RS232/TELNET
1 x D9 Female Connector / Compatible
with third party control system
ETHERNET
PORT
1 x RJ45
Web UI
Browser / Touch screen
Stability
Safety
Hardware structure, no risk of virus
interference
Running time
No auto-reboot during 365 days/year,
7days/7, 24h/24
Firmware
Possible upgrade
1 x USB 2.0
Led
Indicator
INPUT
blue backlight
OUTPUT
blue backlight
PANEL LOCK
blue backlight
STANDBY on
red backlight
STANDBY off
green backlight
Power
Internal Power
Supply
DC 12V/2A, locking barrel connector
Power
consumption
15W
Power adaptor
Universal power adapter
Environment
Operating
temperature
0 ℃~ 45℃
Operating
humidity
20~90% RH
Storage
temperature
.-20 ℃ ~60 ℃
Physical
Dimensions
440.4 x 230 x 45 mm (L x W x H,
standard 1U)
Fixing
components
Rear bracket, footpad and screws
Weight
3.0 KG

4
4. Hardware Descriptions
4.1 Product Appearance
No.
Feature
Description
1
Rack Mount Bracket
Attach the bracket to the left side of the system
chassis for rack mount installation
2
Front Panel
Control Quadview Video Processor or directly
via the front panel push Buttons
3
Rear Panel
Connect Video and Audio signal via rear panel
input connectors
4
System Chassis
Black metal housing and the size is 1 rack unit
5
Rack Mount Bracket
Attach the bracket to the right side of the system
chassis for rack mount installation

5
4.2 Front Panel
No.
Feature
Description
1
IR Receiver
Receives signals from the remote control
transmitter
2
INPUT
HDMI1
Select the HDMI 1 input in full screen
mode
Select HDMI 1 audio in quadview mode
3
HDMI2
Select the HDMI 2 input in full screen
mode
Select HDMI 2 audio in quadview mode
4
HDMI3
Select the HDMI 3 input in full screen
mode
Select HDMI 3 audio in quadview mode
5
HDMI4
Select the HDMI 4 input in full screen
mode
Select HDMI 4 audio in quadview mode
6
LAYOUT
Select Layout A (full screen mode)
7
Select Layout B
8
Select Layout C
9
Select Layout D
10
Select Layout E
11
Select Layout F
12
AUDIO
Select audio source circularly
1
2
3
5
4
6
7
8
9
10
11
12
13
14

6
13
PANEL LOCK
Lock or unlock the front panel buttons
14
STANDBY
Put the system into standby mode or wake
up the system

7
4.3 Rear Panel
No.
Feature
Description
1
OUTPUT
HDMI
Connect to the HDMI display device, connector on
rear panel with locking
2
INPUT
HDMI1
Connect to the HDMI source, connector on rear
panel with locking
3
HDMI2
Connect to the HDMI source, connector on rear
panel with locking
4
HDMI3
Connect to the HDMI source, connector on rear
panel with locking
5
HDMI4
Connect to the HDMI source, , connector on rear
panel with locking
6
AUDIO OUT
Connect to the audio amplifier
7
ETHERNET
Connect to PC, NB or other Controllers through IP
network
8
RS232/TELNET
Connect to PC, NB or other Controllers
9
USB
Attach a USB flash drive for firmware upgrade
10
12V DC
Connect to the 12V/2A power supply, connector
on rear panel with locking
11
POWER ON/OFF
Power switch for turn ON or OFF the
Quadview Video Processor
1
2
3
4
5
6
7
8
9
10
11

8
4.4 IR Remote Control

9
No.
Feature
Description
1
Standby
Press to set system into standby mode or wake
up the system
2
Lock
Press to Lock or unlock the front panel buttons
3
Input
H-1
Select HDMI 1 in full screen mode
Select HDMI 1 audio in quadview mode
H-2
Select HDMI 2 in full screen mode
Select HDMI 2 audio in quadview mode.
H-3
Select HDMI 3 in full screen mode
Select HDMI 3 audio in quadview mode
H-4
Select HDMI 4 in full screen mode
Select HDMI 4 audio in quadview mode
DP
Reserved
VGA
Reserved
4
Layout*
Select Layout A (full screen mode)
Select Layout B
Select Layout C
Select Layout D
Select Layout E
Select Layout F
5
Reserved
6
Info.
System information
7
OK
Reserved
Up
Reserved
Down
Reserved
Left
Reserved
Right
Reserved

10
*Please see Appendix 1
8
Rotate*
Rotate the video display R90o/ L90oin full
screen mode
9
Flip*
Flip display screen in full screen mode
No.
Feature
Description
10
Custom
Layout*
1
Select custom screen layout 1
2
Select custom screen layout 2
3
Select custom screen layout 3
4
Select custom screen layout 4
5
Select custom screen layout 5
6
Select custom screen layout 6
7
Select custom screen layout 7
8
Select custom screen layout 8
11
Set
Red
Set output resolution to 3840x2160@60Hz(with
Auto Detect)
Green
Set output resolution to 3840x2160@30Hz
Yellow
Set output resolution to 1920x1080@60Hz
Blue
Set output resolution to 1280x720@60Hz

11
5. Installation
5.1 Wiring Diagram
Do the following steps for device connections.
a. Connect a HDMI source to the HDMI 1 input connector.
b. Connect a HDMI source to the HDMI 2 input connector.
c. Connect a HDMI source to the HDMI 3 input connector.
d. Connect a HDMI source to the HDMI 4 input connector.
e. Connect the HDMI output connector to a HDMI display device
f. Connect the audio output connector to the audio amplifier, as
required.
g. Connect the 12V/2A adapter to 12V DC connector.

12
5.2 Rack Mount Installation
Take the following steps to attach the two brackets to the system
chassis and install into rack.
a. Remove all cables and power supply before mount the Quadview
Video Processor in the rack
b. Place the system chassis on a sturdy surface
c. Attach bracket to the left side of the system chassis by using the
screw driver and four screws
d. Attach the other bracket to the right side of the system chassis by
using the screw driver and four screws
e. Use your tape measure and level to ensure that the supporting
shelf and the chassis are installed straight and level
f. Make sure that your path to the rack is unobstructed.
g. Slide the unit into the rack and position using the attached L
brackets so that the slots in the brackets are positioned over the
appropriate mounting holes in the side rails of the rack
h. Securely fasten the unit into the rack by using the four screws
which are supplied with the rack mount kit, installing two of the
screws on each side of the unit. Use a screw driver to tighten the
screws on each side of the unit.

13
6. Configurations
6.1 Front Panel Buttons
Please see the section 4.2.
6.2 Remote Control
Please see the section 4.4
6.3 Web UI
You can connect the Ethernet directly from PC to Quadview Video
Process.
Please follow below steps to configure your PC Ethernet setting.
6.3.1 Directly Connect to PC via Ethernet Cable
a. Click Start > Control Panel > Network and Sharing
Center
b. Click “Change Adapter Settings”
c. Highlight the network adapter you want to use to
connect to the device and click “Change Settings” of this
connection. The “Local Area Connection Properties”
window for the selected network adapter.
d. Highlight the Internet Protocol Version 4 (TCP/IPv4)
e. Click Properties. The Internet Protocol Properties
window is relevant to your IT system.
f. Select “Use the following IP Address for static IP
address” and fill in the details. For TCP/IPv4 you can
use any IP address in the range 192.168.1.1 to
192.168.1.255 (excluding 192.168.1.202).
g. Subnet mask fills in 255.255.255.0.
h. Click “OK”.

14
i. After doing the steps from a. to h. successfully, you can
click into Web UI by typing the 192.168.1.202 IP
address in IE or Chrome.
6.3.2 Ethernet Hub or Router
At first, please follow section 6.3.1 and open web browser
then follow 6.3.3 to set the Ethernet type to DHCP. You can
connect the Ethernet port of the Quadview Video Processor to
the Ethernet port on a network hub or network router, via an
Ethernet cable with RJ-45 connector.

15
6.3.3 System Setting Page in Web UI
No.
Feature
Description
1
System
FW version
System firmware version
MAC addr.
MAC address of Quadview Video
Processor
Telnet CMD
Refer to sec. 6.3 for telnet commands.
The response of the commands is not
shown on Web UI.
2
Reboot
Reboot Quadview Video Processor
3
Network
Ethernet
Type
Change the network type to Static IP or
DHCP
Press “Confirm”after setting has finished
or press “Cancel”to ignore the
modification.
2
1

16
Cancel
Confirm
2
1
5
6.3.4 Multi View Page in Web UI
Color Setting
Brightness
Contrast
Hue
Saturation
Off
4
3
Output Setting
3840x2160@30Hz
▼
Window A
▼
Full Screen Setting
On Off
Cancel
Confirm
Cancel
Confirm
Sys
Settings
Load
Default
Multi
View
This manual suits for next models
1
Table of contents
Other Partilink Media Converter manuals