Paselec N5236 User manual

USERS GUIDE
N5236

CONTENT
1. Preface......................................................................................- 1 -
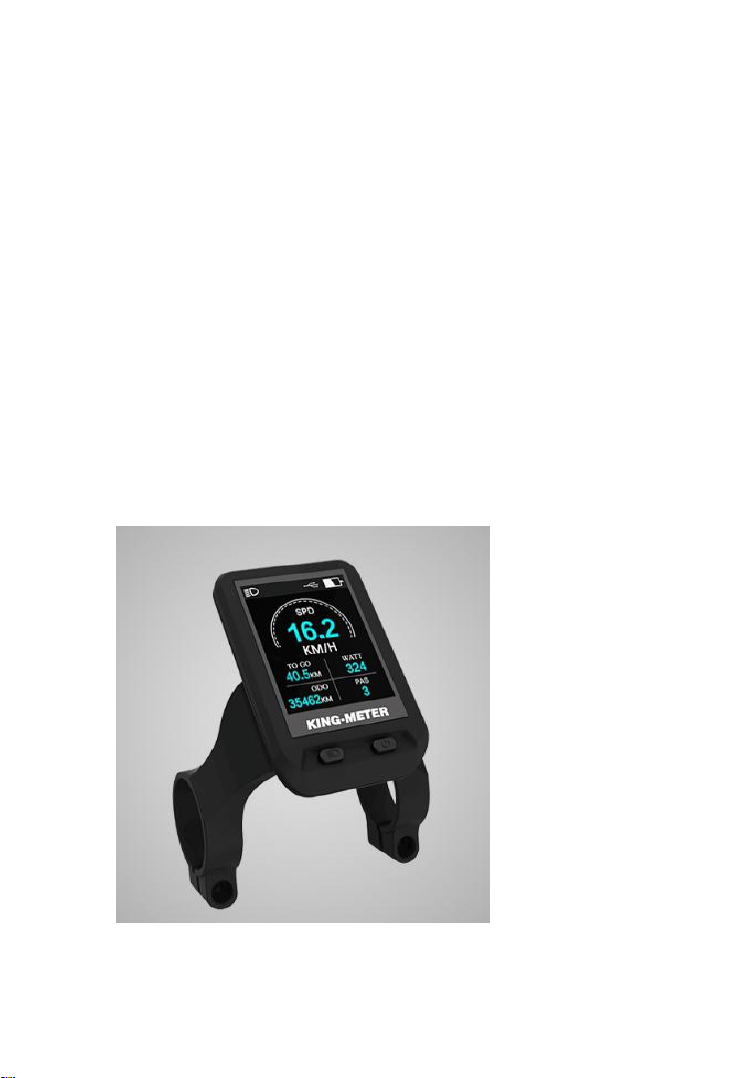
2. Appearance, Size and material.................................................- 1 -
3. Function Summary................................................................... - 3 -
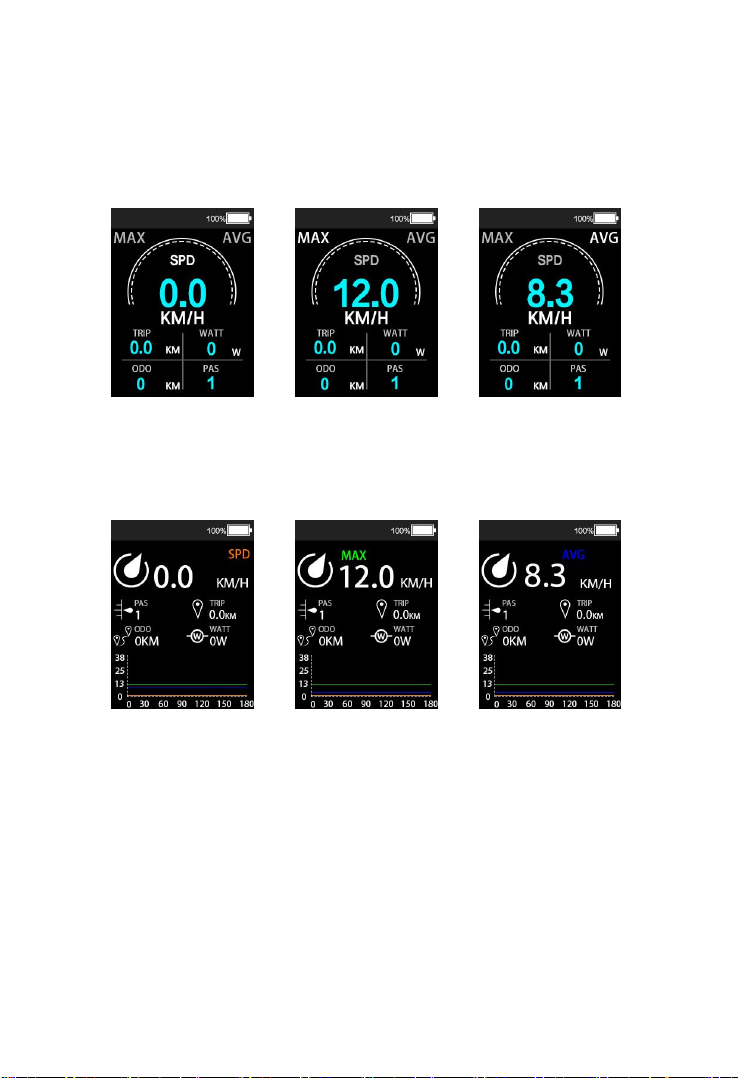
4. Main Display Figures................................................................ - 4 -
5. Note for users...........................................................................- 6 -
6. Standard operation.................................................................. - 6 -
6.1 On/Off............................................................................ - 6 -
6.2 Speed..............................................................................- 6 -
6.3 Turn on/off headlight..................................................... - 8 -
6.4 6km/h Walk assist.......................................................... - 9 -
6.5 PAS Level Adjustment...................................................- 11 -
6.6 Capacity of battery.......................................................- 12 -
6.7 Auto Backlight.............................................................. - 13 -
6.8 USB Charging................................................................- 14 -
6.9 Bluetooth Mode...........................................................- 15 -
6.10 Navigation mode........................................................- 17 -
6.11 Error Code.................................................................. - 21 -
7. Settings...................................................................................- 21 -
7.1 Settings:........................................................................- 21 -
7.2 wheel size check...........................................................- 22 -
7.3 Speed limited check..................................................... - 22 -
7.4 Clearance of Single trip distance..................................- 23 -
7.5 Backlight Setting...........................................................- 23 -
7.6 unit settings..................................................................- 24 -
8. Circuit Diagram and wire sequence.......................................- 25 -
9. Instrument printing code....................................................... - 26 -
10. FAQ & Quality assurance and warranty scope.....................- 26 -

- 1 -
1. Preface
To ensure better performance of your e-bike, please read
through the N5236 product introduction carefully before
using it. We will use the brief words to inform you of all
the details (including hardware installation, setting and
normal use of the display) when using our display.
Meanwhile, the introduction will also help you solve
possible confusion and barriers.
2. Appearance, Size and material
The Working temperature scope of N5236 housing
material is -20 ℃—+60 ℃, the shell material can ensure
normal use and good mechanical performance of the
products.

- 2 -
Display Size and Installation Size (Unit: mm)
Button unit is connected to the bottom of the
N5236 display via lead cable. In the following introduction,
is named as “Switch”. is named as
“Headlight”.

- 3 -
N3-button unit:
N3-button unit is connected to the bottom of the display via lead cable
In the following introduction, is named as
“MODE”. is named as “UP”, is named as
“DOWN”.
3. Function Summary
N5236 display content list as follows:
◆capacity of the battery

- 4 -
◆Power of Cycling
◆Speed (current speed, average speed and Max speed)
◆Distance (single trip distance and ODO)
◆PAS level
◆Turn on/off headlight
◆6km/h walk assist
◆USB Charging
◆Bluetooth, GPS location
◆Error code
◆Multi set up parameters: Wheel Size, Speed limited, unit
settings (metric/imperial), Backlight Setting, Single trip
distance Clearance
◆Photosensitive backlight (Automatically adjust the
screen backlight according to the ambient light intensity).
4. Main Display Figures
There are three kinds of display interfaces, including
normal display interface, detailed information interface
and navigation interface, they can be switched by Press
and hold the “MODE” button for a long time.

- 5 -
Normal display interface
Detailed information interface Navigation interface
No.
normal display
interface
detailed
information
interface
navigation interface
1
Headlight
Headlight
Headlight
2
Walk assist
Walk assist
Walk assist
3
Navigation
Navigation
Navigation
4
USB Charging
USB Charging
USB Charging
5
Battery Capacity
Battery Capacity
Battery Capacity
6
Power of Cycling
Single trip distance
Remaining distance
7
PAS level
Power of Cycling
Current speed
8
ODO
Current, average
and Max speed
ODO

- 6 -
9
Single trip distance
ODO
PAS level
10
Current speed
PAS level
Single trip time
11
Current speed
Navigation direction
indicator
5. Note for users
When the instrument displays the error code, please go to
the dealer for maintenance.
6. Standard operation
6.1 On/Off
Press and hold the “Switch” button for 2 seconds, the
display will start to work. In the power on state, long press
the “Switch” button for 2 seconds to turn off the e-bike
power. In the shutdown state, the battery power is no
longer used for the display, and the leakage current of the
instrument is less than 1uA.
If the e-bike is not used for a long time, the display will
automatically shut down.
6.2 Speed
After the display is powered on, the display will show the
current speed by default. Short press the “MODE” button
briefly to switch the display information. The sequence of

- 7 -
display is: current speed → max speed → average speed.
Normal display interface:
Current speed Max speed Average speed
Detailed information interface:
Current speed Max speed Average speed
Navigation interface

- 8 -
Current speed Max speed Average speed
6.3 Turn on/off headlight
Press the “Headlight” button briefly to turn on/off the
headlight
Normal display interface:
Headlight on
Detailed information interface:

- 9 -
Headlight on
Navigation interface:
Headlight on
6.4 6km/h Walk assist
Press and hold the "Down" button in the main interface to
enter the 6km walk assist mode, and release to exit the
the walk assist mode.
Normal display interface:

- 10 -
6km/h walk assist mode
Detailed information interface:
6km/h walk assist mode
Navigation interface:
6km/h walk assist mode

- 11 -
6.5 PAS Level Adjustment
Short press the “UP” or “DOWN” button to switch the
power assisted level of the e-bike and change the output
power of the motor. The level range is level0-level5, level0
is the lowest power, level 5 is max power. The default level
is level1.
Normal display interface:
PAS level1 PAS level5
Detailed information interface:
PAS level1 PAS level5
Navigation interface:

- 12 -
PAS level1 PAS level5
6.6 Capacity of battery
When the battery voltage is high, the LCD segments shows
100%. When the battery is under low voltage (<=20%), the
battery power indicator color turns yellow, when the
battery capacity is insufficient (<=10%), the battery power
indicator color turns red, indicating that the battery is
under voltage seriously and needs to be charged
immediately.
Normal display interface:
Battery power display Low power Under voltage

- 13 -
Detailed information interface:
Battery power display Low power Under voltage
Navigation interface:
Battery power display Low power Under voltage
6.7 Auto Backlight
When the brightness of the surrounding environment
changes, the instrument will automatically control the
brightness of the screen backlight through the built-in
photosensitive element. When the external environment
becomes dark, the backlight will be dimmed synchronously,
and when the external environment is bright, the backlight
will be brighten synchronized.

- 14 -
6.8 USB Charging
Plug in the USB device before power on the instrument,
turn on the power to charge the USB device, the USB icon
will lights up, unplugs the USB device, and the USB icon
turns off after 2 Seconds; after starting up the instrument,
insert the USB device, and long press the “UP”, “Down”
and “Mode” buttons to start the charging function. If
there is a USB device connected, the USB device will be
charged, and the USB charging icon will be on. If the USB
device is pulled out, the USB charging icon will be turned
off after 2S.
Normal display interface:
USB Charging interface
Detailed information interface:

- 15 -
USB Charging interface
Navigation interface:
USB Charging interface
6.9 Bluetooth Mode
Users need to search app "Tahuna" in app store, download
and install it. When the instrument is powered on and the
Bluetooth is on, log in to the app for use. The Bluetooth
name of the instrument is "BR2262e".
Normal display interface:

- 16 -
Bluetooth mode interface
Detailed information interface:
Bluetooth mode interface
Navigation interface:
Bluetooth mode interface

- 17 -
6.10 Navigation mode
The navigation mode can only be used when Bluetooth
function is turned on in the navigation interface. The
instrument can display the current remaining distance and
riding directions.
Direction indication position
Indicators as following:
Indicator
Icon
Indicator
Icon
No navigation
U-Turn
Replanning
Arrived
Turn Left
Turn Right
Table of contents