manuals.online logo
Brands
  1. Home
  2. •
  3. Brands
  4. •
  5. Paso
  6. •
  7. Measuring Instrument
  8. •
  9. Paso PMS2000 Series User manual

Paso PMS2000 Series User manual

Other manuals for PMS2000 Series

5

Other Paso Measuring Instrument manuals

Paso PMS2000 Series User manual

Paso

Paso PMS2000 Series User manual

Paso PMS2000 Series User manual

Paso

Paso PMS2000 Series User manual

Popular Measuring Instrument manuals by other brands

Powerfix Profi 278296 Operation and safety notes

Powerfix Profi

Powerfix Profi 278296 Operation and safety notes

Test Equipment Depot GVT-427B user manual

Test Equipment Depot

Test Equipment Depot GVT-427B user manual

Fieldpiece ACH Operator's manual

Fieldpiece

Fieldpiece ACH Operator's manual

FLYSURFER VIRON3 user manual

FLYSURFER

FLYSURFER VIRON3 user manual

GMW TG uni 1 operating manual

GMW

GMW TG uni 1 operating manual

Downeaster Wind & Weather Medallion Series instruction manual

Downeaster

Downeaster Wind & Weather Medallion Series instruction manual

Hanna Instruments HI96725C instruction manual

Hanna Instruments

Hanna Instruments HI96725C instruction manual

Nokeval KMR260 quick guide

Nokeval

Nokeval KMR260 quick guide

HOKUYO AUTOMATIC UBG-05LN instruction manual

HOKUYO AUTOMATIC

HOKUYO AUTOMATIC UBG-05LN instruction manual

Fluke 96000 Series Operator's manual

Fluke

Fluke 96000 Series Operator's manual

Test Products International SP565 user manual

Test Products International

Test Products International SP565 user manual

General Sleep Zmachine Insight+ DT-200 Service manual

General Sleep

General Sleep Zmachine Insight+ DT-200 Service manual

Sensa Core Lacto Spark user manual

Sensa Core

Sensa Core Lacto Spark user manual

VOLTCRAFT UTS-1980 operating instructions

VOLTCRAFT

VOLTCRAFT UTS-1980 operating instructions

EBCHQ 94915 Operation manual

EBCHQ

EBCHQ 94915 Operation manual

Balluff BIP LD2-T017-01-EP-S4 Series user guide

Balluff

Balluff BIP LD2-T017-01-EP-S4 Series user guide

Pulsar IMP Lite Series instruction manual

Pulsar

Pulsar IMP Lite Series instruction manual

ETCR 6800 user manual

ETCR

ETCR 6800 user manual

manuals.online logo
manuals.online logoBrands
  • About & Mission
  • Contact us
  • Privacy Policy
  • Terms and Conditions

Copyright 2025 Manuals.Online. All Rights Reserved.

1- PMS2000 System -
INTRODUZIONE
Nel ringraziarVi per aver scelto un prodotto
PASO, vogliamo ricordarVi che la nostra azienda
opera con sistema di qualità certificato. Tutti i
nostri prodotti vengono pertanto controllati in
ogni fase della produzione per garantirVi la
piena soddisfazione del Vostro acquisto. Per ogni
evenienza la garanzia coprirà, nellanno di
validità, eventuali difetti di fabbricazione.
Vi raccomandiamo di leggere attentamente le
seguenti istruzioni duso per sfruttare appieno
le prestazioni offerte da questo prodotto e per
evitare eventuali problemi.
INTRODUCTION
While thanking you for having chosen a PASO
product, we would like to remind you that our
company works according to a certified Quality
System. This means that all our products are
checked during every phase of manufacturing
in order to guarantee that you will be fully
satisfied with your purchase. At all events, the
guarantee will cover any manufacturing flaws
for the whole year for which it is valid. We
recommend that you read the following
instructions for use carefully in order to exploit
in full the performance of this product and to
avoid any problems.
NOTA
Nel continuo intento di migliorare i propri prodotti,
la PASO S.p.A. si riserva il diritto di apportare
modifiche ai disegni e alle caratteristiche tecniche
in qualsiasi momento e senza alcun preavviso.
NOTE
PASO S.p.A. strive to improve their products
continuously, and therefore reserve the right to
make changes to the drawings and technical
specifications at any time and without notice.
Istruzioni per luso
Instructions for use
Manuel d'utilisation
Gebrauchsanleitung
Gebruiksaanwijzing
Instrucciones de empleo
SISTEMA MODULARE PROFESSIONALE PMS2000
PMS2000 PROFESSIONAL MODULAR SYSTEM
Modulo selezione zone digitale
Digital-zones Selection module PM2042-B
Module numérique de sélection de zones
Digitales Zonenwahlmodul
Módulo numérico selección zonas
Digitale zoneselectiemodule
- PMS2000 System -
Ref. 11/513 PM2042-B
44
Via Mecenate, 90 - 20138 MILANO - ITALIA
TEL. +39-02-580 77 1 (15 linee r.a.)
FAX +39-02-580 77 277
http://www.paso.it
Printed in Italy - 03/02 - 0.2K - 11/513
S.p.A
NOTA
La PASO declina ogni responsabilità per danni a cose e/o persone derivanti dall'uso non
corretto dell'apparecchio o da procedure non rispondenti a quanto riportato sul presente
libretto. NOTE
PASO will not accept any liability for damage to property and/or persons arising out of
incorrect use of the equipment or of procedures that do not comply with the instructions
provided in this booklet. NOTE
PASO décline toute responsabilité en cas de dommages matériels et/ou physiques provoqués
par l'utilisation impropre de l'appareil ou encore par des opérations ou des interventions ne
respectant pas les instructions figurant dans la présente notice.
MERKE
PASO lehnt jede Haftung für Schäden an Personen und / oder Gegenständen ab, die durch
unzweckmäßige Verwendung oder Vorgehen entstehen, die nicht den Anweisungen dieses
Handbuches entsprechen. OPMERKING
PASO kan niet aansprakelijk worden gesteld voor schade aan voorwerpen en/of persoonlijk
letsel die het gevolg zijn van een onjuist gebruik van het apparaat of van procedures die niet
overeenkomen met de voorschriften uit deze handleiding.
NOTA
La PASO rehusa cualquier responsabilidad ante daños a cosas y/o personas causados por una
utilización no correcta del aparato o por operaciones no conformes a cuanto indicado en este
folleto.
- PMS2000 System -
Ref. 11/513 PM2042-B
2
1. DESCRIZIONE GENERALE 1. GENERAL DESCRIPTION
1.1 Descrizione pannello posteriore
[1] Terminali per linea "Musica".
[2] Terminali per linea "Annunci".
[3] Terminali linea 1.
[4] Terminali linea 2.
[5] Terminali linea 3.
[6] Terminali linea 4.
[7] Terminali linea 5.
[8] Terminali linea 6.
[9] Ingresso/uscita digitale.
[10] Connessione per allarme.
1.1 Rear panel description
[1] Terminals for "Music" line.
[2] Terminals for "Announcements" line.
[3] Line 1 terminals.
[4] Line 2 terminals.
[5] Line 3 terminals.
[6] Line 4 terminals.
[7] Line 5 terminals.
[8] Line 6 terminals.
[9] Digital input/output.
[10] Connection for alarm.
2. GENERALITÀ
Il modulo selezione zone permette di indirizzare
una o due linee di amplificazione (generalmente
intese come linea musica e linea annunci) su più
zone di ascolto (fino a sei). Per la selezione delle
zone è necessario utilizzare le postazioni
microfoniche PMB131 e PMB136.
La selezione delle zone è effettuata per mezzo
di appositi relais a doppio scambio. Uno scambio
di questi relè è utilizzato per la funzione di
OVERRIDE (annullamento delle attenuazioni
locali degli altoparlanti).
2. GENERAL INFORMATION
The zone-selection module can be used to direct
one or two amplification lines (usually understood
to mean the music line and the announcement
line) to several listening zones (up to six).
It is necessary to use the PMB131 and
PMB136 microphone stations to select the
zones. The zones are selected by means of
special relays with double change-over contacts.
One change-over contact of these relays is used
for the OVERRIDE function (cancellation of the
local attenuators of the loudspeakers).
- PMS2000 System -
Ref. 11/513 PM2042-B
43
○○○○○○○○○○○○○○○○○○○○○○○○○○○○○○○○○○○○○○○○○○○○
○○○○○○○○○○○○○○○○○○○○○○○○○○○○○○○○○○○○○○○○○○○○
○○○○○○○○○○○○○○○○○○○○○○○○○○○○○○○○○○○○○○○○○○○○
○○○○○○○○○○○○○○○○○○○○○○○○○○○○○○○○○○○○○○○○○○○○
○○○○○○○○○○○○○○○○○○○○○○○○○○○○○○○○○○○○○○○○○○○○
○○○○○○○○○○○○○○○○○○○○○○○○○○○○○○○○○○○○○○○○○○○○
○○○○○○○○○○○○○○○○○○○○○○○○○○○○○○○○○○○○○○○○○○○○
○○○○○○○○○○○○○○○○○○○○○○○○○○○○○○○○○○○○○○○○○○○○
○○○○○○○○○○○○○○○○○○○○○○○○○○○○○○○○○○○○○○○○○○○○
○○○○○○○○○○○○○○○○○○○○○○○○○○○○○○○○○○○○○○○○○○○○
○○○○○○○○○○○○○○○○○○○○○○○○○○○○○○○○○○○○○○○○○○○○
○○○○○○○○○○○○○○○○○○○○○○○○○○○○○○○○○○○○○○○○○○○○
○○○○○○○○○○○○○○○○○○○○○○○○○○○○○○○○○○○○○○○○○○○○
○○○○○○○○○○○○○○○○○○○○○○○○○○○○○○○○○○○○○○○○○○○○
○○○○○○○○○○○○○○○○○○○○○○○○○○○○○○○○○○○○○○○○○○○○
○○○○○○○○○○○○○○○○○○○○○○○○○○○○○○○○○○○○○○○○○○○○
○○○○○○○○○○○○○○○○○○○○○○○○○○○○○○○○○○○○○○○○○○○○
○○○○○○○○○○○○○○○○○○○○○○○○○○○○○○○○○○○○○○○○○○○○
○○○○○○○○○○○○○○○○○○○○○○○○○○○○○○○○○○○○○○○○○○○○
○○○○○○○○○○○○○○○○○○○○○○○○○○○○○○○○○○○○○○○○○○○○
○○○○○○○○○○○○○○○○○○○○○○○○○○○○○○○○○○○○○○○○○○○○
○○○○○○○○○○○○○○○○○○○○○○○○○○○○○○○○○○○○○○○○○○○○
○○○○○○○○○○○○○○○○○○○○○○○○○○○○○○○○○○○○○○○○○○○○
○○○○○○○○○○○○○○○○○○○○○○○○○○○○○○○○○○○○○○○○○○○○
○○○○○○○○○○○○○○○○○○○○○○○○○○○○○○○○○○○○○○○○○○○○
○○○○○○○○○○○○○○○○○○○○○○○○○○○○○○○○○○○○○○○○○○○○
○○○○○○○○○○○○○○○○○○○○○○○○○○○○○○○○○○○○○○○○○○○○
○○○○○○○○○○○○○○○○○○○○○○○○○○○○○○○○○○○○○○○○○○○○
○○○○○○○○○○○○○○○○○○○○○○○○○○○○○○○○○○○○○○○○○○○○
○○○○○○○○○○○○○○○○○○○○○○○○○○○○○○○○○○○○○○○○○○○○
○○○○○○○○○○○○○○○○○○○○○○○○○○○○○○○○○○○○○○○○○○○○
○○○○○○○○○○○○○○○○○○○○○○○○○○○○○○○○○○○○○○○○○○○○
○○○○○○○○○○○○○○○○○○○○○○○○○○○○○○○○○○○○○○○○○○○○
○○○○○○○○○○○○○○○○○○○○○○○○○○○○○○○○○○○○○○○○○○○○
○○○○○○○○○○○○○○○○○○○○○○○○○○○○○○○○○○○○○○○○○○○○
○○○○○○○○○○○○○○○○○○○○○○○○○○○○○○○○○○○○○○○○○○○○
○○○○○○○○○○○○○○○○○○○○○○○○○○○○○○○○○○○○○○○○○○○○
○○○○○○○○○○○○○○○○○○○○○○○○○○○○○○○○○○○○○○○○○○○○
○○○○○○○○○○○○○○○○○○○○○○○○○○○○○○○○○○○○○○○○○○○○
○○○○○○○○○○○○○○○○○○○○○○○○○○○○○○○○○○○○○○○○○○○○
○○○○○○○○○○○○○○○○○○○○○○○○○○○○○○○○○○○○○○○○○○○○
○○○○○○○○○○○○○○○○○○○○○○○○○○○○○○○○○○○○○○○○○○○○
○○○○○○○○○○○○○○○○○○○○○○○○○○○○○○○○○○○○○○○○○○○○
○○○○○○○○○○○○○○○○○○○○○○○○○○○○○○○○○○○○○○○○○○○○
○○○○○○○○○○○○○○○○○○○○○○○○○○○○○○○○○○○○○○○○○○○○
○○○○○○○○○○○○○○○○○○○○○○○○○○○○○○○○○○○○○○○○○○○○
○○○○○○○○○○○○○○○○○○○○○○○○○○○○○○○○○○○○○○○○○○○○
○○○○○○○○○○○○○○○○○○○○○○○○○○○○○○○○○○○○○○○○○○○○
○○○○○○○○○○○○○○○○○○○○○○○○○○○○○○○○○○○○○○○○○○○○
- PMS2000 System -
Ref. 11/513 PM2042-B
3
3. INSTALLAZIONE
Anche se i moduli selezione zone possono essere
inseriti in una posizione qualsiasi all'interno
del cestello PMS2002-B, se ne raccomanda
l'installazione, dato l'assorbimento di corrente
più alto degli altri moduli del sistema, nelle
posizioni più prossime a quella del modulo
alimentatore. In un sistema nel quale devono
essere utilizzati più moduli selezione zone si
dovrà provvedere ad installare questi ultimi
cestello.
Gli altri moduli del sistema andranno installati,
proseguendo verso sinistra, dopo quelli di
selezione zone (vedi figura 3.1).
3. INSTALLATION
Although the zone-selection modules can be
inserted in any position inside the PMS2002-B
card cage, their installation in the positions
closest to that of the power-supply module is
recommended due to the fact that they absorb
more current than the other modules making up
the system. In a system in which several zone-
selection modules are to be used, these will have
to be installed in the positions at the extreme
right-hand end of the card cage. The other
modules will then have to be installed after the
zone-selection modules, proceeding towards the
left (see Figure 3.1).
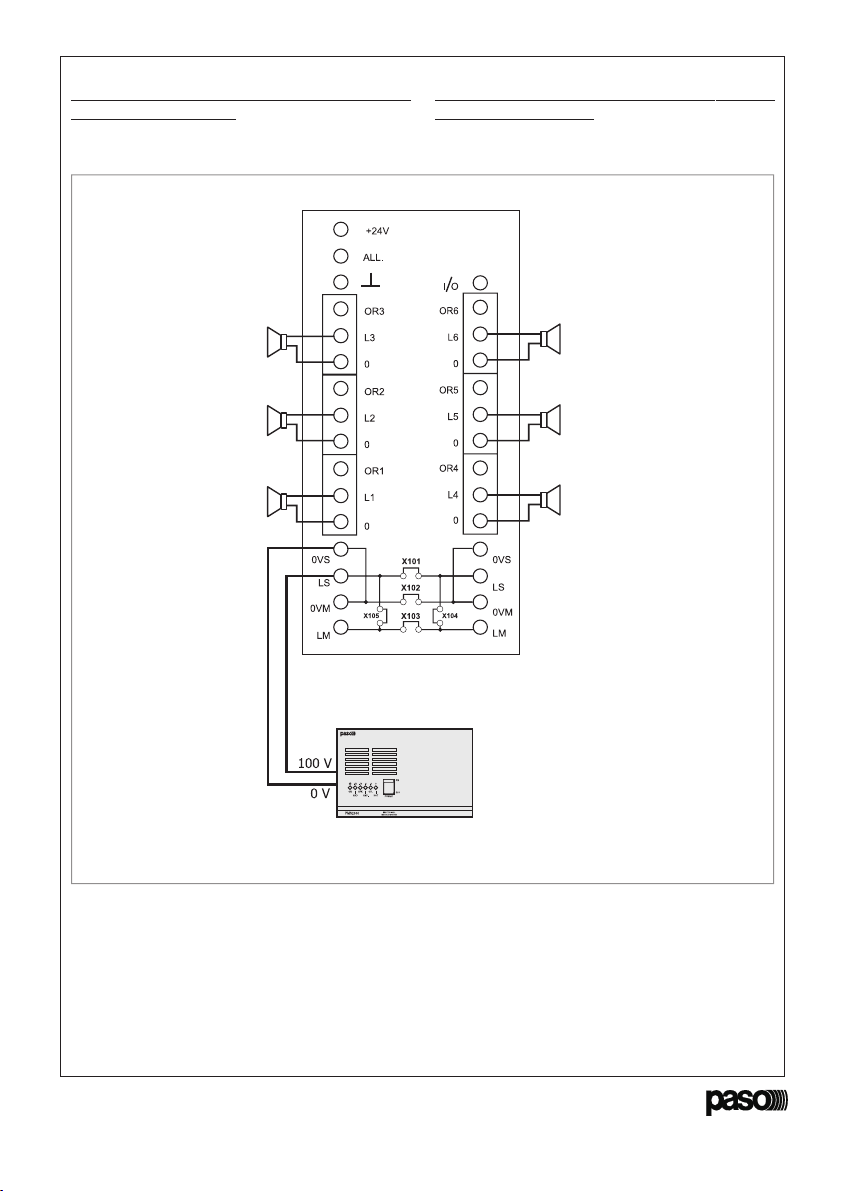
A = Moduli selezione zone
Zone-selection modules
Fig. 3.1
NOTA
Il modulo selezione zone non ha alcuna influenza
sulle linee di segnale e di controllo del cestello,
pertanto, la sua posizione non determina alcuna
variazione nella funzionalità dei vari busses.
Prima d'installare il modulo è necessario
provvedere alla configurazione di alcuni settaggi
presenti sulla scheda secondo quanto descritto
nei paragrafi seguenti. Seguire, per linstallazione,
le istruzioni di montaggio allegate al cestello dei
moduli PMS2002-B.
IMPORTANTE
I terminali marcati con il simbolo
sono attivi e pericolosi.
Il cablaggio esterno collegato a questi terminali,
DEVE essere eseguito esclusivamente da
personale specializzato.
NOTE
The zone-selection module does not affect the
signal and control lines of the card-cage in any
way, and therefore its position does not cause any
changes in the functional characteristics of the
various busses. Before installing the module, it
is necessary to configure some settings on the
card, on the basis of the descriptions contained in
the following paragraphs. Carry out the installation
following the mounting instructions supplied with
the card cages of the PMS2002-B modules.
IMPORTANT
The terminals marked with the symbol
are active and dangerous.
The external connections toward these terminals
MUST be carried out by specialized personnel
only.
- PMS2000 System -
Ref. 11/513 PM2042-B
42
○○○○○○○○○○○○○○○○○○○○○○○○○○○○○○○○○○○○○○○○○○○○
○○○○○○○○○○○○○○○○○○○○○○○○○○○○○○○○○○○○○○○○○○○○
○○○○○○○○○○○○○○○○○○○○○○○○○○○○○○○○○○○○○○○○○○○○
○○○○○○○○○○○○○○○○○○○○○○○○○○○○○○○○○○○○○○○○○○○○
○○○○○○○○○○○○○○○○○○○○○○○○○○○○○○○○○○○○○○○○○○○○
○○○○○○○○○○○○○○○○○○○○○○○○○○○○○○○○○○○○○○○○○○○○
○○○○○○○○○○○○○○○○○○○○○○○○○○○○○○○○○○○○○○○○○○○○
○○○○○○○○○○○○○○○○○○○○○○○○○○○○○○○○○○○○○○○○○○○○
○○○○○○○○○○○○○○○○○○○○○○○○○○○○○○○○○○○○○○○○○○○○
○○○○○○○○○○○○○○○○○○○○○○○○○○○○○○○○○○○○○○○○○○○○
○○○○○○○○○○○○○○○○○○○○○○○○○○○○○○○○○○○○○○○○○○○○
○○○○○○○○○○○○○○○○○○○○○○○○○○○○○○○○○○○○○○○○○○○○
○○○○○○○○○○○○○○○○○○○○○○○○○○○○○○○○○○○○○○○○○○○○
○○○○○○○○○○○○○○○○○○○○○○○○○○○○○○○○○○○○○○○○○○○○
○○○○○○○○○○○○○○○○○○○○○○○○○○○○○○○○○○○○○○○○○○○○
○○○○○○○○○○○○○○○○○○○○○○○○○○○○○○○○○○○○○○○○○○○○
○○○○○○○○○○○○○○○○○○○○○○○○○○○○○○○○○○○○○○○○○○○○
○○○○○○○○○○○○○○○○○○○○○○○○○○○○○○○○○○○○○○○○○○○○
○○○○○○○○○○○○○○○○○○○○○○○○○○○○○○○○○○○○○○○○○○○○
○○○○○○○○○○○○○○○○○○○○○○○○○○○○○○○○○○○○○○○○○○○○
○○○○○○○○○○○○○○○○○○○○○○○○○○○○○○○○○○○○○○○○○○○○
○○○○○○○○○○○○○○○○○○○○○○○○○○○○○○○○○○○○○○○○○○○○
○○○○○○○○○○○○○○○○○○○○○○○○○○○○○○○○○○○○○○○○○○○○
○○○○○○○○○○○○○○○○○○○○○○○○○○○○○○○○○○○○○○○○○○○○
○○○○○○○○○○○○○○○○○○○○○○○○○○○○○○○○○○○○○○○○○○○○
○○○○○○○○○○○○○○○○○○○○○○○○○○○○○○○○○○○○○○○○○○○○
○○○○○○○○○○○○○○○○○○○○○○○○○○○○○○○○○○○○○○○○○○○○
○○○○○○○○○○○○○○○○○○○○○○○○○○○○○○○○○○○○○○○○○○○○
○○○○○○○○○○○○○○○○○○○○○○○○○○○○○○○○○○○○○○○○○○○○
○○○○○○○○○○○○○○○○○○○○○○○○○○○○○○○○○○○○○○○○○○○○
○○○○○○○○○○○○○○○○○○○○○○○○○○○○○○○○○○○○○○○○○○○○
○○○○○○○○○○○○○○○○○○○○○○○○○○○○○○○○○○○○○○○○○○○○
○○○○○○○○○○○○○○○○○○○○○○○○○○○○○○○○○○○○○○○○○○○○
○○○○○○○○○○○○○○○○○○○○○○○○○○○○○○○○○○○○○○○○○○○○
○○○○○○○○○○○○○○○○○○○○○○○○○○○○○○○○○○○○○○○○○○○○
○○○○○○○○○○○○○○○○○○○○○○○○○○○○○○○○○○○○○○○○○○○○
○○○○○○○○○○○○○○○○○○○○○○○○○○○○○○○○○○○○○○○○○○○○
○○○○○○○○○○○○○○○○○○○○○○○○○○○○○○○○○○○○○○○○○○○○
○○○○○○○○○○○○○○○○○○○○○○○○○○○○○○○○○○○○○○○○○○○○
○○○○○○○○○○○○○○○○○○○○○○○○○○○○○○○○○○○○○○○○○○○○
○○○○○○○○○○○○○○○○○○○○○○○○○○○○○○○○○○○○○○○○○○○○
○○○○○○○○○○○○○○○○○○○○○○○○○○○○○○○○○○○○○○○○○○○○
○○○○○○○○○○○○○○○○○○○○○○○○○○○○○○○○○○○○○○○○○○○○
○○○○○○○○○○○○○○○○○○○○○○○○○○○○○○○○○○○○○○○○○○○○
○○○○○○○○○○○○○○○○○○○○○○○○○○○○○○○○○○○○○○○○○○○○
○○○○○○○○○○○○○○○○○○○○○○○○○○○○○○○○○○○○○○○○○○○○
○○○○○○○○○○○○○○○○○○○○○○○○○○○○○○○○○○○○○○○○○○○○
○○○○○○○○○○○○○○○○○○○○○○○○○○○○○○○○○○○○○○○○○○○○
○○○○○○○○○○○○○○○○○○○○○○○○○○○○○○○○○○○○○○○○○○○○
- PMS2000 System -
Ref. 11/513 PM2042-B
4
3.1 Isolamento linea "MUSICA"
In condizione di riposo (nessuna zona
selezionata) la linea di ogni singola zona è
collegata alla linea di amplificazione "MUSICA",
cioè, alla linea di amplificazione collegata ai
terminali "0V M" e "L M" [1] (impostazione di
default). È possibile isolare ogni singola zona
dalla linea "Musica" rimuovendo il ponticello
cortocircuitante dal connettore corrispondente
(particolari [A] di fig. 3.1.1).
3.1 Insulation of the "MUSIC" line
In idle conditions (no zones selected), the line
of each single zone is connected to the "MUSIC"
amplification line, that is to say to the
amplification line connected to the "0V M" and
"L M" terminals [1] (default setting).
It is possible to insulate each single zone from
the "Music" line by removing the short-circuiting
jumper from the corresponding connector (detail
[A] in Figure 3.1.1).
Fig. 3.1.1
In tabella 3.1.1 è riportata la corrispondenza
zona-connettore.
ZONA CONNETTORE
1CN101
2CN102
3CN103
4CN104
5CN105
6CN106
Tabella 3.1.1
Isolando una zona dalla linea "Musica"
s'impedisce che, in condizione di riposo (zona
non selezionata), venga distribuito alcun segnale.
Table 3.1.1 shows the correspondence between
the zones and the connectors.
ZONE CONNECTOR
1CN101
2CN102
3CN103
4CN104
5CN105
6CN106
Table 3.1.1
Insulating a zone from the "Music" line prevents
any signals from being distributed to it in the
idle condition (zone not selected).
- PMS2000 System -
Ref. 11/513 PM2042-B
41
○○○○○○○○○○○○○○○○○○○○○○○○○○○○○○○○○○○○○○○○○○○○
○○○○○○○○○○○○○○○○○○○○○○○○○○○○○○○○○○○○○○○○○○○○
○○○○○○○○○○○○○○○○○○○○○○○○○○○○○○○○○○○○○○○○○○○○
○○○○○○○○○○○○○○○○○○○○○○○○○○○○○○○○○○○○○○○○○○○○
○○○○○○○○○○○○○○○○○○○○○○○○○○○○○○○○○○○○○○○○○○○○
○○○○○○○○○○○○○○○○○○○○○○○○○○○○○○○○○○○○○○○○○○○○
○○○○○○○○○○○○○○○○○○○○○○○○○○○○○○○○○○○○○○○○○○○○
○○○○○○○○○○○○○○○○○○○○○○○○○○○○○○○○○○○○○○○○○○○○
○○○○○○○○○○○○○○○○○○○○○○○○○○○○○○○○○○○○○○○○○○○○
○○○○○○○○○○○○○○○○○○○○○○○○○○○○○○○○○○○○○○○○○○○○
○○○○○○○○○○○○○○○○○○○○○○○○○○○○○○○○○○○○○○○○○○○○
○○○○○○○○○○○○○○○○○○○○○○○○○○○○○○○○○○○○○○○○○○○○
○○○○○○○○○○○○○○○○○○○○○○○○○○○○○○○○○○○○○○○○○○○○
○○○○○○○○○○○○○○○○○○○○○○○○○○○○○○○○○○○○○○○○○○○○
○○○○○○○○○○○○○○○○○○○○○○○○○○○○○○○○○○○○○○○○○○○○
○○○○○○○○○○○○○○○○○○○○○○○○○○○○○○○○○○○○○○○○○○○○
○○○○○○○○○○○○○○○○○○○○○○○○○○○○○○○○○○○○○○○○○○○○
○○○○○○○○○○○○○○○○○○○○○○○○○○○○○○○○○○○○○○○○○○○○
○○○○○○○○○○○○○○○○○○○○○○○○○○○○○○○○○○○○○○○○○○○○
○○○○○○○○○○○○○○○○○○○○○○○○○○○○○○○○○○○○○○○○○○○○
○○○○○○○○○○○○○○○○○○○○○○○○○○○○○○○○○○○○○○○○○○○○
○○○○○○○○○○○○○○○○○○○○○○○○○○○○○○○○○○○○○○○○○○○○
○○○○○○○○○○○○○○○○○○○○○○○○○○○○○○○○○○○○○○○○○○○○
○○○○○○○○○○○○○○○○○○○○○○○○○○○○○○○○○○○○○○○○○○○○
○○○○○○○○○○○○○○○○○○○○○○○○○○○○○○○○○○○○○○○○○○○○
○○○○○○○○○○○○○○○○○○○○○○○○○○○○○○○○○○○○○○○○○○○○
○○○○○○○○○○○○○○○○○○○○○○○○○○○○○○○○○○○○○○○○○○○○
○○○○○○○○○○○○○○○○○○○○○○○○○○○○○○○○○○○○○○○○○○○○
○○○○○○○○○○○○○○○○○○○○○○○○○○○○○○○○○○○○○○○○○○○○
○○○○○○○○○○○○○○○○○○○○○○○○○○○○○○○○○○○○○○○○○○○○
○○○○○○○○○○○○○○○○○○○○○○○○○○○○○○○○○○○○○○○○○○○○
○○○○○○○○○○○○○○○○○○○○○○○○○○○○○○○○○○○○○○○○○○○○
○○○○○○○○○○○○○○○○○○○○○○○○○○○○○○○○○○○○○○○○○○○○
○○○○○○○○○○○○○○○○○○○○○○○○○○○○○○○○○○○○○○○○○○○○
○○○○○○○○○○○○○○○○○○○○○○○○○○○○○○○○○○○○○○○○○○○○
○○○○○○○○○○○○○○○○○○○○○○○○○○○○○○○○○○○○○○○○○○○○
○○○○○○○○○○○○○○○○○○○○○○○○○○○○○○○○○○○○○○○○○○○○
○○○○○○○○○○○○○○○○○○○○○○○○○○○○○○○○○○○○○○○○○○○○
○○○○○○○○○○○○○○○○○○○○○○○○○○○○○○○○○○○○○○○○○○○○
○○○○○○○○○○○○○○○○○○○○○○○○○○○○○○○○○○○○○○○○○○○○
○○○○○○○○○○○○○○○○○○○○○○○○○○○○○○○○○○○○○○○○○○○○
○○○○○○○○○○○○○○○○○○○○○○○○○○○○○○○○○○○○○○○○○○○○
○○○○○○○○○○○○○○○○○○○○○○○○○○○○○○○○○○○○○○○○○○○○
○○○○○○○○○○○○○○○○○○○○○○○○○○○○○○○○○○○○○○○○○○○○
○○○○○○○○○○○○○○○○○○○○○○○○○○○○○○○○○○○○○○○○○○○○
○○○○○○○○○○○○○○○○○○○○○○○○○○○○○○○○○○○○○○○○○○○○
○○○○○○○○○○○○○○○○○○○○○○○○○○○○○○○○○○○○○○○○○○○○
○○○○○○○○○○○○○○○○○○○○○○○○○○○○○○○○○○○○○○○○○○○○
○○○○○○○○○○○○○○○○○○○○○○○○○○○○○○○○○○○○○○○○○○○○
- PMS2000 System -
Ref. 11/513 PM2042-B
5
3.2 Selezione del modo di funzionamento
3.2.1 Funzionamento con linea di
amplificazione singola
Il modulo è pre-impostato per l'impiego in sistemi
dotati di una singola linea di amplificazione per
entrambi i programmi sonori: musica di
sottofondo e annunci (vedi par. 4.1).
Con questa impostazione la selezione di una o
più zone determina il silenziamento delle zone
non selezionate.
3.2.2 Funzionamento con linea di
amplificazione doppia
Il modulo può funzionare anche in impianti dotati
di due linee di amplificazione separate: una per
la diffusione di musica di sottofondo ed una per
la diffusione degli annunci (vedi par. 4.2).
Per impostare il modulo per il funzionamento
con la doppia linea di amplificazione è necessario
rimuovere il ponticello dai terminali del
connettore CN107 (particolare [D] di fig.
3.1.1).
3.3. Alimentazione
Questo modulo viene alimentato dalla linea a
24 volt del cestello nel quale risulta installato.
Al morsetto "+24V" è disponibile un'alimentazione
per attivare, tramite interruttore esterno, l'allarme
che inserisce tutte e sei le zone del modulo.
3.2 Selection of the operating mode
3.2.1 Operation with a single
amplification line
The module is pre-set for use in systems that
have a single amplification line for both sound
programmes, i.e. background music and
announcements (see point 4.1).
With this setting, selecting one or more zones
causes muting of those zones that have not been
selected.
3.2.2 Operation with a double
amplification line
The module can also operate in systems equipped
with two separate amplification lines: one for
broadcasting background music and one for
broadcasting the announcements (see point 4.2).
To set the module for operation with the double
amplification line it is necessary to remove the
jumper from the terminals of connector CN107
(detail [D] in Figure 3.1.1).
3.3. Power supply
This module is powered from the 24 V line of the
card-cage in which it is installed.
On the "+24V" there is a power supply for
activating the alarm that includes all six zones
covered by the module. This power supply is
activated by means of an external switch.
- PMS2000 System -
Ref. 11/513 PM2042-B
40
NOTA
Eventuales altavoces no regulables, es decir no
provistos del antedicho atenuador, se deberán
conectar con los terminales "0V" y "L" de la línea
de conexión con tres hilos.
4.4 Activación de la alarma
Si se desea activar una señal de alarma (que
será enviada a todas las zonas), basta colocar
un interruptor entre los terminales "+24V" y
"ALL" (ver det. [D], en la fig. 4.3.1).
5. LISTA DE PIEZAS DE REPUESTO
Panel frontal serigrafiado........... 36/2159-S2
Relé 2 cambios 24V 5A......................... 21/26
6. CARACTERÍSTICAS TÉCNICAS
OPMERKING
Eventuele niet regelbare luidsprekers, dat wil
zeggen luidsprekers die niet voorzien zijn van
een verzwakker, moeten worden aangesloten op
de klemmen "0V" en "L" van de uit drie draden
bestaande aansluitlijn.
4.4 Activering van het alarm
In het geval men een alarmsignaal zou willen
activering (dat naar alle zones wordt gezonden),
hoeft er slechts een schakelaar tussen de
aansluitklemmen "+24V" en "ALL" te worden
geplaatst (zie detail [D], afb. 4.3.1).
5. LIJST VAN VERVANGINGSONDERDELEN
Frontpaneel met zeefdruk.......... 36/2159-S2
24V 5A relais met 2 omschakelcontacten 21/26
6. TECHNISCHE KENMERKEN
solropadatroposamixámaicnetoP sélersoledsoibmacttaw005
edtadnegomrevlaamixaM
sialerednavnetcatnoclekahcsmo
negardrevnennuk
solropadatroposamixámetneirroC
sélersoledsoibmacA5edeidmoortselamixaM
sialerednavnetcatnoclekahcsmo
negardrevnennuk
edamotaled.XÁMomusnoC
)V42+(nóicatnemila Am001 tehnavemanpo.XAM
tnupemanfamoorts)V42+(
- PMS2000 System -
Ref. 11/513 PM2042-B
6
4. CONNESSIONI ED USO
Il modulo dispone di morsettiere a vite di tipo
estraibile per le varie connessioni ai dispositivi
di comando dei relais, alle linee degli altoparlanti
e agli amplificatori.
Si raccomanda di utilizzare, per i collegamenti,
cavi di buona qualità e di prestare particolare
cura, durante la realizzazione degli stessi,
affinchè i conduttori non presentino sfilacciature
o contatti incerti.
I morsetti accettano cavi con sezione
massima di 2,5 mm2.
Ogni relè del modulo è in grado di sopportare una
potenza massima della linea di cinquecento watt.
Questi moduli possono essere pilotati
esclusivamente dalle postazioni microfoniche
digitali PASO PMB131 e/o PMB136, in grado
di gestire fino a trentasei zone. Quindi, all'interno
del Sistema Modulare PMS2000, è possibile
montare il numero massimo di sei moduli zone.
4. CONNECTIONS AND USE
The module has terminal strips with binding
screws of the removable type for the various
connections to the relay control devices, to the
loudspeaker lines and to the amplifiers.
It is strongly recommended that the connections
be made using good-quality cables and that
particular care should be taken while making the
connections to avoid using frayed cables or
uncertain contacts.
The terminals will take cables with a maximum
cross-section of 2,5 mm2.
Each relay of the module is able to take a max.
potential of the line of five hundred watt.
These modules can only be driven by PASO
PMB131 and/or PMB136 digital microphone
stations, which are capable of managing up to
thirty-six zones. It is therefore possible to mount
a maximum of six zone modules inside the
PMS2000 Modular System.
Seguendo le indicazioni della tabella sottostante,
impostare l'indirizzo di riconoscimento per
ciascuno dei moduli tramite i ponticelli CN108,
CN109 e CN110 (vedi figura).
Indirizzo CN110 CN109 CN108
1
2
3
4
5
6
= ponticello inserito
= ponticello non inserito
Address CN110 CN109 CN108
1
2
3
4
5
6
= jumper inserted
= jumper not inserted
The jumpers CN108, CN109 and CN110
(see figure) can be used to set the address of
each module. For this purpose, follow the
indications shown in the below table.
- PMS2000 System -
Ref. 11/513 PM2042-B
39
4.3 Conmutación palabra/música
con OVERRIDE (exclusión de
los atenuadores locales)
Algunas instalaciones utilizan unos atenuadores
locales, situados en los altavoces, para permitir
una regulación individual de cada punto de
emisión. En tal caso puede ser necesario
bypasar los atenuadores (función denominada
"OVERRIDE") para poder difundir los anuncios
vocales, los mensajes de emergencia o las
señales de alarma al más alto nivel sonoro
posible.
Utilizando líneas de distribución con tres hilos
es posible utilizar los cambios de los relés del
módulo de selección zonas para excluir los
atenuadores durante la selección de las zonas.
En la figura 4.3.1 se muestra el esquema de
conexión referido al ejemplo recién descrito.
Fig./Afb. 4.3.1
4.3 Omschakeling gesproken tekst/
muziek met override (uitsluiting van
de lokale verzwakking)
In sommige systemen wordt gebruik gemaakt
van lokale verzwakkers, die op de luidsprekers
zijn aangebracht, voor een afzonderlijke
regeling van de verschillende punten van
verspreiding. In deze gevallen kan het nodig
zijn de verzwakkers te "bypassen" (een functie
die "OVERRIDE" heet) om de gesproken
mededelingen, de noodmeldingen of de
alarmsignalen op een zo hoog mogelijk
geluidsvolume te kunnen verspreiden. Door
distributielijnen met drie draden te gebruiken
is het mogelijk de omschakelcontacten van de
relais van de zoneselectiemodule te gebruiken
om de verzwakkers uit te sluiten wanneer de
zones geselecteerd zijn. Op afbeelding 4.3.1
ziet u het aansluitschema voor het systeem uit
het hierboven beschreven voorbeeld.
D
Atenuadores locales
Lokale verzwakking
- PMS2000 System -
Ref. 11/513 PM2042-B
7
4.1 Speech/music switching with a
single amplification line
The connection diagram shown in Figure 4.1.1
refers to a system equipped with a single
amplification line for broadcasting both
background music and the announcements
(the output of amplifier is applied to terminals
[1] of the terminal strip of the module). In this
type of system, when announcements are sent
to the selected zones, the connections between
the lines of the zones that have not been
selected and the amplification line are cut off.
No signals will therefore be sent to these zones
for the whole period during which the selection
remains active (see point 3.2).
4.1 Commutazione parola/musica con
singola linea di amplificazione
Lo schema di collegamento riportato in fig. 4.1.1
si riferisce ad un impianto dotato di una sola linea
di amplificazione per la diffusione sia della musica
di sottofondo che degli annunci (l'uscita
dell'amplificatore è applicata ai terminali [1] della
morsettiera del modulo).
In questo tipo d'impianto, quando vengono
emessi gli annunci nelle zone selezionate, viene
interrotto il collegamento tra le linee delle zone
non selezionate e la linea di amplificazione; la
diffusione di segnale su tali zone, pertanto,
risulterà interrotta per tutto il tempo in cui rimane
attiva la selezione (vedi par. 3.2).
Fig. 4.1.1
Musica - Music
Annunci - Announcements
Amplificatore
Amplifier
- PMS2000 System -
Ref. 11/513 PM2042-B
38
Fig./Afb. 4.2.3
¡ATENCIÓN!
En la tipología de amplificación doble es necesario
seguir terminantemente las instrucciones
proporcionadas en los ejemplos a fin de evitar
daños permanentes a los amplificadores.
LET OP!
Bij een dubbele versterking dienen de in de
voorbeelden gegeven aanwijzingen nauwlettend
worden opgevolgd, ter voorkoming van
blijvende schade aan de versterkers.
X101
X104
X105
Palabra - Tekst
Música - Muziek
- PMS2000 System -
Ref. 11/513 PM2042-B
8
Qualora si rendesse necessario aver più potenza
installata su ogni linea, è possibile sfruttare le
tipologie di collegamento illustrate nelle figure
(4.1.2) e (4.1.3).
If it should be necessary to have more power
installed on each line, it is possible to exploit
the connection typologies illustrated in Figures
(4.1.2) and (4.1.3).
Fig. 4.1.2
Amplificatore
Amplifier
- PMS2000 System -
Ref. 11/513 PM2042-B
37
En este tipo de instalación los anuncios son
emitidos sólo en las zonas seleccionadas
mientras que en las restantes zonas sigue
presente la música de fondo.
Si fuese necesario tener más potencia instalada
en cada línea, es posible recurrir a los tipos de
conexión mostrados en las figuras 4.2.2 y 4.2.3.
Fig./Afb. 4.2.2
In dit type systeem worden de mededelingen
alleen verspreid in de geselecteerde zones, terwijl
in de overige zones de achtergrondmuziek blijft
klinken.
Mocht het noodzakelijk zijn het vermogen op elke
lijn te verhogen, dan kunnen de in de
afbeeldingen 4.2.2 en 4.2.3 weergegeven
aansluitmogelijkheden worden gebruikt.
X104
X105
Palabra - Tekst
Música
Muziek
- PMS2000 System -
Ref. 11/513 PM2042-B
9
ATTENZIONE!
Nel caso si volesse configurare l'impianto
seguendo quanto illustrato nella fig. 4.1.3, e
cioè utilizzando la potenza massima, è
INDISPENSABILE tagliare i ponticelli X101,
X102 e X103 (particolari [A], fig. 3.1.1). La
mancata osservanza di tale operazione può
portare al malfunzionamento permanente degli
amplificatori.
ATTENTION!
If it should be wished to configure the system
as illustrated in Figure 4.1.3, that is to say using
the maximum power, it is ESSENTIAL to cut
jumpers X101, X102 and X103 (details [A],
Figure 3.1.1). Failure to comply with this
condition may lead to permanent malfunctioning
of the amplifiers.
Fig. 4.1.3
X101
X102
X103
- PMS2000 System -
Ref. 11/513 PM2042-B
36
4.2 Conmutación palabra/música con
doble línea de amplificación
NOTA
Para configurar el módulo para el
funcionamiento con la doble línea de
amplificación es necesario quitar el puente de
los terminales del conectador CN107 (detalle
[D] en la fig. 3.1.1).
El esquema de conexión mostrado en la fig.
4.2.1 hace referencia a una instalación provista
de una línea de amplificación para la difusión
de la música de fondo (salida del amplificador
conectada con los terminales [1]) y una línea
para la difusión de los anuncios (salida del
amplificador conectada con los terminales [2]).
Fig./Afb. 4.2.1
4.2 Omschakeling tekst/muziek met
dubbele versterkingslijn
OPMERKING
Voor het instellen van de module voor de
functie met een dubbele versterkingslijn, dient
de brug van de aansluitklemmen van de
connector CN107 (detail [D] van afb. 3.1.1)
verwijderd te worden. Het aansluitschema dat
is weergegeven op afb. 4.2.1 heeft betrekking
op een systeem dat voorzien is van een
versterkingslijn voor de achtergrondmuziek
(uitgang van de versterker verbonden met de
klemmen [1]) en een lijn voor de verspreiding
van mededelingen (uitgang van de versterker
verbonden met de klemmen [2]).
X104
X105
Música - Muziek
Palabra - Tekst
- PMS2000 System -
Ref. 11/513 PM2042-B
10
4.2 Commutazione parola/musica con
doppia linea di amplificazione
NOTA
Al fine di impostare il modulo per il funzionamento
con la doppia linea di amplificazione è necessario
rimuovere il ponticello dai terminali del
connettore CN107 (particolare [D] di fig.
3.1.1). Lo schema di collegamento riportato in
fig. 4.2.1 si riferisce ad un impianto dotato di
una linea di amplificazione per la diffusione della
musica di sottofondo (uscita dellamplificatore
collegata ai terminali [1]) e una linea per la
diffusione degli annunci (uscita dellamplificatore
collegata ai terminali [2]).
Fig. 4.2.1
4.2 Voice/music switching with double
amplification line
NOTE
In order to set the module for operation with the
double amplification line, it is necessary to
remove the jumper from the terminals of
connector CN107 (detail [D] of Figure 3.1.1).
The connection diagram shown in Figure 4.2.1
refers to a system equipped with an amplification
line for broadcasting background music (output
of the amplifier connected to terminals [1]) and
a line for broadcasting the announcements
(output from the amplifier connected to
terminals [2]).
X104
X105
Annunci - Announcements
Musica - Music
- PMS2000 System -
Ref. 11/513 PM2042-B
35
¡ATENCIÓN!
Si se desea configurar la instalación
siguiendo cuanto mostrado en la fig. 4.1.3,
es decir utilizando la potencia máxima, es
INDISPENSABLE cortar los puentes X101,
X102 y X103 (detalle [A], fig. 3.1.1).
No efectuar dicha operación puede conllevar
daños permanentes a los amplificadores.
LET OP!
In het geval men de installatie zou willen
configureren aan de hand van hetgeen op
afbeelding 4.1.3 is weergegeven, dat wil zeggen
met gebruik van het maximum vermogen, dan
DIENEN ABSOLUUT de bruggen X101, X102
e X103 (details [A], afb. 3.1.1) te worden
losgeknipt. Het niet in acht nemen van deze
handeling kan een blijvend slechte werking van
versterkers tot gevolg hebben.
Fig./Afb. 4.1.3
X101
X102
X103