Patrol Hawk 2AKOIPHGW User manual

User Manual
WiFi - GSM- APP
Smart Home Security System
Enjoy Smart & Safe Life

Tips:
Please read through this user manual before installation so as to operate properly.
Please keep well of the user manual for further reference.
Please get around understanding of this manual for properly operation.
FCC ID: 2AKOIPHGW
FCC ID: 2AKOIPH818HW
FCC ID: 2AKOIPH818MC
FCC ID: 2AKOIPH818YK
N O T E : T h i s e q u i p m e n t h a s b e e n t e s t e d a n d f o u n d t o c o m p l y w i t h
t h e l i m i t s f o r a C l a s s B d i g i t a l d e v i c e , p u r s u a n t t o p a r t 1 5 o f t h e F C C
R u l e s . T h e s e l i m i t s a r e d e s i g n e d t o p r o v i d e r e a s o n a b l e p r o t e c t i o n
a g a i n s t h a r m f u l i n t e r f e r e n c e i n a r e s i d e n t i a l i n s t a l l a t i o n . T h i s
e q u i p m e n t g e n e r a t e s u s e s a n d c a n r a d i a t e r a d i o f r e q u e n c y e n e r g y
a n d , i f n o t i n s t a l l e d a n d u s e d i n a c c o r d a n c e w i t h t h e i n s t r u c t i o n s ,
m a y c a u s e h a r m f u l i n t e r f e r e n c e t o ra d i o c o m m u n i c a t i o n s . H o w e v e r,
t h e r e i s n o g u a ra n t e e t h a t i n t e r f e r e n c e w i l l n o t o c c u r i n a p a r t i c u l a r
i n s t a l l a t i o n . I f t h i s e q u i p m e n t d o e s c a u s e h a r m fu l i n t e r f e r e n c e t o
r a d i o o r t e l e v i s i o n r e c e p t i o n , w h i c h c a n b e d e t e r m i n e d b y t u r n i n g
t h e e q u i p m e n t o f f a n d o n , t h e u s e r i s e n c o u r a g e d t o t r y t o c o r r e c t
t h e i n t e r f e r e n c e b y o n e o r m o r e o f t h e f o l l o w i n g m e a s u r e s :
- R e o r i e n t o r r e l o c a t e t h e r e c e i v i n g a n t e n n a .
- I n c r e a s e t h e s e p a r a t i o n b e t w e e n t h e e q u i p m e n t a n d r e c e i v e r.
- C o n n e c t t h e e q u i p m e n t i n t o a n o u t l e t o n a c i r c u i t d i f f e r e n t f r o m t h a t
t o w h i c h t h e r e c e i v e r i s c o n n e c t e d .
- C o n s u l t t h e d e a l e r o r a n e x p e r i e n c e d r a d i o / T V t e c h n i c i a n f o r h e l p
C h a n g e s o r m o d i f i c a t i o n s n o t e x p r e s s l y a p p r o v e d b y t h e p a r t y
r e s p o n s i b l e f o r c o m p l i a n c e c o u l d v o i d t h e u s e r ' s a u t h o r i t y t o
o p e r a t e t h e e q u i p m e n t . T h i s d e v i c e c o m p l i e s w i t h P a r t
1 5 o f t h e F C C R u l e s . O p e r a t i o n i s s u b j e c t t o t h e f o l l o w i n g t w o
c o n d i t i o n s :
( 1 ) t h i s d e v i c e m a y n o t c a u s e h a r m f u l i n t e r f e r e n c e , a n d
( 2 ) t h i s d e v i c e m u s t a c c e p t a n y i n t e r f e r e n c e r e c e i v e d , i n c l u d i n g
i n t e r f e r e n c e t h a t m a y c a u s e u n d e s i r e d o p e r a t i o n .

Foreword
Features
Dear users:
Thanks for selecting WiFi and 3G securiy system. The system adopts WiFi and 3G dual
network to transmit alarm message. It pushes the alarm message to users' smart phone App
when alarming. Meanwhile, it’s able to send SMS and make phone calls. By using dual
network, it is more stable, safer and faster. Also users could remote control the alarm panel
and open IP camera monitoring on site.
For more convenient using, please follow the steps on this user manual. Please feel free to
contact us if you have any questions or problems while using, we are much pleased to be on
your service.
★ Adopting WiFi & 3G/2G network, enable to be controlled by iOS and Android APP.
★ Support 1 Householder, 99 users.
★ Adding sensors by scanning QR code.
★ Support HD IP cameras, live video communication.
★ 24 hours monitoring temperature and humidity, enable to preset alarm value.
★ Auto detect WiFi & 3G/2G signal status.
★ 24 hours detecting doors/windows closed or not.
★ Low battery alert for sensors, auto detect whether sensors connected alarm panel or not.
★ Monitoring AC power, failure or recovery status.
★ All the operation logs can be checked on Vcare App.
★ Siren prompt and SMS prompt when arm/disarm by remote controller.
★ Setup siren alert time(0~254 seconds for optional).
★ Delay alarm/arm/disarm functions(0~60 seconds for optional).
★ Six languages and voice prompt(English,Russian,German,Spanish,French and Chinese).
★ Support 99 normal sensors, 20 remote controls,2 wired zones.
★ Support wireless strobe siren and 2 routes home appliance control switch.
★ When WiFi network failure,auto switch to 3G/2G network.
★ 3 SMS alarm numbers and 3 alarm call numbers.
★ Support two-way communication, arm or disarm on phone keypad.
★ Recorded voice for 10 seconds.
3G/2G Mode:
1

1. Package List
2
1.1 Kit A
SOS
Alarm Panel*1 PIR Detector*1Door Sensor*1 Remote Controller*2
Other accessories:
Power adapter*1,alarm panel mounting bracket*1,PIR mounting bracket*1
door sensor double-sided adhesive*1,user manual*1.
Notice: The version is dual network of .WiFi+3G/2G

2.Preparation before using
2.1 Alarm Panel and Sensors
2.2 Insert SIM Card
2.3 Plug Power & Turn On System
2.1.1 Control Panel:Front
2.1.2 Control Panel:Back
Listen in MIC
Siren(80db)
SIM Socket
Wired zone terminal
Temperature and humidity
sensor probe terminal
WiFi Setting Button
Record MIC
Tamper switch
Wireless signal indicator
3G/2G signal indicator
Power indicator
Record button
Power port
Power Port
Power switch
Power Switch
Speaker
Alarm Indicator(Red)
WiFi Signal(Blue)
Arm Indicator(Red)
This system is WiFi & GSM/WCDMA intelligent security system, Once alarm occurs, the host will push
alarm message to the users via WiFi. If the WiFi network failure, the alarm panel will automatically switch
to the GSM/WCDMA network, sending SMS and making calls to alert users for alarming. Hence, we
recommend you to insert SIM card inside.
1.Select the appropriate SIM card.
2.SIM card is inserted into the host's SIM port.
1.Plug power adapter to power port.
2. Push power switch from OFF to ON for turning on the system.
54

3. Adding Users Via APP
3.1 APP Download and Installation
3.2 Add Users
Scan the QR code, download APP to your smart mobile system (iOS or Android System)
and install it.
Adding APP to your mobile, it allows 1 householder, 99 users.
First, add 1 user as householder, please do it as following steps.
3.2.1
QR Code
1. Click to open APP on
your mobile
2.After the welcome interface, then entry into emergency call
interface, click ” > “ on the right side, get into the main interface.
3. On the main interface,
click "Devices"
4. Click "Householder"
7. Enter WiFi password.
8. Quick press the "WiFi
Setting Button" on the back of
the panel. (As shown in the
picture on the right.)
9. After heard "beep" sound
from the host, click “Start” on
APP to configure, also you can
see the progress bar of the
configuration.
10. Enter "6 Digit Password of
panel", and then click OK (Note:
Default password is "123456").
11. Make a personalized name
as you like for and click “Finish”.
12. Well Done.
5. Make sure the WiFi network which
you want to connect panel and the WiFi
network your current mobile phone
connecting are in the same router,
please click "Yes" to finish connection.
6. If not, please click the “settings",
then choose the correct WiFi network,
reconnect it and then click "Yes".
76

1.Click “Admin User” enter into
Management interface.
4. Send invite code by SMS to
the family members you want
to add them in.
5. Open your family member’s
phone, then enter the main
interface, click "Devices"
7. Enter the received invitation code.
8. Enter your mobile phone number.
9. Enter user name, for example”Jason”
10. Click "Acception".
11. Complete, Click "Finish".
6. After entering adding
users interface, click on the
"Users".
2. Click "Members". 3.Click "Invite"
3.2.2 Add users, please refer to the following pictures step by step. (Note: It can add up to 99 users, the
user can not set the parameters of the host, but the other functions are same as householder.)
4. APP Interface & Features.
Check all the event records about the host.
WiFi connecting status
host arm/disarm status
Return to previous interface Enter into setting interface
Temperature / humidity data
Validity period
GSM network status
Anyone at home
Backup battery status
Power connecting status
4.1 Emergency Call Interface
4.2 Main Interface
4.3 Admin Management Interface
All the added devices will be listed here.
Each device will display name, using time,
temperature, humidity and installation address.
Also displays the current arm/disarm status
and whether there are contents unreviewed.
You can also click settings icon for settings.
98
3 latest message scrolling listed.
SOS emergency call function, quite suitable for
the elderly and children. When he/she feel not
well or get lost, click on the "SOS" button, APP
will immediately record a small video, and push
GPS location infomation to all members in APP.
Weather forecast, real-time update the weather
for you.
Weather forecast.

Door/Window
Sensor
Door/Window Open
Somebody In
Fire Alert
Water leakage Alert
Gas Leakage Alert
Emergency Call Alert
Medical Call Alert
Detectors Alert
Door/Window
Sensor disconnect
Door/Window
Closed
PIR Detector
Low Battery
Low Battery Alert
Low Battery Alert
PIR Detector
Disconnected
Smoke Detector
Disconnected
Water Sensor
Disconnected
Gas Detector
Disconnected
Emergency Button
Disconnected
Medical Call
Button Disconnected
Detectors Disconnected Detectors Low Battery
Door Sensor
Low Battery
PIR Motion
Sensor
Smoke Detector
Water Leakage
Detector
Gas Detector
Emergency
Button
Medical Call
Button
More Detectors
Health Monitoring
IP Camera
Intercom
Smart Control
4.4 Setting Interface
Modify Languages
Add remote controllers,20pcs.
Modify Time
Add emergency buttons,8pcs.
Adding Detectors
Add door/window sensors, PIR sensors etc,99pcs.
Setting mobile phone numbers for SMS and phone calls
Add gas/smoke detectors, 8pcs.
Modify Admin Password
Add medical call buttons, 8pcs.
Modify Installation Address
Add water leakage detectors,4pcs.
More Settings
Add intercom,4pcs.
4.4.1 Modify languages: Support Chinese, English, Russian, French, German, Spanish. After
modification, pushing message will use that language; (Note: Command according to APP
prompts)
4.4.2 Modify System Time: Recommend users reset time for new host. (Note: Command
according to APP prompts)
4.4.3 Adding Wireless Accessories: You can add all kinds of intrusion detectors and
emergency detectors, for details refer to the following description.
1. Click "Wireless sensors"
into adding sensors interface
2. Adding wireless sensors
interface
How to add sensors, please
follow below examples.
1110
Click into Emergency
Call Interface
Delete All unread
alarm records
Click into members
management interface
Click into alarm
records interface

Example: Add and delete door/window sensor
1.Click to enter into the interface
of adding door/window sensor.
1. Click into SMS and phone
call numbers setting interface.
4. Click ok, App will automatically
recognize the door/window sensor.
2. Click the scan detection.
2. Click to set numbers, can setup
3 SMS and 3 phone call numbers.
5. Adding successfully.
3. Scan QR code on the back of the
sensors.
3. After setting phone numbers,
click “ok” to finish settings.
6. All the accessories are added by
scanning QR code, simple and fast.
4.4.4 Set phone number for SMS message and phone call. (Note: this function are special for
GSM/WCDMA edition. While WiFi network is not working, it will automatically switch to
4.4.5
4.4.6 )
4.4.7
Modify admin password. (Note: please refer to step 4.4, according to App prompts.)
Modify installation address. (Note: please refer to step 4.4,according to App prompts
More settings.
Items Functions
If WiFi network breakdown, host will push message. alert
If GSM/CDMA network breakdown, App will push alert message.
When arming, App will push message if door/window isn’t closed
properly.
alert
If accessories in low battery, APP will push alert message.
If power breakdown or out of power, App will push alert message.
When arm or disarm the panel, whether sending SMS alert.
The Siren volume can be adjusted,High/Medium/Low for optional.
The arming delay time can be chosen from 0~99s, default is 30s.
Delay alarm time could be chosen from 0~99 seconds, default is 0s.
Delay disarm time could be chosen from 0~99 seconds, default is 0s.
Siren alert time could be chosen from silent or 0~254s/keep alerting. Default is 90s.
Three group of timing arm can be setup.
Three group of timing disarm can be setup.
The alarm mode for wired zones: NC or NO, default is NC.
Temperature alarm can be set from Closed or 0 ~120℃,default alarm is 85℃.℃
Could set somebody at home reminder, the default is closed for this function.
GSM/CDMA Alarm function could be chosen from Closed/Open/Auto Change.
Three group of timing stay arm (home stay) can be setup.
When arm or disarm by remote controllers, whether need siren prompt.
WiFi network breakdown alert
GSM/CDMA
network breakdown alert
Door/window not closed alert
Accessories low battery alert
Power breakdown alarm
Arm/disarm SMS alert
Siren prompt when arm/disarm
by remote controllers
The volume of internal siren
Delay arming time (s)
Delay alarm time (s)
Delay disarm time (s)
Siren alert time (s)
Timing arm
Timing disarm
Timing stay arm
NC/NO alarm for wired zones
GSM/CDMA network alarm
Temperature alarm (℃)
Someone at home reminder
Enter a personalise name
for easily recognition.
Click here to delete all detectors.
1312
Click here to delete sensors one by one.

4.4.8 Setup home stay arm zones
4.4.9 odify Zone NameM
4.4.10 Check Sensors’ Status
2
2
4
1. Enter into sensor management interface,
click the icon of home stay arm.
1. Click related host to get into
users management interface.
1. Enter into sensor management
interface, choose the zone.
1. Click into sensor management
interface,choose the zone.
2. In pop up window, switch to
OFF status and confirm.
2.Click related icons to check alarm messages.
Click “Delete Alarm”to delete all the red bubbles.
1. Intrusion detectors (Door Sensor/ PIR motion sensor/ More detectors) only can be triggered to alarm when host is in
ARM status. Other types detectors (SOS button / medical call button / fire detector) can directly trigger to alarm even in
disarm status.
2. In Home Stay ARM status, the switch of intrusion detectors needs to turn on so that can be triggered to alarm.(Default
for newly added detectors arehome stay arm detectors, user can modify the zone types, details please refer Step 4.4.8 ).
3. If sensors had been triggered to alarm, there will be a red spot on sensor management interface. Other types such as
(operating record/power failure/ temper switch) alarm message will appear in “Alarm Records”, with a red spot there.
After checked, the red spot will disappear. Or click “clean” to delete all red spot.
4.Different type of alarm message, APP will push different alarm music to inform users.
5. If turn on “ when GSM network breakdown, APP push message alert” function, when the host detect there is something
wrong with the GSM network, APP will push message to alert all the users.
6.If turn on “When WiFi network breakdown, auto change to GSM network” function, when WiFi network breakdown, Host
will send SMS to the 3 preset SMS numbers for reminder.
7. When those sensors such as door/window sensor, PIR detector, gas detector, water detector, smoke detector are
disconnected with alarm host, APP will push alert message (without SMS alert message), and in sensors management
interface the related icon will be in grey color.
8.When those sensors such as door/window sensor, PIR detector, gas detector, water detector, smoke detector are in low
battery, the APP will push low battery alert message every two hours. ( This function can be turn off), also in sensor
management interface there will be low battery icon listed.
9. Door sensor closed/open status can be checked and if door had not been closed properly when host armed, APP will
push alert message, also in sensor management interface there will be door open/closed status icon listed.
2. In pop up window, input new name,
for example, “Front Door Alarm”.
2.The management interface of
door/window sensors.
3. After setup, the sensors are not in status of
home stay. It will not be triggered to alarm
when the panel in home stay mode.
3.Modified successfully.
Note: All new added sensors are in home stay arm zone, the following steps can cancel home stay arm zone.
Door/window open
Door/window sensor disconnected
Door/window closed Door sensor low battery
4.4.11 Check Alarm Records
4.4.12 APP Alarm Handling and Some Notices
Red Icon Unread Alarm Records
Grey Icon: NO Alarm Records
:
Click here can check all hosts
alarm records.
As pictures shows: There
are two unread water
leakage alarm message.
1514
2
Gate
Detector 001
Front
Door Alarm
Detector 003 Detector 004

4.4.13 Phone Call Alarm Handling
1. If choose GSM/CDMA network (with GSM/CDMA SIM card insert),the system will push alarm
information to Vcare APP, and it will also send SMS and make phone call to preset mobile numbers. If
don’t choose GSM/WCDMA network, it will neither send SMS text message nor make calls when
alarming. If choose “smart mode”, alarm host will send SMS and make phone call to preset phone
numbers in the situation of WiFi network breakdown.
2.When using GSM/WCDMA network, alarm host will send SMS firstly and then make phone call to preset
mobile numbers. If someone answers it, the calling will stop, then hearing the pre-record and alarm voice
message, get into listening status. At this moment, press “1” on mobile keypad, host will be in armed
status, press”2", get into disarmed status, press”3" to start siren, press “4” to close siren prompt. If the
calling is busy or no answer, it will auto dial to next mobile phone number until someone answers it. It will
call 3 times in cycle, if still no answer, it will stop calling finally.
5. Accessories
5.1 PIR Motion Sensor
5.2 Door/Window Sensor
Alarm Indicator
Alarm Indicator
Transmitter Magnet
Installation:
1.Open the shell, remove the insulation strip.
2.Mounting it on the wall with height at 2.20 meters.
3.To prevent false alarm, avoid facing vents, air condition, etc
places.
Installation:
1.
2.Paste the two parts on window/door with a double sided
adhesive tape.
3.When magnet move away from transmitter for 2cm distance,
it will be triggered to alarm.
Open the shell, remove the insulation strip.
Usage:
1.Press the button, the alarm host will give related response.
Lens
5.3 Remote Controllers
SOS
Signal Indicator
Disarm
Panic Button
Arm
Home Stay Arm
1716

18 19
6. APP Interface
6.1 Arm/Disarm/Home Stay Arm
1. Click “Arm Status”, get into
“Arm/Disarm” management
interface.
2. Arm/Disarm
management interface.
ARM: After arming, once trigger the
sensor will activate alarm.
Home Stay Arm: Only those sensors set
to home stay armed mode will be
triggered to alarm.
Disarmed: After disarmed, all intrusion
type sensors will not alarm, only panic
button, gas sensor, smoke detector will
be activate to alarm.
Start Siren: Press this button to start
siren.
Stop Siren: Press this button, the siren
will stop ringing.

7. Gateway Settings by SMS Text
6.4 FAQ about IP Camera
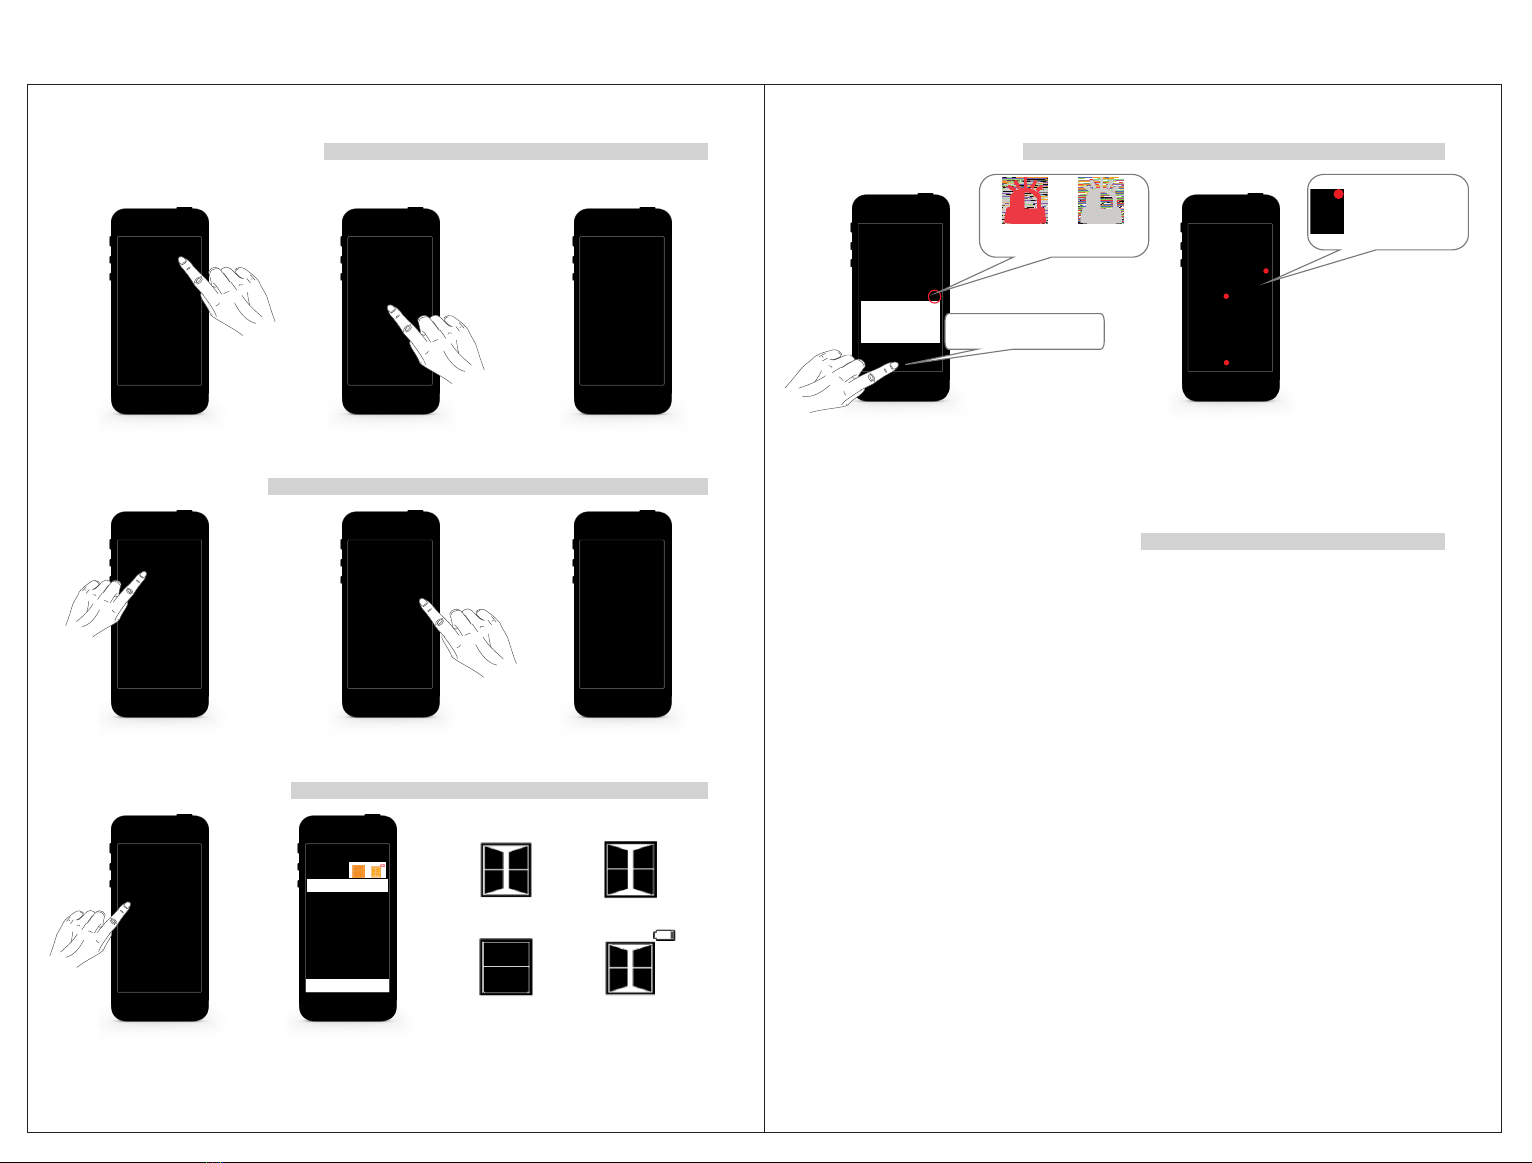
1. Q: When adding a device, APP did not prompt the discovery of a new equipment.
A: Please check if the camera and cell phone are in the same LAN;
Please check if the camera’s network indicator keeps on;
If camera and cell phone are not in the same LAN, it is recommended to use the ID number
manually add camera.
2. Q: When viewing live video, the device reminds the password is wrong.
A: Please check if the remote access password which being set when add the device is right
or not. If not, please select edit to re-set it from the list of entries in the camera.
If you forget your remote access password of the camera, suggest you to press the reset
button to restore the device to factory defaults(password:123).
3. Q: “Device list” reminds the device is offline.
A: Please check whether the network of the camera is normal, and network indicator of
device is on.
Please check whether the router network is normal.
4. Q: Unable to search the video files during playback.
A: Please check if the SD card is damaged. Please check the retrieval time of the video file,
the system time of the camera.
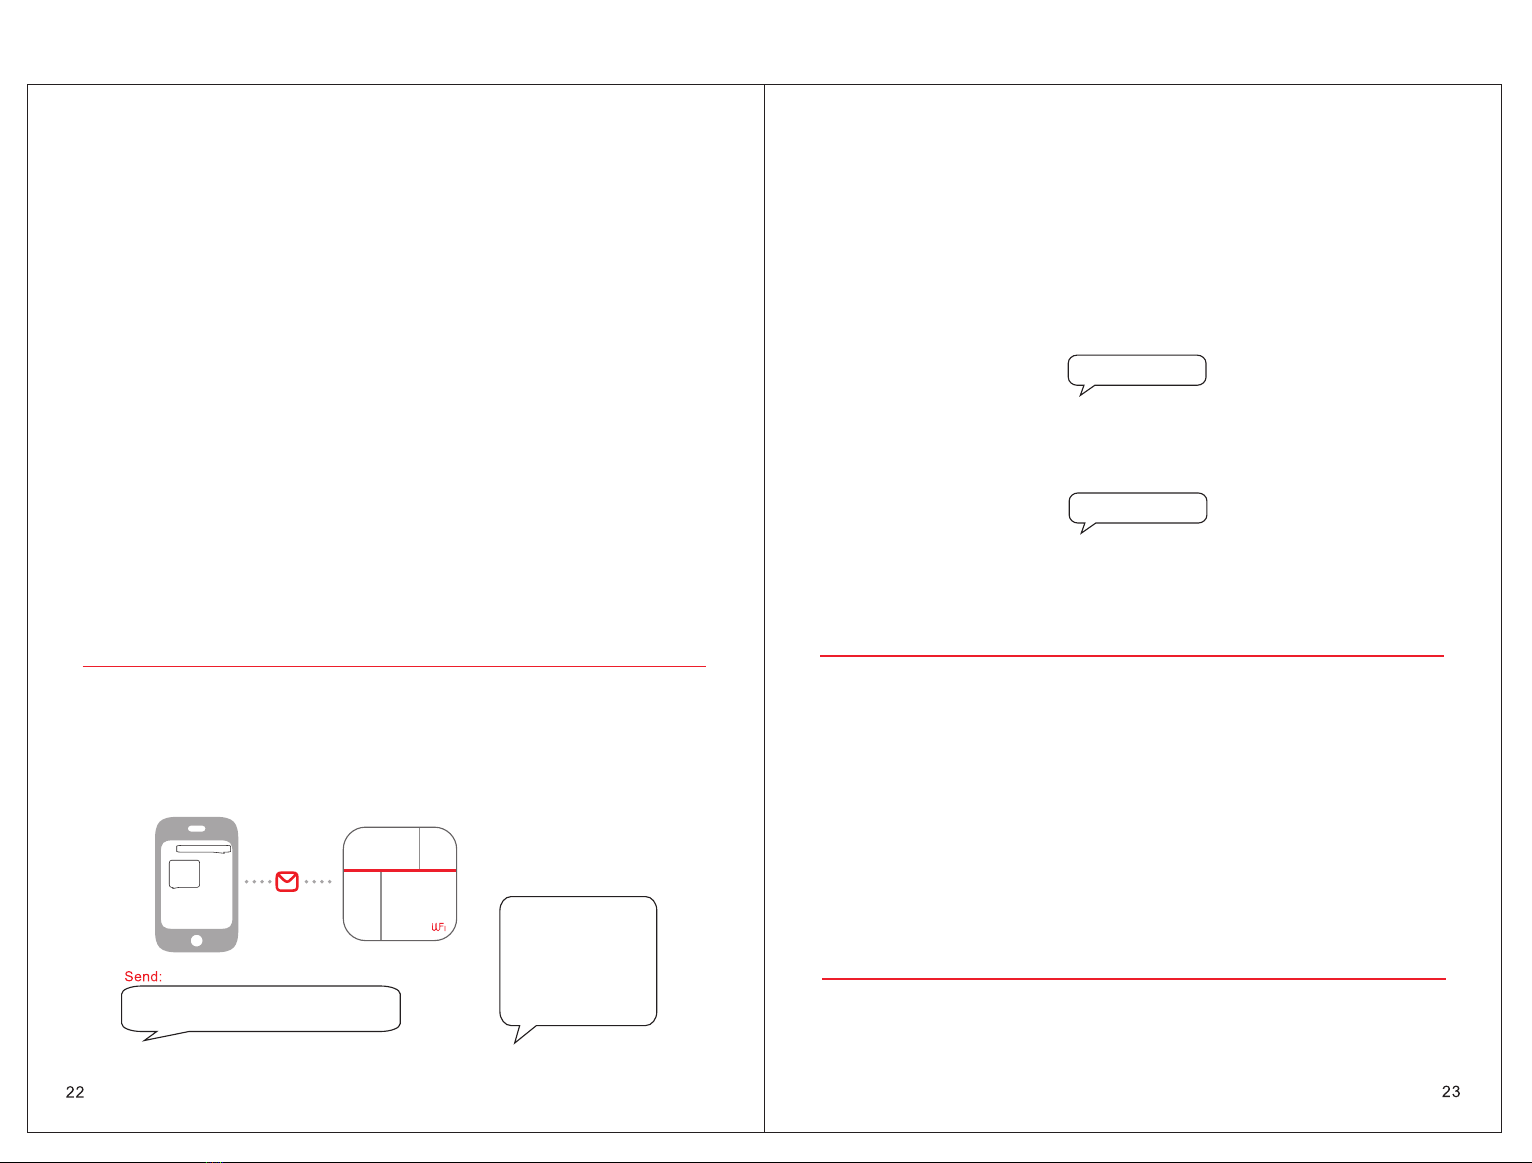
7.1. Setup Phone Number by SMS
SMS Format:“Password + DD + 1st SMS alarm number, 2nd SMS alarm number, 3rd SMS
alarm number, 1st calling number, 2nd calling number, 3rd calling number”
For example, set 13688888888 as the 1st SMS alarm number, 13988888888 as the 3rd
calling number, then send SMS: 1234DD13688888888,,,,,13988888888
SMS:
TEL:
SMS:
1.13 688 8888 88
2.
3.
TEL:
1.
2.
3.13 988 8888 88
1234 DD13 688 8888 88,, ,,, 1398 8888 888
1234DD13688888888,,,,,13988888888
1.13688888888
3.
2.
2.
3.13988888888
1.
Reply:
Remark: User can setup the 3 SMS numbers and 3 calls numbers by sending one SMS command,
also can D.I.Y to setup any one or more of the phone numbers as they mind.
User should use a comma to separate each phone number, and the last number is unnecessary
to add comma.
SMS Format: Password + DD + *,*,*,*,*,*
Remark: *,*,*,*,*,*means relevant alarm SMS numbers and calling numbers. If need to delete
1st alarm SMS number and 3rd alarm calling number, the command should be: 1234DD*,,,,,*
SMS Format: Password + DD
The set numbers will be replied to the 1st alarm SMS number.
Arm: Password + A1 Disarm: Password + A2
For example: Initial password is 1234, arm remotely by sending SMS: 1234A1
Alarm host replies with "Panel armed" , the message will be sent to the 3 alarm SMS numbers.
(Note: The first SMS alarm number is necessary as all the setting messages will
be sent to first SMS number.)
7.2. Delete Phone Numbers
7.3. Inquiry Set Alarm Numbers
(Note: The first SMS alarm
number is necessary as all the setting messages will be sent to first SMS number.)
7.4. Arm/Disarm
1234DD*,,,,,*
1234DD
Send:
Send:
8. Cautions
1.Keep away from water.
2.Install host in hidden place with good WiFi and GSM/WCDMA signal.
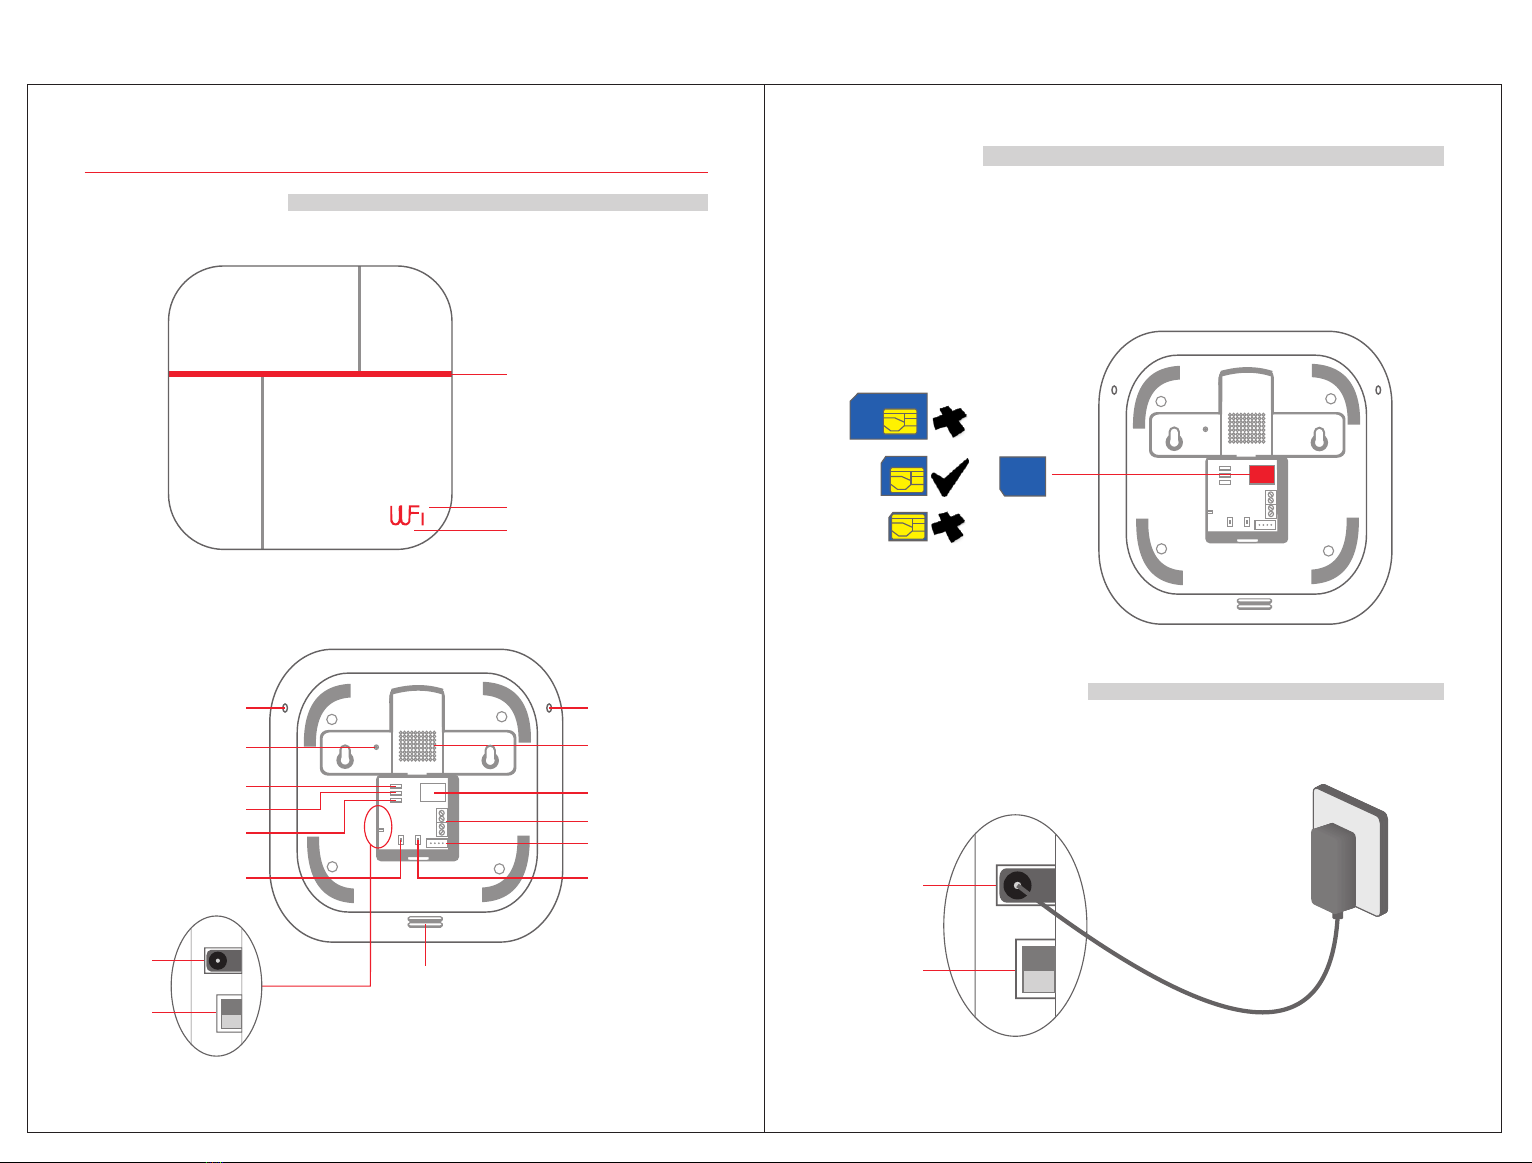
3.Turn Off power when insert/take out the SIM card.
4.Connect power adapter well and keep good heat dissipation.
5.Enter into normal running status about 12 seconds later.
6.Check all the detectors batteries in time and charges them when battery is low.
7.Don’t install alarm host close to the objects with strong interference,such as TV, computer etc.
8.Regularly check the SIM cad in the alarm host( Check GSM/WCDMA signal, balance, etc.)
9.Inspect the alarm systems operation regularly.
10.The smart mobile phone for installing APP should keep the network unblocked,in case information
can't arrive in time.
11.Design for indoor use rather than outdoor.
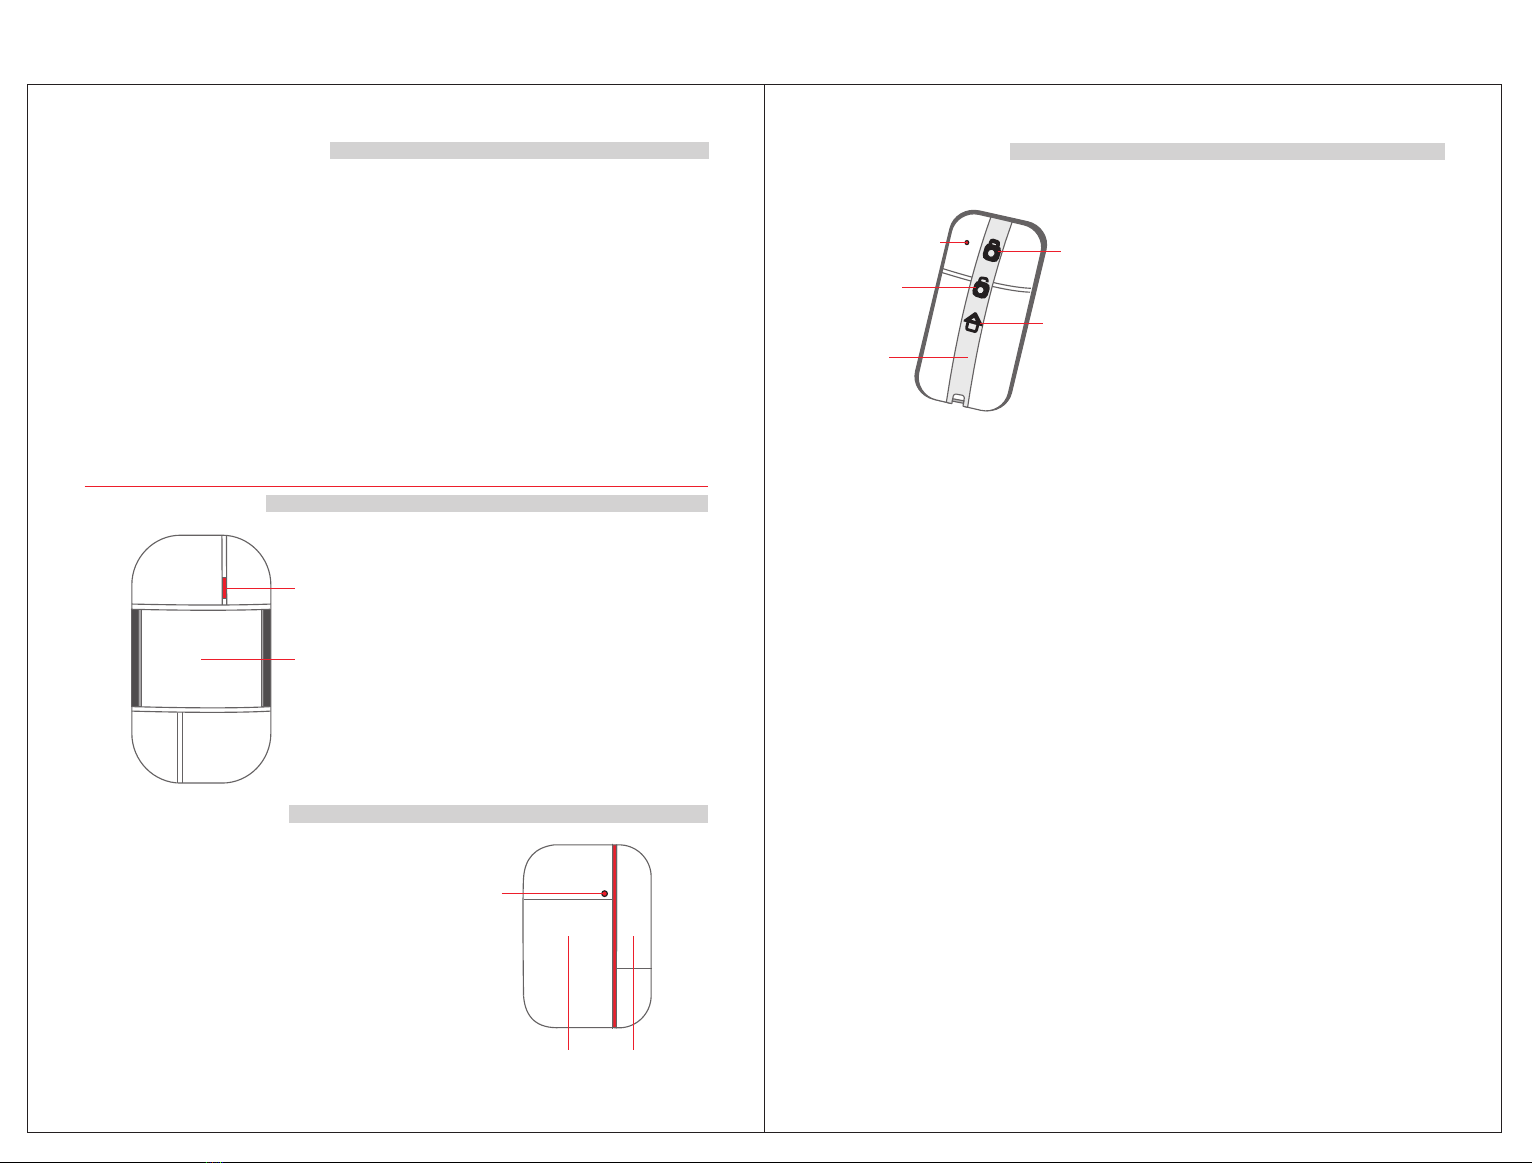
9.How to reset the Gateway to factory default.
Please switch off the power of gateway, hold pressing the REC button (the REC button is on
the back of gateway),switch on power at the same time, it will be reset successfully after the
gateway make 3"di, di,di” beep sounds.
You could setup the gateway again for 25s later.
This manual suits for next models
3
Table of contents
Other Patrol Hawk Security System manuals