Pawple PAW6MLWF User manual
6-MEAL AUTOMATIC PET FEEDER
USER GUIDE
PAW6MLWF

6-MEAL AUTOMATIC
PET FEEDER
USER GUIDE
PAW6MLWF
Thank you for purchasing the Pawple™ 6-Meal Automatic Pet Feeder. This User Guide is intended to
provide you with guidelines to ensure that operation of this product is safe and does not pose risk to
the user. Any use that does not conform to the guidelines described in this User Guide may void the
limited warranty.
Please read all directions before using the product and retain this guide for reference.
This product is intended for household use only.
This product is covered by a limited one-year warranty. Coverage is subject to limits and exclusions.
See warranty for details.
Package Contents
• 6-compartment food storage tray
• Rotating lid with LCD display and cover/carry handle
• User Guide

Product Overview
1. Display cover & carrying handle
2. Rotating lid
3. Release knob
4. LCD display screen
5. Storage tray
Control Panel: (See below)
6. On/Off button
7. Enter button
8. Up arrow button
9. Down arrow button
10. Start button
11. Speaker
12. Battery compartment A
13. Battery compartment B
2
2
3
1
4
5
12
13
11
10
98
7
6

3
Get Started with your New Automatic Feeder
Install Batteries
1. Turn the green knob on the lid from the lock ( ) to the unlock ( ) position to release it.
2. Remove the lid and flip it upside down. You will see two separate compartments, one large
and one small.
3. Open both battery lids by pressing in the latches and pulling straight up. Fit the batteries
into their designated spaces in the compartments.
4. Close the battery compartment covers and make sure the latches snap securely into place.
5. Install the lid by fitting the protruding shaft on the feeder compartment into the
corresponding circular opening on the underside of the lid. You may have to spin the lid a
little to get the shaft to settle into place.
6. Turn the green knob on the lid from the unlock position ( ) to the lock position ( ) to
securely fasten it in place.
1&2 3
Small
Compartment
Release Knob
Large
Compartment
4 5&6
NOTE: Always use four batteries of the same brand and type. Always check batteries and battery wrappings
before installing them in the device. Do not mix used and new batteries.

Turn on the Feeder & Set the Time
1. Lift the green cover on the control panel and press the power button.
If you have trouble with the display cover, try pressing the slightly raised
green square on the cutout around the display panel and lifting up.
2. When the device is switched on, the time will automatically begin to flash
12:00 AM. This will happen every time the device is powered off and
back on.
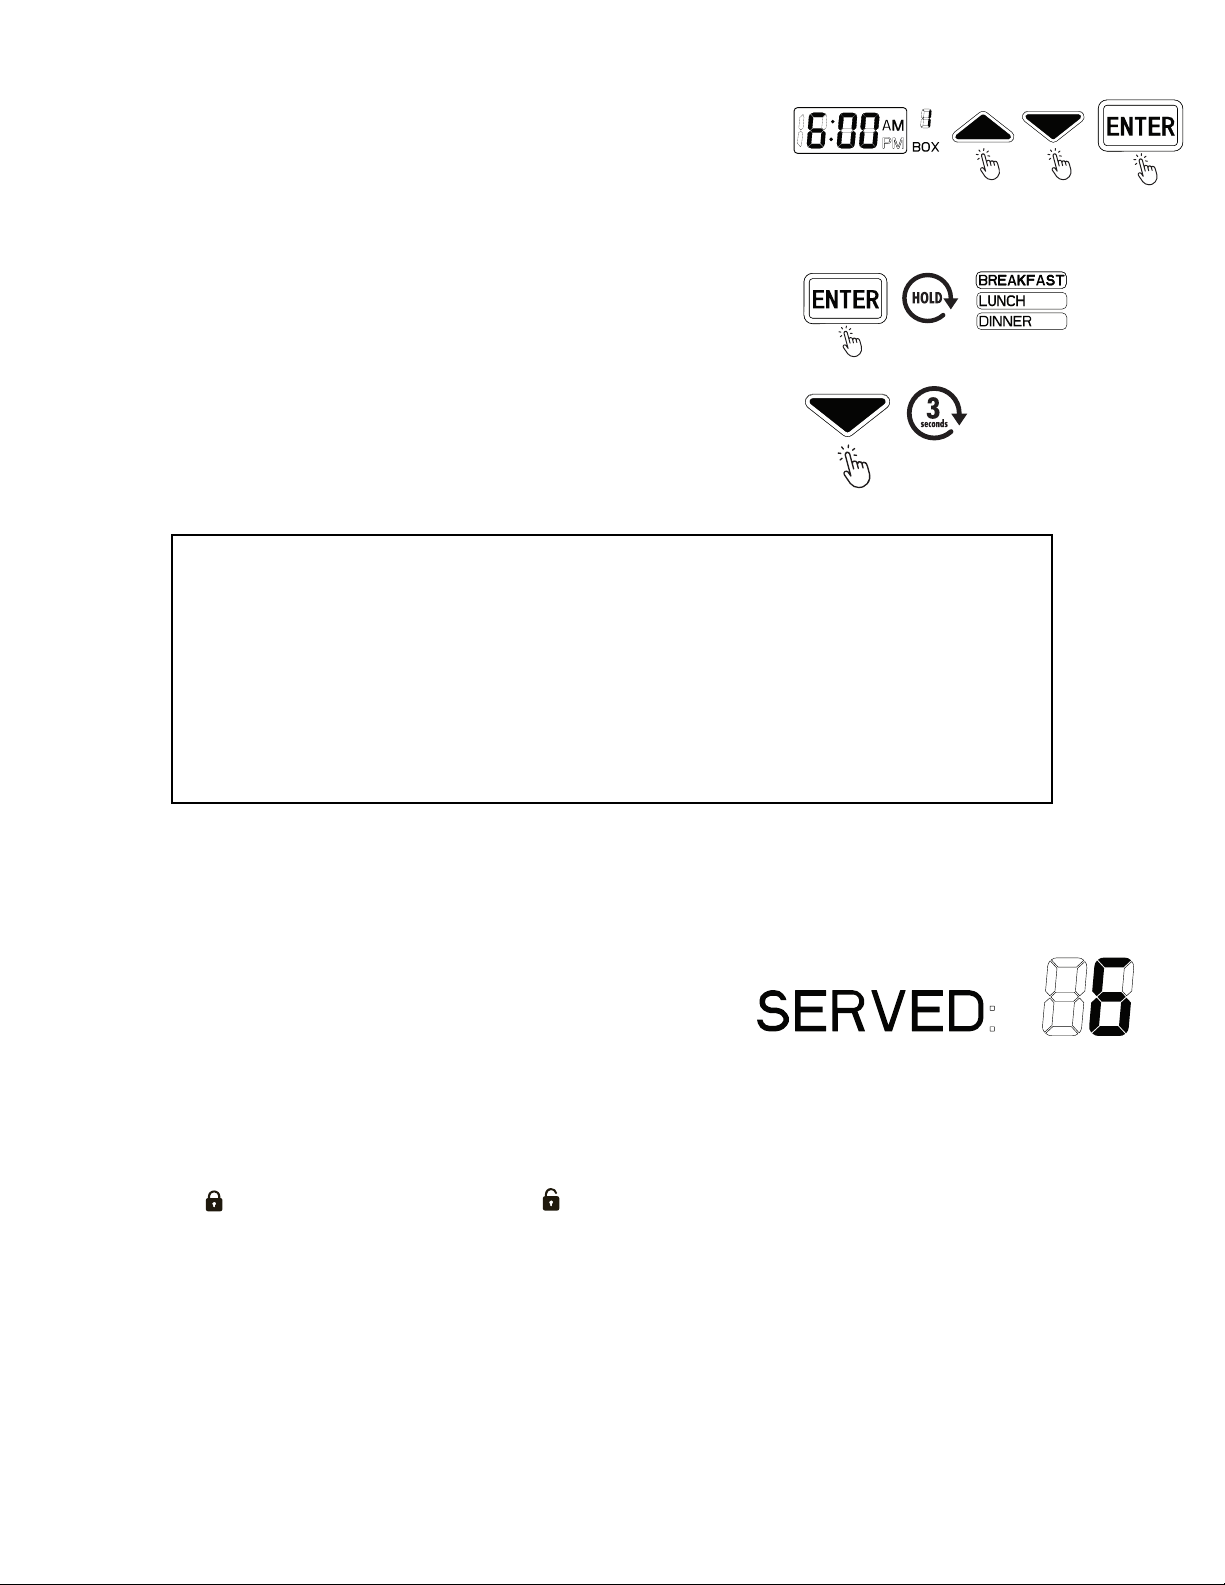
3. Press the ENTER button once to set the current time. On the LCD display,
you should see the hour (12:) start flashing.
4. Use the up and down arrow buttons to set the hour. The time will
automatically change between AM and PM as you navigate. Make sure you
select the correct hour (e.g., 6 AM or 6 PM), or else your feeding schedule
may not work correctly. Press the ENTER button again to confirm.
5. The minutes (:00) should start flashing. Use the up and down arrows to
set the minutes. When the time displayed on the device is correct, press
the ENTER button one last time to confirm the time and end the process.
4
Setting Meals & Meal Sizes
1. Press the ENTER button and hold it down for three (3) seconds. The word
MEALS should begin flashing on the LCD display.
2. Press ENTER again and the word BREAKFAST should start flashing.
Use the up and down arrows to cycle through BREAKFAST, LUNCH,
and DINNER.
3. Use ENTER to confirm the meal you want to change or set. The meal name
(e.g., BREAKFAST) will stop flashing, and the word YES will start flashing.
a. If you want to set a time for your pet to be fed for this meal, hit
ENTER to confirm while YES is flashing and proceed to Step 4.
b. If you want the feeder to skip this meal entirely, hit the up or down
arrow so that the word NO begins to flash, then press ENTER to
confirm. You will be returned to the meal settings menu (meal name
will be flashing).
4. Now that you have selected a meal to edit, the hour on the time display
should begin to flash. Use the up and down arrows to select the hour for
this meal to be served to your pet. (Again make sure to check the AM/PM
display to select the correct hour). Press ENTER to confirm.
5. The minutes should now be flashing. Use the up and down arrows to
select the correct minute for the meal to be served, then press ENTER
to confirm.
NOTE: Whenever the device is powered off, the time will reset to 12:00 AM, and you will need to reset the
time using this process when the device is turned back on. However, the feeder will not reset your feeding
schedules upon powering down.
Additional Information
1. The SERVED counter on the display shows you how
many compartments have been opened per cycle. Once
the counter reaches six (6), and all compartments have
been served, the red LED light on the lid will begin
flashing slowly, notifying you to remove the lid and refill the feeding compartments.
2. To refill the feeding compartments, turn the green knob above the display cover from the
locked ( ) position to the unlocked ( ) position and lift the lid straight up to separate it
from the feeding tray.
3. Once the compartments have been refilled, replace the lid, return the green knob to the
locked position, and press the START button to reset the SERVED counter to zero (0).
Programming will resume normally.
4. Always make sure the LCD display cover is securely fastened after programming to ensure
that your pet(s) do not accidentally press buttons and/or change settings.
5
Setting Meal Sizes
6. For each meal, you can choose whether the feeder should open a
single compartment or multiple compartments. This is indicated by
the word BOX on the right side of the LCD display screen. Use the
up and down arrows to cycle between one (1), two (2), or three (3)
compartments to be opened. Press ENTER to confirm.
7. Repeat steps 2-6 until you have programmed times and sizes for all
the meals you want to be scheduled. Press and hold the ENTER button
until the device beeps twice to confirm and set your programmed
meal settings. The names of the meals you have programmed will be
displayed on the left side of the screen.
8. To manually advance the feeder, press and hold the down arrow for
three seconds. The lid will rotate and open the next food compartment.
NOTE: Each compartment holds approximately 1 cup (240 ml) of wet or dry food. If you choose more
than one compartment to be opened, the feeder will open sections one after the other at an interval of 10
minutes. For example, let’s say you set BREAKFAST at 6:15AM and choose BOX 2. The feeder will rotate and
open the first compartment at 6:15AM. The compartment will stay open until 6:25AM, when it will rotate to
open the second compartment.
Please keep this in mind when filling and setting feeding times. If your pet eats dry food slower than wet
food, in the above example, you would want to fill container one with wet food and container two with dry
food, so he or she has a longer time to eat the dry food until the lid rotates at the designated LUNCH time.
Compartment numbers are designated by raised numbers on the bottom of each compartment of the
feeding tray.

5. If the LED light is flashing slowly, but the SERVED counter has not reached 6, this indicates
that the batteries need to be changed. After changing the batteries (refer back to “Install
Batteries” on page 3), you will need to turn the device back on and set the time. You will not
need to reprogram the scheduled meals; those are stored in the feeder’s memory and those
settings will not change unless you change them.
6. If you will be away for an extended period of time, you should install new batteries in the
feeder before leaving. The feeder will continue to operate on a schedule, but you will still
need to have someone refill it at the end of each day/meal cycle. Never leave wet food in the
feeder overnight or for any extended period of time.
Safety Precautions
1. Remove all packaging before using this device. Some items may be packed in polyurethane
bags. Please keep all packaging materials out of reach of children and pets. Properly dispose of
all packing materials immediately after unpacking product, as the bags used for packaging could
present a suffocation or choking hazard.
2. Read all instructions carefully before attempting to operate this device. Improper usage could
result in your pet(s) not being fed properly or not being fed at all. Improper use or mishandling
could also result in permanent damage to your device.
3. Only use this feeder indoors, in a dry place, and on solid, even ground.
4. Do not place the feeder in a closet, in a narrow/confined space, or too close to a wall or
other obstructing item. The top section of the feeder rotates a full 360° to expose the different
feeding compartments, so your pet needs to be able to access all of the feeding compartments.
Placing it too close to your walls or other objects may restrict your pet’s ability to access his or
her meals.
5. This product was not intended for use or play by children, and we recommend you do not
allow children to play or tamper with it, to reduce the risk of important settings being changed
or damage to the feeder and its moving parts. Adult supervision should always be required when
children are near the feeder.
6. Do not try to disassemble the feeder or repair it on your own.
7. The lid of the feeder is not dishwasher-safe.
8. The feeding bowls are dishwasher-safe.
9. Remove all batteries if you are not using the feeder for an extended period of time.
10. Do not mix types and brands of batteries in the feeder. Batteries are not included.
6

Care and Maintenance
• The feeder compartment is dishwasher-safe for your convenience.
• The lid of the feeder is not dishwasher-safe. Do not submerge the lid in water; this could
damage the internal electronics and cause the batteries to short out, create an electrical
shock, or catch fire. To clean the lid, wipe it with a soft cloth and a mild cleaning agent.
• Make sure all parts of the feeder are completely dry before refilling and re-assembling
the device.
• Exposure to sunlight could damage the internal electronics or cause discoloration; be sure the
device is placed in a shady place.
Specifications
• Dimensions: 12.5" x 12.5" x 4" (320 x 320 x 98mm)
• Weight: 33.5 oz. (950g)
• Material: ABS Plastic
• Working Voltage: 6V
• Wattage: 1.2W
• Battery Type: Four (4) Alkaline C Batteries (not included)
• Battery Capacity: 2800mAh
Questions or problems? Contact us!
support@pawplepets.com
1-833-665-2184
PAWPLE, the PAWPLE logo,
PETS ARE PEOPLE, TOO!, and
the BAR CODE DEVICES are
trademarks of C&A IP Holdings, LLC, in the U.S.
All other products, brand names, company names, and logos are trademarks of their respective owners, used merely to identify their respective products,
and are not meant to connote any sponsorship, endorsement or approval.
Distributed by C&A Marketing, Inc., 114 Tived Lane East, Edison, NJ 08837. Made in China.
© 2018. C&A IP Holdings, LLC. All Rights Reserved.
7
Table of contents
Other Pawple Pet Care Product manuals

Popular Pet Care Product manuals by other brands


Petsafe
Petsafe Petporte smart flap installation guide

Prevue Pet Products
Prevue Pet Products Catville 7240 quick start guide

Dogtra
Dogtra 1800NC Series owner's manual

Num'axes
Num'axes Expert 600 user guide

MERRY
MERRY CAT WASHROOM MPS006 manual

Petsafe
Petsafe pawz away PWF00-13665 Operating and training guide