manuals.online logo
Brands
  1. Home
  2. •
  3. Brands
  4. •
  5. PCS
  6. •
  7. Control Unit
  8. •
  9. PCS PulseWorx PIM-U User manual

PCS PulseWorx PIM-U User manual

Model: PIM-U
Powerline Interface Module
Installation Guide and
Owner’s Manual
FUNCTION
The PIM-U Powerline Interface Module - USB is the de facto
interface between a computer and the Universal Powerline
Bus (UPB). The PIM-U connects to the USB port of your
computer with a standard serial cable (provided) and sends
and receives UPB communication packets on the existing
house wiring. The PIM-U can be plugged into any free wall
outlet throughout the home. No additional wiring is required
and no radio frequency signals are used for communication.
DRIVER INSTALLATION
The very first time that the PIM-U is used with a computer it is
very likely that you will need to install two software drivers
that are included on the mini CD. To do this, follow these
steps:
1. Insert the mini-CD into the CD (or DVD) drive of your
computer.
2. Connect the USB serial cable (provided) between your
PIM-U and any USB port of your Windows® based
computer.
3. Windows should discover the PIM-U and bring up the
“Found New Hardware Wizard”.
4. Select “No, not this time” and press the Next button.
Windows will bring up the wizard dialog for installing
the USB Serial Converter driver.
5. Select “Install the software automatically…” and press
the Next button. Windows will install the first driver and
bring up the “Finished” dialog.
6. Press the Finish button. Windows should, once again,
bring up the “Found New Hardware Wizard”
7. Select “No, not this time” and press the Next button.
Windows will bring up the wizard dialog for installing
the USB Serial Port driver.
8. Select “Install the software automatically…” and press
the Next button. Windows will install the second driver
and bring up the “Finished” dialog.
9. Press the Finish button.
10.Remove the mini-CD from your computer’s CD drive and
store it for future use.
NOTE: If you have an internet connection available to your
computer, you can choose to allow the “Found New Hardware
Wizard” to download the drivers off of the internet. In this case
you would not need to use the mini-CD.
IMPORTANT SAFETY INSTRUCTIONS
When using electrical products, basic safety precautions should
always be followed, including the following:
1. READ AND FOLLOW ALL SAFETY INSTRUCTIONS.
2. Keep away from water. If the product comes in contact with
water or other liquid, turn off the circuit breaker and unplug
the product immediately.
3. Never use products that have been dropped or damaged.
4. Do not use this product outdoors.
5. Do not use this product for other than its intended purpose.
6. To avoid any risk of fire, burns, personal injury or electric
shock, install this product out of the reach of small children.
7. Do not cover this product with any material when in use.
8. This product uses grounded plugs and sockets to reduce the
risk of electric shock. These plugs and sockets fit only one
way. If they do not fit, consult an electrician.
9. SAVE THESE INSTRUCTIONS.
INSTALLATION
The Powerline Interface Module is designed for indoor use with
devices that provide a USB serial port. To install the PIM-U
module follow these steps:
1. Connect the serial cable (provided) between the PIM’s USB
serial connector and any open USB port of the computer.
2. Plug the PIM-U into any grounded wall outlet. The Status
LED should start blinking and then stay solid blue.
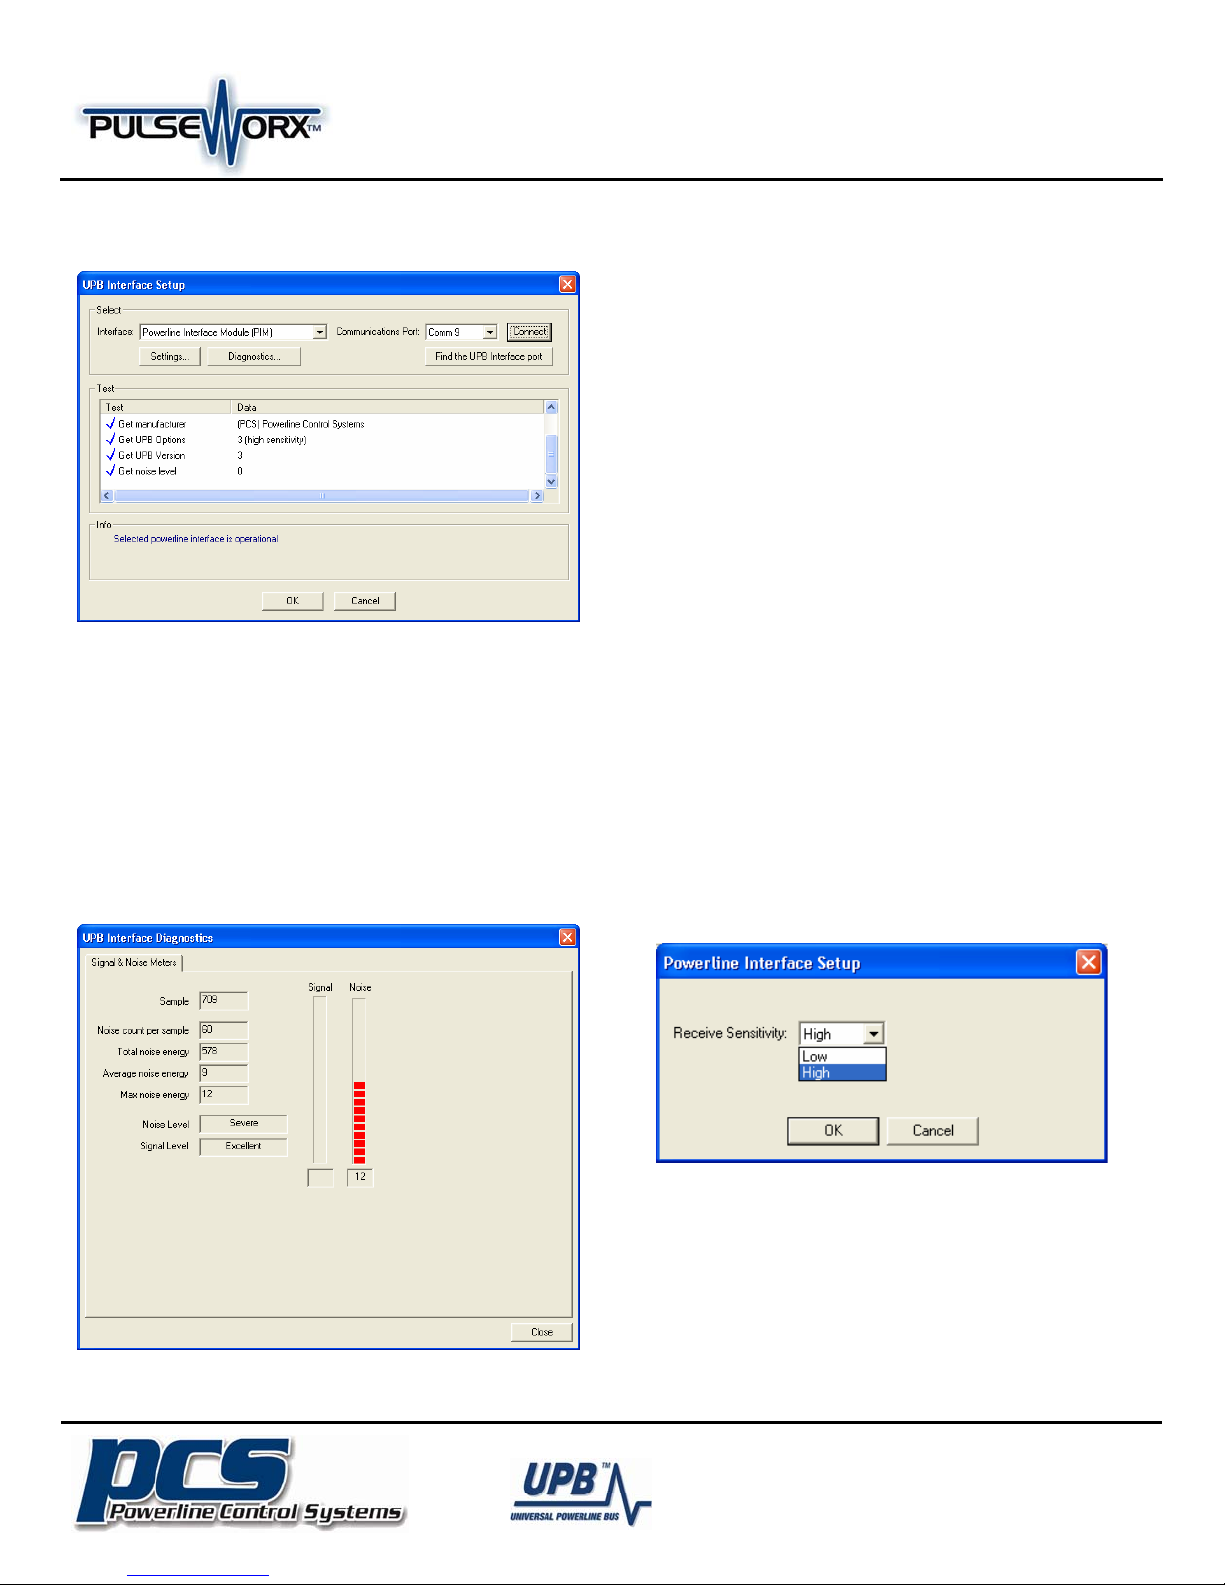
OPERATION
The PIM-U is the perfect interface device for use with PCS’
UPStart Setup Software. UPStart allows you to easily configure
all of your PulseWorx Lighting System devices. The UPStart
User’s Guide (available on the PulseWorx web site:
www.PulseWorx.com) explains how to configure your system
using UPStart software.
The Inventors Of:
19201 Parthenia St. Suite J
Northridge, CA 91324
(Phone) 818-701-9831 (Fax) 818-701-1506
[email protected] www.pcslighting.com
Model: PIM-U
Powerline Interface Module
Installation Guide and
Owner’s Manual
To use the PIM-U with UPStart select ToolsÆUPB Interface
DeviceÆSelect to bring up the UPB Interface Setup dialog.
Select the “Powerline Interface Module” as the Interface and
then press the “Find UPB Interface port” button. UPStart
will automatically find the Communication Port that the PIM-
U is connected to. Next, press the “Connect” button to have
UPStart connect and test the PIM-U.
Signal & Noise Meters
Once connected, the PIM-U will constantly send reports to
UPStart as to what is currently happening on the powerline.
You can get a peek into the results of these reports by
pressing the “Diagnostics” button to bring up the Signal &
Noise Meters as shown below.
The meters will display a real-time indication of what the PIM-
U is reporting. UPStart will also classify the reports as either
“Signal” or “Noise” and display them on the proper meter. The
meters are very useful for troubleshooting problems on the
powerline.
Status LED Indications
The PIM-U contains a bi-color (blue/red) Status LED that will also
give a visual indication of what UPB information is currently on
the powerline.
Blue: No UPB Signal
Magenta: Received a UPB Message
Red: Transmitted a UPB Message
Push-button
The push-button on the front of the PIM-U is used to put the
device back to its factory default condition. To set the PIM-U
back to factory defaults first press the pushbutton 5times
rapidly. The Status LED will blink blue. Next, press the
pushbutton 10 times. The Status LED will blink red. Finally,
press the pushbutton 2times. The Status LED will stop blinking.
The device is now restored to its factory default state.
CONFIGURATION
The PIM-U has an adjustment for UPB receive sensitivity. The
factory default for this setting is “High”. If the PIM-U is to be used
in severe powerline noise, you may find that it operates better in
the “Low” receive sensitivity setting.
To adjust the receive sensitivity press the “Settings” button on
the UPB Interface Setup dialog. Next, select the desired receive
sensitivity setting and press the “OK” button.
LIMITED WARRANTY
Seller warrants this product, if used in accordance with all
applicable instructions, to be free from original defects in
materials and workmanship for a period of five years from the
date of purchase. Refer to the warranty information on the
PulseWorx website (www.PulseWorx.com) for exact details.
The Inventors Of:
19201 Parthenia St. Suite J
Northridge, CA 91324
(Phone) 818-701-9831 (Fax) 818-701-1506
[email protected] www.pcslighting.com

Other PCS Control Unit manuals

PCS PulseWorx Gateway User manual

PCS

PCS PulseWorx Gateway User manual

PCS PulseWorx LM2 User manual

PCS

PCS PulseWorx LM2 User manual

Popular Control Unit manuals by other brands

LongSung Technology U6100 user manual

LongSung Technology

LongSung Technology U6100 user manual

CORNING EDGE Series manual

CORNING

CORNING EDGE Series manual

Ubisys C4 quick start guide

Ubisys

Ubisys C4 quick start guide

Ametek Z-tron IV Installation and operating instructions

Ametek

Ametek Z-tron IV Installation and operating instructions

S.& A.S. MicroZed V3.5 user manual

S.& A.S.

S.& A.S. MicroZed V3.5 user manual

Siemens PN16 Mounting instructions

Siemens

Siemens PN16 Mounting instructions

Emerson Fisher Large ET instruction manual

Emerson

Emerson Fisher Large ET instruction manual

jbc DDE-B Series manual

jbc

jbc DDE-B Series manual

Trenz Electronic TE0726 Schematics

Trenz Electronic

Trenz Electronic TE0726 Schematics

Ihse Draco vario 474-SNMPV3 Quick setup

Ihse

Ihse Draco vario 474-SNMPV3 Quick setup

Sony RM-450 Service manual

Sony

Sony RM-450 Service manual

YASKAWA DO-A3 installation manual

YASKAWA

YASKAWA DO-A3 installation manual

Seav BeSUN 433 manual

Seav

Seav BeSUN 433 manual

KEUCO 59948 000070 Installation and operating instructions

KEUCO

KEUCO 59948 000070 Installation and operating instructions

Nibe OPT 10 Installer manual

Nibe

Nibe OPT 10 Installer manual

NeuLog NUL-205 quick start guide

NeuLog

NeuLog NUL-205 quick start guide

Cooper Wiring Devices AD130 quick start guide

Cooper Wiring Devices

Cooper Wiring Devices AD130 quick start guide

Clack Water Specialist CI Programming manual

Clack

Clack Water Specialist CI Programming manual

manuals.online logo
manuals.online logoBrands
  • About & Mission
  • Contact us
  • Privacy Policy
  • Terms and Conditions

Copyright 2025 Manuals.Online. All Rights Reserved.