PCWork PCW09A User manual

User Manual PCW09A
Digital Soldering Station

2

3
English ....................................................................................................... 4
Deutsch .................................................................................................... 21
Français ................................................................................................... 38
Português ................................................................................................. 55
Ελληνική ................................................................................................... 72
Italiano ..................................................................................................... 89
Español .................................................................................................. 106
Polski ..................................................................................................... 123
Eesti ....................................................................................................... 140
Dansk ..................................................................................................... 157
Svenska ................................................................................................. 174

4
Copyright Statement ...................................................... 5
General Notes ............................................................... 5
Safety Instructions ......................................................... 6
Product Description ..................................................... 10
Product Features / Technical Data .............................. 10
Preparation For Operation ........................................... 12
Setting The Temperature Of The Device ..................... 12
Operation Of The Device ............................................. 13
Setting The Start-Up Target Temperature .................... 15
Setting A Compensation Temperature ......................... 15
Switching Between Fahrenheit And Celsius ................ 16
Setting A Device Password .......................................... 16
Exiting The Menu ......................................................... 17
Cleaning And Storage Of The Device .......................... 17
Fuse Replacement ...................................................... 17
Soldering Tip Replacement ......................................... 18
Spare Parts .................................................................. 19
Information regarding waste disposal .......................... 19
EN User
Manual

5
Please read these instructions completely before using the device, keep the
instructions and pass them on when you hand the device over to other people.
Copyright Statement
In accordance with international copyright law, you are not allowed to copy the
contents of this manual in any form (including translations) without given permission in
written form by the distributor.
General Notes
• It is not permitted to change the manual in any way or add additional content,
without given permission in written form by the distributor / importer.
• The operator of this soldering station is obliged to ensure that every other person
using this device has read and understood the manual, especially the safety
instructions.
• The operator is obliged to ensure proper usage, a functioning device prior usage,
the provision of the manual, and that only qualified users operate the device.
• Any change related to the design or construction of the device is not permitted.
• Warranty and any liability in regards to material damage or personal injury are
suspended in the following cases:

6
§ Improper usage and operation of the device
§ Not following the instructions and safety regulations provided by the manual
§ Operation and usage without wearing proper personal protection equipment
§ Usage and installation of non-approved spare parts
§ Improper maintenance and changes related to the design or construction of the
device; removal of the type plate
Safety Instructions
• The soldering station is intended for soldering work in the electronics sector within
the power and temperature range specified in these operating instructions.
• Sufficient ventilation or soldering fume extraction must be provided at the
workplace.
• The unit may only be used in a dry, dust-free environment.
• The equipment is not allowed to be used in potentially explosive atmospheres.
• Failure to follow the manual and the safety instructions may result in accidents and
damage.
• Any use other than that described in the manual is not permitted and will result in
loss of warranty and guarantee as well as exclusion of liability. This also applies to
modifications and conversions of any sort on the device.

7
• The soldering station may only be used:
§ for soldering/desoldering electrical and electronic components in printed
circuits and modules.
§ for tinning conductive tracks and cable ends
§ for making cable connections.
• The soldering station must not be used under any circumstances:
§ for heating liquids or plastic parts
• The soldering station may only be used if safe operation is guaranteed. Safe
operation of the soldering station is not to be expected in the following cases:
§ visible damage to the device
§ no function of the device
§ long storage under improper conditions.
§ improper transport
• A defective soldering station cannot be operated anymore and has to be
immediately disconnected from power and secured against unintentional use.
• The soldering station may only be opened and repaired by specialists who are
authorized to do so due to their training. Any intervention by the user may result in
a risk of electric shock and will also invalidate the warranty.
• The soldering station may only be operated on the 230V (220-240V)/50 Hz AC
mains.

8
• The switched-on soldering station must not be left unattended.
• The soldering station must not be operated or stored within the reach of children.
• When used in school, the device must be supervised by an experienced teacher.
• Soldering work may only be carried out on parts which are de-energized.
• When using the soldering station commercially, the relevant accident prevention
regulations must be observed.
• When transporting the soldering station from a cold to a warm environment,
condensation may form as a result of the change in temperature, which may lead
to impairment or damage to the device electronics. Therefore, do not switch on the
soldering station until it has reached the ambient temperature.
• The soldering iron reaches temperatures of over 160 °C. Touching the metallic parts
of the heated soldering iron can cause severe burn injuries to humans and animals!
• The soldering station should not remain set at a high temperature for an
unnecessarily long time.
• The soldering iron must never be immersed in water to cool down.
• The device must not be subjected to strong mechanical pressure
• The soldering station can heat up considerably during operation and must therefore
only be placed on a stable, solid, non-flammable surface. The air slots provided in
the housing for heat dissipation must not be covered or blocked under any
circumstances.

9
• When soldering cables and contacts, make sure that conductive, bare metal parts
are protected against contact by suitable measures (cover, insulation with non-
flammable material).
• If the housings/coverings of mains-powered devices have to be opened for repair
and maintenance work, live parts, contacts and charged capacitors are exposed.
Due to the possible danger to life, soldering work in this case may only be carried
out by qualified personnel.
• When carrying out repair work, observe the recommendations of the device
manufacturer for the use of suitable soldering agents.
• Use only a dust brush and a soft, slightly moistened cloth to clean the outer housing
parts of the soldering station that has been switched off and disconnected from the
mains (do not use harsh cleaners, spray cleaners or solvents). Make sure that no
liquid gets into the interior of the unit through the housing openings during cleaning.
• If the protective fuse burns out due to an overload, use only a fuse of the same type
as a replacement. Under no circumstances may a defective fuse be bypassed, or a
fuse with different characteristics be used. The fuse may only be replaced when the
soldering station is switched off and disconnected from the mains.

10
Product Description
The soldering station is suitable for all electronic soldering work in the output range up
to 60W. It features a fully adjustable electronic temperature control with digital display
of set and actual temperature. Due to the wide temperature range, the soldering
station is also suitable for RoHS-compliant lead-free soldering.
Product Features / Technical Data
• Temperature range: 180°C – 480°C / 356-896°F
• Output: max. 60W; 24V DC soldering iron
• Input voltage range: 100-240V
• Compact design & size: 128x104x79mm; weight: ca. 1kg
• Fast heating up thanks to ceramic heating core
• Integrated temperature sensor
• Large HD LED screen showing target and actual temperature
• Precise temperature adjustment and temperature compensation setting
• Device is microprocessor controlled, which provides stable temperatures
• Easy soldering tip replacement
• Password protection of device to prevent unwanted modifications by third parties
11
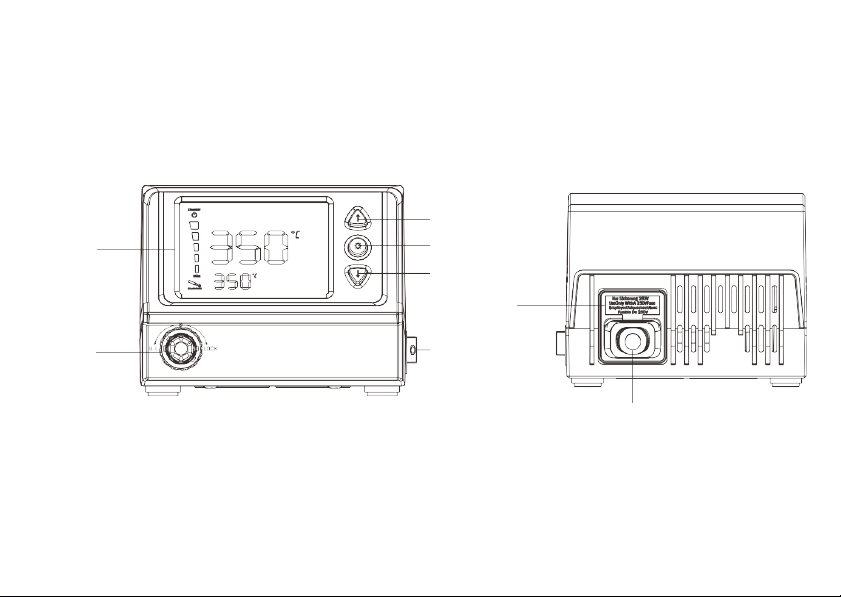
Product Drawing And Characteristics
BK96
9S
Fuse
Power Cable
Connector
LED
Display
Soldering
Iron
Socket
Power
Switch
Down Button
Function Button
Up Button
Front
Back

12
Preparation For Operation
• Place the soldering station with soldering iron holder on a flat, level, non-
combustible surface and away from combustible objects.
• Make sure that the power switch is set to "0" (off).
• Connect the soldering iron to the soldering iron connection and tighten the cap nut.
• Place the soldering iron in the soldering iron holder and apply water to the cleaning
sponge.
• Connect the mains cable to an outlet with protective contact.
Setting The Temperature Of The Device
• Switch on the device with the power switch ("I"). The display lights up and shows
the (previously defined) target temperature as well as the current temperature.
• The device will heat up until the current temperature matches the target temperature
• Change the target temperature of the device through pressing the Up and Down
buttons next to the display
• The display will indicate the newly chosen target temperature and the device will
heat up until the current temperature matches the target temperature.

13
Operation Of The Device
• Carefully tin the soldering tip before using it for the first time. To do this, switch on
the soldering station and allow some solder to melt into a thin, coherent film on the
soldering tip at a temperature of approximately 200 °C.
• The correct soldering temperature is decisive for the quality of the solder joints. In
the electronics sector the usual soldering temperature is between 300 °C and
380 °C.
• If the soldering tip temperature is too low, it will lead to "cold" solder joints and poor
solder flow. If the temperature is too high, it will lead to excessive heating of the
solder joint and burning of the flux with a strong, harmful smoke development.
• Do not select a soldering temperature higher than 410°C for normal soldering. Such
a temperature may only be used for a short time and for special soldering on large-
area, appropriately cooled parts. There is a high risk of damage to components and
board!
• Immediately before soldering, wipe off the soldering tip on the moistened cleaning
sponge. Residues from incompletely evaporated flux, oxides and other impurities
are removed by this and can thus no longer reach the soldering point.
• Before you put the soldering iron back into the holder after soldering, the soldering
tip must be cleaned again and tinned with a little solder. It is important that the
soldering tip is always wetted with solder, otherwise it will become passive after
some time and will no longer accept solder.

14
• The soldering tip is heated up to operating temperature (soldering temperature set
on the soldering station), cleaned and well-tinned soldering tip is brought to the
soldering point together with the solder wire.
• The flux now flows first, thereby cleaning the surfaces of the metal parts to be
soldered, and then the solder, in order to make the electrically conductive
connection. The soldering time in electronics does not exceed two seconds. A good
solder joint will look smooth and shiny when cooled after the soldering iron is
removed. Poor, defective solder joints look dull, uneven and brittle after cooling.
• Possible causes of soldering defects and damage to the soldering tip:
§ Tip temperature too high or too low
§ Too much mechan ical pressure on the soldering tip during soldering
§ Tip not carefully tinned
§ Tip contaminated by solder residues or incorrect cleaning, by contact with
plastics, resins, silicones, greases, dry cleaning sponge
§ Unclean solder, wrong solder (too low tin content)
• Clean the tip regularly with the moistened cleaning sponge
• Set a lower temperature for longer soldering pauses; this protects the soldering tip
and extends its service life.
• When you have finished soldering, allow some solder to melt on the soldering tip.
Place the soldering iron in the holder and switch off the device. The excess solder
is then wiped off the hot soldering tip on the damp cleaning sponge before starting
the next project.
•
•

15
Setting The Start-Up Target Temperature
• Press the function button to enter the menu settings
• Press the up and down buttons to switch between the different menu settings
• Choose menu setting one by pressing the function button again
• Press the up and down buttons to set a start-up target temperature (range: 180-
480°C / 356-896°F)
• Press the function button again to choose the temperature and finish the setting
Setting A Compensation-Temperature
• Tes t the actu al temper atur e of the so lder ing tip and compare wit h t he indicated
temperature on the display
• In case the actual temperature at the soldering tip is different than the indicated
temperature on the display (can happen for example when different tips are used),
you can define a compensation temperature, in order to off-set the difference
• Press the function button to enter the menu settings
• Press the up and down buttons to switch between the different menu settings
• Choose menu setting two by pressing the function button again
• Press the up and down buttons to set the compensation temperature (range: -70-
70°C / -94-158°F)
• Press the function button again to choose the temperature and finish the setting

16
Switching Between Fahrenheit And Celsius
• Press the function button to enter the menu settings
• Press the up and down buttons to switch between the different menu settings
• Choose menu setting three by pressing the function button again
• Press the up and down buttons to switch between Fahrenheit and Celsius
• Press the function button again to choose the temperature and finish the setting
Setting A Device-Password
• Press the function button to enter the menu settings
• Press the up and down buttons to switch between the different menu settings
• Choose menu setting four by pressing the function button again
• Press the up and down buttons to switch between the numbers, press the function
button to choose a number and then repeat the process until you have chosen three
digits. If you are setting your password for the first time, you have to enter and
confirm the password twice.
• Changing the password: enter the old once and then the new password twice
• Clearing the password (in case you forgot it): Turn the device off, press and hold
the three buttons (up, down, function) at the same time, turn on the device. The
display should show “000” and you can stop pressing the buttons and set anew
password according to the process described above.

17
Exiting The Menu
• Press the up and down buttons to switch between the different menu settings
• Choose menu setting zero by pressing the function button again and exit the menu
Cleaning And Storage Of The Device
• Disconnect the device from the power supply after use.
• Store the device in a clean, cool and dry place.
• Clean the outer housing parts of the device only with a dust brush or a dry linen
cloth. Do not press on the display! In case of heavier contamination, the cleaning
cloth can be slightly moistened with water. Do not use any cleaning agents or
chemicals!. Make sure that no liquid gets into the interior of the unit through the
housing openings during cleaning.
Fuse Replacement:
• Disconnect the device from the power supply and carefully open the fuse box on
the back of the device for instance with a screwdriver
• Only use a fuse of the same type as a replacement. Under no circumstances may
a defective fuse be bypassed, or a fuse with different characteristics be used.
• Tak e out the bur ned fuse, insert a correct replacement fuse an d make sur e i t sits
tightly in the box
• Close the fuse box
18
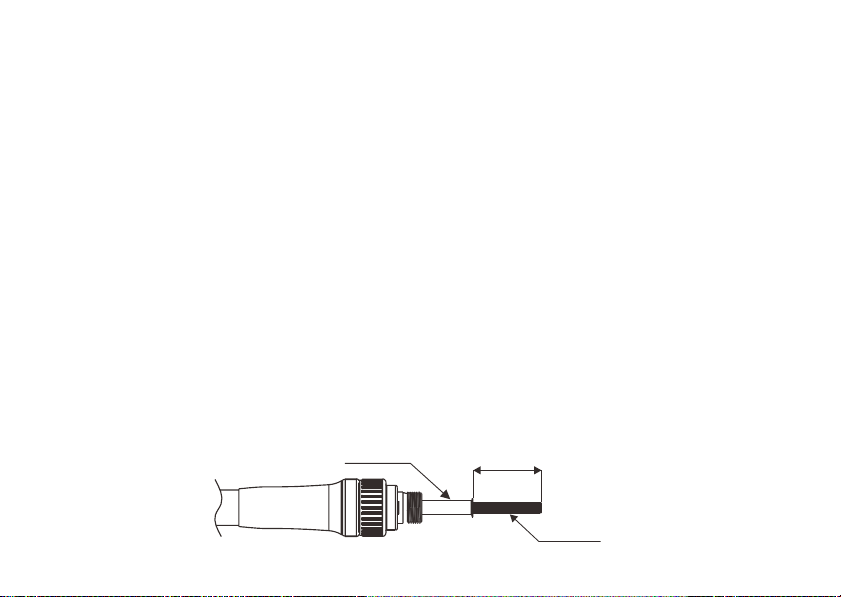
Soldering Tip Replacement
• Switch off the soldering station and disconnect it from the power supply.
• Let the soldering iron cool down completely before carrying out the tip replacement!
Burn hazard! Never operate the soldering iron without the soldering tip inserted!
• Only use 900M series tips (outer diameter ф6.5mm; recommendation: use
original PCWork tips)
• Loosen the thumbscrew on the soldering tip sleeve and carefully remove it.
• Now carefully pull the soldering tip out of the heating element.
• Insert the new soldering tip, replace the soldering tip sleeve and carefully tighten
the thumbscrew - do not overtighten!
• Clean the tip during and daily after use with the wet soldering sponge or a soldering
metal sponge. The surface must always be completely tinned and bright.
• Do not use abrasive or corrosive cleaning agents (file, coarse abrasives, machine
cleaning, acid, sharp fluxes or similar). Only use fluxes containing resin!
Drawing Of Soldering Tip Sleeve:
Heating element
Stainless steel
casing
23mm

19
Spare Parts:
• Only use original, approved spare parts
• Contact your dealer for official spare parts such as ceramic heating core
replacements or soldering irons
• Repairs should only be done by certified specialists
• Do not modify the station or do any repair by yourself (void of warranty)
Information Regarding Waste Disposal
You are not permitted to dispose of this device in household garbage. This soldering
station corresponds to the EU-directive concerning the “Waste of Electrical and
Electronic Equipment”. Please dispose of the device in your local collection point.
Creation date of manual: April 2022 – all technical changes reserved. No responsibility
is taken for any technical or printing errors.
20
Importer / Distributer:
Company Name
P+C Schwick GmbH
Address
Pohlhauser Straße 9, 42929
Wermelskirchen, Germany
Email
info@schwick.de
Internet
www.schwick.de
WEEE-No.
DE 73586423
Local district court
Wermelskirchen, Germany
Table of contents
Languages:


