Peachtree M24 User manual

POWERED SPEAKER SYSTEM
24

Safety
Information
Front & Rear Panels
Remote Control
Connecting Speakers & Using Bluetooth
USB DC Port
Phono Input
Aux Input
USB & Optical Inputs
Warranty and Repair
Specications
(Rev. 2/2017)
POWERED SPEAKER SYSTEM
24

Congratulations on your new M24 Powered Speaker System.
Please take a few minutes to read this manual to understand its
features and operation. Thank you and enjoy!
You can register your M24 at:
www.peachtreeaudio.com/support/product-registration.html.
Please store this instruction manual for future reference.
BDo not use this product near water or moisture. Clean only with a dry cloth. Unplug this
product from the wall outlet before cleaning.
CPlace the unit on a solid surface. Do not block any ventilation openings.
D Do not put it in a closed bookcase or a cabinet that may keep air from owing through its
ventilation openings.
EDo not install near any heat sources, such as radiators,heat registers,stoves or other
appliances that produce heat.
FProtect the power cord from being walked on or pinched,particularly at plugs and the
point where they exit from the product.
GServicing is required when the product has been damaged. Do not attempt to service this
product yourself. Opening or removing covers may expose you to dangerous voltages or
other hazards. Please contact the manufacturer to be referred to an authorized service
center near you.
H To prevent risk of re or electric shock,avoid over loading wall outlets, extension cords,or
integral convenience receptacles.
IDo not let objects or liquids enter the product.
J Use proper power sources. Plug the product into a proper power source,as described in
the operating instructions or as marked on the product.
SAFETY INSTRUCTIONS

Unpacking
These speakers were carefully tested and inspected during production. After unpacking
please check for any damage. It is rare that a unit is damaged during shipping, but if this has
occurred, please contact the seller immediately.
We recommend that you retain the original carton and packing material in the event shipping
is required in the future.
Recommended Speaker Setup
Proper speaker placement has a major impact on sound. All rooms and tastes are different
so some experimentation to nd what works best for you is encouraged.
For the best bass response, we recommend keeping a minimum distance of 10-inches/25cm
between the speakers and the rear wall. Aim the bafe of the speaker towards your head if
possible. Toeing them inward will provide more pinpoint imaging and aiming them straight
ahead will provide a greater sense of spaciousness.
Use the included rubber stands if the speakers are located on a desk or other surface below
head level. They will aim the speaker upward and provide some additional isolation between
the speakers and the surface they are resting on.
Speaker Conditioning and Break-in
Although a break-in period is not required,we recommend that you play between 24 to 48
hours of music through the speakers before doing any critical listening.
Speaker Cleaning
We do NOT recommend using any solvents or cleaners on the cabinets or drivers. Just wipe
the cabinets with a soft, dry cloth as needed.
INFORMATION

FRONT & REAR PANELS
12
7
3
10
8
9
4
5
11
612
BStatus LEDs & IR Receiver Window:
• Red: Standby or Auto-Standby
(after 30 minutes without playing)
• Blinking RED: Mute
CVolume Up/Down & Input Select: Rotate clockwise/counter-clockwise to increase/
decrease the volume level. Push to toggle through inputs.
DRCA Input: For line-level or Phono input. Please make sure the switch below is set to
Phono when using a turntable and to Aux when using a line-level source such as a CD
player, TV or cable box.
ERCA Input Switch (Phono/Aux): Switches the RCA input between Phono and Aux (line-
level) input modes.
FSUB Out: For connection to an external subwoofer if desired.
GPower On / Off: Connects and disconnects AC mains power. We recommend turning the
power off if the speakers will not be used for an extended period of time.
HOptical Digital Audio Input: For digital audio source input up to 24/96 PCM. Utilizes the
internal DAC.
IUSB Audio Input: For connection from a Mac or PC. Accepts up to 24/96 PCM audio
using a USB-A to USB-B cable commonly used to connect a computer to a printer or
other peripheral USB device.
JGround Screw Terminal: For connection from a turntable ground.
KUSB Power Port: NOT an Audio input. Provides 5V/1A DC to power or charge a USB
device. Recommended to power an outboard Wi-Fi receiver or to charge your mobile
phone.
LAC Input: Connects to a wall socket for AC power input.
MLeft Speaker Output: Connects to the left speaker for proper stereo operation.
• White: Optical Input
• Green: RCA Input (Phono/Aux Input)
• Orange: USB Input

REMOTE CONTROL
Aux USB
Opt
++
Bass Flat Treble
--
9
10
11
12
14
1
2
3
4
5
6
7
8
13
BToggles between On and Standby
CSelects the Bluetooth input
DIncreases the volume
ESelects the previous track
FDecreases the volume
GSelects the RCA (Phono/Aux) Input
HResets the bass and treble controls
IIncreases and decreases bass
JToggles mute on and off
KSelects the next track
LToggles between play and pause
MSelects the USB input
NSelects the Optical input
OIncreases and decreases treble

CONNECTING SPEAKERS & USING BLUETOOTH
Bluetooth Function
Pairing a Bluetooth audio device to the M24.:
If you have a Bluetooth equipped audio device, such as phone, music player, or computer
and wish to connect it wirelessly to the M24, you need to pair them rst:
1. Power on the M24 and select the Bluetooth input. The blue LED will be blinking.
2. Go to the Bluetooth menu on your Bluetooth audio device and select “Peachtree M24.”
This may take a few seconds to appear. If a pairing code is required enter; “1234” or
“0000.”
3. Once paired, the M24 will beep and the input LED will turn solid blue. You may now begin
playing audio from the paired device.
4. The paired Bluetooth device should automatically connect to the M24 whenever it is within
wireless range. If it doesn’t, simply select “Peachtree M24” from the Bluetooth menu of
the paired device. This is normal.
5. To connect a new Bluetooth audio device to the M24, make sure the currently paired
device is either out of range, the Bluetooth function is turned off or “Peachtree M24” is
forgotten in the Bluetooth menu of the currently paired device. This will allow the M24 to
pair to a different Bluetooth audio device. The M24 can connect to one Bluetooth audio
device at a time.
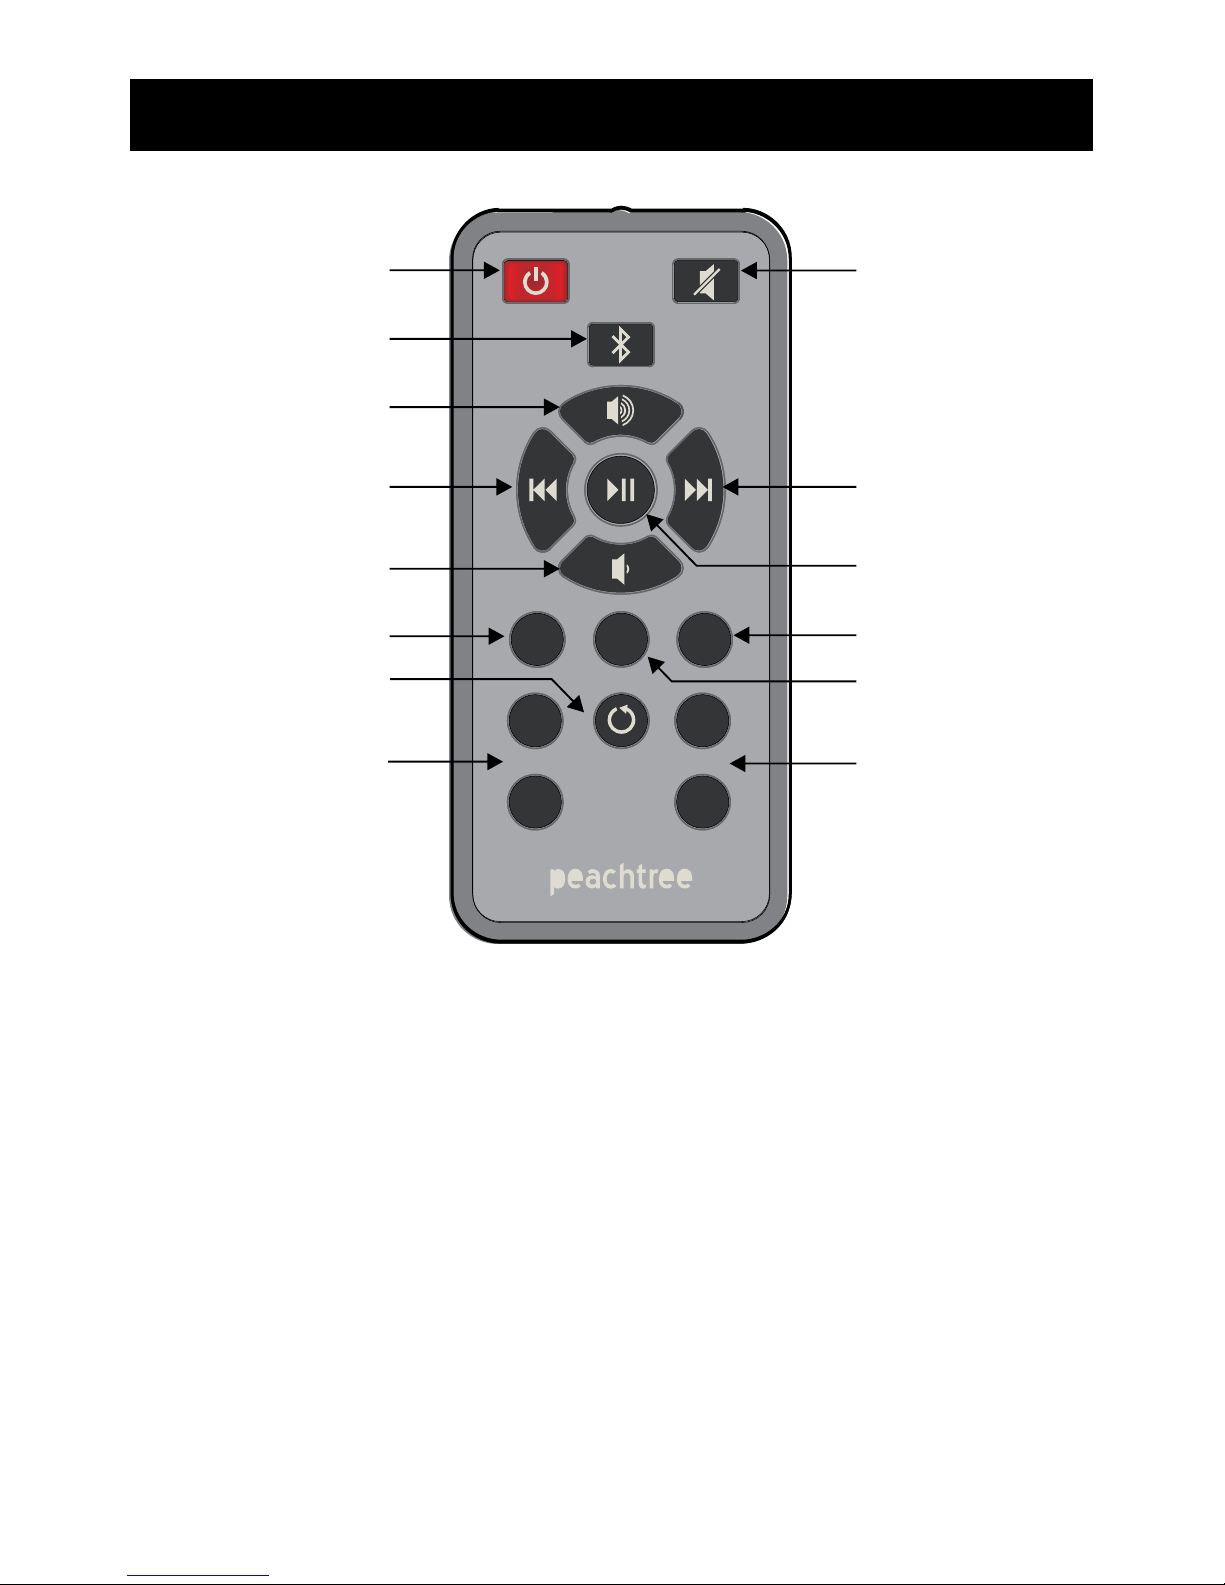
Note: The Play/Pause, Next and Previous buttons on the remote should control your
Bluetooth audio device if it supports Bluetooth Audio/Video Remote Control Prole (AVRCP).
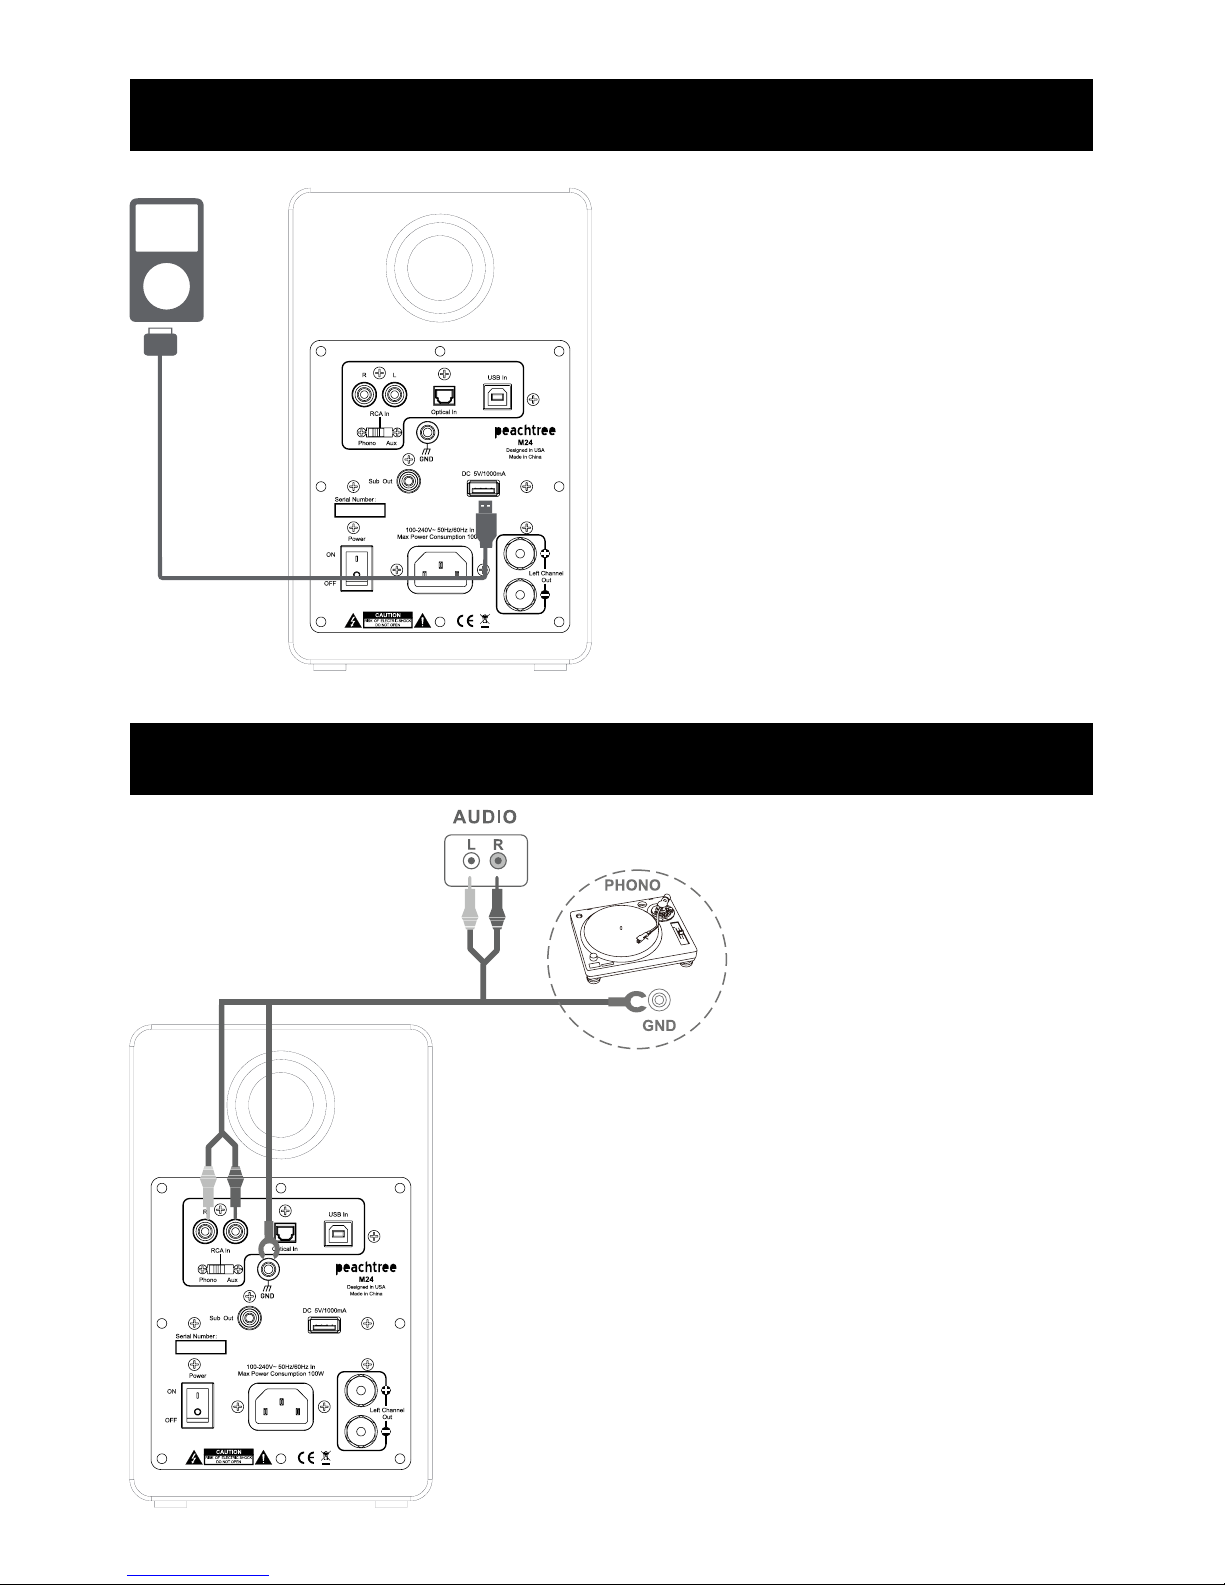
Connecting your speakers
1: Connect the RED(+) and BLACK(-) terminals from the left speaker to the corresponding
terminals on the right speaker using the included speaker cable. Insulation on cable
must be stripped on all ends. Note: Because this system is self-powered, do not connect
the speaker terminals to the speaker outputs of a stereo receiver.
2: Connect the power cord into the left speaker and the other end into the wall outlet.

USB DC PORT
The USB port is designed to power or charge
a connected USB device (Wi-Fi module,
mobile phone, portable audio player, etc.).
Note: No audio will be sent to the speaker
through this USB port.
PHONO INPUT
For use with a turntable without a built-in phono pre-amp.
1. Slide the Phono/Aux switch to the Phono position.
2. Connect the RCA L/R from your turntable to the RCA
L/R inputs on the rear panel of the M24.
3. Connect the ground wire from the turntable to the GND
on the rear panel of the M24.
4. Press Aux on the M24 remote control. You can also
select this input by pressing the volume knob on the
front panel until you see the green LED.

AUX INPUT
Using the Aux Input
1. Slide the Phono/Aux switch to Aux position.
2. Connect the RCA L/R or 3.5mm from your audio device to the RCA L/R inputs on the rear
panel of the M24.
3. Press Aux on the M24 remote control.
B
3.5mm output from audio device.
PC
3.5mm
Audio
Output
A
RCA output from audio device.
AUDI O
RL
Audio

USB & OPTICAL INPUTS
t
USB output from computer.
1. Connect the USB output from your computer to the USB In on the rear panel of the M24.
2. Press USB on the M24 remote control. You can also select this input by pressing the
volume knob on the front panel until you see the orange LED.
Optical output from audio device.
1. Connect the optical output from your audio device to the Optical In on the rear panel of
the M24.
2. Press Opt on the M24 remote control. You can also select this input by pressing the
volume knob on the front panel until you see the white LED.

SPECIFICATIONS
Tweeter 1 inch soft-dome
Woofer 4 inch Fiberglass cone
Nominal impedance 4 Ohm
Sensitivity 2.83V(1W/1M) 85dB
Power Output 50W x 2
Frequency Response 55Hz - 20kHz
Crossover System 2-way
Amplier Type Class D
Amplier Input Sensitivity 480mV (Line RCA)
THD (1W@1KHz) < 0.1%
Dimensions 140 mm x 190 mm x 220 mm
5.5 inch x 7.5 inch x 8.7 inch
Net Weight 5.7 kg / 12.6 lb
WARRANTY AND REPAIR
International Warranty
Peachtree Audio warrants this product for one (1) year, parts and labor, from the original date of
purchase from an authorized Peachtree Audio re-seller.
Peachtree Audio reserves the right to refuse any warranty claims if coverage cannot be veried by a
valid proof of sale or serial number. Peachtree Audio assumes no responsibility for product failures
caused by accident, neglect, misuse, modication or unauthorized repair.
Warranty does not cover shipping costs. Visit www.peachtreeaudio.com for complete warranty details.
Repair Process
In the event that a product fails, please repack it in its original carton and contact an authorized
Peachtree reseller for further instructions. If the reseller is unable to assist, please contact Peachtree
(RA) number prior to shipping the product.
Any products received without an RA number may be misdirected and repair delayed.
If a RA number is issued by Peachtree Audio, please ship the product using FedEx or UPS. Do not ship
using a Postal Service. Peachtree Audio assumes no responsibility for products in transit. Please insure
the shipment for the product’s replacement value in the unlikely event it is lost, stolen or damaged in
transit.
US Shipping Address:
Peachtree Audio
2045 120th Avenue N.E. Bellevue, WA 98005 USA
RA#
www.peachtreeaudio.com

Other manuals for M24
1
Table of contents