Peak Roots GOLDi600 Assembly instructions

model#
GOLDi600
Copyright 2021 Peak Roots, INC All Rights Reserved
Owners Manual &
Safety Instructions
English
G600
LED GROW LIGHT DESIGNED FOR
INDOOR VERTICAL FARMING

© 2021 Peak Roots, INC ., All Rights Reserved
Peak Roots G600
CRITICAL WARNING
The G600 LED high-performance luminaire that runs on remote 48v power sources. The remote
power source and frame technology is designed to remove excess heat from the plant canopy area
and soil. The luminaire uses a frame technology design that works in traditional horizontal lighting
over the plants as well as vertical farming using multiple levels.
Refer to This Manual while using the luminaire to familiarize yourself with its operation and
installation. With limited set up time due to the simplistic design of the G600 LED horticulture light,
you can start growing almost immediately. To avoid problems with your G600 LED horticulture
light, first read all warnings throughout this manual and the section on “Safety Warnings”.
The G600 LED horticulture light does not come with power source, controller and or dimmer
and must be specified and ordered separately.
2
●DO NOT hang the G600 LED horticulture light directly above ANY SURFACE
AREA. The frame must be placed a minimum of 8 inches above any surface.
In no circumstance should any part of the luminaire be touching any other
surface except the installation hanger brackets provided.
INTRODUCTION
This User Manual is for Peak Roots: USL, CNL Light-emitting-
diode Horticultural Luminaire Model No. G600
THIS MANUAL PROVIDES INSTRUCTIONS FOR PROPER OPERATION AND CORRECT METHODS OF
INSTALLATION. INCORRECT USAGE OR INSTALLATION MAY VOID THE WARRANTY AND CAUSE
SERIOUS INJURY OR DEATH.

ITEM CHECK LIST
The following items are included with your G600 LED horticulture luminaire.
luminaire luminaire power leash
warranty card
hanger brackets
Each frame is loaded with six
LED panels and is powered by a
single 48v input.
User manual with all safety
information and item parts
included.
10 foot power cord is included.
Please ll out and return
warranty card, and follow all
instructions.
Two hanger brackets for use
with frame’s three hanging
options.
3
user manual
© 2021 Peak Roots, INC ., All Rights Reserved

CONTENTS
1.
2.
3.
5.
G600 quick start instructions ....................................................................................... 5
G600 hanging instructions and options ................................................................... 7
G600 parts list................................................................................................................. 6
G600 installation warnings ........................................................................................... 9
Quick start guide
Hanging Instructions
Parts
Installation Warnings
4
4.
G600 specifications and power ratings ...................................................................... 8
Specications
6.
Quick nd index table ................................................................................................. 10
Index
7.
G600 warnings ............................................................................................................. 11
WARNINGS
© 2021 Peak Roots, INC ., All Rights Reserved

QUICK START GUIDE
5
Remove all contents from box
Carefully remove all components from the box and the protective foam end caps
to ensure that your G600 box includes all the parts. See Parts List. Be careful not
to damage the connections built into the frame.
1.
Attach frame hangers to G600 frame
Remove (2) frame hangers from plastic packaging and attach hanger brackets into
secured slots in frame at four points. There are three options of secured slots to
choose from.
3.
Connect luminaire power leash to LED
power source
First connect the luminaire’s power leash to the frame, then connect the opposite
end to the 48v power source. If purchased, attach dimmer and lower the power to
the luminaire before turning on.
5.
Inspect all components
Inspect the included components for any damage, missing parts, or other concerns.
Contact your local retailer to get a replacement or new part if needed.
2.
Connect luminaire power leash to G600
frame
Remove luminaire power leash from plastic packaging. Connect the power leash to
frame connector receptacles.
4.
© 2021 Peak Roots, INC ., All Rights Reserved

6
PARTS
Each Peak Roots G600 luminaire includes the following parts:
10 foot Power Leash Cord
Warranty Card
G600 luminaire frame
Instructional Manual
(2) Hanger Brackets
© 2021 Peak Roots, INC ., All Rights Reserved

HANGING INSTRUCTIONS
7
Horizontal four point hanging
Alternative mounting
Remove (2) frame hanger bracket from the plastic and
attach hanger brackets into secured slots on each end of
the luminaries’ frame. Use (2) hanger brackets per frame.
All G600 frames feature threaded secure holes for
mounting alternatives to the standard hanger brackets.
Learn more about alternative mounting options at:
www.peakroots.com
1.
3.
Mounting Means
Side lighting two point wide
Remove (1) frame hanger bracket from the plastic packaging
and attach hanger bracket into secured slots on the length
side of the frame for wide side lighting hanging point. Use
(1) hanger bracket per frame.
2.
Provided with wire frame hangers secured by slots in frame at 4 points
© 2021 Peak Roots, INC ., All Rights Reserved

8
Electrical Input Ratings
Wattage (W) 600 watts
Voltage (Vac) 48Vdc x 6
Current (A) 2
Remote Power Unit (Not Provided) listed, Class 2, max 48Vdc 2A output for specied for
each LED array.
Description Painted aluminum or sheet steel, Frame consists of 4 rails, Measuring
minimum 1.6 mm thick, overall 120.5 cm (47.5 in.) long by 57 cm (22.5 in.)
wide by 27 mm (1.1 in) depth.
Weight 9 lbs
Length 47.5 inches
Width 22.5 inches
ELECTRICAL RATINGS G600
SPECIFICATIONS
APPLICATION
The G600 is SUITABLE FOR DAMP LOCATIONS The G600 luminaire is designed for horticulture
applications such as traditional horizontal grow light coverages as well as vertical environments.
The luminaire uses remote power sources such as a 48 Volt LED driver.
GENERAL CONSTRUCTION
This product complies with the applicable Standards for USL and/or CNL luminaires. All compo-
nents of products bearing the C-UL mark shall be Listed or Recognized for Canada or CSA Certied,
in addition to being UL Listed or Recognized as noted under the “Technical Considerations” section
noted below, the General Description on the following pages.
LUMINAIRE HOUSING FRAME
PHOTOBIOLOGICAL RATING: IEC 62471 Risk Group exempt. No Labeling Required.
© 2021 Peak Roots, INC ., All Rights Reserved

INSTALLATION WARNINGS
9
MINIMUM DISTANCE BETWEEN ADJACENT LUMINAIRE AND COMBUSTIBLE
MATERIALS
The minimum distance between adjacent luminaires as well as the minimum distance between
the luminaire and combustible materials such as walls, ceilings, movable partitions and the like
should be four (4) inches.
MINIMUM ROOM VOLUME PER INSTALLED LUMINAIRE
The minimum room volume per installed luminaire requires the appropriate air ow and con-
ditioning to maintain an appropriate ambient environment temperature of below eighty (80)
degrees F. Below are instructions for an example of how to control the ambient temperature of
the installed environment:
REMOTE POWER SOURCE LOCATION
To maintain an appropriate ambient environment temperature, consider where to position as
well as how to mount remote LED driver power supplies to remove excess heat.
LED driver power supplies mounting options:
1. Mount outside of the grow area or room to remove the maximum amount of heat.
2. Mount remotely on the wall. If mounted on a wall be sure to use mounting hardware that
raises the at bottom of the LED power supply directly o any surface area. It is recommended
that you do not mount the LED power supply directly at against the wall. To reduce even more
heat, cool the LED drivers with a fan or appropriate HVAC unit.
ROUTING LUMINAIRE POWER LEASH CORDS
To prevent cord damage, route all cords away from hot surfaces of the luminaire or other heat
producing elements, when applicable. WARNING - Cords should not be concealed or routed
through ceilings and walls.
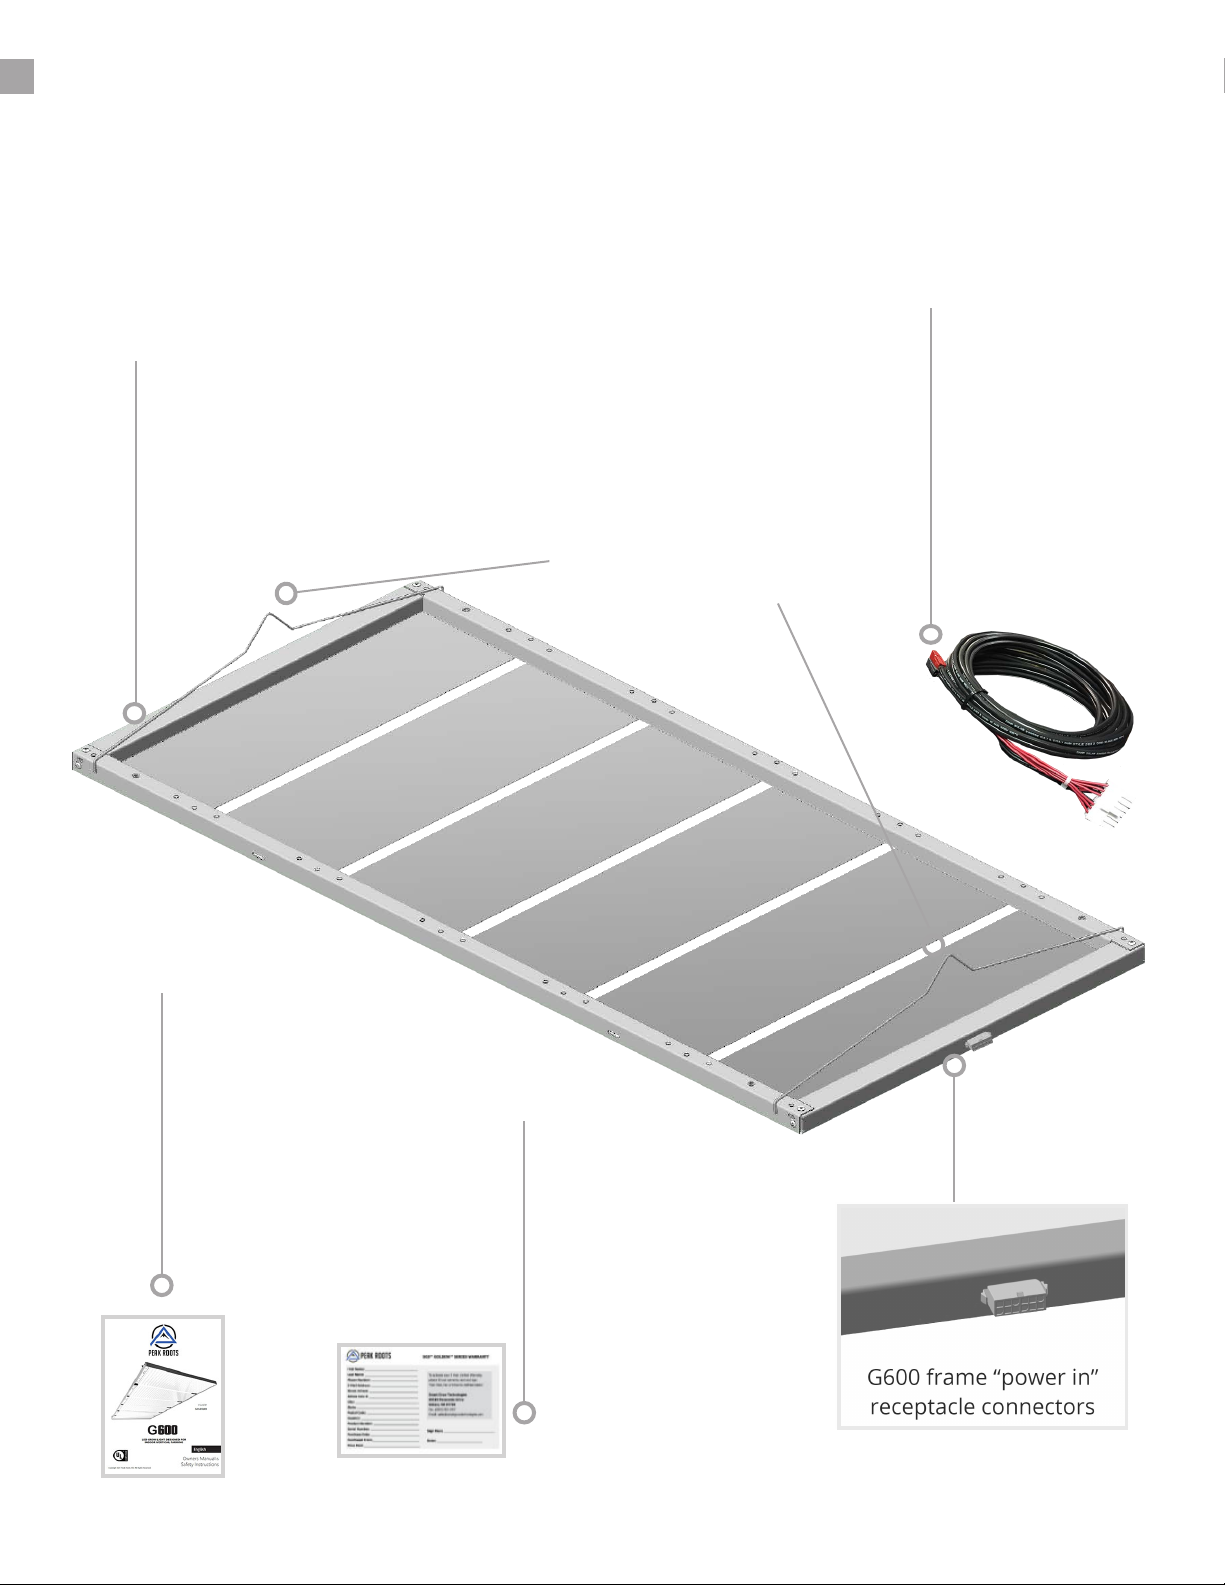
For luminaires with special congurations, use male plugs for connection to the branch circuit or
remote power source.
TECHNICAL CONSIDERATIONS
USL indicates product complies with the Standard for Luminaires, UL 1598 and the United States country specic requirements
contained within the Standard, along with the relevant parts of the UL Standard for Light Emitting Diode (LED) Equipment for
Use in Lighting Products, UL 8750 and UL Standard for Low Voltage Luminaires, UL 2108. CNL indicates product complies with
the Canadian National Standard for Luminaires, CSA C22.2 No. 250.0 and the Canadian country-specic requirements con-
tained within the Standard. Outline of Investigation for Horticultural Luminaires, UL 1598D.
PHOTOBIOLOGICAL RATING: IEC 62471 Risk Group exempt. No Labeling Required.
© 2021 Peak Roots, INC ., All Rights Reserved

INDEX
10
A
Application ................................................... 8
All Parts ........................................................ 6
B
Basic System................................................. 6
Box................................................................. 8
C
Cable (luminaire power cord leash)........ 3,6
Certication .................................................. 8
Current ..........................................................8
D
Distances ................................................. 9,11
E
Energy Usage ............................................... 8
F
Frame Technology ................................ 2,6,7
G
General Construction ................................. 8
H
Hanging Instructions .................................. 7
I
Index ........................................................... 10
J
Cable ......................................................... 114
L
LED Driver .................................................... 8
M
Mounting ...................................................... 7
N
Not Advisable Use ..................................... 11
O
Operation Warnings ................................. 11
P
Power Unit ............................................... 114
Power Leash Cords................................... 3,6
Q
Quick Start ................................................... 5
R
Remote Power Unit................................... 8,9
Routing Luminaires Power Leashes ...... 3,6
Receptacle Power Connectors ................... 6
S
Safety Warnings ........................................ 11
Side Lighting ................................................ 7
Specications ............................................... 8
T
Temperature Warning .............................. 11
V
Voltage .......................................................... 8
W
Warnings ................................................. 9,11
Wattage ........................................................ 8
Weight .......................................................... 8

SAFETY WARNING
11
FAILURE TO OBSERVE ANY OF THE FOLLOWING SAFETY WARNINGS MAY RESULT IN SERIOUS
INJURY OR DEATH. IN ADDITION, FAILURE TO OBSERVE THESE SAFETY WARNINGS WILL RESULT
IN A WAIVER OF ALL LIABILITIES OF SMART GROW TECHNOLOGIES, INC. AND WILL VOID ALL
WARRANTIES.
WARNING
●Do NOT hang directly above any surface. There must a minimum of 8 inches above any surface
area directly below the luminaire.
●Must hang or position lights a minimum of 4 inches from wall, racks or next to other luminaires.
●If the exterior of the luminaire LED panels are damaged, contact Smart Grow immediately. DO
not turn on.
●Make sure power cord and luminaire cord are properly connected.
●Do NOT hang by either the power cord or luminaire cord.
●Do NOT operate the light systems in wet locations. (Suitable for damp locations)
●Do NOT plug this system into a supply voltage other than what is instructed on the luminaire.
●Do NOT attempt to open, rewire or reconfigure any components of the light system.
●These products operate at very high temperatures. Keep away from children.
●Do NOT plug or unplug a LED panel or luminaire cord while the LED power source is on.
●Do NOT use with generators.
●Do NOT touch any part of the luminaire with any metal object or electrical conducting element
when powered on.
●Do NOT power-on the luminaire when staring directly at the lighting elements. This may cause
temporary or permanent eye damage.
●Do NOT look directly at the luminaire when powered on for any extended period of time (more
than two seconds). This may cause temporary or permanent eye damage.
●Do NOT allow luminaire to touch any liquids at any time.
●Do NOT touch any part of the luminaire with any metal object or electrical conducting element
when powered on.
●Do NOT drill through or damage the luminaire in any manner.
●Do NOT allow the luminaire to come into contact with any corrosive materials, chemical sprays.
●Do NOT send a dysfunctional luminaire to Peak Roots without prior approval (request a Return
Authorization Number “RMA” from your place of purchase), and always use proper packaging to
protect the unit from damage in shipping.
© 2021 Peak Roots, INC ., All Rights Reserved

Peak Roots
69319 Panoramic Drive, Sisters, OR 97759
www.peakroots.com
© 2021 Peak Roots, INC ., All Rights Reserved
Table of contents
Other Peak Roots Lighting Equipment manuals
Popular Lighting Equipment manuals by other brands

MICRODOS
MICRODOS Panel Series Installation and maintenance instructions

Home Zone Security
Home Zone Security ELI0987V installation instructions

CONIC
CONIC BEEZOOM1940 user manual

WAC Lighting
WAC Lighting M6000-STAKE Installation instruction

ROADWORX
ROADWORX Lighting Stand 1 user manual

CANARMNA
CANARMNA LUL-14 manual

Cooper Crouse-Hinds
Cooper Crouse-Hinds eLLK 92 NIB Series operating instructions

INNOVAPLAS
INNOVAPLAS WALK WAY manual

TMC
TMC Pro Pond ro Pond UV110 Instructions for installation and use

Philips
Philips UrbanSpark Mounting instructions

Emos
Emos NANO-GREEN quick guide

LIGMAN
LIGMAN ITRB04 1520 Series installation manual