manuals.online logo
Brands
  1. Home
  2. •
  3. Brands
  4. •
  5. Pearl
  6. •
  7. Indoor Furnishing
  8. •
  9. Pearl D-2000TC User manual

Pearl D-2000TC User manual

Other Pearl Indoor Furnishing manuals

Pearl Roselyn User manual

Pearl

Pearl Roselyn User manual

Pearl D-1500TGL User manual

Pearl

Pearl D-1500TGL User manual

Pearl Lauren User manual

Pearl

Pearl Lauren User manual

Popular Indoor Furnishing manuals by other brands

Regency LWMS3015 Assembly instructions

Regency

Regency LWMS3015 Assembly instructions

Furniture of America CM7751C Assembly instructions

Furniture of America

Furniture of America CM7751C Assembly instructions

Safavieh Furniture Estella CNS5731 manual

Safavieh Furniture

Safavieh Furniture Estella CNS5731 manual

PLACES OF STYLE Ovalfuss Assembly instruction

PLACES OF STYLE

PLACES OF STYLE Ovalfuss Assembly instruction

Trasman 1138 Bo1 Assembly manual

Trasman

Trasman 1138 Bo1 Assembly manual

Costway JV10856 manual

Costway

Costway JV10856 manual

moss DESIGN Caisson Credenza Assembly instructions

moss DESIGN

moss DESIGN Caisson Credenza Assembly instructions

Aquaglide FULL DECK 15.0 owner's manual

Aquaglide

Aquaglide FULL DECK 15.0 owner's manual

AREBOS AR-HE-SW30 user manual

AREBOS

AREBOS AR-HE-SW30 user manual

Till-Hilft Fulda 87005.330 Assembly instructions

Till-Hilft

Till-Hilft Fulda 87005.330 Assembly instructions

Twoey Outside 2010 quick start guide

Twoey Outside

Twoey Outside 2010 quick start guide

Hettich Easys 200 operating instructions

Hettich

Hettich Easys 200 operating instructions

The bedboss RELAX 404 Series owner's manual

The bedboss

The bedboss RELAX 404 Series owner's manual

Oeseder Möbelindustrie Bern 991 720 Assembly instructions

Oeseder Möbelindustrie

Oeseder Möbelindustrie Bern 991 720 Assembly instructions

Costway HW68469 user manual

Costway

Costway HW68469 user manual

Next ALIX A27743 Assembly instructions

Next

Next ALIX A27743 Assembly instructions

BROSA Hans Assembly guide

BROSA

BROSA Hans Assembly guide

Prodigg MINIKA PBA015T-FUR installation manual

Prodigg

Prodigg MINIKA PBA015T-FUR installation manual

manuals.online logo
manuals.online logoBrands
  • About & Mission
  • Contact us
  • Privacy Policy
  • Terms and Conditions

Copyright 2025 Manuals.Online. All Rights Reserved.

PEARL TIMPANI THRONE
Dual-Zone Seat Cushion
Back Rest
Lock Nut
Quick Release
Height Adjustment Clamp
Back Rest Back/Front
Adjustment Knob
Threaded Post
Support Casting
Congratulations on your purchase!
To get optimum performance from your Timpani Throne,
please read this Instruction Manual before playing.
Instruction Manual
Foot Rest
D-2000TC
1
2
34
Foot Rest
Place the Foot Rest onto the four Support Castings. Align
the holes and bolt the Foot Rest to the Support Castings
using the tightening-sequence as shown below in Fig. 1.
Fig. 1
Tighten the bolts in the
sequence shown to assure
even tensioning of the Foot
Rest.
Foot Rest
Support Casting
Fig. 1
Quick Release Height Adjustment Clamp
1. Loosen the Wing Nut and open the Clamp. Lift the
Threaded Post and spin the Lock Nut to the approximate
desired height.
2. Close the clamp and latch the Wing Nut but only tighten it
slightly.
3. Spin the Threaded Post until the desired height is
achieved.
4. Tighten the Wing Nut securely then securely tighten the
Lock Nut against the Clamp.
(Fig. 2)
Lock Nut
Threaded Post
Quick Release
Height Adjustment
Clamp
Wing Nut
CAUTION:
For correct operation, the threads on the Threaded Post
and Clamp must be engaged properly. If they are not, turn
the Threaded Post slightly until the threads match.
When opening the Clamp, hold the Threaded Post with
your free hand to keep it from dropping and pinching your
fingers.
For stability, keep AT LEAST 5mm of the Threaded Post
below the clamp (please see the diagram).
Fig. 2
5mm
Back Rest Replacement
The Dual-Zone cushion allows sitting on either the tapered
or straight ends of the seat. Attach the Back Rest to the
appropriate side of the seat using the four Allen head bolts
and the provided Allen wrench as shown in (Fig. 5A and 5B).
Tighten the bolts securely.
Fig. 5A
Fig. 5B
Seat Attachment
When attaching the seat cushion to the base, make sure
that the two halves of the Seat Clamp Bracket are parallel
by adjusting the Hex Nut and Wing Nut accordingly. Tighten
the Wing Nut securely to keep the seat cushion from turning.
If you prefer the seat cushion to follow your body as your
play, loosen the Wing Nut slightly. (Fig. 3)
Back Rest
The D-2000BR features an adjustable Back Rest with
adjustments for front/back and up/down positioning for
optimum support and comfort.
Back Rest Attachment
Assemble the Allen head bolts and washers in the sequence
shown and attach the Back Rest to the Bracket under the
seat cushion. Tighten the bolts securely. (Fig. 4)
Allen Head Bolt
Washer
Spring Washer
Seat Clamp
Bracket
Hex Nut Wing Nut
Fig. 4
Fig. 3
Products and specifications are subject to change without notice.
Printed in Taiwan.
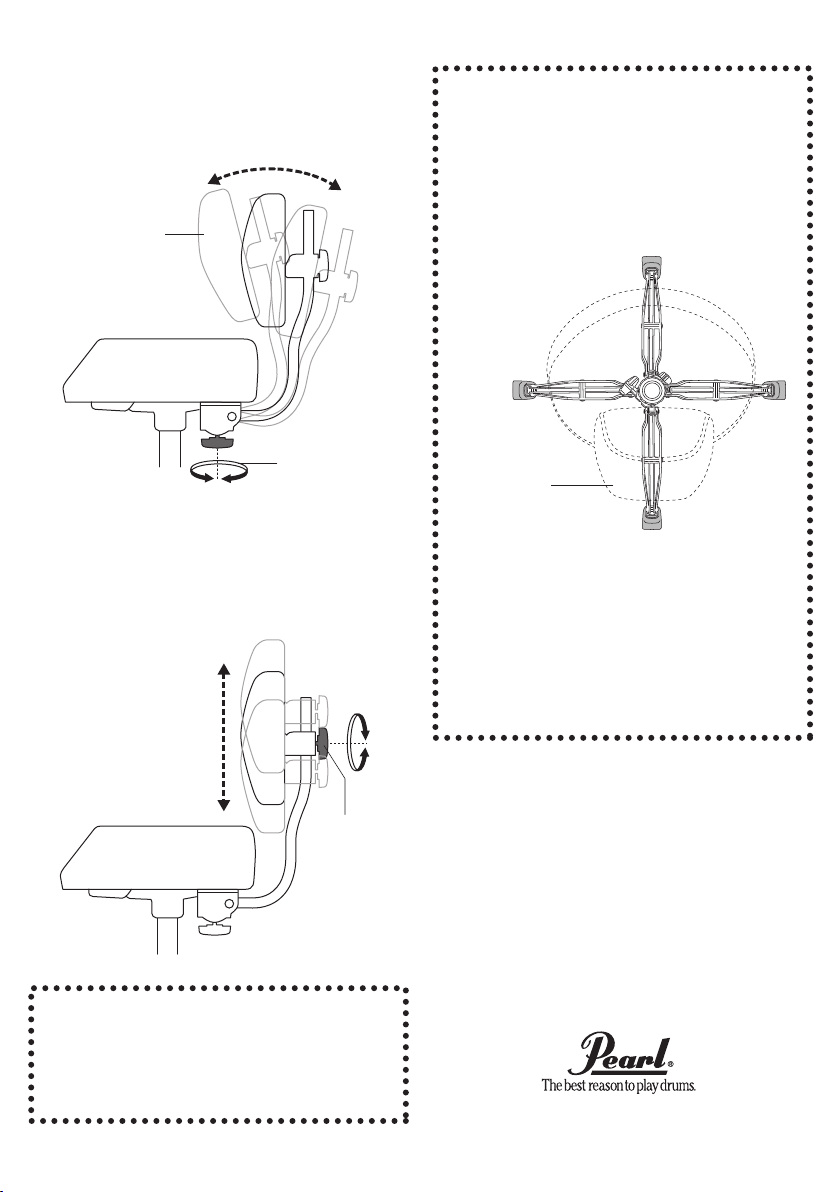
Front/Back Back Rest Adjustment
To move the Back Rest toward you, turn the adjustment
knob clockwise; likewise, to move the Back Rest away from
you, turn the adjustment knob counterclockwise (Fig. 6).
Up/Down Back Rest Adjustment
Loosen the Adjustment Knob and slide the Back Rest up or
down to the desired position and tighten the Adjustment
Knob as shown in (Fig. 7).
Adjustment
Knob
Adjustment Knob
Back Rest
Back Rest
CAUTION:
The Back Rest is designed to support your back while
playing and is not intended to be used as a recliner.
Leaning back too far on the Back Rest can cause bodily
injury and/or damage to the Back Rest and Throne.
When using the Back Rest, align one of the legs under
the Back Rest for optimum stability and to reduce the
chance of tipping backward from leaning back too far.
The Drum Throne is intended for seating while playing
drums. It is not designed as a ladder, footstool, or any
other application other than its intended use.
When folding the tripod legs, be careful not to pinch your
fingers between the legs and the stand.
When handling tubular hardware do not put your fingers
into the tubes to prevent injury to your fingers.
Fig. 6
Fig. 7
CAUTION:
Adjusting the Front/Back and/or Up/Down settings of the
Back Rest while seated may require twisting and reaching
that can cause injury to your body. To prevent injury,
perform these adjustments before sitting and repeat as
necessary until the best comfort/support is achieved.