Peleman Hard Cover Maker 650 User manual

1
USER MANUAL
HARD COVER
MAKER 650

2

3
Hard Cover Maker 650
5
6
7
8
9
12
13
14
17
20
21
24
26
26
27
28
29
30
Introduction
Safety Precautions
Specifications
Installation instructions
Required Materials
What to do with the cover material?
Starting up
Creating a Hard Cover Basic with the Hard Cover Maker 650
Creating a Basic Peleman Box
Tips & Tricks
After the personalisation
Frequently Asked Questions
Technical problems
Maintenance
Annex I
Annex II
How to set a personalized Hard Cover Making Program?
EG- Declaration of incorporation regarding machines

1. On / Off Switch
2. Protection-frame
3. Display
4. Tray
5. Power socket
6.Side handles
7. Small tray for wrapping tools
8.Positioning Corners
(art.code: SPCASE00003)
9.Wrapping Clamps
• 4x 25cm (art.code: SPCASE00002)
• 4x 18cm (art.code: SPCASE00001)
• 2x 12cm (art.code: SPCASE00004)
• 2x 8cm (art.code: SPCASE00005)
10. Softpad (art.code: ISP0129)
A.Display
B. Mode
C. +
D. –
3
A
B
4
7
6
1
DC
5
2
89
10

5
Introduction
Thank you for buying this Peleman product.
Please read these operating instructions carefully so you will know
how to install and operate the Hard Cover Maker 650. After you have
finished reading the instructions, we advise you to put them away in a
safe place for future reference.
Hard cover Maker 650
The Hard Cover Maker 650 is a user-friendly and cost efficient
personalisation system created in response to the growing demand
for personalized covers. The Hard Cover Maker 650 is designed for use
with the patented Hard Cover Basic and is carefully assembled and
tested.

6
Safety Precautions
Make sure you place the product on a solid flat horizontal surface which can
hold at least 100 kg.
This product is intended for indoor use only and therefore needs to be
protected from water and dirt. Never operate the product in a humid
environment.
Always use a soft cloth to clean the product. Avoid using rough materials to
clean the product since these could scratch the surface.
Make sure that all electrical plugs and connectors are connected correctly
and firmly before switching on the product.
Never use the product for other purposes other than those described in this
manual.
Never insert any other objects in the Hard Cover Maker 650 than Hard Cover
Basics from Peleman.
Never insert hands or other body parts in the product. Failing to do so may
result in a serious injury.
Never expose the product to flammable or explosive gasses.
In case of a damaged machine and/or cable, please contact your local
Peleman distributor.
The Hard Cover Maker 650 may only be installed and operated by
appropriately experienced, trained or instructed personnel.
Make sure to read the manual completely before installing and operating the
machine.
Warnings
Only trained technicians are allowed to open and/or service the product.
Never try to open or modify the product yourself.
!

7
Specifications
Mechanical Specifications
Dimensions: 330 x 920 x 560 mm
Weight: +/- 90 kg
Electrical specifications
Warning! Always replace the fuse with a fuse of the same type and ratings!
Disclaimers
PERFORMANCE DATA
Performance data given in this manual is provided as a guide for the user in
determining suit¬ability and does not constitute a warranty. It may represent
the result of Peleman’s test condi¬tions and the users must correlate it to
actual application requirements.
CHANGE IN SPECIFICATIONS
Product specifications and accessories may be changed at time, based on
improvements and other reasons. Consult with your Peleman representative
at any time to confirm the actual specifications of your purchased product.
110V Version 220V Version
100 - 120 V ~ 50-60 H 220 - 240 V ~ 50-60 Hz
15 A - 1800 W 8.1 A - 2060 W
FUSE : 500V ~ 16A Time lag FUSE : 500V ~ 10A Time lag
CSA CE

8
Installation instructions
Place the Hard Cover Maker 650 on top of a solid flat horizontal surface that
can hold at least 100 kg. When you lift the Hard Cover Maker 650, use only
the side handles (6) and make sure you are with at least 2 persons for lifting.
Plug in the power cord in the corresponding socket.
Connect the power cord to the power supply. Make sure the cable is laid in a
way that it cannot obstruct the passage or that a person would trip.
Place the Hard Cover Maker 650 on top of the Table for the Hard Cover
Maker. Make sure the 4 feet of the Hard Cover Maker 650 fit in the holes
located on the top of the Table.
Place the Spine Maker Press on top of the
Hard Cover Maker 650.
Make sure the 6 feet of the Spine Maker
Press fit in the holes located on top of the
Hard Cover Maker 650.
How to place the Harc Cover Maker on top of the Hard Cover Maker Table.
How to install the Spine Maker Press (optional)
6

9
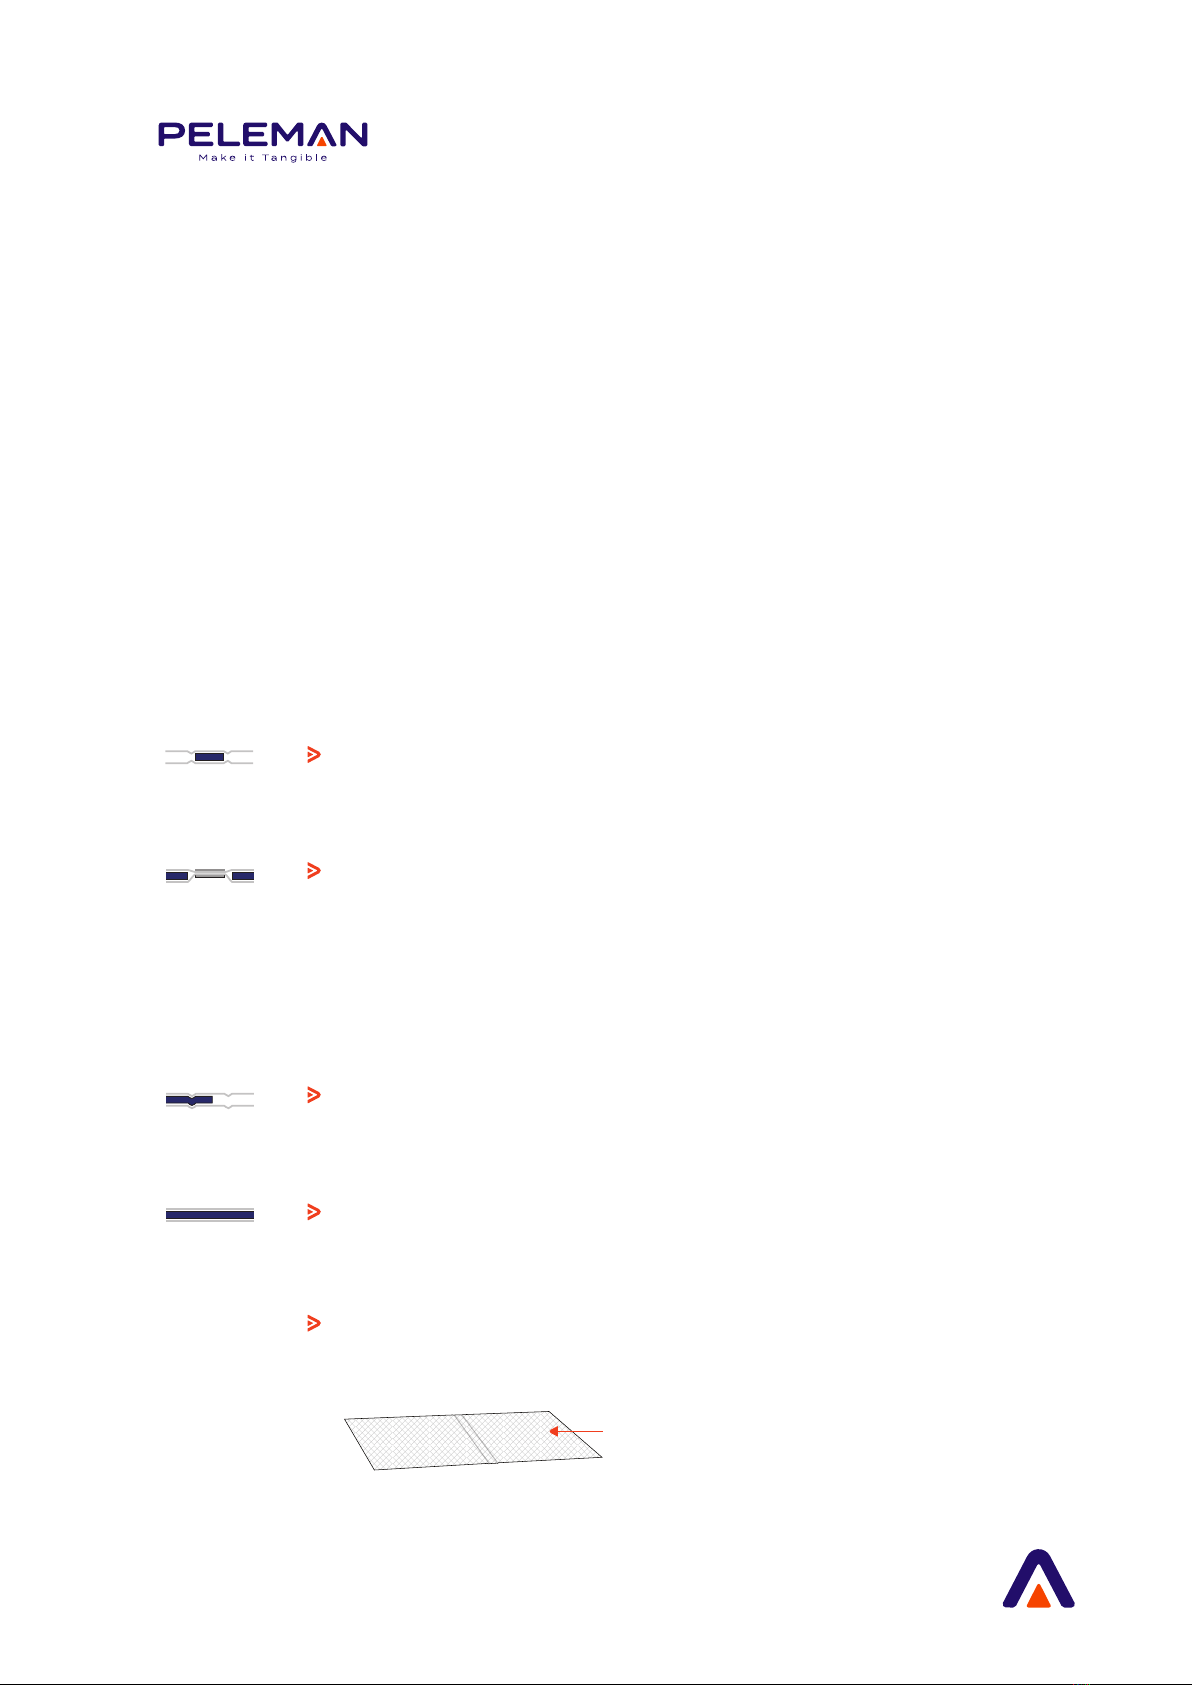
The 3-pieces Hard Cover Basic with 3 pieces of 2,7mm thick
greyboard.
For traditional bookbinding and casing-in.
The 3-pieces Hard Cover Basic with 2 pieces of 2,7mm thick
greyboard and the middle piece in 0,3mm thick steel sheet
covered with 2 resins: the binding resin and the casing-in
resin. To use with the Mirror Sheet to finish the inner side of
the book.
For binding with Resin SteelBinding.
The one-piece Hard Cover Basic with 2 creases in the
2,7mm thick greyboard. To use with the Mirror Sheet.
For ring binders, folders, portfolios...
The one-piece Hard Cover Basic in 2,7mm thick greyboard.
To use with the Mirror Sheet.
For displays, top cards, game boards...
For the Hard Cover Basic Box in combination with the Clips:
2.7mm thick cardboard.
We are able to provide 4 differents Hard Cover Basic types:
Required Materials
The Hard Cover Maker 650 uses a unique and patented way of casing and
wrapping in. It is an environmentally friendly solution which requires low
maintenance and helps cutting costs. Such a unique casing-in system asks
for some unique components and products.
Hard Cover Basic
The Hard Cover Basic is an in-house designed innovative and patented
pre-made cover de¬veloped for use with the Casemaking systems. The
Hard Cover Basic is covered with a thin layer of hotmelt on the outside and
inside.
Our summer at the beach!
glossy side = hot melt side

10
Mirror sheet (provide by Peleman)
To finish the inner side of your product, you have to use the Mirror sheet. One
side of the Mirror Sheet is coated with a thin layer of hot melt. The Mirror Sheet
of the Hard Cover Basic is standard supplied with either a white or black Mirror
Sheet.
Be aware, when sealing the Mirror Sheet, you have to place the glossy side
down.
Cover Material (provide by the user)
The cover material is either laminated print or any cover material used in hard
cover production. For the exact measurements of the cover material, go to the
Peleman website where you can download a template for all standard sizes. If
you want to wrap a substrate other than paper or a non-standard Hard Cover
Basic size, you can use another document on our website. This document
clearly defines the sizes of the overlap and the corners. Peleman offers a range
of cover material to be used with the Hard Cover Basic. These materials can be
found on the next page. All cover materials ordered will be delivered per roll.

11
Available in:
KABL
blossom
RMB001060KABL
KASL
silver
RMB001060KASL
KACH
charcoal
RMB001060KACH
K ATU
turqoise
RMB001060KATU
KALI
lime
RMB001060KALI
KAUL
ultra-
marine
RMB001060KAUL
KAOY
oyster
RMB001060KAOY
KANA
naranja
RMB001060KANA
KARE
red
RMB001060KARE
KAMA
marron
RMB001060KAMA
Linen / Kashmir Covermaterial (Unit/Roll: 106m2)
Suede Covermaterial (Unit/Roll: 112m2)
Vegan Leather Covermaterial (Unit/Roll: 84m2)
ROSERED
rose red
RMB0140ROSERED
COBBLUE
cobalt blue
RMB0140COBBLUE
SAHYEL
sahara yellow
RMB0140SAHYEL
Available in:
REDBROWN
redwood
brown
RMB0140REDBROWN
AQUABLUE
aqua
blua
RMB0140AQUEBLUE
BEAURED
beaujolais
red
RMB0140BEAURED
SUNYEL
sunrise
yellow
RMB0140SUNYEL
BASGREEN
basil
green
RMB0140BASGREEN
Available in:
WIDTH: 106 CM
WIDTH: 140 CM
WIDTH: 140 CM

12
What to do with the printed cover
material?
Printing
Personalizing your cover start with selecting the appropriate cover material
or designing a cover, the templates will guide you with this.(*) The same
templates also give you the possibility to determine the cover material sizes
of non-printed cover materials. For the best results make sure you use
optimal printer settings.
Tip: The Hard Cover Maker 650 works at ±100°c
Laminating
Some printed cover materials need to be laminated, to avoid damage. Make
sure that the laminate properties correspond with the printed cover material.
It is also important to match the CaseMaker program with the required
laminate and printed cover material.
See annex II to know which is the recommended program for the used paper
and laminate.
We recommend using either Digital Lay Flat GBC 38 micron or Digital
Nylonex ultrabond GMP 38 micron.
Cutting
The last preparation is cutting the cover material. Keep in mind that the
overlap of the cover material need to be 18,5 mm and each corner has to be
cut at 30 mm both on the top as on the side of the cover material. When you
have used the Peleman templates, you can flawlessly cut along the cutting
lines of the printout.
*contact your Peleman reseller for more information about the templates.

13
Starting up
Switch the Hard Cover Maker 650 on, the Peleman
logo will appear for about 10 seconds. The Hard Cover
Maker 650 will start up using the last used setting
as default. During the first start-up of the Hard Cover
Maker 650, a default setting will be activated. Heating
starts right away and the display shows the “heating-up
screen”.
To change the program, press (B). The program
menu appears and the currently active program blinks.
Run through the pre-set programs with (C) and (D).
To confirm, press (B).
Wait until the heating pictogram stops blinking and
a checkmark appear on the screen + beep, the Hard
Cover Maker 650 is now ready to use.
B C D

14
Creating a Hard Cover Basic with the
Hard Cover Maker 650
Open the tray, and lift the protection
frame.
Place your Hard Cover Basic with
the hot melt side (glossy side) up
and place it on the middle of the
table.
Place the Positioning Corners on
the two opposite corners of the
Hard Cover Basic.
Place the printed cover material
with the printed side facing
upwards, on top of the Hard Cover
Basic. Align it to the Positioning
Corners
Lower the protection frame and
close the tray. The display will show
a pictogram blinking. Pressing is in
process.
A beep indicates that the pressing
cycle is over. Open the tray, and lift
the protection frame.
(gluing the cover material)

Creating a Hard Cover Basic with the
Hard Cover Maker 650
Turn your Hard Cover Basic with the
personalised side down. Then tilt it
forward, folding the bottom side of
the Hard Cover Basic.
Place the Wrapping Clamp on the
upper side of the Hard Cover Basic.
Push the clamps firmly to avoid air
bubbles. Repeat this step for every
long side.(Choose the correct side of
Wrapping clamps according to the size of
your Hard Cover Basic)
A. After you have wrapped all the
longer sides, pinch the overlapping
cover material in each corner, to
optimize the look of your corners
before wrapping the short sides.
Now wrap the short sides the same
way you wrapped the longer sides.
After sealing the cover material on the Hard Cover Basic, you have to fold
the sides. You can fold them with the Wrapping Clamps. We advise to fold
both longest sides of the plano first, followed by folding both shorter sides.
(wrapping the sides)
A
Article code Description
SPCASE00001 Wrapping Clamp 18 cm standard thickness
SPCASE00002 Wrapping Clamp 25 cm standard thickness
SPCASE00004 Wrapping Clamp 12 cm standard thickness
SPCASE00005 Wrapping Clamp 8 cm standard thickness
SPCASE00TH1 Wrapping Clamp 18 cm for thick materials
SPCASE00TH2 Wrapping Clamp 25 cm for thick materials
SPCASE00TH4 Wrapping Clamp 12 cm for thick materials
SPCASE00TH5 Wrapping Clamp 8 cm for thick materials

16
Place the Hard Cover Basic
with Wrapping Clamps with the
personalised cover down on the
table. Use the Wrapping Clamps to
align the Mirror Sheets. Be aware to
avoid that the Mirror Sheet sticks
to the protection frame by placing
the Mirror Sheet with the glossy
side (melt side) down. If your Hard
Cover Basic has binding resin in the
middle, protect the resin with the
Silicon Protection Paper.
Lower the protection frame and
close the tray to start pressing.
As soon as the tray is locked the
display shows a pictogram blinking:
pressing is in process.
A beep indicates the end of the
pressing cycle. Now the sides are
wrapped and the Mirror Sheets are
glued to the Hard Cover Basic.
Open the tray and lift the protection
frame. Place the softpad on top of
the Hard Cover Basic with the mirror
sheets and do a second pressing.
A beep indicates the end of the
pressing cycle.
Remove the wrapping clamps, and
your Hard Cover Basic is ready.

17
Creating a Basic Peleman Box
Open the tray, and lift the protection
frame.
Place your Basic Peleman Box plano
(top or bottom) with the magnet down
on the middle of the table.
Place the Positioning Corners on the
two opposite corners of the Basic
Peleman Box plano.
Place the cover material with the
personalised side up, on top of the
Basic Peleman Box plano. Align it to
the positioning corners.
Lower the protection frame and
close the tray. The display will show
a pictogram blinking. Pressing is in
process.
A beep indicates that the pressing
cycle is over. Open the tray, and lift
the protection frame. Repeat these
steps for the other side of the Basic
Peleman Box.
(gluing the cover material)

18
Creating a Basic Peleman Box
A beep indicates that the pressing cycle is
over. Open the tray, and lift the protection
frame. Repeat these steps for the other
side of the Basic Peleman Box.
Turn your Basic Peleman Box plano with
the personalised side down. Then tilt it
forward, folding the bottom side of the
plano.
Place the Wrapping Clamp on the upper
side of the Basic Peleman Box Plano.
Push the clamps firmly to avoid air
bubbles. Repeat this step for every long
side.
A. After you have wrapped all the longer
sides, pinch the overlapping cover
material in each corner, to optimize the
look of your corners.
Now wrap the short sides the same way
you wrapped the longer sides.
Place the Basic Peleman Box plano with
Wrapping Clamps with the personalised
cover down on the table. Use the
Wrapping Clamps to align the Mirror
Sheets. Make sure that the mirror sheet is
aligned so that the missing corner of the
mirror is the back of the plano.
After sealing the cover material on the Hard Cover Basic, you have to fold the
sides. You can fold them with the Wrapping Clamps. We advise to fold both
longest sides of the plano first, followed by folding both shorter sides.
(wrapping the sides)
B
A
A. Top plate
B. Bottom plate

19
Lower the protection frame and close
the tray to start pressing. As soon as
the tray is locked the display shows
a pictogram blinking: pressing is in
process.
A beep indicates the end of the
pressing cycle. Now the sides are
wrapped and the Mirror Sheets are
glued to the Basic Peleman Box
plano.
Open the tray and lift the protection
frame. Place the softpad on top of the
plano with the Mirror Sheets and do a
second pressing. A beep indicates the
end of the pressing cycle.
Remove the Wrapping clamps
Repeat these steps for the other side
(bottom) of the Basic Peleman Box.
Your Basic Peleman Box is now ready!
SCAN FOR VIDEO

20
Make sure you have removed the Wrapping Clamps.
Place the Hard Cover Basic with the Mirror Sheets up on the table.
Afterwards you can lay the softpad on the Hard Cover Basic.
Lower the protection-frame and close the tray before pressing.
Tips & tricks
To avoid change of appearance of the cover material.
The appearance of some delicate cover materials changes under the influence
of heat, therefore we advise to try the different program settings until it resolves.
If you are using thicker cover material use the adviced Wrapping Clamps*.
*SEE PAGE 15
When the appearance keeps changing you can place the Application softpad
on top.
Table of contents