manuals.online logo
Brands
  1. Home
  2. •
  3. Brands
  4. •
  5. Pelgrim
  6. •
  7. Oven
  8. •
  9. Pelgrim MAC524RVS User manual

Pelgrim MAC524RVS User manual

This manual suits for next models

1

Other Pelgrim Oven manuals
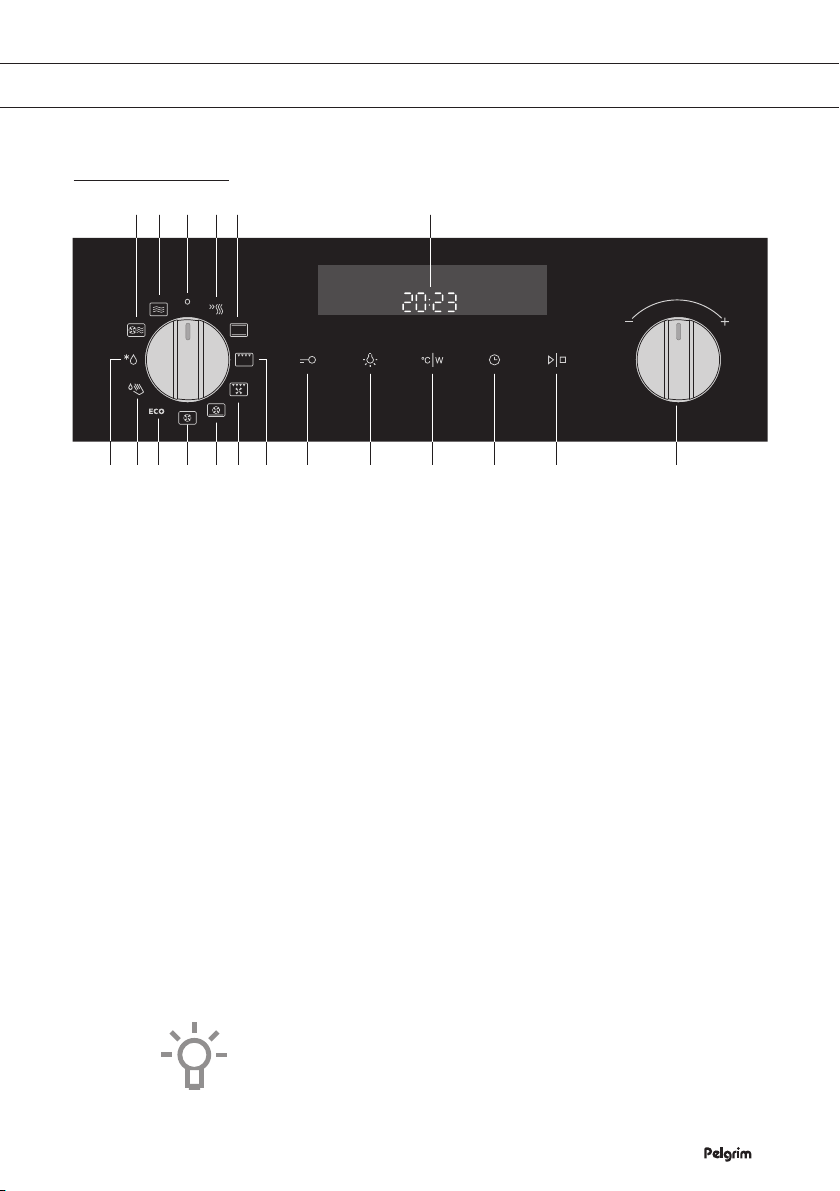
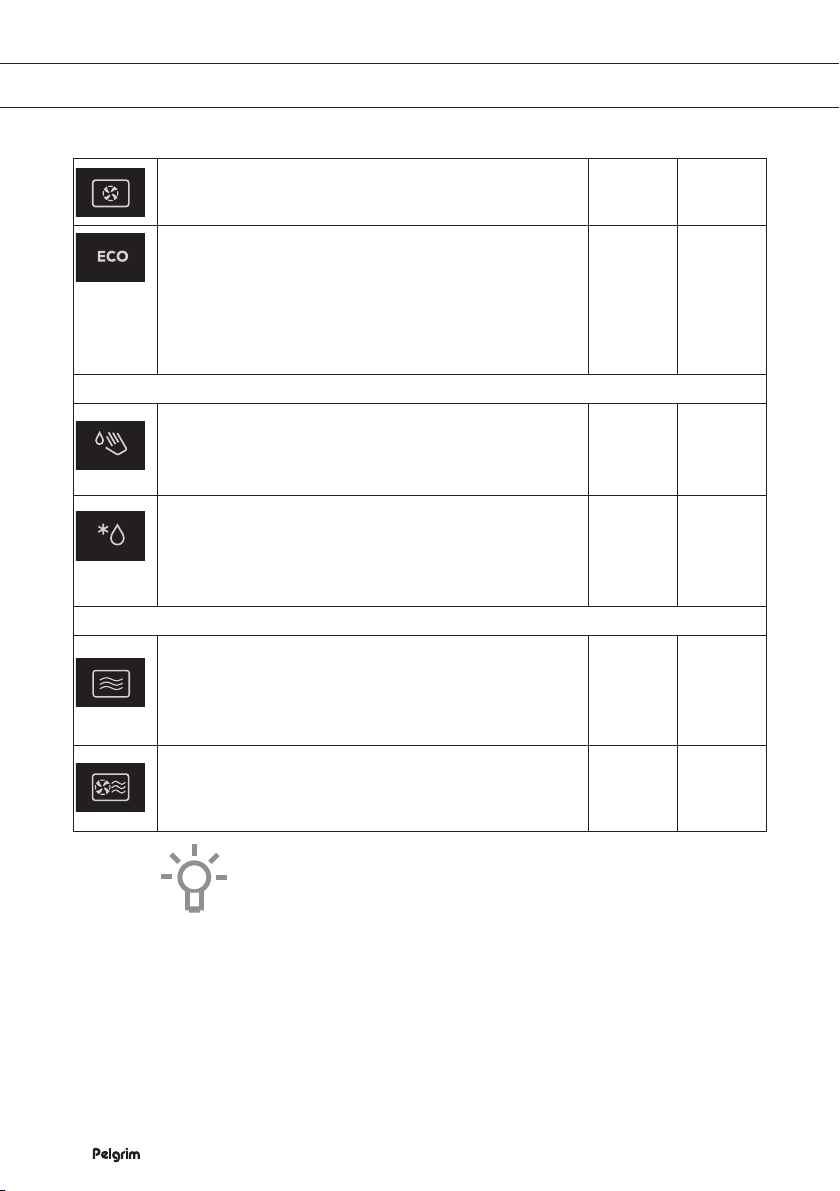
Pelgrim OVM436 User manual

Pelgrim

Pelgrim OVM436 User manual

Pelgrim OVM624RVS User manual

Pelgrim

Pelgrim OVM624RVS User manual

Pelgrim OVP716RVS User manual

Pelgrim

Pelgrim OVP716RVS User manual

Pelgrim OVM614RVS User manual

Pelgrim

Pelgrim OVM614RVS User manual

Pelgrim OST 653 User manual

Pelgrim

Pelgrim OST 653 User manual

Pelgrim OVM326RVS User manual

Pelgrim

Pelgrim OVM326RVS User manual

Pelgrim OVM406RVS User manual

Pelgrim

Pelgrim OVM406RVS User manual

Pelgrim OST 370 User manual

Pelgrim

Pelgrim OST 370 User manual

Pelgrim COS834MAT User manual

Pelgrim

Pelgrim COS834MAT User manual

Pelgrim O500 Series User manual

Pelgrim

Pelgrim O500 Series User manual

Pelgrim O560RVS/P08 User manual

Pelgrim

Pelgrim O560RVS/P08 User manual

Pelgrim OST 350 User manual

Pelgrim

Pelgrim OST 350 User manual

Pelgrim OVM616RVS User manual

Pelgrim

Pelgrim OVM616RVS User manual

Pelgrim Novecento NF1000 User manual

Pelgrim

Pelgrim Novecento NF1000 User manual

Pelgrim OPC560 Series User manual

Pelgrim

Pelgrim OPC560 Series User manual

Pelgrim 955 ONY User manual

Pelgrim

Pelgrim 955 ONY User manual

Pelgrim OVM824RVS User manual

Pelgrim

Pelgrim OVM824RVS User manual

Pelgrim OVM516RVS User manual

Pelgrim

Pelgrim OVM516RVS User manual

Pelgrim OKW740RVS User manual

Pelgrim

Pelgrim OKW740RVS User manual

Pelgrim OAS560 Series User manual

Pelgrim

Pelgrim OAS560 Series User manual

Pelgrim MAC696RVS User manual

Pelgrim

Pelgrim MAC696RVS User manual

Pelgrim OVM826RVS User manual

Pelgrim

Pelgrim OVM826RVS User manual

Pelgrim OVM336 User manual

Pelgrim

Pelgrim OVM336 User manual

Pelgrim OVM526RVS User manual

Pelgrim

Pelgrim OVM526RVS User manual

Popular Oven manuals by other brands

Brandt FC 222 user manual

Brandt

Brandt FC 222 user manual

aumate TOA20M04N-1E instruction manual

aumate

aumate TOA20M04N-1E instruction manual

Maytag CWE4100AC - 24" Single Electric Wall Oven Dimension Guide

Maytag

Maytag CWE4100AC - 24" Single Electric Wall Oven Dimension Guide

Kernau KBO 1076 S PT B instruction manual

Kernau

Kernau KBO 1076 S PT B instruction manual

Bosch HB 37 N Series User manual and installation instructions

Bosch

Bosch HB 37 N Series User manual and installation instructions

Electrolux EOD5420AA user manual

Electrolux

Electrolux EOD5420AA user manual

Mx Onda MX-HC2183 instruction manual

Mx Onda

Mx Onda MX-HC2183 instruction manual

Daewoo F6EV19SM2 Service manual

Daewoo

Daewoo F6EV19SM2 Service manual

Blodgett MT3870 Specifications

Blodgett

Blodgett MT3870 Specifications

GE ZET2F owner's manual

GE

GE ZET2F owner's manual

GE JK3000DF3WW owner's manual

GE

GE JK3000DF3WW owner's manual

eka EKF 523 NT Operating and instruction manual

eka

eka EKF 523 NT Operating and instruction manual

AEG Electrolux E3191-5 user manual

AEG Electrolux

AEG Electrolux E3191-5 user manual

Pratica Rocket Express quick start guide

Pratica

Pratica Rocket Express quick start guide

Viking Professional VGSO260T user guide

Viking

Viking Professional VGSO260T user guide

FM RX203 instruction manual

FM

FM RX203 instruction manual

Bosch HBN331 9B Series instruction manual

Bosch

Bosch HBN331 9B Series instruction manual

NEFF B95M42N0MK Instructions for use

NEFF

NEFF B95M42N0MK Instructions for use

manuals.online logo
manuals.online logoBrands
  • About & Mission
  • Contact us
  • Privacy Policy
  • Terms and Conditions

Copyright 2025 Manuals.Online. All Rights Reserved.

Instructions for use
Oven
MAC524RVS
MAC524MAT
EN Instructions for use EN 3 - EN 29
Pictograms used
Important information
Tip
EN 3
CONTENTS
Your oven
Introduction 4
Control panel 5
Description 6
Guide rails/Telescopic guide rails 6
Accessories 7
Use
First use 8
Oven settings 9
Oven modes 11
Defrosting 14
Microwave 15
Microwave function / Combi function 17
Using the timer 18
Selecting additional functions 20
Cleaning
Cleaning your oven 22
The Aqua clean function 22
Removing and cleaning the guide rails 23
Replacing the oven light bulb 24
Troubleshooting
25
Your oven and the environment
Disposing of the appliance and the packaging 27
Cooking test
Food tested in compliance with the EN 60350-1 standard 28
Food tested in compliance with the EN 60705-2 standard 29
EN 4
Introduction
Congratulations on your choice of this Pelgrim microwave oven.
This product was designed with simple operation and optimum comfort
in mind. With the extensive setting options, you can always select the
right method of preparation.
This manual describes the best way to work with this oven. In addition
to information on operation, you will also find background information
that may come in handy when using the appliance.
Read the separate safety instructions before
using the device!
Read this manual before using the appliance and keep it in a safe
place for future use.
The installation instructions are included separate.
YOUR OVEN
Register your appliance for warranty purposes
We are convinced of the quality of our products. This is why we offer
a warranty period of up to 8 years*. All you need to do is register your
appliance on pelgrim.nl (when purchased in the Netherlands) and
pelgrim.be (when purchased in Belgium).
*Visit www.pelgrim.nl or www.pelgrim.be for full warranty terms and conditions.
EN 5
YOUR OVEN
Control panel
1. Off
2. Fast preheat
3. Top + bottom heat
4. Grill
5. Grill + fan
6. Hot air + bottom heat
7. Hot air
8. ECO Hot air
9. Aqua clean
10. Defrosting
11. Microwave + hot air
12. Microwave
13. Display (cooking information and timer clock)
14. Child lock
15. Oven lighting on/off
16. Temperature / power
17. Timer
18. Start / stop
19. Multi-function selector
Note:
The keys respond best if you touch them with a large area of your
fingertip. Every time you press a button during use, a short warning
signal will sound.
7 6 5 48910 1914 15 16 17
131 2 31211
18
EN 6
YOUR OVEN
Description
1. Control panel
2. Oven levels
3. Oven door
4. Door handle
Guide rails/Telescopic guide rails
• The oven has four or five guide rails (Level 1 to 4/5), depending on
the model. Level 1 is mainly used in combination with bottom heat.
The two upper levels are mainly used for the grill function.
• Place the oven rack, baking tray or steam dish in the gap between
the guide rail sliders.
• A number of shelf levels can have fully-retractable telescopic guide
rails, depending on the model.
▷Pull the telescopic guide rails out of the oven cavity completely
and place the oven rack / baking tray / steam dish on them.
Then slide the oven rack / baking tray / steam dish on the
telescopic guide rails, back into the oven cavity.
▷Only close the oven door when the telescopic guide rails have
been returned completely back into the oven cavity.
1
3
Level 1
Level 2
Level 3
Level 4
2
4
EN 7
Accessories
Your appliance is accompanied by a range of accessories, depending
on the model. Only use original accessories; they are specially suited
to your appliance. Be sure that all the accessories that are being used
are able to withstand the temperature settings of the chosen oven
function.
Note: not all accessories are suitable/available for every appliance
(it may also differ by country). When purchasing, always provide the
exact identification number of your appliance. Please see the sales
brochures or check online for more details about optional accessories.
Accessories that can be supplied with your appliance (depending on the model)
Enamelled baking tray; to be used for pastries and cakes.
• Do not use the enamelled baking tray for microwave functions!
• Suitable for pyrolysis cleaning.
Oven rack; mainly used for grilling. A steam dish or pan with food
can also be placed on the oven rack.
• The oven rack is equipped with a safety peg. Lift the rack slightly
at the front to slide it out of the oven.
• Do not use the oven rack for microwave functions!
Deep enamelled baking tray; to be used for roasting meat and
baking moist pastry. It can also be used as a drip tray. Place
the deep baking tray into the first level for use as a drip tray
during grilling.
• Do not use the deep enamelled baking tray for microwave
functions!
• Suitable for pyrolysis cleaning.
Glass baking tray; for microwave and oven use.
• NOT suitable for pyrolysis cleaning.
YOUR OVEN
EN 8
USE
First use
Setting the current time of day
When the appliance is first plugged in, the ‘display’ lights up. After
three seconds, the Clock symbol and “12:00” blink on the display.
1. Turn the ‘Multi-function selector’ to set the time of day.
2. Confirm the settings by pressing ‘start / stop’.
If nothing is pressed, the settings are stored automatically after
three seconds.
You can always set the current time by pressing the “timer
button” twice. Then turn the ‘Multi-function selector’ to set the
current time. Confirm the settings by pressing “start/stop”.
If nothing is pressed, the settings are stored automatically after
three seconds.
Using the oven
The oven has 10 oven functions and 1 cleaning function. Consult the
table to select the right oven function to prepare a dish.
1. Place the dish in the oven.
▷Attention; for most dishes the oven has to be preheated first.
Please do not insert your food in the oven yet, but wait until the
preheating is complete.
2. Turn the ‘Mode selector’ to the desired oven setting.
The selected pictogram will appear on the display.
3. Touch the ‘Temperature / power key’.
4. Set the oven to the desired temperature using the ‘Multi-function
selector’.
5. Select, if required, a cooking time by pressing the ‘timer key’
6. Press the ’Start / stop’ key.
The oven will start the oven function set and heat the oven to the
selected temperature. The temperature symbol in the display will
flash. When the oven has reached the selected temperature, the
temperature symbol in the display will remain illuminated.
Multi-function
selector
Mode selector
Temperature /
power key
Start / stop key
EN 9
Remarks
• The temperature can be adjusted during preparation.
• Cooking times are rough estimates and may vary subject to some
conditions.
• Some recipes should be preheated using the selected oven mode.
• If you are using parchment paper, make sure it is highly temperature
resistant.
• When cooking larger chunks of meat or pastry, a lot of steam will
be generated inside the oven, which in turn may condense on the
oven door. This is a normal phenomenon which will not affect the
operation of the appliance. After the cooking process, wipe the
door and the door glass dry.
• To prevent condensation (dew) do not leave heated food cool off in
a closed oven.
Oven settings
Consult the table to select the right oven function. Also consult the
instructions for preparation on the dish packaging.
Function Description Suggested
temp. °C
Suggested
power (W)
Oven mode
Fast preheat
Use this function if you wish to heat the oven to the desired
temperature as quickly as possible. This function is not
appropriate for cooking food! When the oven is heated
up to the desired temperature, the heating process is
completed.
Top Heat + Bottom Heat Setting
Heat comes from top and bottom heating elements.
This setting is suitable for baking and roasting.
200
Grill Setting
Food is heated by the top heating element.
240
Top heat + Fan setting
The heat generated by the top heating elements is
distributed by the fan. This mode can be used for grilling
meat and fish.
170
Hot Air + Bottom Heat Setting
Hot air and the bottom heating element combine so food
can be crisped and browned.
200
USE
EN 10
Hot Air Setting
Food is heated by hot air from the back of the oven. This
setting provides uniform heating and is ideal for baking.
180
ECO Hot air
The dish is heated by hot air. ECO Hot air uses less energy
but gives the same result as the hot air setting. Cooking
takes several minutes longer. This function is used to roast
meat or to bake pastry.
This mode uses residual heat for low energy consumption
(in accordance with energy class EN 60350-1). In this
mode, the actual temperature in the oven is not displayed.
180
Automatic functions
Aqua clean
By the help of hot steam the surface of the oven cavity will
be soaked and you can easily clean your oven. The aqua
clean programme takes only 4 minutes time. Then wait
± 30 minutes.
750
Defrosting
Microwaves are an excellent way of defrosting frozen food.
Microwaves gently defrost frozen food in a short period of
time. The oven features automatic defrosting programs that
employ microwaves (A1 to A5).
Microwave function / Combi function
Microwave
Microwave energy is used to cook and defrost foods. It
provides fast efficient cooking without changing the colour
or form of food. Power level and cooking time are manually
set to suit various dishes.
750
Microwave + Hot Air
This function is suitable for all kind of meat and poultry as
well as casseroles and gratin dishes, sponge cakes and
light fruit cakes, pies and crumbles, roast beef and chicken.
160 600
Each oven mode features basic or default settings which can be
adjusted.
Adjust the settings by pressing the relevant key (before pressing the
‘Start / stop key’). Some settings are not available with some programs;
an acoustic signal will remind you of such cases.
USE