Peloton TREAD User manual

USER MANUAL

23
|
TABLE OF CONTENTS
04
06
07
08
10
16
17
18
18
18
19
19
19
21
22
TABLE OF CONTENTS
SAFETY INFORMATION
LABELS
MEMBER SUPPORT
NOTICES
SPECIFICATIONS
SETTING UP THE TREAD
Location requirements
Leveling
Transportation
Storage
Plugging in and powering on
Powering off
Adjusting the touchscreen
USING THE TREAD
GETTING STARTED
22
22
22
23
23
24
27
30
34
Logging in
Selecting a class
Class types
Class screen
Adding a Prole
MAINTENANCE AND CARE
TROUBLESHOOTING
ASSEMBLY
LIMITED HOME USE WARRANTY
WARNING:Read all precautions and instructions in this manual before using this
equipment. Improper use or maintenance can void the warranty. Keep this manual for
future reference. The information in this manual may not reect recent updates as we
continue to improve our product. Please see onepeloton.com/manuals for the latest
version of the manual.

4SAFETY INFORMATION 5
|
SAFETY INFORMATION
Read and follow all warnings, instructions,
and procedures before using the Peloton
Tread. It is the owner’s responsibility
to ensure that all users are aware of all
warnings and precautions. Use only as
described. Misuse of this equipment may
result in serious injury or death.
Peloton is not responsible for damage or
injury caused by inappropriate use.
Consult a physician before beginning a new
tness plan. Incorrect or excessive training
can result in serious injury.
If you experience faintness, chest pain,
or shortness of breath, stop exercising
immediately and consult a physician.
Metrics on the screen, including heart rate
monitoring, may be inaccurate. Use values
for reference only
Keep children and animals away from
the Tread.
Children under the age of 16 and persons
with reduced physical, sensory, or mental
capabilities that impair the safe use of the
equipment may not use the Tread. Children
over the age of 16 and persons with a lack
of experience and knowledge must be given
supervision or instruction before using
the Tread. Do not allow children to perform
maintenance or to play with the Tread.
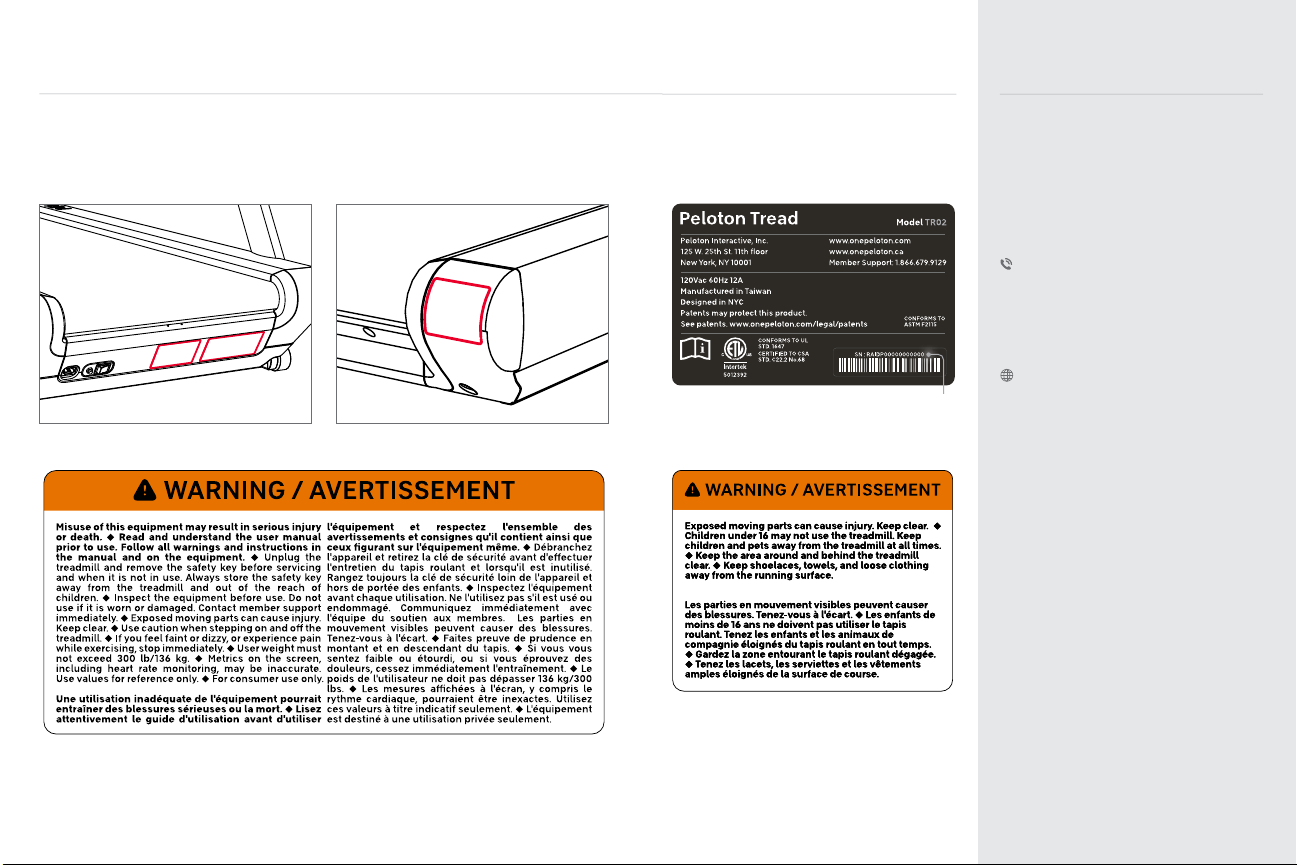
Inspect the Tread for loose, worn,
damaged, or incorrect parts before using.
Do not use before parts are replaced,
repaired, or tightened.
Do not wear loose or dangling clothing
while using the Tread. Keep towels, loose
clothing, and accessories away from the
running surface. Make sure your shoelaces
don’t extend past the soles of your shoes.
Users must not be under 105 lb/48 kg or
over 300 lb/136 kg.
Be careful when stepping on and off the
treadmill. Never mount or dismount while
the belt is moving.
Use handrails for support, but avoid resting
your whole weight on the handrails.
If an error occurs during operation, the
Tread belt may come to a gradual or
sudden stop, depending on the error and
your speed. Always remain alert while
using the Tread.
Ensure that the power supply is plugged
into an outlet that supports 15 amps and
complies with local building codes. Avoid
GFCI and RCBO outlets. Never plug any
power cord directly into the Touchscreen.
Unplug the Tread and remove the safety
key before servicing and when it is not in
use. Always store the safety key away from
the Tread and out of the reach of children.
Familiarize yourself with emergency stop
procedures before using the Tread.
Test the emergency stop by pulling the
safety key out while the belt is moving.
The Tread is for indoor use only. Do not
store or operate the Tread outdoors,
at high humidity levels, or in damp or wet
locations. Always keep the running surface
clean and dry.
The Tread is designed for home
use. Do not use in a commercial or
rental setting.
Set up and operate the Tread on a solid,
level surface.
Make sure you have at least 78.7”/2 m
of clearance directly behind the Tread,
and 24”/60 cm of clearance on each side
of the Tread. Keep the area around the
Tread clear of furniture, equipment,
and accessories.
Use only original parts from Peloton.
Unauthorized changes or modications to
this equipment could damage the Tread,
impair its operation, and void your warranty
Do not attempt to service the Tread
yourself other than performing the basic
maintenance described in this manual.
Assembly and service other than basic
maintenance should be performed by
authorized personnel.
Keep hands away from moving parts. Never
touch the moving belt or reach under the
Tread while it is powered on. Never put
items under the deck.
Never operate the Tread if it isn’t working
properly, or if the power cord has been
damaged. Keep power cord away from
heated surfaces, sharp edges, and water.
Do not soak or spray Tread surfaces with
liquid. Clean using a damp cloth.

6MEMBER SUPPORT 7
|
LABELS
Familiarize yourself with all warnings on the Tread before use.
If any label is damaged or lost, contact member support for a replacement immediately.
The serial number indicates this unit’s
date of construction. For example,
‘RAPID1200417xxxx’ would mean that the
unit was constructed on 17 April 2020.
A
A
B
C
*
*
C
B
MEMBER SUPPORT
Peloton’s #1 concern is member
satisfaction. If you require assistance or
are experiencing issues with your Peloton
Tread, please contact member support for
additional help.
US 1.866.679.9129
CAN 1.833.821.0099
UK +44.808.169.6469
DE +49 32211001778
support.onepeloton.com
When you contact member support, have
the following information ready:
1 Tread ID/serial number†
2 Purchase Date
3 Your order number or the email address
associated with your Tread purchase
†To access the Tread ID/serial number
from the touchscreen, tap the menu icon
at the lower right, and select About.

8NOTICES 9
|
This device complies with part 15 of the
FCC Rules. Operation is subject to the
following two conditions: (1) this device
must not cause harmful interference,
and (2) this device must not accept any
interference received, including interference
that may cause undesired operation.
NOTE:This equipment has been tested
and found to comply with the limits for
a Class B digital device, pursuant to
Part 15 of the FCC Rules. These limits
are designed to provide reasonable
protection against harmful interference in
a residential installation. This equipment
generates, uses and can radiate radio
frequency energy and, if not installed and
used in accordance with the instructions,
may cause harmful interference to radio
communications. However, there is no
guarantee that interference will not occur
in a particular installation. If this equipment
does cause harmful interference to radio
or television reception, which can be
determined by turning the equipment off
and on, the user is encouraged to try to
correct the interference by one or more
of the following measures:
1Reorient or relocate the
receiving antenna.
2Increase the separation between the
equipment and receiver.
3 Connect the equipment to an outlet on a
circuit different from that towhich the
receiver is connected.
4Consult the dealer or an experienced
radioTV technician for help.
CAUTION:
1To comply with FCC RF exposure
compliance requirements, a separation
distance of at least 20cm must be
maintained between the antenna of
this device and all persons.
2This transmitter must not be co-located
or operating in conjunction with
any other antenna or transmitter.
NOTICES
EU DECLARATION OF
CONFORMITY
Hereby, Peloton Interactive, Inc.
declares that the Peloton Tread
is in compliance with Directive
2006/42/EC. The full text of the
declaration of conformity is available
at onepeloton.co.uk/compliance.
Waste electrical products should not
be disposed of with household
waste. Please recycle where facilities
exist. Check with your local authority
or retailer for recycling advice.
This product is ANT+™ certied and
is compatible with ANT+ sensors
that support heart rate monitoring.
DISTRIBUTED BY:
US/CANADA
Peloton Interactive, Inc.
125 West 25th Street11th Fl
New York, NY 10001
UK
Peloton Interactive UK Limited
Orion House, 8th Floor
5 Upper St Martin’s Lane
London WC2H 9EA
United Kingdom
EU
Peloton Interactive Deutschland GmbH
c/o We Work, Friedrichstr. 76
10117 Berlin
Germany

10 11
|
SPECIFICATIONS
SPECIFICATIONS
A
B
C
D
E
F
G
H
I
J
K
L
M
TOUCHSCREEN
TRAY
STOP BUTTON
SPEED KNOB
SAFETY KEY
POWER SWITCH
INCLINE WHEELS
DECK
FEET
BELT
FOOTRAILS
HANDRAIL
INCLINE KNOB
C
B
L
K
H
J
G
F
I
E
M
D
A

12 13
|
SPECIFICATIONS
DIMENSIONS
Total : 68” L x 33” W x 62” H (173 cm L x 84 cm W x 157 cm H)
Screen : 23.8” diagonal
Belt : 59” L x 20” W (150 cm L x 51 cm W)
Step-up height : 8”/20 cm
Weight : 290 lb/132kg
TECHNOLOGY
Screen : 23.8” 1080p HD touchscreen
Camera : 8MP still photo/1080P video camera with privacy cover
USB-C network/charging port
3.5 mm headphone jack
4 Digital Microphone Array
User Controls :
One-touch wake/stop/sleep button
Speed and Incline knobs with jump buttons
On-screen speed and incline shortcuts
Volume up/down buttons
Sound :
Front-facing stereo speakers, 2.2 channel with rear-facing woofers
80Hz to 20KHz frequency response
Weighted emission sound pressure at runner’s ear: <65dbA*
Connection :
WiFi 802.11 a/b/g/n/ac, MIMO 2x2 Antenna
ANT+™ wireless
Bluetooth® 5.0
100 Mbps Ethernet via network/charging port
SPECIFICATIONS CONTINUED
*Noise emission under load is higher than without load.

SPECIFICATIONS 15
|
14
SPECIFICATIONS
Power Requirements :
US/Canada: 120Vac, 60Hz, 12A
UK/Germany: 230V 50Hz, 10A
Avoid GFCI/RCD/RCBO outlets
USER REQUIREMENTS
Height : 4’11” - 6’4”/150 - 193 cm
Weight : 105 - 300 lb/48 - 136 kg
Age : 16 years or older
CONTINUED
PERFORMANCE
Speed : 0-12.5 mph/0-20 kph
Incline : 0-12.5% grade
Motor : 3 HP DC
Screen Adjustment : 0-50 degree vertical tilt
Safety : Removable safety key
POWER CONSUMPTION
Networked Standby Mode :
Power Consumption: 1.9W
Power consumption with all interfaces connected: 1.9W
Time to enter Standby Mode : 20 mins of inactivity
Off Mode :
Power Consumption : 0.0W
Time to enter Off mode : N/A; Turn off equipment using power switch

16 SETTING UP YOUR TREAD 17
|
LOCATION REQUIREMENTS
yInstall the Tread on a hard, at, stable surface. Avoid high pile carpets. If you put a mat
under the Tread, choose a hard, thick mat that won’t curl up or interfere with the
incline mechanism.
yBootcamp and Floor classes take place off or partially off the Tread. Make sure that you
have adequate space to work out behind or alongside the Tread.
yThe Tread deck can incline to a height of 15”/40 cm. Make sure that the area above your
Tread is free of obstructions and that the ceiling height is at least 20”/.5 m greater than
the height of your tallest Tread user.
yMake sure the Tread is situated within 5’/1.5 m of an outlet. The provided power cord
must be able to reach the outlet at minimum and maximum incline, with some slack.
The power cord must never pass under the Tread.
yMake sure you have at least 78.7”/2 m of clearance directly behind the Tread and
24”/60 cm of clearance on each other side.
24" / 60c m
78.7" / 2m
24" / 60c m
24" / 60c m
SETTING UP YOUR TREAD
SAFETY INFORMATION
When installing the Tread, make sure that the electrical installation complies with all local
codes and ordinances. Consult an electrician if you are not sure whether your outlet can
support the Tread.
Do not use extension cords or adapters. Do not attach other appliances to the same circuit.
Avoid GFCI and RCBO outlets. If no suitable outlet is available, contact an electrician.
Use a dedicated, grounded circuit capable of carrying 15 or more amps. If the circuit is not
properly grounded there is a risk of electric shock.
Never put anything under the Tread or reach under the Tread while it is powered on. Keep
the area around the Tread free of obstructions.

18 19
|
SETTING UP YOUR TREAD
SETTING UP YOUR TREAD CONTINUED
LEVELING
yIf the Tread rocks or wobbles, stabilize it by adjusting the back feet.
yUse a 27mm wrench or an adjustable wrench to loosen the nut at the top of
each back leg.
yTurn one or both feet clockwise until all feet rest rmly on the ground.
yTighten the locking nuts.
MOVING THE TREAD
yMake sure to power down and unplug the Tread before moving it.
yOne person stands at front, holding the handrail.
yOne person lifts from the back.
yTilt the Tread forward.
ySlowly and carefully roll the Tread backwards or forwards.
For more information on transporting the Tread to a new location, contact
member support.
STORAGE
yStore the Tread in a dry, indoor area.
yRemove the Safety Key and store it in a separate location when the Tread is not in use.
yTo reattach the Safety Key, t the magnet into the notch under the center button. Wrap
the cord around the cleat twice and place the clip on the magnet.
CAUTION: Do not attempt to move the Tread with fewer than two people.
PLUGGING IN AND POWERING ON
yPlug in the power cord.
ySwitch the Tread on.
yPress the center button to wake the Tread.
POWERING OFF
yPress and hold the center button.
ySwitch the Tread off.
ADJUSTING THE TOUCHSCREEN
yHold the top and bottom of the screen and tilt back or forward.
yYou should be able to look at the screen comfortably from the center of the deck.

20 21
|
USING THE TREAD
USING THE TREAD
WARNING:Do not start the Tread before stepping onto the running surface.
Step onto the Tread from the rear, using handrails for balance. Avoid putting your
full weight on the handrails.
CENTER BUTTON
yWhen the running surface is in motion, press to stop.
yWhen the Tread is powered on, but inactive, press to wake.
yWhen the Tread is active, press and hold for three seconds to sleep.
SPEED
yTurn the speed knob forward to increase speed in increments of 0.1 mph.
yTurn the knob backward to decrease speed in increments of 0.1 mph.
yPress the jump button at the center of the knob to increase speed to the next whole mph.
yTap Speed to change your speed using on-screen shortcuts. Tap the screen and select
Customize Shortcuts to put in your own shortcut speeds.
INCLINE
yTurn the incline knob forward to increase incline in increments of 0.5 percent grade.
yTurn the knob backward to decrease incline in increments of 0.5 percent grade.
yPress the jump button at the center of the knob to increase incline speed to the next
whole percent grade.
yTap Incline to change your incline using on-screen shortcuts. Tap the screen and select
Customize Shortcuts to put in your own shortcut incline settings.
CAUTION:The Tread will only function when the safety key is present and fully
engaged. Do not lose the safety key
SAFETY KEY
Familiarize yourself with emergency stop procedures before using the Tread.
yDetach the magnetized clip from the center rail and clip it to a tight-tting
piece of clothing.
yDetach the safety key to stop the belt immediately and disable the Tread.
yTo start running again, reattach the safety key and press the center button.
yAlways detach the safety key when the Tread is not in use.
SETTING UP YOUR TREAD CONTINUED

22 GETTING STARTED 23
|
GETTING STARTED
CONNECTING TO THE INTERNET
ySelect your WiFi network and enter the password. Tap Connect.
yIf a WiFi network is not available, you can connect to a wired network. Use an adapter
to connect an Ethernet cable to the network port on the back of the touchscreen.
The Tread will connect to the network automatically.
LOGGING IN
yWhen logging in for the rst time, please have available your Subscription Activation Key
or the login information you set up when you purchased the Peloton Tread.
yOnce a subscription is activated and associated with this Tread, any user can log in and
access subscription content.
CAUTION: Ethernet cable must not pass underneath the Tread or touch the
running surface.
|
SELECTING A CLASS
ySelect live classes from the schedule or choose from on-demand classes.
yFilter by instructor, class length, class type, and more.
yMost Peloton classes will include warmup and cooldown.
ySelect More for a Scenic Run or Just Run experience.
CLASS TYPES
Peloton’s schedule includes a variety of different kinds of classes. Class types may
include the following:
yRunning/Walking: cardio-focused classes taking place entirely on the Tread.
yBootcamp: a combination of cardio segments taking place on the Tread and strength
segments taking place off the Tread.
yStrength/Yoga/Cardio: classes taking place off the Tread.
yFor more information on classes, go to onepeloton.com/tread/classes.
CLASS SCREEN
1 Your Timeline shows class segments and your progress within the class
2 Time remaining in the class
3 Heart rate is measured when you connect a heart rate monitor
4 The Leaderboard shows all participants in a class. Filter by Friends, Tags, or users who
are Here Now.
5 Your current Incline, in percent grade
6 Your current Output, in watts, is a combination of Speed and Incline
7 Your current Pace, in minutes per mile
8 Your current Speed, in miles per hour
9 Total elevation measures the vertical distance you’ve climbed
10 Total output
11 Calories burned
12 Distance measures the horizontal distance you’ve traveled
ADDING A PROFILE
To let another person use your Tread, tap the icon next to your username at the lower left
of the screen and select Add/Remove Proles. The new user can log in with an existing
Peloton account or tap Create an Account to set up a new one.

MAINTENANCE AND CARE 25
|
24
MAINTENANCE AND CARE
SAFETY INFORMATION
The safety and integrity of the Tread can only be maintained when it is regularly examined
for damage and repaired.
Always power down and unplug the Tread before cleaning or performing maintenance.
It is the owner’s sole responsibility to ensure that regular maintenance is performed.
Replace worn or damaged parts immediately. Do not use the Tread until repairs are made.
Use only original parts from Peloton. Changes or modications to this unit not expressly
approved by Peloton could void the warranty.
Service other than the procedures described here must be performed by an
authorized technician.
MAINTENANCE SCHEDULE
Before every class:
yCheck the area around and underneath the Tread for potential obstructions.
Weekly:
yClean Tread surfaces.
yCheck power cord for damage.
yClean the area underneath the Tread.
Monthly:
yCheck the entire Tread for wear and damage.
yTest the safety key by pulling it out while walking on the Tread.
yMake sure the belt is centered.
Every six months:
yLubricate the belt.
CLEANING THE TREAD
yClean the Tread regularly for optimal performance and longevity.
yClean surfaces with a damp cloth and mild, soapy water.
yNever use abrasive cleaners.
yNever spray or pour liquid directly on Tread surfaces. Never allow liquid to drip into
any opening on the Tread.
yAlways power off and unplug the Tread before cleaning.

26 27
|
TROUBLESHOOTING
CENTERING OR TENSIONING THE BELT
LUBRICATING THE BELT
1 Power down and unplug the Tread.
2 Use a 3mm Allen wrench to remove one screw from each rear end cap and three
from the rear belt guard.
3 Use a 6mm Allen wrench to tighten the tensioning screws on each side of the belt.
Tightening a screw will increase the tension on that side of the belt, and can pull
the belt out of alignment. Make sure the red line on the belt stays between the
two centering dots at the front of the Tread.
4 Return the belt guard and end caps to the back of the deck and screw
them into place.
For more detailed instructions, visit support.onepeloton.com.
1 Power down and unplug the Tread.
2 Use a 3mm Allen wrench to remove one screw from each rear end cap and three
from the rear belt guard
3 Use a 6mm Allen wrench to loosen the tensioning screws on each side of the belt.
4 Apply a bead of silicone lubricant to the deck board.
5 Use the 6mm Allen wrench to tighten both tensioning screws. Make sure the
red line on the belt sits between the two centering dots at the front of the Tread.
6 Return the belt guard and end caps to the back of the deck and screw them
into place.
MAINTENANCE AND CARE CONTINUED
Problem: The touchscreen has trouble connecting to WiFi.
Solution: Peloton recommends a minimum of 10-15 mbps download and 2.5 mbps
upload speed for your touchscreen. WiFi extenders and boosters, distance from the router,
and obstructions like walls and furniture can weaken your WiFi signal. If you continue to
have trouble with your WiFi connection, you can connect to a Local Area Network (LAN).
Use an adapter to connect an Ethernet cable to the USB-C network port on the back of
the touchscreen.
Problem: The Tread is producing an unusual noise.
Solution: Immediately stop the belt and set the incline to zero. Power down and unplug the
Tread and contact member support.
Problem: The belt won’t move.
Solution: First, make sure the Tread is awake. If the screen is dark, the Tread is asleep and
will not work. If the Tread is awake, try detaching and reattaching the safety key. If you
are still unable to start the belt, use the power switch at the front of the deck to turn the
Tread off and then on. If you are unable to start the belt after power cycling, contact
member support.
Problem: Control lights are on, but the touchscreen is blank.
Solution: If you have just turned on the Tread, wait a few moments for the system to boot.
If the screen still doesn’t turn on, try to wake the system by touching the screen or by
pressing and holding the center button for a few seconds. If the screen is still unresponsive,
contact member support.
CAUTION:Any repair or troubleshooting procedure other than those described in
this section must be performed by authorized personnel.
TROUBLESHOOTING

28 29
|
TROUBLESHOOTING
Problem: The Tread does not register heart rate data.
Solution: Check your heart rate monitor.
yIs the sensor receiving data? You may need to tighten the strap or moisten the
electrodes to help the monitor pick up your heart rate.
yIs the heart rate monitor paired with a different device?
yDoes the monitor battery need to be replaced?
Keep in mind that the Tread will only display heart rate data when a class is in progress.
Problem: The Tread won’t turn on.
Solution: First make sure that the power cord is securely attached to the Tread and the
outlet, and that the Tread is switched on. Then press and hold the center button for a
few seconds. The control lights should turn on. If the Tread is still unresponsive, contact
member support.
Problem: The Speed and/or Incline knob does not work.
Solution: If the Tread is awake and the controls are not working, check the control
lights. The Tread will function only when the safety key is present and fully engaged.
Solid red lights indicate that the safety key is not connected. Try detaching and
reattaching it. Blinking red lights indicate an error. Follow the instructions on the screen,
or, if there are no instructions, use the switch on the underside of the deck to turn the
Tread off and then on. If the issue persists after power cycling, contact
member support.
TROUBLESHOOTING CONTINUED
Problem: The belt comes to a stop during a workout.
Solution: If an error occurs during operation, the Tread belt will come to a stop. The stop
may be gradual or more sudden, depending on the error and your speed.
Errors could include:
yThe safety key disconnecting
yThe Tread not registering the presence of a user below the minimum user weight
yA temporary issue with the touchscreen software
If an error occurs, follow the instructions on the screen. If there are no instructions, use
the switch on the underside of the deck to switch the Tread off. Wait 30 seconds before
switching it back on. See support.onepeloton.com for more information
on possible errors.
Problem: Control lights are red.
Solution:
ySolid red lights indicate that the safety key is not connected. The Tread will
function only when the safety key is present and fully engaged. Try detaching
and reattaching it.
yBlinking red lights indicate an error. Follow the instructions on the screen, or,
if there are no instructions, use the switch on the underside of the deck to turn the
Tread off and then on. See support.onepeloton.com for more information on
possible errors.

PARTS
Box 1:
Deck
Box 2:
Uprights x 2
Handrail
M5x10 button head screws x 4
M6x10 low prole cap head screws x 6
M6x12 at head cap screws x 3
M10x16 cap head screws with washers x 14
Box 3:
Touchscreen
31
|
ASSEMBLY
ASSEMBLY
30
WARNING:The Peloton Tread was not designed for assembly and installation
by consumers. The Peloton Tread assembly instructions are intended to assist
trained, professional installers, using specialized tools, in assembling the Peloton
Tread. The Peloton Tread weighs 290 lb/132 kg and requires more than one person
to assemble and/or move. Do not attempt to move the Tread with fewer than two
people. Improper assembly of the Peloton Tread can lead to serious injury. Damage
or equipment failure resulting from the improper or negligent assembly will not
be covered under Peloton’s warranties. If you use these assembly instructions to
assemble, disassemble, or move the Peloton Tread, you do so entirely at your own
risk. By undertaking assembly of your Peloton Tread, you agree to waive and release
Peloton from any and all claims that you may have resulting from the assembly of
the Peloton Tread by anyone other than a trained professional.
WARNING:Perform a complete visual inspection of the Peloton Tread and test all
features and functions prior to use.
TOOLS REQUIRED
3mm Allen wrench
4mm Allen wrench
8mm Allen wrench
27mm wrench
Torque wrench with 4mm
and 8mm hex bits
1 Connect left upright cable
2 Add right and left uprights
3 Connect three handrail cables
4 Push the handrail all the way into
the uprights
1
3 4
2

32 33
|
ASSEMBLY
ASSEMBLY CONTINUED
5 Add handrail screws. Torque screws to
35 lb-ft/47 N•m
6 Torque upright screws to
35 lb-ft/47 N•m
7 Attach upright bolt covers
8 Snap on upright caps
9 Add handrail bolt covers
5
8 9
710 11
1412
10 Attach tray
11 Install safety key
12 Add touchscreen
13 Torque screws to 7 lb-ft/9 N•m
14 Plug in power/data cable
15 Plug in and power on
16 The Home Installer App will
run automatically and perform
speed and incline calibration

34 WARRANTY 35
|
LIMITED HOME USE WARRANTY
Peloton Interactive, Inc. (“Peloton”) extends
the following Limited Warranty to U.S.
purchasers, which applies only to non-
commercial, in-home, indoor use of the
Peloton Tread. Any other use of the Peloton
Tread shall void this Limited Warranty. During
the applicable Limited Warranty periods
described below, the covered components
of the Peloton Tread will be free of defects
or malfunctions during normal use. Certain
exclusions apply, as further described in this
Limited Warranty.
The Limited Warranty applies for the
following components of the Peloton Tread
only, for the time period indicated. The
Limited Warranty applies only against defects
discovered within the applicable Limited
Warranty period and only so long as the
Peloton Tread remains in the possession of
the original purchaser, or for gifted Peloton
Treads, the owner of the original Subscription
attached to that Peloton Tread
FRAME: FIVE YEARS
Peloton warrants the platform frame, which
is dened as the steel structural portion of
the Tread deck excluding any moving parts
attached to the structural frame, against
defects in workmanship and materials for
a period of ve years from the date of
original delivery.
HD TOUCHSCREEN: 12 MONTHS
Peloton warrants the touchscreen against
defects in workmanship and materials for
a period of 12 months from the date of
original delivery.
TREAD COMPONENTS: 12 MONTHS
Peloton warrants the components and all
original parts of the Peloton Tread (other
than the frame, motor, and walking belt)
against defects in workmanship and
materials for a period of 12 months from
the date of original delivery.
LABOR: 12 MONTHS
For Peloton Treads originally assembled by
an authorized Peloton technician, Peloton
will cover the labor cost for the repair or
replacement made under this Limited
Warranty for a period of 12 months from
the date of original delivery. Except where
applicable law requires otherwise, repair
labor is not covered for locations where
Peloton did not originally assemble the
Peloton Tread or if the Peloton Tread is
moved to a location that is outside of
Peloton’s service area.
* Limited Home-Use Warranty valid only in
the United States.
EXCLUSIONS AND LIMITATIONS
WHO AND WHAT IS COVERED:
The original owner of the Peloton Tread.
The Peloton Tread must remain in the
possession of the original purchaser, or
for gifted Peloton Treads, the owner of
the original Subscription attached to that
Peloton Tread. This Limited Warranty is
not transferable.
If a defect arises in the Peloton Tread or a
warranted component within the applicable
Limited Warranty period, the purchaser’s
sole and exclusive remedy is for Peloton
to, at Peloton’s discretion to the extent
permitted by law, either replace or repair
the defective or malfunctioning Peloton
Tread or component with the same or a
comparable model.
Any replacement or repaired component
shall be warranted for the remainder of the
original Limited Warranty period or 30 days,
whichever is longer, or for any additional
period that is required by applicable law.
Where permitted by law, replacement
units, parts and electronic components
reconditioned to as-new condition by
Peloton or its vendors may sometimes
be supplied as warranty replacement and
constitute fulllment of warranty terms.
WHAT IS NOT COVERED:
Any other Peloton products or services,
non-Peloton products, or labor not approved
in advance by Peloton member support,
units that are, or that Peloton reasonably
believes to be, stolen, counterfeit, or
purchased from an unauthorized distributor
or reseller, units purchased or used outside
the U.S. or Canada, and units missing
serial numbers.
Software, even if sold with or embedded in
the Peloton Tread, or Internet connectivity.
Peloton does not warrant that the operation
of the Peloton Tread will be uninterrupted
or error-free.
Damage or equipment failure due to
normal wear and tear, improper or negligent
assembly, maintenance, installation,
relocation, or repair (other than that caused
by a Peloton authorized service technician),
USA

36 37
|
WARRANTY
use of the Peloton Tread with parts or
accessories from third parties, or with parts
or accessories not originally intended for
or compatible with the Peloton Tread, or
any use contrary to the instructions in the
Peloton Tread User Manual.
Damage or equipment failure due to
accident, abuse, improper or abnormal
use, neglect, corrosion, discoloration of
paint or plastic (or any other change in
cosmetic appearance that does not affect
performance), theft, vandalism, re, ood,
wind, lightning, freezing or other natural
disasters or acts of God of any kind,
electrical wiring, power reduction, power
uctuation or power failure from whatever
cause, unusual atmospheric conditions,
collision, introduction of foreign objects, or
modications that are unauthorized or not
recommended by Peloton.
Incidental or consequential damages.
Peloton is not responsible or liable for
indirect, special, incidental or consequential
damages, economic loss, loss of property
or prots, loss of enjoyment or use, or
other consequential damages of any
nature whatsoever in connection with
the purchase, use, repair or maintenance
of equipment or parts. Peloton does not
provide monetary or other compensation
for any such repairs or replacement parts
costs, including but not limited to gym
membership fees, work time lost, cost of
substitute equipment, diagnostic visits,
maintenance visits or transportation.
Equipment used for commercial purposes
or for any use other than a single family
or household.
Any attempt to move within your home,
transport to another location outside your
home, or repair the Peloton Tread creates a
risk of injury and property damage. Peloton
is not responsible or liable for any damage
or injury incurred during, or as a result of,
any move, transport, repair or attempt to
move, transport, or repair the Peloton Tread
by anyone other than a Peloton authorized
service technician. All moves, transport or
repairs of the Peloton Tread attempted by
you or your agents are undertaken AT YOUR
OWN RISK and Peloton will have no liability
for any injury to persons or property arising
from such attempted moves, transport or
repairs. In addition, labor may no longer be
covered if you transport the Peloton Tread
outside of Peloton’s service area.
LIMITED HOME USE WARRANTY CONTINUED
THIS LIMITED WARRANTY IS THE
EXCLUSIVE WARRANTY GIVEN BY
PELOTON AND SUPERSEDES ANY
PRIOR, CONTRARY OR ADDITIONAL
REPRESENTATIONS. ALL OTHER
WARRANTIES, EXPRESS OR IMPLIED,
INCLUDING ANY STATUTORY WARRANTY
OR CONDITION OF MERCHANTABILITY OR
FITNESS FOR A PARTICULAR PURPOSE,
ARE DISCLAIMED EXCEPT TO THE EXTENT
PROHIBITED BY LAW. IN SUCH EVENT,
SUCH WARRANTY IS LIMITED TO THE
DURATION OF THE WARRANTY PERIODS
SET FORTH ABOVE. THIS EXCLUSION
APPLIES EVEN IF THIS WARRANTY
FAILS OF ITS ESSENTIAL PURPOSES
AND REGARDLESS OF WHETHER
DAMAGES ARE SOUGHT FOR BREACH
OF WARRANTY, BREACH OF CONTRACT,
NEGLIGENCE, OR STRICT LIABILITY IN
TORT OR UNDER ANY OTHER LEGAL
THEORY. SOME JURISDICTIONS DO NOT
ALLOW THE EXCLUSION OR LIMITATION
OF INCIDENTAL OR CONSEQUENTIAL
DAMAGES, SO THE ABOVE LIMITATION
MAY NOT APPLY TO YOU. THIS LIMITED
WARRANTY GIVES YOU SPECIFIC LEGAL
RIGHTS, AND YOU MAY ALSO HAVE
OTHER LEGAL RIGHTS, WHICH VARY
FROM
STATE TO STATE.
HOW DO I OBTAIN
WARRANTY SERVICE?
Contact member support if you believe
you need service.
1.866.679.9129
onepeloton.com
To be eligible for service under this Limited
Warranty you must provide Peloton with the
serial number of your Peloton Tread and the
dated receipt, or other proof of purchase
indicating the date purchased, upon
discovering any nonconformity or defect.
Claims must be made within the specied
warranty period.
USA

LIMITED HOME USE WARRANTY
Your acceptance of this Limited Warranty
is voluntary and is NOT a condition to
the purchase of the Peloton Tread or any
Membership. You agree to be bound by this
Limited Warranty and You expressly agree
to the receipt of electronic communication
from Us for purposes consistent with Your
rights and responsibilities contained in this
Limited Warranty (which You may opt out of
at any time by contacting us at
onepeloton.ca/company/contact).
It is fully understood by You that the
Services available under this Limited
Warranty apply only to the specic Peloton
Tread purchased. Your cancellation rights
relating to this Limited Warranty are set out
in Part E below.
We extend this Limited Warranty to You,
which applies only to the non-commercial,
in-home, indoor use of the Peloton Tread.
Any other use of the Peloton Tread shall void
this Limited Warranty. This Limited Warranty
applies only to defects discovered within the
applicable Term. Additional exclusions and
limitations apply, as further described in this
Limited Warranty. There is no cost to You for
this Limited Warranty.
If You wish to purchase an extended
warranty for the Peloton Tread, see support.
onepeloton.ca. The purchase of an extended
warranty is completely optional and is not
required in order for this Limited Warranty
to apply.
A. DEFINITIONS
In this Limited Warranty, capitalized words in bold
type have the following denitions:
“Applicable Provinces” means the
provinces in Canada in which this Limited
Warranty applies, being British Columbia,
Alberta, Saskatchewan, Manitoba and
Ontario, so long as the Peloton Tread is
delivered and used in such provinces.
“Cancellation Rights” means the rights to
cancel this Limited Warranty, as set out in
Part E below.
“Customer”, “You” and “Your” means the
customer who purchased the Peloton Tread
to which this Limited Warranty applies.
“Frame” means the steel structural portion
of the Peloton Tread deck, excluding any
moving parts attached thereto.
CANADA
38 39
|
WARRANTY
WHAT IF I HAVE QUESTIONS
OR CONCERNS?
You may direct any questions or
concerns to member support.
1.866.679.9129
Peloton Interactive, Inc.
125 West 25th Street, 11th Floor
New York, NY 10001
Attention: Limited Warranty Claims
Any disputes between you and Peloton
related to this Limited Warranty or the
Peloton Tread will be governed by the
then-current dispute resolution procedures
in Peloton’s Terms of Service, available at
onepeloton.com/terms-of-service.
WHAT IF I WANT
MORE COVERAGE?
Extended warranty coverage is available for
purchase. See support.onepeloton.com for
more details.
LIMITED HOME USE WARRANTY CONTINUED
USA
Other manuals for TREAD
1
This manual suits for next models
1
Table of contents
Other Peloton Treadmill manuals