Pentair SB-PF-GTW-001 User manual
1
INSTALLATION AND USER MANUAL
SB-CU-IMP-070A
SB-PF-GTW-001
Pentair Home App
IMPORTANT SAFETY INSTRUCTIONS
READ AND FOLLOW ALL INSTRUCTIONS
SAVE THESE INSTRUCTIONS
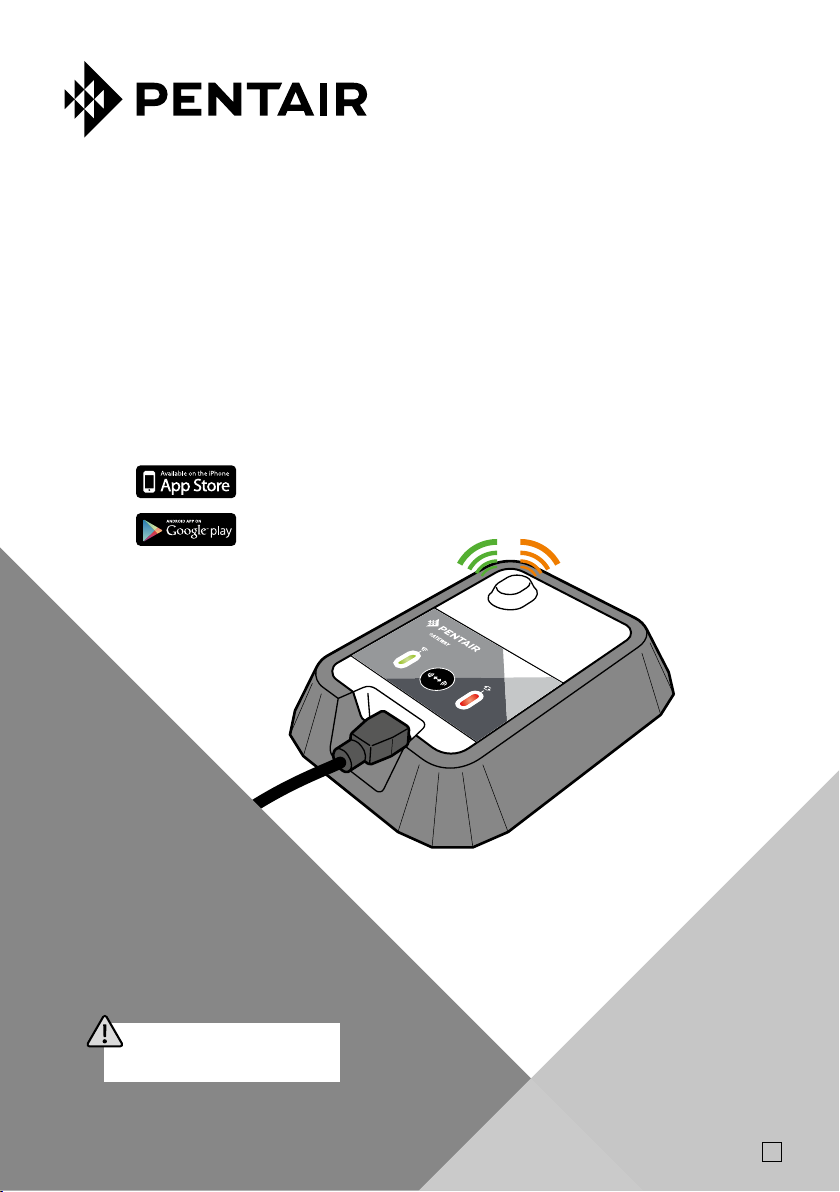
GATEWAY

Pentair thanks you for placing your trust in your GATEWAY equipment, the WiFi / Pentair series GATEWAY compatible interface, allowing you to
remotely connect your pool equipment via the application Pentair, available in the App store and Play store.
Please carefully read this user manual to fully benet from all of the functions of your GATEWAY. Store it carefully so that it can be consulted at
any time.
Declaration of conformity
Directives – Harmonised standards
Pentair International Sarl - Avenue de Sévelin 20 - 1004 Lausanne - Switzerland
We declare, under our own responsibility, that the product meets the directives
RED 2014/53/EU
SAFETY EN 62368-1:2014+A11:2017 ; EN 62311: 2008
EMC EN 301 489-3 V2.1.1 ; EN 301 489-1 V2.2.3 ; EN 301 489-17 V3.2.4 ; EN 301 489-1 V2.2.0
RADIO EN 300 220-2 V3.1.1 : EN 300 328 V2.2.2
GATEWAY (+ PARTS) PART NUMBERS:
SB-PF-GTW-001A SB-SE-GTW-001A
SB-CO-DIV-038A SB-CO-DIV-039A
Other normative documents Authorised person for technical documentation
Pentair International S.a.r.l
Avenue de Sévelin 20
1004 Lausanne - Switzerland
Lausanne, 2020 12 21
Jacques Van Bouwel
Engineering Mgr
Product specications: SB-SE-GTW-001A
Operating temperature: 0° to 40° C Operating hygrometry: 40% at 40° C Power supply: 5.0V 1.0A
Maximum operating altitude: 2000 m Weight (without power supply): 0.1 kg
Watertightness: IP 20 Consumption: 1W
Specications of 230 V / USB power supply: VEL05US050-EU-BB
Input : 100-240V~50/60Hz 0.18A Output : 5.0V 1.0A max
Waste treatment of electronic devices at the end of their service life:
The crossed-out bin placed on the main parts which make up the product indicates that
it must not be disposed of together with the household waste. It must be returned to an
appropriate collection point for electronic device recycling (information available from the
local household waste collection service). This product contains potentially dangerous substances
which may have adverse effects on the environment and human health.
- Customer Support: +33(0)1 84 28 09 40 (8:30 a.m. to 4:30 p.m.) CET www.pentairpooleurope.com
- Warranty: 2 ans
© 2022 Pentair International LLC, All rights reserved - The document is subject to change without notice
Trademarks and disclaimers: Pentair® is a trademarks and/or registered trademarks of Pentair and/or its aliated companies. Unless indicated
otherwise, names and brands of others that may be used in this document are not used to indicate an aliation or endorsement between the
owners of these names and brands and Pentair. Those names and brands may be the trademarks or the registered trademarks of these parties,
or others.

3
IMPORTANT SAFETY GUIDELINES, READ AND FOLLOW ALL OF THE INSTRUCTIONS, KEEP THESE INSTRUCTIONS
GENERAL POINTS
- DANGER - INSTALLERS, POOL SPECIALISTS AND OWNERS MUST CAREFULLY READ THESE WARNINGS AND
ALL INSTRUCTIONS BEFORE USING THIS PRODUCT.
- WARNING - Most countries regulate the construction, installation and operation of public swimming pools and spas, and the construction of
residential pools and spas. It is important to comply with these regulations, many of which directly regulate the installation and use of this
product. Consult your local building and health codes for more information.
- WARNING - This installation and user guide contains important information on the installation, operation and safety of this product. This guide
should be provided to the owner and/or user of this product.
INSTALLATION
- DANGER - DO NOT DISMANTLE OR OPEN THE POWER SUPPLY: RISK OF ELECTRIC SHOCK or electrocution
- WARNING - Before installing this product, read and follow the warnings and instructions of this guide. Failing to follow these warnings and
instructions may lead to serious injuries, death or material damage. Refer to www.pentairpooleurope.com for more information linked to this
product.
- WARNING - Do not connect the USB cable connector to any USB port, other than the one provided by the power adaptor.
USE
- WARNING – Check the status of this device daily to ensure that the remote management system for your pool and the devices connected to it
are always accessible and functional.
Security / explanation of symbols used
Alternating current Double insulation without grounding
Direct current
Summary
INTRODUCTION
> Content of packaging p 04
> Device description p 04
> General function of the device p 04
INSTALLATION
> Connection p 05
> LED meaning p 05
> Provisioning your Gateway to your WiFi home router p 07
> Pairing the Gateway to a device p 09

GATEWAY
S/N 1234567890
Gateway SB-SE-GTW-001A
QC Passed
Pentair International Sarl
Avenue de Sévelin 20
CH-1004 Lausanne
Mfg Year
Apr-2021
MADE IN ITALY
5V 1A / IP20 - 868,3 MHz
4
Content of Packaging
Gateway description
General function of the device.
µUSB / USB cable
Gateway
Gateway
Pairing
WIFI
Connexion
Home router
(internet provider)
Gateway compatible devices
Antenna
Green Led
Button
Red Led
µUSB connector
4x anti-slip feet
PNR ID
Manufacturer tag
230V / USB power supply
ref. VEL05US050-EU-BB
INPUT: 100-240V~50/60Hz 0.18A
OUTPUT: 5.0V 1.0A max.
The Gateway makes it possible to connect your Gateway’s compatible devices to your Pentair App account
via your WiFi home router.
GATE WAY
3
2
1
5
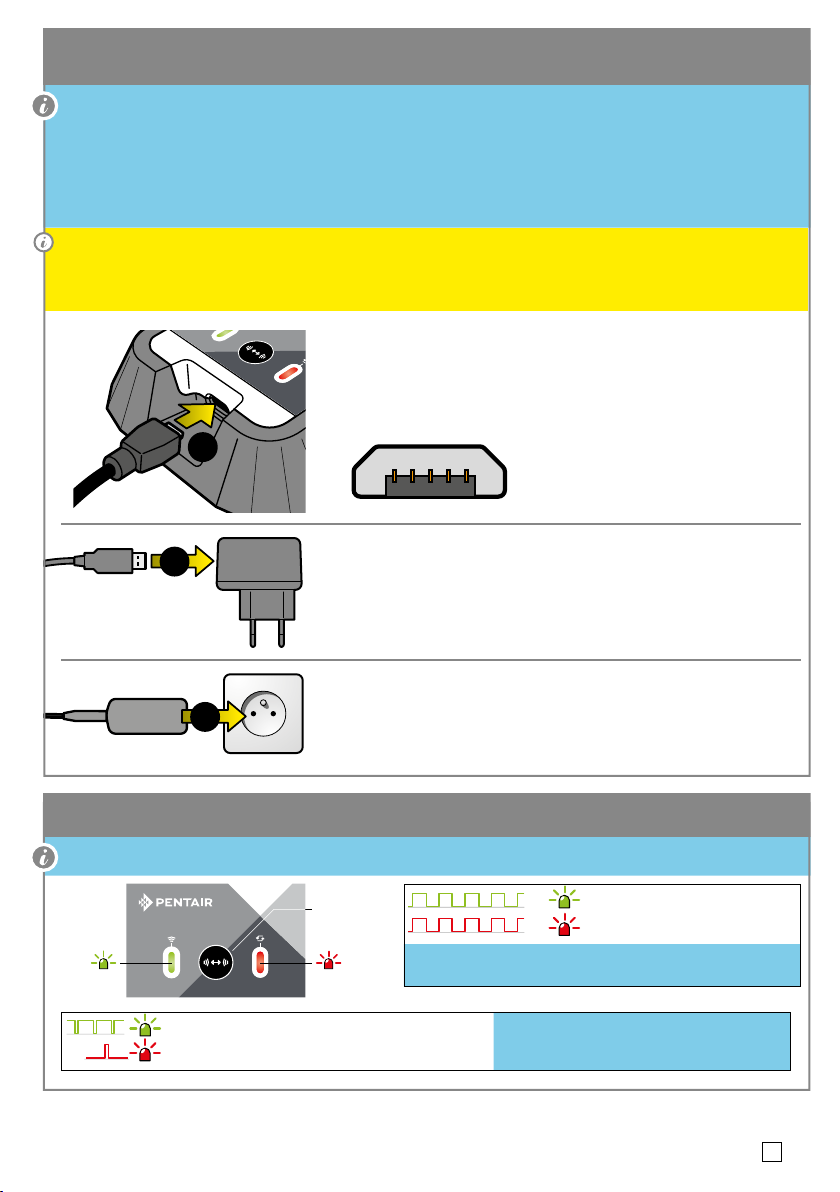
Installation and connection
LED meaning
Button
Micro cut-off = connected to the server
1 short ash blinking = sending information to the server
Double ashes :
= new device, no connection
The Gateway is functioning perfectly
The device is new and free of any provisioning with a home router.
- Proceed as described next pages.
Simply connect the power supply provided and match the WiFi to your home router, connection to the Pen-
tair’s App server is automatic.
By following the instructions, after creating your Pentair account within the Pentair Home App, you will be able
to connect to your installation in a few minutes. The controls sent via the App are effective in a few seconds.
Place the Gateway indoors in a dry and well-ventilated area, far away from any heat sources.
After optimizing the radio range, the Gaetway shouldn’t be near, or in contact with metal (parts/objects).
Depending on the lighting frequency of the LEDs, the Gateway provides information on its status.
1- Connect one end of the USB cable provided to the µUSB port of the
Gateway.
BE CAREFUL, DO NOT FORCE THE CONNECTION TO THE SOCKET AND
THE CONNECTOR, SEE BELOW THE ORIENTATION OF THE CONNECTOR
2- Connect the end of the USB cable to the USB port in the power supply.
DO NOT USE ANY POWER SUPPLY OTHER THAN THE ONE PROVIDED.
3- Connect the power supply to a 230V socket, in compliance with local
applicable standards.

=
>1 sec
=
< 0.3 sec
6
LED meaning
Trouble shooting:
The WiFi connection to the home router is working. The connection to the Pentair server has not been set up.
- Make sure your device is ON and connected to internet.
- The Gateway is automatically congured, provided the DHCP server of your internet home router is activated
(in the vast majority of cases, the DHCP server is activated by default on the installation of your internet home
router). This function can be accessed via the management menu of your internet home router. Refer to your
internet access provider for more details. The Gateway uses the TCP 8883 & 443 port. Make sure that those
ports are open towards the outside.
The WiFi connection to the home router is not working.
- Make sure your device is ON and the WiFi is activated.
- Restart provisioning between the Gateway and the home router.
You have just longly pressed the button.
- Proceed to WiFi provisioning (see following page).
- To exit WiFi provisioning mode before 5 min, press the button more than 1 sec again.
You just made a short press on the button.
- Proceed to Pentair’s device pairing (see p8).
- To exit pairing mode before 5 min, press the button less than 0.3 sec again.
An automatic update has failed. Wait for the status to change, Gateway will automatically reattempt an update.
If this status doesn’t disappear after 30 minutes, check that your internet connection is functioning properly
and if necessary, contact Pentair technical support on techsupport.poolemea@pentair.com.
An automatic update is in progress. !! Do not unplug the USB (shut down) during that process !!
- Wait for the status to change (this may take some minutes).
WiFi provisioning :
Pairing :
Firmware up-date:
Micro cut-off 2 sec spaced = WiFi OK, but no connection to the server
Flashing = no connection to the WiFi
Flashing = automatic rmware update (wireless) in progress
Slow ashes = the automatic (wireless) update has failed
Permanent (time out 5 min) = Long button pressed for WiFi provisioning.
Alternative permanent fast blinking (time out 5 min)
= Short button pressed for pairing (to Speedeo Connect for ex)

GATEWAY
> 1 sec
7
Provisioning your Gateway to your WiFi home router (1/3)
#1: Make sure :
- you have downloaded the Pentair Home App and created your account.
- you have downloaded the Pentair Home App and have created your account.
#2: Place your Gateway within range of your WiFi home router.
#3: Give a long push (> 1 sec) on the button. The red LED will steady light.
You will now have 5 minutes to complete this provisioning sequence.
#4: Open Pentair Home App under your pool
account. In device set up menu, access to
the screen asking you if you will be using a
Gateway?
Select «Yes»

8
Provisioning your Gateway to your Wi-Fi home router (2/3)
#5: Make sure your phone’s Bluetooth® connection is on. Your Gateway will be discoverable as
«PNRXXSGWXXXXXXXXX». Select it.
#6: Continue the ow of menus by selecting your WiFi network and populate the credentials asked and continue
untill getting «Connected». Then your Gateway is connected to your WiFi home router.
GATEWAY
GATEWAY
< 0.3 sec
Pairing the Gateway to a device (compatible, Pentair range).
#1: Make sure your Gateway is properly power supplied.
#2: Give a short push (< 0.3 sec) on the pairing button. The green and red LEDs should be ashing alternatively and
quickly. You will now have 5 minutes to complete this pairing sequence.
#3: On the device to be paired, go on the pairing menu and select «Gateway» then valid or launch the pairing
procedure (depending user interface type).
#4: Within the 5 minutes duration, as soon as the LEDs stop ashing, Gateway and device are successfully paired.
9
Provisioning your Gateway to your Wi-Fi home router (3/3)
#7: Close the navigation page.
You can now return to your original WiFi settings.
#8: The green indicator light will ash following step described below:
From now on, the data from Gateway’s compatible devices is recorded regularly on the cloud.
= Searching WiFi
= Searching Pentair server
= Server connected
SAVE THESE INSTRUCTIONS !
PENTAIR INTERNATIONAL SARL,
Av. de Sévelin 20, CH-1004 - LAUSANNE, Switzerland
www.pentairpooleurope.com
Copyright – Limited Licence: except as specically permitted herein, no portion of the content of this document may be reproduced in any form or by any means without the prior written
permission of Pentair International SRL. © 2022 Pentair. All rights reserved.
Popular Gateway manuals by other brands

LST
LST M500RFE-AS Specification sheet

Kinnex
Kinnex Media Gateway quick start guide

2N Telekomunikace
2N Telekomunikace 2N StarGate user manual

Mitsubishi Heavy Industries
Mitsubishi Heavy Industries Superlink SC-WBGW256 Original instructions

ZyXEL Communications
ZyXEL Communications ZYWALL2 ET 2WE user guide

Telsey
Telsey CPVA 500 - SIP Technical manual


