4
motor in 220 degree oven
for four hours. Recheck
after motor cools. If motor
is new or thoroughly dry,
needle of ohmmeter will not
move on the ground check:
This indicates a reading of
50 megohms or higher. One
megohm is one million ohms.
When making the ground
check, if the needle goes
to zero the motor in all
probability has a wire
touching the stator shell at
some point and the stator
will have to be replaced.
5. Winding resistance test. If
motor shows a satisfactory
ground check then the
winding resistance must
be checked. Use ohmmeter
with scale pointer set on
R x 1 scale. On this scale,
meter reads directly on
ohms. Always check the
meter with leads together
as described above, under
ground check, before making
a reading on the winding.
Connect one meter lead to
the terminal with the brown
wire connected underneath
the terminal board. Connect
the other lead to the terminal
housing with the blue wire.
Meter should read 1.2 to 1.4
ohms; this is the resistance
of the main winding for a
115 volt stator. This reading
for a 230 volt stator should
be 4.8 to 5.9 ohms. Now
connect one meter lead to
the brown wire terminal
and the other meter lead
to the red wire beneath the
terminal board. The meter
should read 3.8 to 5.4 ohms
for a 110 volt stator. For a
230 volt stator this reading
should be 16 to 21 ohms.
This is the resistance of the
start winding. Now connect
one meter lead to the red
wire and one to the blue
wire. The meter reading
should be the sum of the
other two readings or 5.0
to 6.8 ohms for a 115 volt
stator or 20.8 to 26.9 ohms
for a 230 volt stator. If the
readings obtained do not
agree with those given, the
stator is defective and must
be replaced.
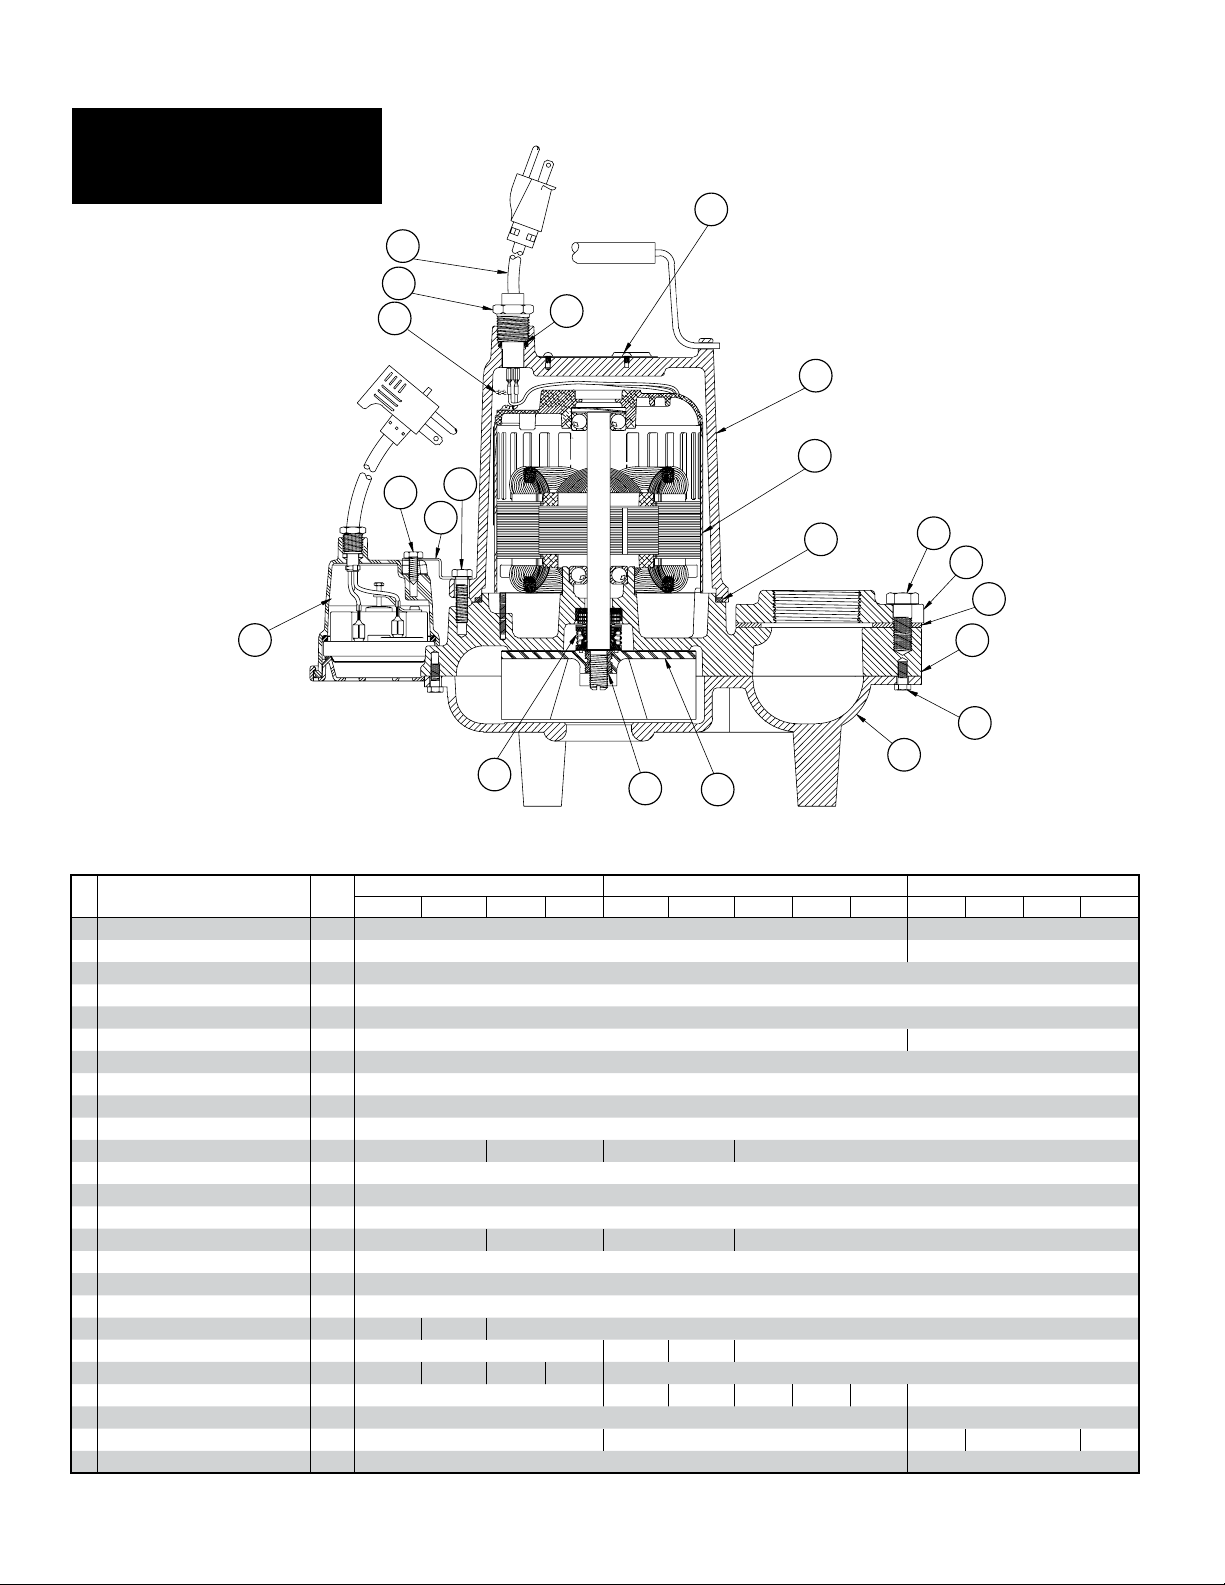
6. Replacing seal. If water
is found in motor, seal
must be replaced. Remove
bottom casting (5). Place
screwdriver in shaft slot and
tap impeller (6) lightly with
hammer to unscrew. Use
cloth on impeller to prevent
cutting hand. Tap on end
of shaft with a plastic or
rubber hammer. This will
push seal (8,9) from shaft.
Clean case thoroughly;
all sand and dirt must be
removed. Remove stationary
ceramic seat of seal from
housing. Push new ceramic
seat into housing. Use
Parker O-ring lube on
rubber ring. Replace rotor in
housing. Use care in putting
shaft through ceramic seat
to be sure it is not chipped.
Inspect seal after shaft is
in place. If seal has been
chipped it must be replaced.
Do not replace rotating part
of seal until the balance of
the pump is assembled.
7. Bearings. When the pump
rotor has been removed,
check bearings before
replacing. If bearings are
rusted or rough when turned,
they must be replaced. Pull
bearings with a bearing
puller. If puller cannot be
replaced over lower bearing,
remove the outer race by
cracking in a vise. After outer
race is cracked, it can be
removed and the balls can
be removed. This will allow
inner race to be pulled.
When replacing bearings
push only on inner race.
If a press is not available,
bearings can be tapped on,
using a sleeve that bears
only on the inner race.
Never pound on the outer
race or bearing will be
ruined.
8. Reassembly of stator and
housing. Replace stator (20)
with terminal block turned
toward switch pocket as
shown by drawing. Replace
plate and bolts (2). Be sure
ears on plate are in place
inside of shell of stator.
Replace cord (21) with push
on terminals in place on
terminal block. Bend tabs of
push on connectors down so
that they cannot touch plate
or housing. Place wire in
straight up position so that
housing (24) can be replaced
over wire. Be sure bearing
load springs are in place in
housing before replacing
housing. Hold springs in
place in housing with O-ring
lube, or other heavy grease.
Be sure rubber ring (3) is
in place on case when
lowering housing into
place. Tap down on top
of housing with plastic or
rubber hammer to seat over
bearing. Replace screws
(10) and tighten evenly from
one side to the other until
housing is firmly in place.
At this point turn shaft to be
sure rotor is free. If rotor
binds, it indicates screws
are not tightened evenly.