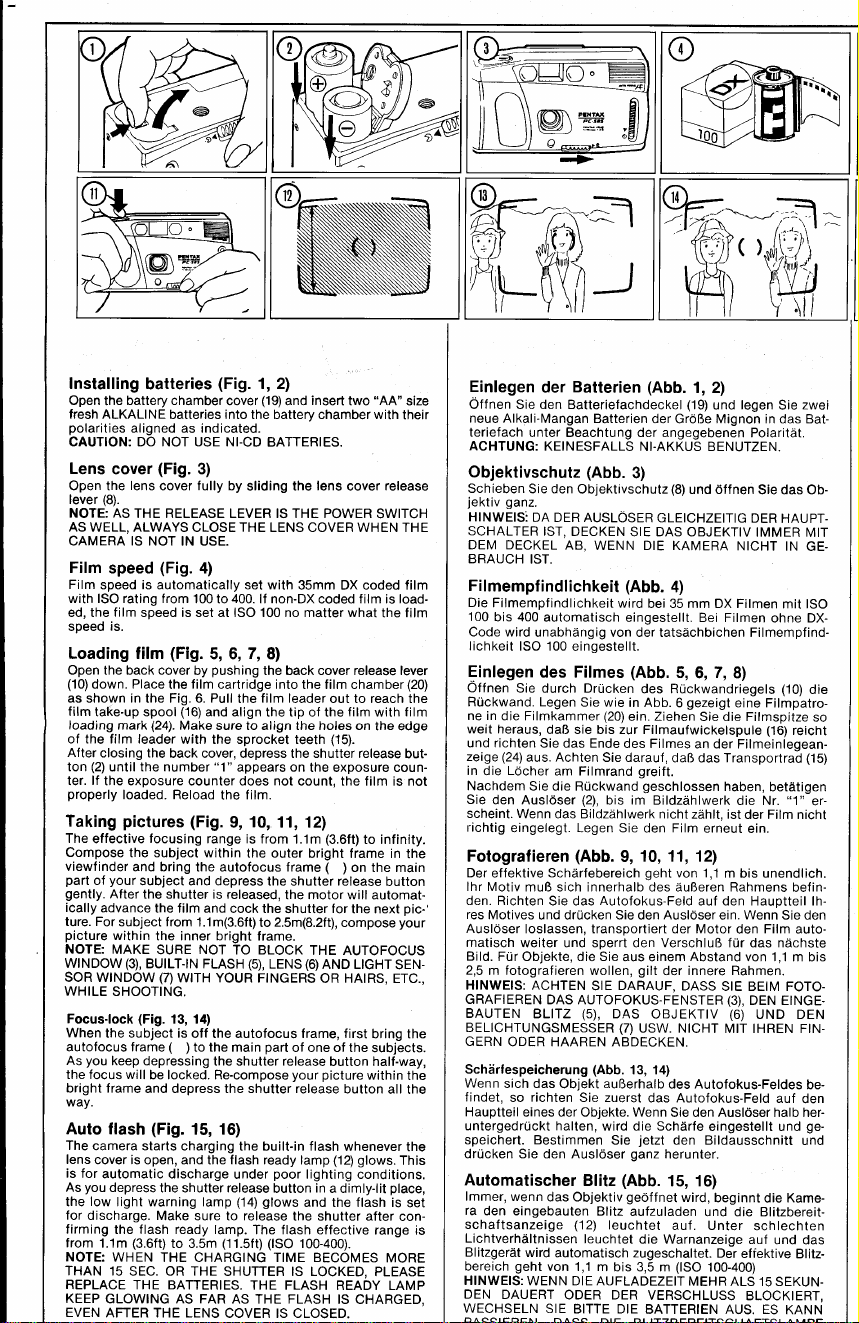
Installing
batteries
(Fig.
1,2)
Open the battery chamber cover(19)
and insert two "AA" size
fresh
ALKALINEbatteriesintothe batterychamberwith their
polarities
alignedas indicated.
CAUTION: DO NOT USE NI-CD BATTERIES.
Lenscover
(Fig.3)
Open the lens cover fully by sliding the lens cover release
lever (8).
NOTE:AS THE RELEASELEVERISTHE POWER
SWITCH
ASWELL,ALWAYS
CLOSETHE LENSCOVERWHEN THE
CAMERA IS NOT IN USE.
Filmspeed
(Fig.
a)
Film speed is automatically set with 35mm DX coded film
with ISOratingfrom 100to 400.
lf non-DX
coded film is load-
ed,the film speed is set at ISO 100no matter what the film
speed is.
Loadingfilm (Fig.5, 6, 7, 8)
Open the back cover by pushing the back cover releaselever
(10)
down. Place
the film cartridgeintothe film chamber(20)
as shown in the Fig.6.Pull
the film leader
out to reachthe
film
take-upspool
(16)
and
alignthe tip of thefilm
with film
loading mark
(24).
Make sureto align the holes on the edge
of the film leader with the sprocket teeth (15).
Afterclosing the backcover,depressthe shutterrelease
but-
ton (2)
until
the number
"1" appearson the exposurecoun-
ter.
lf the exposure
counterdoes not count,the film is not
properly
loaded.Reload
the film.
Taking
pictures
(Fig.
9,10,
11,12)
The effectivefocusing range is from 1.1m
(3.6ft)
to infinity.
Compose the subject within the outer bright frame in the
viewfinder
and bring
the autofocusframe
( )on the main
part of your subject and depressthe shutter release
button
gently.
Afterthe shutter is released,
the motor will automat-
ically
advance
the film and cock the shutterfor the next pic-'
ture. For subject from 1.1m(3.6ft)
to 2.5m(8.2ft),
compose your
picture
within the innerbrightframe.
NOTE: MAKE SURE NOT TO BLOCK THE AUTOFOCUS
wlNDow (q, BUTLT-|NFLASH
(5),
LENS
(6)ANDLtcHT SEN-
soR wrNDow (7)wtTH youR FTNGERS
OR HAIRS,ETC.,
WHILE SHOOTING.
Focus-lock(Fig. 13, 14)
When the subject is off the autofocus frame,first bring the
autofocusframe( )to the main part
of oneof the subjects.
As you keepdepressing
the shutterrelease
button half-way,
the focus will be locked.Re-compose
your picture
within the
bright frame and depress the shutter release
button all the
way.
Auto flash
(Fig.
15,16)
The camera starts charging the built-in flash whenever
the
lens
coveris open,and the flash ready
lamp(12)
glows.
This
is for automaticdischarge
under
poor lightingconditions.
As youdepress
the shutterrelease
button ina dimly-lit
place,
the low lightwarning lamp (14)
glows and the flash is set
for discharge. Make sure to releasethe shutter after con-
firming the flash ready lamp. The flash effective range is
from '1.1m
(3.6ft)
to 3.5m (11.5ft)
(lSO 100-400).
NOTE: WHEN THE CHARGING TIME BECOMES MORE
THAN 15 SEC. OR THE SHUTTERIS LOCKED.
PLEASE
REPLACETHE BATTERIES.
THE FLASH READY LAMP
KEEP
GLOWINGAS FAR AS THE FLASH IS CHARGED.
EVEN
AFTERTHE LENS
COVERIS CLOSED.
Einlegen
der Batterien
(Abb.
1,2)
OffnenSie den Batteriefachdeckel
(19)
und legen
Sie
zwei
neueAlkali-Mangan
Batterien
derGroReMignonindas Bat-
teriefach
unterBeachtungder angegebenen
Polaritdt.
ACHTUNG:
KEINESFALLS
NI.AKKUSBENUTZEN.
Objektivschutz
(Abb.
3)
Schieben
Sieden Objektivschutz
(8)
und dffnen Siedas Ob-
jektiv
ganz.
HINWEIS:
DADERAUSLOSER
GLEICHZEITIG
DER
HAUPT-
SCHALTER
IST,
DECKEN
SIEDAS
OBJEKTIVIMMERMIT
DEM DECKEL
AB, WENN DIE KAMERA NICHT IN GE-
BRAUCH IST.
Filmempfindlichkeit
(Abb.
4)
Die
Filmempfindlichkeit
wirdbei35mm DX Filmen
mit ISO
100
bis 400
automatisch
eingestellt.Bei Filmen
ohne DX-
CodewirdunabhdngigvondertatsdchbichenFilmempfind-
lichkeit
ISO100
eingestellt.
Einlegen
des Filmes
(Abb.
5,
6,7,
8)
Offnen Sie durch Drricken
des Rrickwandriegels
(10)
die
RUckwand.Legen
Siewie in Abb.
6 gezeigt
einefitmp'atro-
ne in
die Filmkammer
(20)
ein.
Ziehen
Siedie Filmspitze
so
weit heraus,
daRsie bis zur Filmaufwickelspule(16)
reicht
und richten
Siedas Ende
des Filmes
ander Filmeinlegean-
zeige
(241
aus.
Achten Siedarauf
,
daR
das Transportrad
(15)
in die Ldcher
am Filmrand
greift.
Nachdem
Siedie Rrickwand
geschlossen
haben,
betdtigen
Sie den Ausldser(2),
bis im Bildzdhlwerk
die Nr. "1" er-
scheint.
Wenndas Bildzdhlwerk
nichtzahlt,ist
der Film nicht
richtig
eingelegt.LegenSie den Film erneut
ein.
Fotografieren
(Abb.
9, 10,11,121
Der
effektive
Schdrfebereich
geht
von 1,1
m bis unendlich.
lhr Motiv
muRsich innerhalbdes liuBerenRahmens
befin-
den.Richten
Siedas Autofokus-Feld
auf den Hauptteillh-
res
Motives
unddrUckenSiedenAusloser
ein.
WennSieden
Ausloser
loslassen,transportiertder Motor
den Film auto-
matisch weiter und sperrtden VerschluRfrjrdas ndchste
Bild.
Fr.irObjekte,dieSie
auseinem
Abstand
von 1,1m bis
2,5
m fotografierenwollen,
gilt der innereRahmen.
HINWEIS:ACHTEN
SIE DARAUF,
DASS
SIE BEIM FOTO-
GRAFTEREN
DASAUTOFOKUS-FENSTER
(3),
DENEtNGE.
BAUTEN BLITZ (5), DAS OBJEKTIV (6) UND DEN
BELICHTUNGSMESSER
(7)
USW. NICHT MIT IHREN FIN-
GERN
ODERHAARENABDECKEN.
Schdrfespeicherung
(Abb. 13,14)
Wenn sich das Objekt auRerhalb
des Autofokus-Feldes
be-
findet,
so richten
Sie zuerst
das Autofokus-Feld
auf den
Hauptteil
einesderObjekte.WennSiedenAusloserhalbher-
untergedrr-ickthalten,wird die Schdrfe eingestellt und ge-
speichert. Bestimmen Sie jetzt den Bildausschnitt und
drrlckenSie den Ausl6ser
ganzherunter.
Automatischer
Blitz
(Abb.
15,16)
lmmer,
wenn
dasObjektiv
geoff
netwird,
beginnt
dieKame-
ra den eingebautenBlitz aufzuladen
und die Blitzbereit-
schaftsanzeige (12) leuchtet auf. Unter schlechten
LichtverhSltnissen
leuchtet
die Warnanzeige
auf und das
BlitzgerAt
wird automatischzugeschaltet.
Der
effektive
Blitz-
bereich geht von 1,1m bis 3,5 m (lSO 100-400)
HINWEIS:
WENN DIEAUFLADEZEIT
MEHR
ALS15SEKUN.
DEN DAUERT ODER DER VERSCHLUSS BLOCKIERT,
WECHSELN SIE BITTEDIE BATTERIENAUS. ES KANN