PeopleKey V30 Plus User manual

4.01 33 Lexington Drive, Bella Vista, NSW 2153, Australia
1800-015-458 International: +61 2 9960-7200
Quick Start Guide

4.01 33 Lexington Drive, Bella Vista, NSW 2153, Australia
1800-015-458 International: +61 2 9960-7200

Quick Start Guide V2.016_2 (V30 Plus).Docx 29/07/2019 Page 3of 19
Table of Contents
Howtocorrectlyplaceyourfingeronthescannerforbestreadquality._________4
Examples____________________________________________________________4
AccessingtheV30PlusSystemMenutoEnrolusers._________________________6
AccessingtheV30PlusSystemMenuforFingertesting_______________________7
AccessingtheV30PlusSystemMenutoDeleteanEnrolment._________________8
AccessingtheV30PlusSystemMenutochangeAuthoritylevel.________________9
AccessingtheV30PlusSystemMenutochangeaUserThreshold._____________10
AccessingtheV30PlusSystemMenutoEnroluserswith“Passwords”_________11
AccessingtheV30WEBinterface________________________________________12
V30Webinterface___________________________________________________12
AccessingtheV30Webinterface________________________________________12
FingerScannerMaintenance___________________________________________13
Cleaning____________________________________________________________13
Usersfailingverifications______________________________________________14
Stepstoovercome“Verification”failures.________________________________14
HowtoScanontheV30FingerScanner___________________________________15
HowtousetheClockIn&OutFunctionontheV30PlusFingerScanner_________16
V30PlusProcedure:__________________________________________________17
HandyHints:________________________________________________________17
Ihaveinjuredmydefaultfinger,howdoIusemyalternativefinger?___________17

Quick Start Guide V2.016_2 (V30 Plus).Docx 29/07/2019 Page 4of 19
How to correctly place your finger on the scanner for best read quality.
Usetheflatfleshypartunderthelastdigitofyourfinger.Anyfingercanbeused,butitis
commonforpeopletousetherightindexfinger.Figure2illustrateswhichpartofthefinger
mustbeplacedontotheglasssurfaceofthesensor.
Examples
Thefollowingimagesshowwherethefingerisplacedcorrectlyontothesensorglass.The
bottomflatpartofthefingeriscoveringthewholeofthesensorglasswhilethefingeris
pressedfirmlyontotheglasssurface.
Finger placed correctly on the sensor glass .
Slight pressure is necessary .
Finger placed correctly on the sensor glass .
Slight pressure is necessary .
Thispartofthe
fingerisbestfor
firmlypressing
againsttheglass
windowonthe
scanner.
Thefingerneedstobe
placedovertheentire
glasssectionofthe
FingerScannerwhenlit
upwitharedlight.

Quick Start Guide V2.016_2 (V30 Plus).Docx 29/07/2019 Page 5of 19
Thefollowingimagesshowvariousincorrectpositioning’softhefingerontothesensor
glass.Thefinalimagesshowscorrectplacement.

Quick Start Guide V2.016_2 (V30 Plus).Docx 29/07/2019 Page 6of 19
Accessing the V30 Plus System Menu to Enrol users.
NOTE: Manager, Supervisor or Enroller Authority Level is required to access the
System menu
1.Press“SYSTEM”Main screen (DAY DATE TIME)
ENTER ID NO. (Clock in/out)
2.EnteryourPersonalIDNumber. SYSTEM ACCESS
ENTER ID NO.
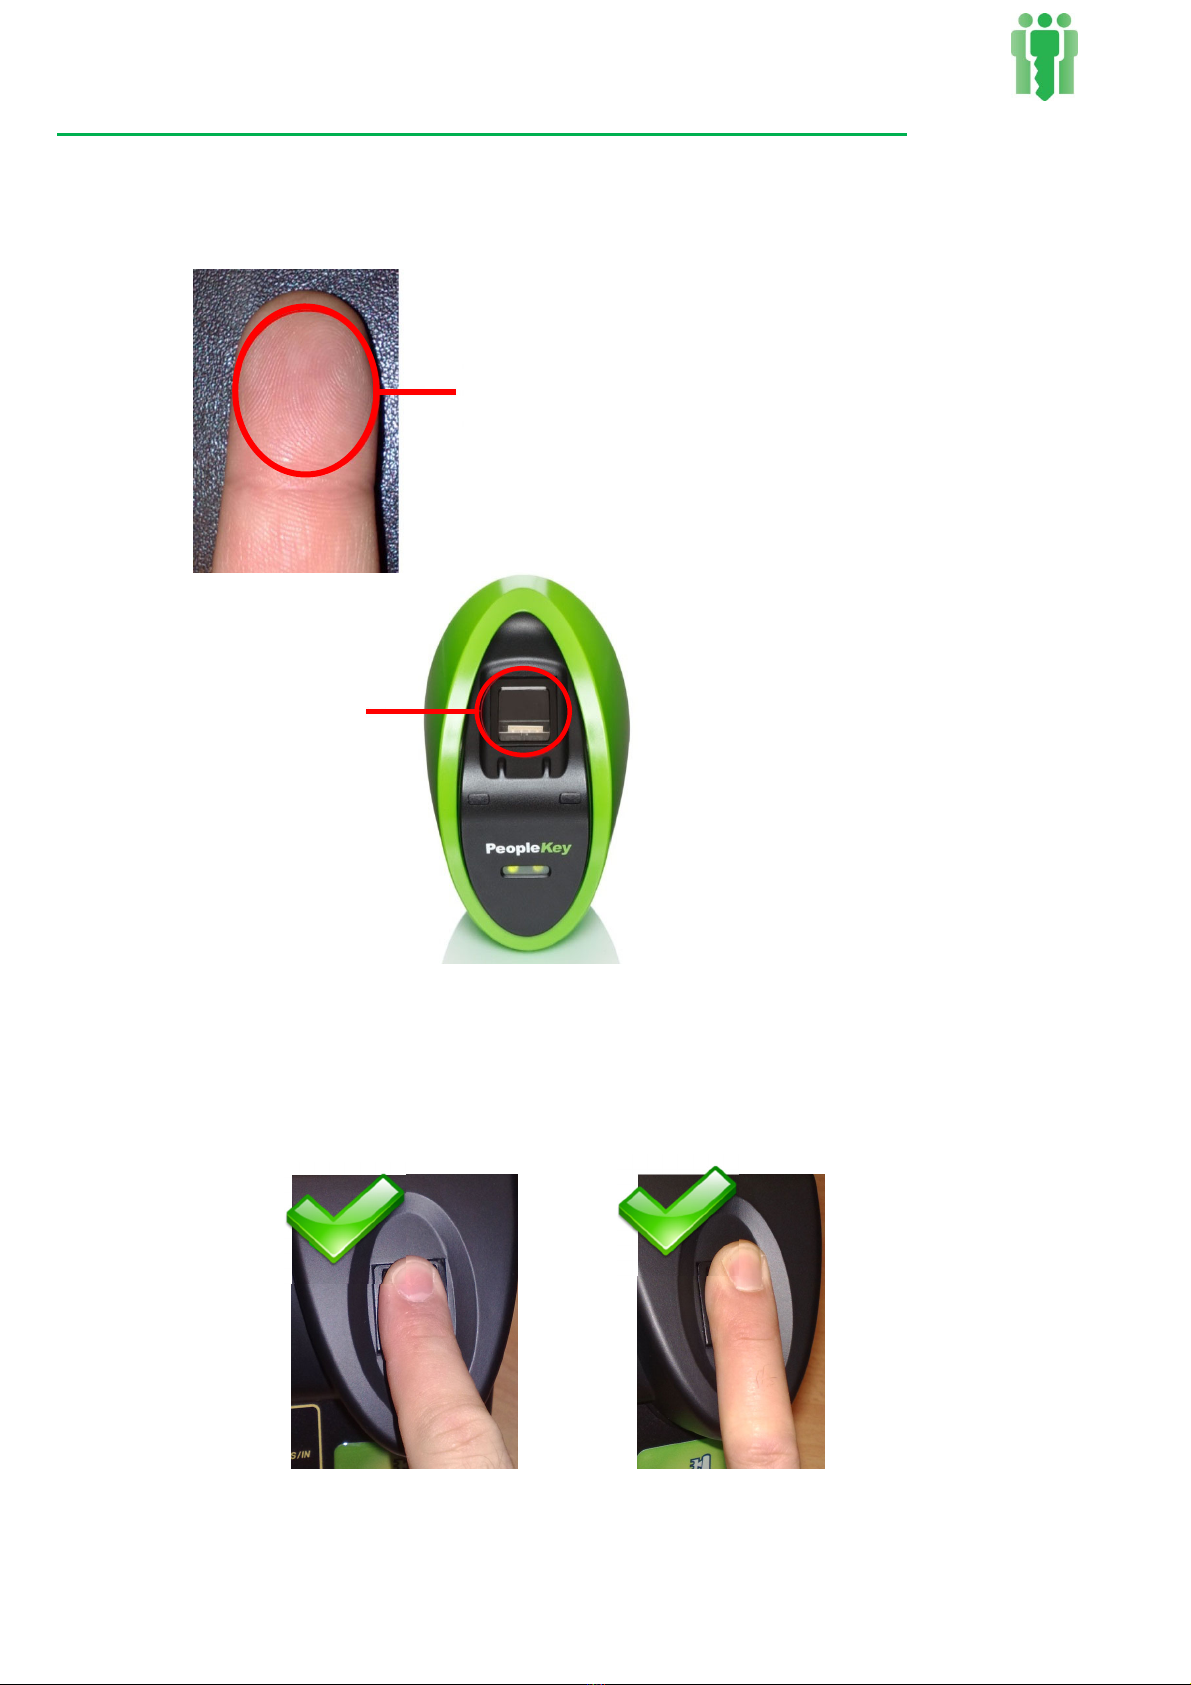
3.Placeyourfingerforverification. PLEASE PLACE FINGER
FINGER NAME
Verificationstatusdisplays.(Greenlight)DAY DATE TIME
VERIFIED
4.Press“YES/IN”keytoEnroll.
Yes: To Enroll
ALT: For Menu
5.Enter“EnrolleeID”(designatedfromyourpayroll
orpredefinedemployeeID).ENROLLEE ID No.
6.Usenumberpadtoselectnumberoffingerstouse
forverification(Usually1).1,2 or 3 Fingers
7.Selecttheauthoritylevelforscanneraccess(scroll
throughtheoptionsbypressing“NO/OUT”)Toselect
desiredlevelpress“YES/IN”.
AUTH. = USER
ACCEPT Y/N?
8.Scrollthroughthefingeroptionsbypressing“NO/OUT”until
desiredfingerchoiceisdisplayedonscreen.
RIGHT INDEX
ACCEPT Y/N?
9.Oncefingerselectedforuse,press“YES/IN”Scanner
glasswindowwillflashaREDstrobe.
PLEASE PLACE
RIGHT INDEX
10.Placefingerfirmlyonglass(aspracticed).Remove
on“beep”andscreeninstruction.REMOVE FINGER
11.Checkreadquality“minutiae”score.
(Typically20to40).MINUTIAE: XXX
12.Scannerglasswindowwillflashmoretimes,place
fingeragainaspromptedforverification.
VERIFIED
13.Attheend,press“YES/IN”toaccepttheenrolmentor
“1”toretest.
ACCEPT Y?N ?
OR [1] TO RETEST
14.Finallypress“CLEAR”repeatedlyexitingtheMain screen (DAY DATE TIME)
menus until back at the main screen.

Quick Start Guide V2.016_2 (V30 Plus).Docx 29/07/2019 Page 7of 19
Accessing the V30 Plus System Menu for Finger testing
NOTE: You must have Manager Authority Level to access the System Menu.
1. Press “SYSTEM”.
DAY DATE TIME
ENTER ID NO.
2. Enter your Personal ID Number.
SYSTEM ACCESS
ENTER ID NO.
3. Place your finger for verification.
PLEASE PLACE FINGER
FINGER NAME
Verification status displays.
DAY DATE TIME
V
ERIFIED
4. Press “No/Out” key for the Menu.
Yes: To Enroll
ALT: For Menu
5. Please place the required finger.
Please place
1
st
Finger
6. Remove finger as instructed.
Remove Finger
7. The resultant score is now displayed.
Minutiae: 25
8. You can now Enroll or press “CLEAR” to exit
Yes: To Enroll
ALT: For Menu

Quick Start Guide V2.016_2 (V30 Plus).Docx 29/07/2019 Page 8of 19
Accessing the V30 Plus System Menu to Delete an Enrolment.
NOTE: You must have Manager or Supervisor Authority Level to access the System
Menu.
1. Press “SYSTEM”.
Main screen (DAY DATE TIME)
ENTER ID NO. (Clock in/out)
2. Enter your Personal ID Number.
SYSTEM ACCESS
ENTER ID NO.
3. Place your finger for verification.
PLEASE PLACE FINGER
FINGER NAME
Verification status displays. (Green light)
DAY DATE TIME
VERIFIED
4. Press “*” (Alt) key for the Menu.
Yes: To Enroll
ALT: For Menu
5. Press “1” key. (for Template).
1:Template 2:Database
3: Setup 4:MG
R
6. Use number pad to select number the ID of the
person to be deleted.
ENTER ID (ALT:*)
7. Press “YES/IN” on prompt “Finger 1 Accept”.
ID No. XXXX
FINGER1 Accept?
8. Press “4” key. (To Delete).
1: AUTH. 2:T/Zone
3: SEC. 4:DELETE
9. The user will now be deleted.
** DELETED **
If the user has more than one finger enrolled, you
will be prompted for the additional fingers. Press “YES/IN”
this will take you back to step “8”, until all
templates are deleted.
ID No. XXXX
FINGER2 Accept?
10. Finally press “CLEAR” repeatedly exiting the
Main screen (DAY DATE TIME)
menus until back at the main screen.

Quick Start Guide V2.016_2 (V30 Plus).Docx 29/07/2019 Page 9of 19
Accessing the V30 Plus System Menu to change Authority level.
NOTE: You must have Manager or Supervisor Authority Level to access the System Menu.
1. Press “SYSTEM” (SYSTEM).
Main screen (DAY DATE TIME)
ENTER ID NO. (Clock in/out)
2. Enter your Personal ID Number.
SYSTEM ACCESS
ENTER ID NO.
3. Place your finger for verification.
PLEASE PLACE FINGER
FINGER NAME
Verification status displays. (Green light)
DAY DATE TIME
VERIFIED
4. Press “*” (Alt) key for the Menu.
Yes: To Enroll
ALT: For Menu
5. Press “1” key. (for Template).
1:Template
2: Setup 3:MG
R
6. Use number pad to select number the ID of the
person to be modified.
ENTER ID (ALT:*)
7. Press “YES/IN” on prompt “Finger 1 Accept”.
ID No. XXXX
FINGER1 Accept?
8. Press “1” key. (for AUTH).
1: AUTH. 2:T/Zone
3: SEC. 4:DELETE
9. Press “NO/OUT
”
to change, “YES/IN
”
to accept.
AUTH.=USER
ACCEPT Y/N ?
(options = User, Enroller, Supervisor, Manager)
1: AUTH. 2:T/Zone
10. Press “CLEAR”.
3: SEC. 4:DELETE
11. Finally press “CLEAR” (Clear) repeatedly exiting the
No More Records
menus until back at the main screen.
12. Completed.
Main screen (DAY DATE TIME)

Quick Start Guide V2.016_2 (V30 Plus).Docx 29/07/2019 Page 10 of 19
Accessing the V30 Plus System Menu to change a User Threshold.
NOTE: You must have Manager or Supervisor Authority Level to access the System Menu.
1. Press “SYSTEM”.
Main screen (DAY DATE TIME)
ENTER ID NO. (Clock in/out)
2. Enter your Personal ID Number.
SYSTEM ACCESS
ENTER ID NO.
3. Place your finger for verification.
PLEASE PLACE FINGER
FINGER NAME
Verification status displays. (Green light)
DAY DATE TIME
VERIFIED
4. Press “*” (Alt) key for the Menu.
Yes: To Enroll
ALT: For Menu
5. Press “1” key. (For Template).
1:Template
2: Setup 3:MG
R
6. Use number pad to select number the ID of the
person to be modified.
ENTER ID (ALT:*)
7. Press “YES/IN” on prompt “Finger 1 Accept”.
ID No. XXXX
FINGER1 Accept?
8. Press “3” key. (For SEC).
1: AUTH. 2:T/Zone
3: SEC. 4:DELETE
9. Press “1” key. (For THOLD).
1: THOLD. 2:PASSWD
10. Press “YES/IN” to change.
THRESHOLD = 20
CHANGE YES/NO
11. Use number pad to enter the new threshold
setting (0-70), then press “YES/IN” to accept the change.
ENTER NEW ANSI
THRESHOLD = ??
12. Finally press “CLEAR” repeatedly exiting the
Main screen (DAY DATE TIME)
menus until back at the main screen.
Note:- PeopleKey Support should be contacted for advice on the threshold settings.
A lower threshold = Less sensitive
A Higher threshold = More sensitive

Quick Start Guide V2.016_2 (V30 Plus).Docx 29/07/2019 Page 11 of 19
Accessing the V30 Plus System Menu to Enrol users with “Passwords”
NOTE: You must have Manager, Supervisor, or Enroller Authority Level to access the System Menu.
1. Press “SYSTEM”.
Main screen (DAY DATE TIME)
ENTER ID NO. (Clock in/out)
2. Enter your Personal ID Number.
SYSTEM ACCESS
ENTER ID NO.
3. Place your finger for verification.
PLEASE PLACE FINGER
FINGER NAME
Verification status displays. (Green light)
DAY DATE TIME
VERIFIED
4. Press “YES/IN” key to Enroll.
Yes: To Enroll
ALT: For Menu
5. Enter “Enrollee ID” (designated from your payroll
or predefined employee ID).
ENROLLEE ID No.
6. press '#' key to enrol only a “Password
Template”.
1,2 or 3 Fingers
7. The displays confirms that the next steps are to
create a password.
Creating Passwd
Template Only
8. Select the authority level for scanner access (scroll
through the options by pressing “NO/OUT”) To select
desired level press “YES/IN”.
AUTH. = USER
ACCEPT Y/N?
9. The scanner now initializes the password script.
Creat New Passwd
10. Enter a minimum of 4numbers for the users
password. Complete by pressing “YES/IN” key.
Enter New Passwd
Xxxxxxxxxx
11. Re-enter the password, press “YES/IN” to submit.
Rpeat Password
Thescannerconfirmsthepasswordsmatch.
Passwrd match
Saving Password.
12. Do not change the advanced settings by pressing
“NO/OUT”
EDIT ADVANCED
Change Y/N
13. To confirm saving the new user with password,
press “YES/IN”
Confirm Password
Change Y/N
14. Finally press “CLEAR” repeatedly exiting the
Main screen (DAY DATE TIME)
menus until back at the main screen.

Quick Start Guide V2.016_2 (V30 Plus).Docx 29/07/2019 Page 12 of 19
Accessing the V30 WEB interface
V30 Web interface
Since the V30 does not have a traditional keypad, access to the menu structure is available by
a Web based interface. The Web Interface for the V30 allows for all the normal functionality
of a keypad (Similar to that of a V90).
Accessing the V30 Web interface
To access a particular V30’s Web Interface on your network, the IP address of the unit must
be known. The V30 Web interface can be accessed by many different devices that have
network connectivity (Including WiFi) to the Finger Scanner’s network.
Enter the IP address of your V30 in a WEB browser on your;
PC
Laptop
Tablet
Smart Phone
Depending on the Firmware version on your V30, one of the following should now be
displayed.
Standard V30 WEB Interface Compact V30 WEB Interface

Quick Start Guide V2.016_2 (V30 Plus).Docx 29/07/2019 Page 13 of 19
The menu’s can now be accessed in the same fashion as the V90. The menu structure for the V30 is
identical to that of the V90 and the V90 instructions can be used to perform the various functions
required.
On later firmware versions a COMPACT version of the WEB interface is available and is aimed for use
on a 4 -5 inch Smart Phone screen.To toggle between the full screen WEB Interface and the compact
version press the following icon on either version of the WEB interface.
Finger Scanner Maintenance
Cleaning
The scanner normally does not require any maintenance; but occasionally, the sensor will
need a clean as a build-up of foreign matter can accumulate on the sensor glass and
surrounding areas.
To clean, wipe the glass and surrounding areas with a “damp, clean, lint free towel or cloth”.
Important
When cleaning glass only use clean materials which are free of dirt and debris to
avoid scratching and marking of the glass.
Do not use metal scrapers, blades or steel wool on either surface of the glass or
surrounding area.
Do not allow water or cleaning fluids to remain in contact with the glass or the
surrounding area for long periods
Do not use abrasive cleaning solutions or materials.

Quick Start Guide V2.016_2 (V30 Plus).Docx 29/07/2019 Page 14 of 19
Users failing verifications
A common problem seen over time is users begin to fail the verification of their finger scan.
A number of factors are a cause of this.
A change in the way the user place’s their finger.
Users who work in wet areas.
Finger prints wear thin during the day with normal activity.
The elasticity of skin decreases with age, so a lot of senior citizens have prints that
are difficult to capture.
A medical skin condition e.g. Dermatitis.
The sensor window requires cleaning.
Steps to overcome “Verification” failures.
The following steps should be conducted to overcome verification failures. Firstly conduct a
finger scan test as detailed previously, this will give a score. Users with a reading below 16
should be re-enrolled.
Finger
Test • Conduct a finger scan
test to verify the score.
Re-Enrol • Delete and re-enrol the user.
Alternative
finger • Re-enrol with a different
finger.
Enrol
more
fingers
• Enrol using MPE for multiple
fingers.
Adjust
threshold
• Adjust the users threshold setting. (V30 Plus
only)
Password • Set user ID to
password.

Quick Start Guide V2.016_2 (V30 Plus).Docx 29/07/2019 Page 15 of 19
How to Scan on the V30 Finger Scanner
Usersteps
Step1.Placefinger
Step2.Confirmverification
Step1.Thefingerneedsto
beplacedovertheentire
glasssectionoftheFinger
Scanner.Thesensorwill
automaticallydetectthe
placementofthefinger
Successfulverificationis
indicatedwithaGreen
light.
Un‐Successful
verificationisindicated
withaREDlight.
Thesensorlightis
illuminatedoncethe
fingerplacementis
detected.
On a successful scan, the transaction to the FingerLan software is recorded as a “Verify_OK”

Quick Start Guide V2.016_2 (V30 Plus).Docx 29/07/2019 Page 16 of 19
How to use the Clock In & Out Function on the V30 Plus Finger Scanner
Step 1.
To “Clock In”press the “Yes/In”
To “Clock Out”Press the “No/Out”
Step 2.
Type in ID, PIN or employee
number on the ke
yp
a
d
.
Step 3.
Place your finger on the sensor plate.
NOTE: The device will prompt you
which finger to scan via the screen.
Usersteps
Step1.ClockInorOut
Step2.EnterIDorPin
Step3.Placefinger

Quick Start Guide V2.016_2 (V30 Plus).Docx 29/07/2019 Page 17 of 19
V30 Plus Procedure:
1) To Clock In press the “YES/IN”.
2) To Clock Out press the “NO/OUT”.
3) The Scanner will now display “IN ENTRY” on the first line and “ENTER ID NO.” on
the second line of the LCD display.
4) Enter your ID on the keypad.
5) The Scanner will now prompt you to place your designated finger on the
sensor plate.
6) Place your correct finger firmly on the sensor plate and wait for the V90 to display
“REMOVE FINGER”.
7) If successful the V30 Plus will now display the word “VERIFIED” as well as light
up the green LED.
8) If unsuccessful the V30 Plus will request you to “PLEASE TRY AGAIN”.
Two further failures will result in the V30 Plus displaying the word
“UNSUCCESSFUL” as well as light up the red LED.
Handy Hints:
1) Ensure that you type in your employee number correctly.
2) Always read the screen on the device. It displays the information required at each
step.
3) Place finger correctly on the scanning pad.
4) If your finger is cracked and dry, rub it in the palm of your opposite hand to coat it
with your natural skin oils.
I have injured my default finger, how do I use my alternative finger?
Once you have pressed the Clock in or Clock out button and entered your employee
number, press the “*” key. The device will then prompt you to scan your alternative
finger on the screen if enrolled.

Quick Start Guide V2.016_2 (V30 Plus).Docx 29/07/2019 Page 18 of 19
Notes

Other manuals for V30 Plus
1
Table of contents
Popular Security System manuals by other brands

Cooper Security
Cooper Security i-on160EX installation guide

Conrad
Conrad UC-AV10 instruction manual

Symmons
Symmons TempControl HTA-100 Installation and service instructions

NAPCO
NAPCO XP-600 - 9-16-1997 user guide

Lorex
Lorex LH316501C8 Specifications

DSC
DSC PTD1610-SCW Installation instructions and operators manual