1. Be sure air is in "OFF" position when connecting tool to air supply.
2. Always wear approved eye protection when using air tools. If raising dust, wear a
suitable mask.
WARNING: Some dust created by power sanding, sawing, grinding, drilling, and other construction activities, contain chemicals known [to
the State of California] to cause cancer, birth defects or other reproductive harm. Some examples of these chemicals are:
1. Lead from lead-based paints;
2. Crystalline silica from bricks and cement or other masonry products;
3. Arsenic and chromium from chemically treated lumber.
Your risk from these exposures varies, depending on how often you do this type of work. To reduce your exposure to these chemicals:
work in a well ventilated area, and work with approved safety equipment, such as those dust masks that are specially designed to lter out
microscopic particles.
3. Use only those accessories that are designed for use with air tools. For example, with
impact wrenches do not use ordinary sockets. Use impact sockets for all- air tools.
4. Be sure to disconnect tool from air supply before changing accessories, performing
service on tool and when not in use.
5. As with any tool, use common sense when operating. Do not wear loose clothing or
jewelry that could become caught by moving parts, causing injury. Operate tool a safe
distance from yourself and others in the work area.
6. To ensure long life of the air tool be sure to oil the tool daily before using. See below for
instructions.
7. Follow air source manufacturers directions for connection of regulators, filters, and other
accessories to air source. Do not install quick couplers directly on tool as they put
unnecessary strain on the air inlet threads possibly causing them to wear out
prematurely. Instead, install them on a short length of air hose attached to the tool.
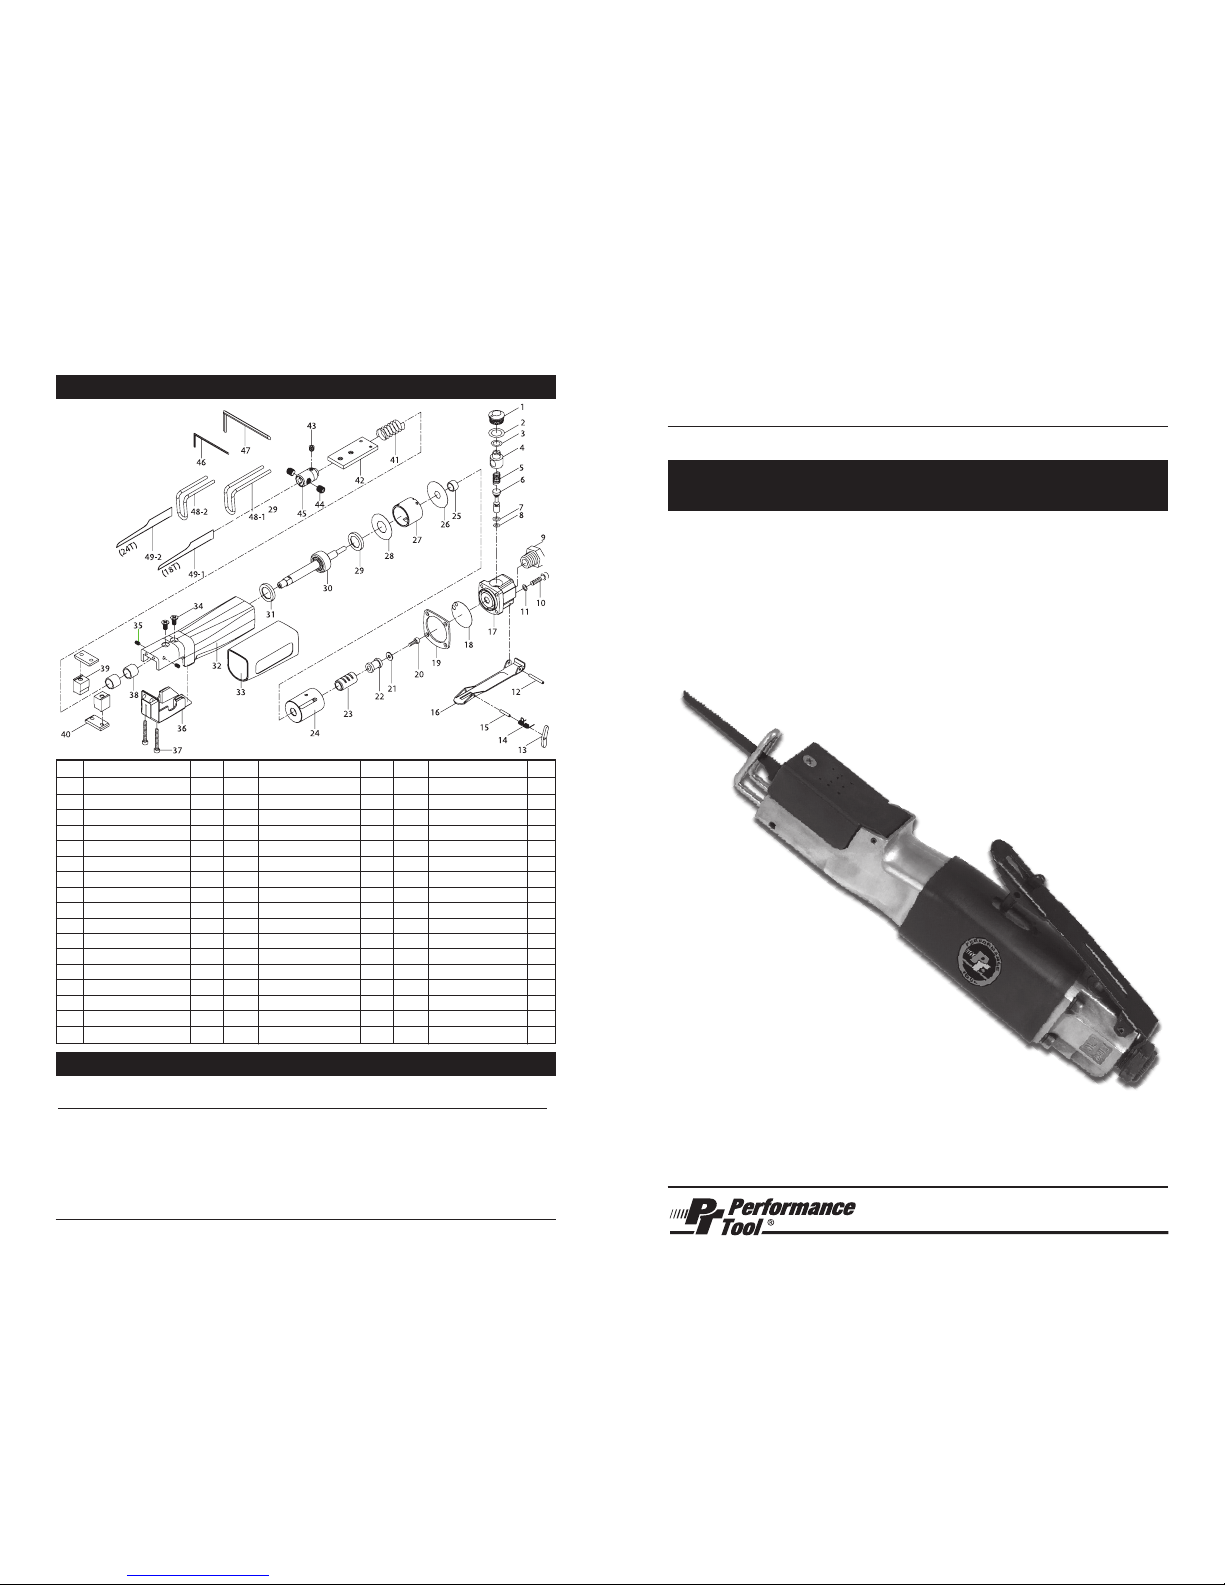
1. The Blade Guard (48) may be removed when replacing blades, but it must always be on
during operation. Using the Saw without the Blade Guard (48) can result in severe injury.
To remove the Blade Guard (48), loosen and remove the two Set Screws (35). When
replacing the Blade Guard (48), place it in the slots and tighten the Set Screws (35).
2. To change blades, first remove the Chuck Cover (36) by removing the Screw (37). Swing
the Chuck Cover (36) back on its hinge.
3. Loosen the two Set Screws (44) inside, until the blade can be removed. Replace with a
new blade and tighten the Set Screws (44). Replace the Chuck Cover (36) and carefully
tighten the Screw (37). Do not overtighten the Screw (37) or you may break the plastic
Chuck Cover(36).
Note: Never use a dull, bent, or cracked blade. Check that the blade and blade guard are
tight before each use.
Using the Saw
CAUTION: Always press lightly when cutting. Do not force the Saw. Sudden forceful
pressing will shorten the stroke, diminish cutting efficiency, or possibly break the blade.
Always operate the Saw with two hands. Hold the top of the Housing (32) with one hand,
and hold the lower Housing (32) and Throttle Lever (16) with the other. Failure to use two
hands may cause the Saw to vibrate out of your control causing serious injury.
WARNING! This Saw may be used for cutting through copper, steel, aluminum, and
plastics. Do not exceed the maximum 16 gauge thickness when cutting with this Saw.
Doing so can cause serious injury and damage to the tool.
WARNING! Check the saw blade prior to each use. Do not use a cracked, bent, or broken
blade.
1. Secure the workpiece in a vise, or clamp it securely to a workbench.
2. Following the directions on page 3, attach the Saw to the air source hose.
3. Push the Throttle Safety forward and pull the Throttle Lever (16).
4. Contact the workpiece allowing the Saw to do the cutting for you. Do not exert pressure
on the workpiece.
5. When finished, release the Throttle Lever (16) and disconnect the Saw from the air
source. After disconnecting the Saw from the air compressor, there could still be enough
air pressure to activate the Saw. Always position the Saw safely and activate the
Throttle Lever (16) repeatedly to make sure all of the air is expended.
Maintenance
1. After each use, wipe down the Saw with a lint free cloth.
2. Make sure that both the housing that holds the blades and the Air Inlet (9) are free of
dirt and debris.
3. Periodically apply a light machine oil to the pivot point of the Throttle Lever (16).
4. Before each use, check the blade to make sure it is securely in place. If necessary,
tighten the Set Screws (44).
5. Before each use, make sure the Blade Guard (48) is securely in place. Tighten if
necessary.
IMPORTANT SAFETY INFORMATION OPERATION
Clean air of correct air pressure is recommended for the power supply for this tool. A
maximum of 90 PSI at the tool is recommended for most air tools of this class. Check
specifications section for recommended pressure. (Depending on length of air hose and
other circumstances, air pressure at compressor may need to be increased to 100 PSI to
ensure 90 PSI at the tool.)
Water in the air hose and compressor tank contributes to reduced performance and
damage of the air tool. Drain the air tank and filters before each use and as necessary to
keep the air supply dry.
Hose length over 25’ causes loss in line pressure. Increase hose I.D. or increase
compressor pressure to compensate for the pressure loss. Use an in-line pressure
regulator with gauge if air inlet pressure is critical.
AIR SOURCE
Oil tool before each use. 4 to 5 drops of a good grade Air Tool Oil placed in the air inlet is
sufficient. Use proper air pressure and CFM rating listed for this tool.
Drain water from hoses and
compressor tank. Water in the air
supply line will cause gumming and
loss of power. Clean the air filter on
the supply line and flush the tool with
gum solvent or a 50/50 mix of air tool
oil and kerosene. It may be
necessary to disassemble the tool to
properly clean and re-lubricate.
LUBRICATION & MAINTENANCE
Air Inlet
Trigger