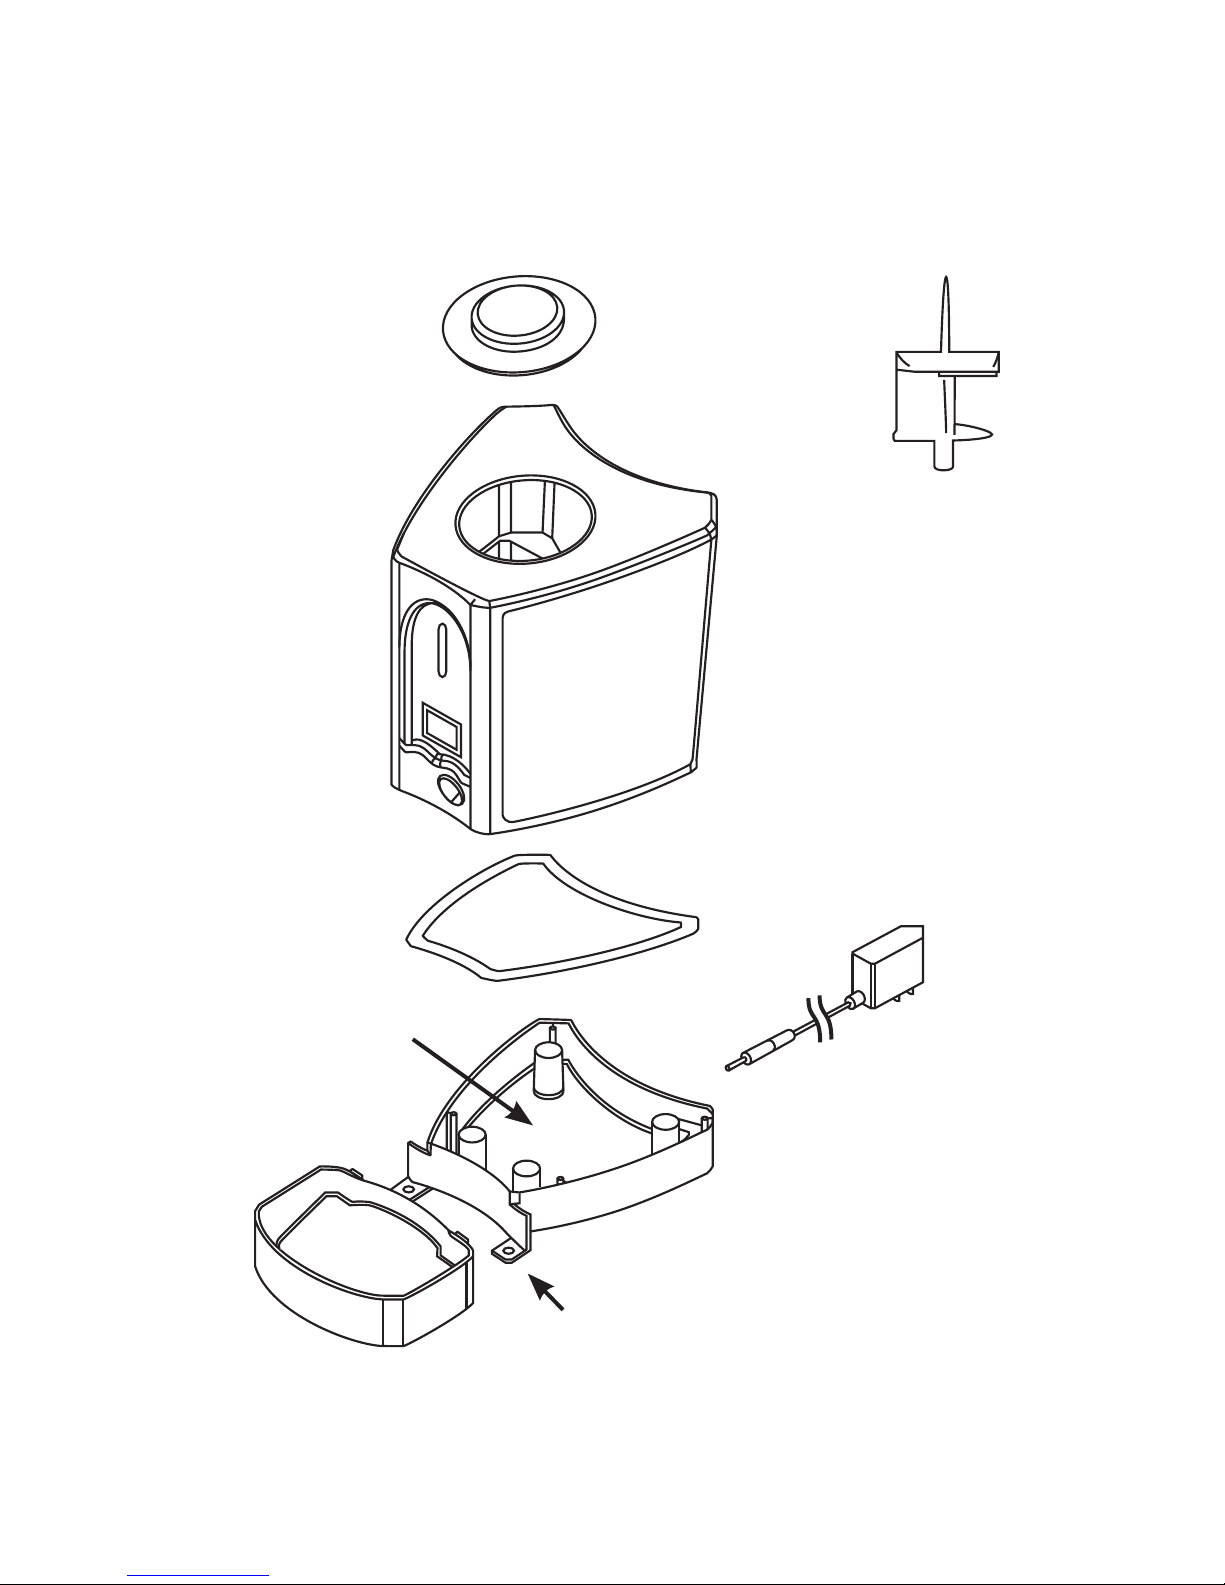
Pet Feedster PF-10 PLUS User manual

PETFEEDSTER.COM
OPERATING INSTRUCTIONS:
PF-10 PLUS
*Shown with kibble theft attachment for cats

1
CONTENTS
Cautions List.............................................................
Power Usage.............................................................
Feeder Assembly.......................................................
Parts Diagram............................................................
Adjustable Flex Feeder Instructions..........................
Programming Instructions.........................................
Frequently Asked Questions.....................................
Troubleshooting Your Pet Feedster...........................
1 Year Limited Warranty............................................
Return Policy.............................................................
2
4
4
5
7
11
18
20
22
23

2
CAUTIONS LIST
• Read all directions thoroughly.
• Keep all packaging and plastic bags away from
children and pets to prevent suffocation.
• Do not allow children to play with or around the unit.
• Do not use an extension cord to plug in the unit as
pets can chew on the cord, etc.
• Do not use the unit with any pets that may have issues
or challenges feeding from the unit.
• Do not place any foreign objects into the unit.
• Do not plug the feeder adapter into an outlet
controlled by a light switch. Also, be careful if you plug
the unit into a GFCI protected outlet as this may cause
the power to be shut off accidentally.
• Make sure that the food outlet stays clear. If it is
blocked, it will cause the unit to jam.
• We recommend using batteries for backup in case of
a power outage. Also, check the power level frequently.
(See timer display for battery gauge)
• If you’re worried about your pet moving or knocking
over the Pet Feedster, you can secure the unit by
screwing it to a plank or the oor. (2 screw holes are
located at the base of the unit under the bowl)
• Use only with dry pet kibble. No wet or canned food.
• Make sure the unit doesn’t touch anything, otherwise
ants can access the food storage despite water in the

3
Ant Water Tray.
• The Pet Feedster can be used indoors or outdoors,
but must be covered to be protected from water,
rain, sprinklers, snow, hail and other severe weather
conditions. Unit should be placed out of direct sunlight.
• Unit should not be placed in areas of standing water
or wet conditions of any kind.
• Always check the battery backup life before leaving for
any extended period of time. The Pet Feedster should
not replace a pet sitter or caretaker when you are gone
for an extended period. This is important for the safety
of your pet.
• Unplug the unit when cleaning.
• Do not operate the unit if the cord is damaged.
Replacements are available at petfeedster.com.
• Service must be performed by Pet Feedster or an
authorized service provider. Do not disassemble the unit.
• When unplugging the unit from the wall outlet, always
pull on the plug and not the power cord.
• Do not immerse or expose the main body, motor, or
cord to water or wet conditions as this will damage
the electronics.
• Use only new batteries when installing or replacing the
batteries. Remove batteries from the unit if you plan on
not using the Pet Feedster for a long period of time.
• Do not place anything on top of the unit. The unit
should be placed on a level surface. Do not use the unit
with the lid off.

4
POWER USAGE
Plug the adapter into an AC outlet rated at 110 volts or
220 volts, 60 Hz only (the rating of North America and
some others). Do not plug feeder adapter into an out-
let controlled by a light switch. We recommend that
you use the battery backup option in case of electrical
outlet failure. Install 6 “D” size batteries into the bat-
tery compartment on the back of the feeder. Check the
battery gauge on the timer display for battery replace-
ment. The unit will run up to 4 months on batteries if you
choose not to plug it into an outlet.
FEEDER ASSEMBLY
Attach food bowl to the base of the feeder by holding
the bowl above the base of the feeder and interlocking
the hooks on the back of the bowl to the base.

5
PARTS DIAGRAM
Top Cover
Main Body
Flex Feeder
Base Body Cover
Base Body
Ant Water Tray
Screw-down holes
Bowl Bowl
AC Adapter
(cord is longer than
appears)

6
STEP 4 Press the NEXT button for 10
seconds until
the CLOCK screen with “- - - -” appears.
TIMER DISPLAY
Increase digital
number
NEXTMODE ADJ
Clock
00:00 00
Feeding Pause
0
QTY
MEALS

7
STEP 4 Press the NEXT button for 10
seconds until
the CLOCK screen with “- - - -” appears.
ADJUSTABLE FLEX FEEDER INSTRUCTIONS
Unit will work with kibble 1/8" to 3/4" only!
Hold top sweeper (A) with one hand and bottom of the
Flex Feeder (B) with the other hand. Slightly unscrew
to the left.
Hand tighten only! Do not use tools or over-tighten!
A
B

8
Adjust the Flex Feeder to your largest kibble piece
by moving part C. The kibble piece should be able to
move easily through the triangle- shaped shaft. You can
also adjust the Flex Feeder to half sizes. Most cat food
will be set to small.
The smallest distribution of food is as little as 1
teaspoon. This will depend on food size and shape
which may vary.
If food doesn't dispense out consistently, enlarge the
opening until it dispenses properly. Food shape and
mixture may cause unit settings to vary. Please adjust to
your specic kibble.
C

9
To install the Flex Feeder, hold on to the thin top spin-
dle and center it in the hopper with the bottom of the
shaft D going into the hole.
When installing Flex Feeder, turn slightly clockwise and
push in softly.
Note: There is a at spot that has to t in one way on
the motor shaft.
D

10
The Flex Feeder should t ush in hopper as in picture
E. It should not be sticking out as in picture F.
For video instructions, go to petfeedster.com under
Owner’s Resources.
EF

11
PROGRAMMING INSTRUCTIONS
STEP 1 Insert batteries or plug in the AC adapter.
STEP 2 Adjust the Flex Feeder to S, M, or L per the
size of your biggest piece of kibble. (If you are using
kibble that is 3/8” do not set the Flex Feeder to large.
For most cat food, the Flex Feeder is set to small)
A. Measure the size of your largest kibble piece.
B. Loosen the bottom of the Flex Feeder.
C. Adjust the shaft to the correct size. This is the
triangle-shaped opening of the Flex Feeder. The
biggest piece of kibble should be able to pass
through the opening very easily.
D. Finger tighten the bottom of the Flex Feeder.
Note: See pages 7-11 for more details.
STEP 3 Insert the Flex Feeder into the bottom of
the food container.
STEP 4 Add 3 to 5 cups of pet food.
STEP 5 Press down on both the NEXT and ADJ
buttons at the same time for 3 seconds.

12
STEP 6 Find your food quantity number
A. Set a measuring cup below the food outlet.
B. Press down on the MODE button for 10 seconds to
show “ADJ” on the timer display. “FEEDING” will show
on the top line of the timer display.
C. Press the ADJ button. Food will start dispensing
immediately.
D. When the desired feeding portion for your pet is
dispensed, press the ADJ button again.
E. Write down the food quantity number for the next steps.
Note: Make sure that the food outlet stays clear. If
blocked, it will cause the unit to jam.
STEP 7 Set the master clock
Note: You will exit out of setup mode after 60 seconds
of inactivity. If you exit setup mode, start again
from step 7A. Also, the Pet Feedster uses 24 hour
military time (for example, 2:30PM = 14:30).
QTY
NEXTMODE ADJ
Feeding
ADJ 00

13
A. Press down on the MODE button for 3 seconds to
get to the “CLOCK” menu on the timer display.
B. Press the ADJ button to set the hour. Then press the
MODE button when done.
C. Press the ADJ button to set the minutes. Then press
the MODE button when done.
D. Wait for 60 seconds to exit programming.
Note: The clock does not adjust for daylight savings. If
you live in an area that observes daylight savings and
wish to keep your pet’s feeding times you must reset the
master clock.
1:00 = 1 AM
2:00 = 2 AM
3:00 = 3 AM
4:00 = 4 AM
5:00 = 5 AM
6:00 = 6 AM
7:00 = 7 AM
8:00 = 8 AM
9:00 = 9 AM
10:00 = 10 AM
11:00 = 11 AM
12:00 = 12 PM
13:00 = 1 PM
14:00 = 2 PM
15:00 = 3 PM
16:00 = 4 PM
17:00 = 5 PM
18:00 = 6 PM
19:00 = 7 PM
20:00 = 8 PM
21:00 = 9 PM
22:00 = 10 PM
23:00 = 11 PM
00:00 = 12 AM
00
NEXTMODE ADJ
Clock
00:00

14
STEP 8 Set meal time(s) & food quantity
Program up to 8 meals for your pet.
A. Press the NEXT button. This will show the 1st circle
(1st meal’s information).
B. Press down on the MODE button for 3 seconds. This
will make the clock blink.
C. Press the ADJ button to set the hour. Press the
MODE button when done.
D. Press the ADJ button again to set minutes. Press the
MODE button when done to set food quantity. (Food
quantity will blink)
E. Press the ADJ button to increase the food quantity
number. Press the MODE button when done. This will
automatically go to the next meal.
F. Repeat for meals 2-8 by repeating STEPS 8B-8E.
After 60 seconds of inactivity, the Pet Feedster will exit setup
mode.
00
NEXTMODE ADJ
00:00
Feeding
Meal Qty
1

15
TO ADJUST INDIVIDUAL MEALS (TIME OR QTY)
A. Press the NEXT button.
B. Press the ADJ button to scroll through all
programmed meals. Arrive at the meal you would like to
change.
C. Press down on the MODE button for 3 seconds. The
hour will start blinking. If you want to change the hour,
press the ADJ button.
D. When you are done or if you don’t wish to change
the hour, press the MODE button. This will move to the
minutes. If you wish to change your minutes, press the
ADJ button.
E. When you are done or if you don’t wish to change the
minutes, press the MODE button. This will move to the
food quantity. Press the ADJ button to adjust the food
quantity.
F. Wait 60 seconds to exit setup mode.
Note: To see other programmed meals or adjust other
meals, wait 60 seconds and start again from step A.

16
TO PAUSE PROGRAMMING
A. Make sure you are in the master clock (not in any
setup mode). If you are, wait 60 seconds to revert back
to the master clock.
B. Press down on the MODE and NEXT button at the
same time for 3 seconds. “Pause” will appear at the top
right of the timer display.
C. To exit pause and turn your meals back on, press
down on the MODE and NEXT button at the same time
for 3 seconds.
NEXTMODE ADJ
Pause
00:00
Clock
00

17
TO ERASE ALL MEAL PROGRAMMING
A. Make sure you are in the master clock (not in any
setup mode). If you are, wait 60 seconds to revert back
to the master clock.
B. Press down on both the NEXT button and the ADJ
button at the same time for 3 seconds.
Note: The master clock will keep its time, but all meal
information will be erased.
MANUAL FEEDING OR ADDITIONAL FEEDING
BETWEEN MEALS
A. Press down on the MODE button for 10 seconds to
show “ADJ” on the timer display.
B. Press the ADJ button and food will start dispensing.
Press the ADJ button again to stop.
C. When nished, allow 60 seconds for the timer display to
revert back to master clock.
Watch videos, read tips, and more at petfeedster.com
under Owner’s Resources.

18
FREQUENTLY ASKED QUESTIONS
Still have some questions about the Pet Feedster? Here
are some frequently asked questions.
Why can’t I see the battery signal on the timer display
after I plug in the AC adapter?
When you unplug the AC adaptor, the timer display will
show that the battery signal is on. When power fails,
the Pet Feedster automatically switches to use battery
power. At that time it will show battery signal.
Can I separate the main body from the base after
installing the batteries to program the Pet Feedster
more easily?
Yes, you can!
How do I feed snacks to my pet?
A. Press down on the MODE button for 10 seconds to
show “ADJ” on the timer display.
B. Press the ADJ button and food will start dispensing.
Press the ADJ button again to stop.
C. When nished, allow 60 seconds for the timer display to
revert back to master clock.

19
Can I use a different bowl?
Absolutely! Detach the Pet Feedster bowl and simply
place your pet’s preferred bowl underneath. This is
helpful if your pet must eat out of stainless steel dishes
due to allergies, etc.
How do I clean the Pet Feedster?
The detachable bowl is dishwasher safe on low heat,
and we recommend cleaning the hopper and external
surfaces of the Pet Feedster with a moist cloth every
couple weeks to prevent food particles from building up.
How do I know my Pet Feedster served a meal?
After each meal is successfully, served, the circle
corresponding to the meal will turn into a black dot.
The timer senses whether or not the motor turned and
dispensed food, and marks the meal as fed or not fed by
the motor’s actions.
Are there any brands of cat food you recommend?
Many customers have asked us if there are any brands
of cat food that they’d recommend for use with their Pet
Feedster, but all dry pet kibble between 1/8” and 3/4” in
size will work.
Please consult your veterinarian for your pet’s individual
nutritional needs when choosing a pet food.
Table of contents
Popular Pet Care Product manuals by other brands

Petsafe
Petsafe Drinkwell 360 PWW00-13705 instructions

Cardigo
Cardigo 60050 instruction manual

Prevue Hendryx
Prevue Hendryx Siberian Mountain manual

INVISIBLE FENCE
INVISIBLE FENCE GPS 1.0 owner's manual

WaterDog Adventure Gear
WaterDog Adventure Gear WAG Boarding Steps PM-6 owner's manual

iPets
iPets PET619A-1 user manual