manuals.online logo
Brands
  1. Home
  2. •
  3. Brands
  4. •
  5. Peter Lynn
  6. •
  7. Aircraft
  8. •
  9. Peter Lynn ARC Twinskin 2004 User manual

Peter Lynn ARC Twinskin 2004 User manual

Other Peter Lynn Aircraft manuals

Peter Lynn SPARK Instruction Manual

Peter Lynn

Peter Lynn SPARK Instruction Manual

Peter Lynn Twinskin User manual

Peter Lynn

Peter Lynn Twinskin User manual

Peter Lynn Scorpion User manual

Peter Lynn

Peter Lynn Scorpion User manual

Peter Lynn PLKB User manual

Peter Lynn

Peter Lynn PLKB User manual

Peter Lynn LEI series User manual

Peter Lynn

Peter Lynn LEI series User manual

Peter Lynn Lynx User manual

Peter Lynn

Peter Lynn Lynx User manual

Peter Lynn Pepper Instruction Manual

Peter Lynn

Peter Lynn Pepper Instruction Manual

Popular Aircraft manuals by other brands

Skywalk Mescal 4 instruction manual

Skywalk

Skywalk Mescal 4 instruction manual

Cessna U206G STATIONAIR Pilot operating handbook

Cessna

Cessna U206G STATIONAIR Pilot operating handbook

Cirrus SR22 Maintenance manual

Cirrus

Cirrus SR22 Maintenance manual

Schleicher ASK 21 Assembly & Disassembly

Schleicher

Schleicher ASK 21 Assembly & Disassembly

Cirrus SR20 Maintenance manual

Cirrus

Cirrus SR20 Maintenance manual

Skywalk Tequila 2 Manual/service

Skywalk

Skywalk Tequila 2 Manual/service

MAULE M-7-235B Airplane Flight Manual

MAULE

MAULE M-7-235B Airplane Flight Manual

Tecnam P92 Echo Super Maintenance manual

Tecnam

Tecnam P92 Echo Super Maintenance manual

Wills Wing HP II Owner's and service manual

Wills Wing

Wills Wing HP II Owner's and service manual

MAULE MX-7-180B Airplane Flight Manual

MAULE

MAULE MX-7-180B Airplane Flight Manual

Ozone ZENO 2 Pilot's manual

Ozone

Ozone ZENO 2 Pilot's manual

Boeing 737 Quick reference handbook

Boeing

Boeing 737 Quick reference handbook

MHD MHDFLY TINY GLIDER Z5630 Manual and using instructions

MHD

MHD MHDFLY TINY GLIDER Z5630 Manual and using instructions

Ozone Roadster Pilot's manual

Ozone

Ozone Roadster Pilot's manual

SpeedWing Mini SpeedWing EX Assembly instructions

SpeedWing

SpeedWing Mini SpeedWing EX Assembly instructions

Daher-Socata TBM 900 Pilot's information manual

Daher-Socata

Daher-Socata TBM 900 Pilot's information manual

Aircraft REIMS F152 Flight manual

Aircraft

Aircraft REIMS F152 Flight manual

Cessna 172 Skyhawk SERIES owner's manual

Cessna

Cessna 172 Skyhawk SERIES owner's manual

manuals.online logo
manuals.online logoBrands
  • About & Mission
  • Contact us
  • Privacy Policy
  • Terms and Conditions

Copyright 2025 Manuals.Online. All Rights Reserved.

2
Congratulations on purchasing your Peter Lynn Kite!
Using Twin Skin technology this kite sets new
standards in jumping, upwind performance and de-
power.
This manual contains information on how to set up
your kite and use it on the water. Its enormous
amount of power and lift are potentially dangerous.
Therefore it is important that you go through this
whole manual carefully in order to understand the kite
and use the kite safely. We also advice you to watch
the instructional video which will give you a yet
clearer understanding of some of the issues covered
in this manual.
Contents
page 2 Introduction
introduction, contents
page 3 Introduction
terminology, putting in and removing sticks
page 4 Setting up
pre-inflation, attaching lines
page 5 Setting up
attaching lines cont., setting more/less bar pressure, using larkshead knots
page 6 Getting ready to launch
closing the zippers, standing at the correct position
page 7 Launching and Landing
launching the kite, landing the kite
page 8 Flying techniques
using the bar for power and depower, using the power adjuster, inverting
page 9 Flying techniques
top/rear line adjustments, packing up your kite
page 10 Water Relaunch
kite lying tip on tip, kite on its leading edge, removing sand and water
page 11 Safety systems and maintenance
safety systems, using your safety release,
using your safety leash quick release, maintenance tips
page 12 More information
Safety precautions, More info about Peter Lynn
Leading edge
Top skin
Trailing edge
Tips
Pockets with
carbon rods
Velcro outlets
Lower skin
Air intake
vents
Top line
attachment
points
Rear line
attachment
points
Putting in and removing sticks
The sticks can be taken in and out at the bottom of the pocket. To place them into the pockets:
To take out the sticks, slowly pull them out after opening the double velcro seal. Do not pull
the stick out very quickly as parts might get caught.
1. Undo the double velcro
seal and slide in the stick
all the way to the other
end.
2. Fold back the first velcro
flap making sure the stick
is in tight.
3. Close up the last velcro flap
and you are ready to go!
3
4
Starting off
To start flying your kite you need to follow the following procedure:
1. Place the kite on the beach ready to pre-inflate
2. Set up your bar and lines
3. Launch the kite
1. Take the kite out of the bag and roll the
kite out. Place one tip on the ground and
let the rest flap in the wind. Fold a small
part of the tip over and place some sand
on it. This part should not be too big, so
as many cells as possible can inflate.
2. Open the zipper and make sure the air
can flow in. While the kite is being pre-
inflated you can start to get your flying
lines ready to be attached to the kite.
Step 2. Set up your bar and lines
1. Roll the leader lines off the bar and place every-
thing flat on the ground. Roll out the flying lines
in a straight line and attach them to the bar as
shown in the bar manual.
Step 1. Place the kite on the beach ready to pre-inflate
5
2. Make sure the lines are free of twist and tangles. Now attach them to
the kite as shown on the diagram.
One set of lines should be attached to the depower set and to the
top attachments on the kite.
The other set of lines should be attached to the ends of the bar
and to the bottom attachment points on the kite.
Less bar pressure
Attach the rear line
to the lower attach-
ment point for less
bar pressure
top line
top line
rear line
rear line
Use a larkshead knot to attach the lines:
Place a larkshead knot in the sleeve, slide it
over the attachment knots and tighten the
larkshead as shown below
More bar pressure
Attach the rear line
to the higher attach-
ment point for more
bar pressure
A simple method to ensure that
your flying lines are attached
properly is doing it in the follo-
wing order, as shown on the
right:
1. Place your flying lines all untan-
gled in a straight line so the
sleeves are lying past the
downwind tip. First attach the
rear line to the upwind tip.
2. Now attach the top line to the
upwind tip, taking it over the
rear line you have just atta-
ched.
3. Take the other top line and
attach it to the downwind tip,
passing it over the kite.
4. Attach the rear line to the
downwind tip and you are
ready to launch your kite with
the assurance of untangled
lines!
1
2
3
1
2
3
4
6
Step 3. Launch the kite
Check that there are no sharp objects near
the kite, as it may slide a little bit over the
sand during launch.
1. Make sure the kite is sufficiently
pre-inflated. Failure to do so will result in the
kite to collapse during take off. Close BOTH
zippers, the inflate zipper and the delflate
zipper!
At the tip that is folded over, make sure the
lines are running freely as shown on the
photo on the right.
2. Check that your kite is ready for take off:
lines are free of tangles, area is clear of
people and other kite flyers. Take your bar
and attach the safety leash to your harness.
Always make sure to attach the safety leash
before flying, so it can be used in case
something goes wrong during the launch.
Pull in your power adjuster.
3. Make sure you stand at the correct
position so your lines are at a 45 degree
angle to the wind direction. (as shown on
the right). Be careful: when there is tension
on the flying line connected to the far tip the
kite can take off at any time. Now you are
ready to launch your kite.
7
Landing
Landing your kite can be done in two ways:
1. Fly your kite all the way to the edge of the wind window, and slowly steer it down to the
ground. An assistant can then grab the spar closest to the ground and after releasing
the tension on your lines the kite flaps in the wind.
2. Fly your kite to the edge of the wind window and slowly bring it down close to the ground.
Make sure you are not landing your kite in an area with poles or other sharp objects on
the ground. Activate your safety system. The kite will lose its shape and fall on the
ground.
Make sure the far top and rear line lie over
the lowerskin of the kite and slowly pull the tip
up. Keep your rear lines tensioned. Take a
few steps back. The kite will slide back and
slowly get into shape.
The tip will come up further. Once the kite is
off the ground keep the rear lines slightly
tensioned until it has filled up with air. Let the
kite slowly fly up to the zenith.
!• Make sure you are not launching in an area with obstacles like poles or cars, make
sure the area is free of people or other kiteflyers. Do not fly your kite near power-
lines, airports, highways, or in thunderstorms.
• Make sure the ground is free of sharp objects to prevent the fabric from getting
damaged.
• The kite can collapse during the launch when it is not completely filled up with air.
• Keep the rear lines tensioned until the kite is completely filled up.
• Pre-inflate the kite properly. The more you pre-inflate the easier the launch.
• Do not launch while hooked into a harness.
• When in doubt of the wind strength, try a smaller kite first.
• Check your lines properly, make sure they are free of twists and tangles.
The launch
8
When sheeting out the bar the power
of the kite decreases. When pulling in the bar the power of
the kite increases.
Using the bar
The power of your kite can easily be controlled with the bar. When the
depower loop is hooked in, the bar can slide over the depower line which changes
the angle of attack causing the kite to produce more or less power.
Using the power adjuster
To change the overall power of the kite the power adjuster can be used.
Sheeting out
Causes the kite to produce more power overall.
Pull the black end of the loop (the end with the Peter
Lynn logo) towards you and release forward. The
clip slides away in small steps. Repeat the process
until you find the right setting.
Pulling in
Causes the kite to produce less power overall.
Pull the grey end of the loop towards you. The clip
is pulled towards you and locks in.
• To make tighter turns, pull the bar a bit more towards the body when steering.
• Slowly bring back the kite straight above your head when things get out of hand.
This is a secure area where the pull is the smallest.
• Do not fly your kite straight through the center of the wind window.
Sheeting out
Pulling in
!
Inverting
Very occasionally when the kite overflies completely and then drifts back, it may invert, so the
back skin is facing the flyer. The kite will fly inverted. Land the kite nose down, allow it to roll
over and then relaunch the kite.
Top/Rear line adjustments
Adjusting your lines is very important. These are some guidlines that might
help you adjust your kite:
• If the kite stalls frequently, your rear lines are too tight. Shorten the lines on the top
attachments of the kite.
• If the kite steers very slow, your rear lines are too loose. Shorten the leader lines on your
bar.
When your kite stalls, reach forward and jerk the top lines until the kite gets moving.
When setting your kite you can also divide the
depower line into 3 regions. (see image)
region 1: your kite should now be fully depowered,
with the rear lines hanging slack.
region 2: this is the standard position where you are
holding your bar when surfing.
region 3: now the kite should stall slightly.
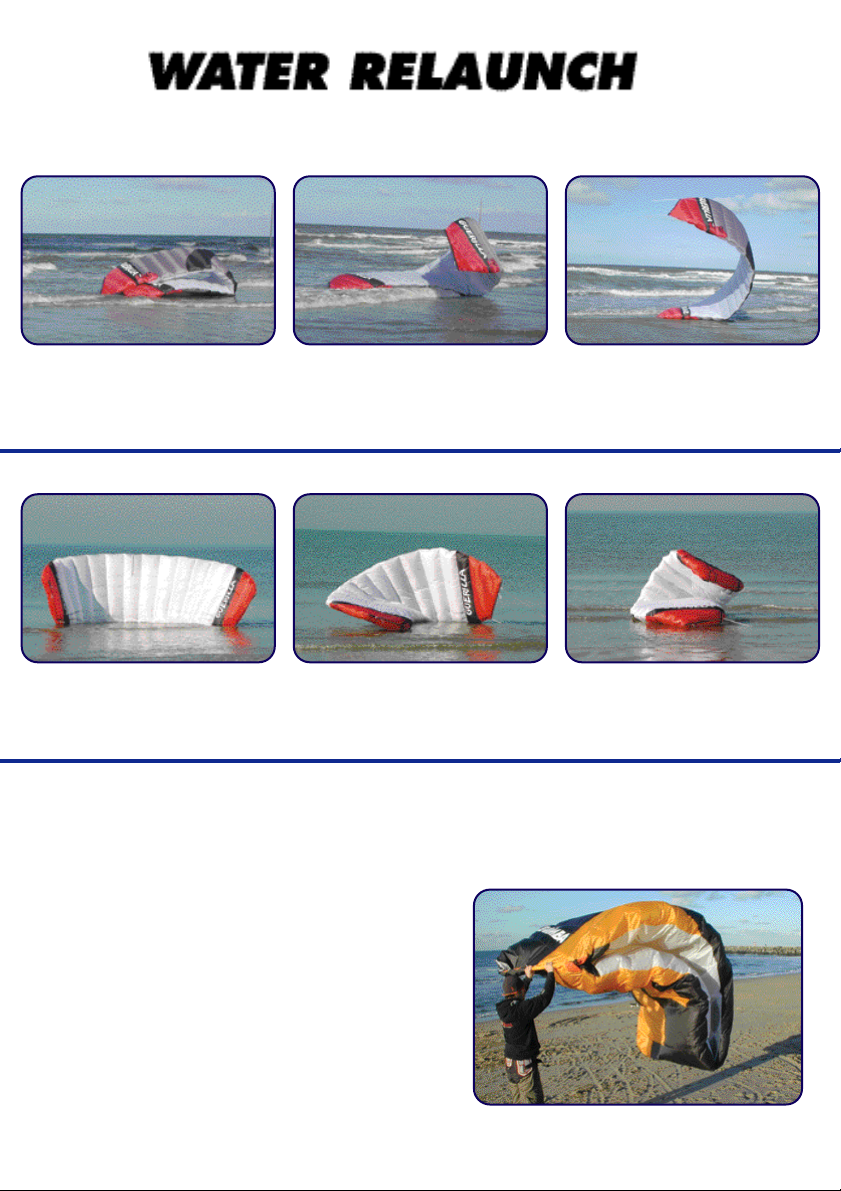
Packing up your kite
Even when taking a short break, we would not rec-
ommend you to leave your kite flat on the beach. The
constant flapping of the downwind tip will weaken the
fabric in this area. Fold the kite in half, with a good
portion of sand on both tips. This will prolong the life
of your kite. When pausing for a longer period of
time, we would recommend you to roll up your kite,
as UV rays damage the fabric.
At the end of your kiting session, open the deflation zipper and fold
the kite in half. You can place some sand on the two tips, and the
kite will deflate itself whilst you are winding up your lines.
If you wish to store your kite without sticks the easiest method is
to pull open the double velcro seal, pulling out the sticks partially
and now rolling up the complete kite from tips to the center, push-
ing the air out. When you are ready pull out the sticks and fold
them up, and place them in the bag together with the kite.
When storing the kite with the sticks in, just roll up your kite from tips to center.
Now undo the zipper at the bottom of the bag and pull out the gauze.
Place your kite in the gauze.
123
9
1234
10
After a water relaunch fly the kite up the zenith. If water has seeped into the kite, keep the
kite above your head till the water has dribbled out through the tips. Then continue surfing.
Removing sand & water
When there is some sand or water in the kite, you
can remove it by opening the small velcro outlets on
the tip. Another method is holding both tips and
shaking the kite whilst the deflation zipper is open.
The sand will come out of the kite via the deflation
zipper.
Kite on its leading edge
Tip on tip
1
1. The kite lies on the water
tip on tip.
2
2. Pull the rear line of the
bottom tip. The kite will open
up...
3
3. ...regaining its shape.
Now just steer the kite off
the water.
1
1. The kite lands with its
leading edge on the water.
2
2. Pull in one backline so the
kite rolls over onto one tip.
3
3. Now you can follow the tip
on tip relaunch to finish off
the procedure.